Level Overview: Deconstructing the Pixel Canvas
The 60-30-10 Rule of Composition
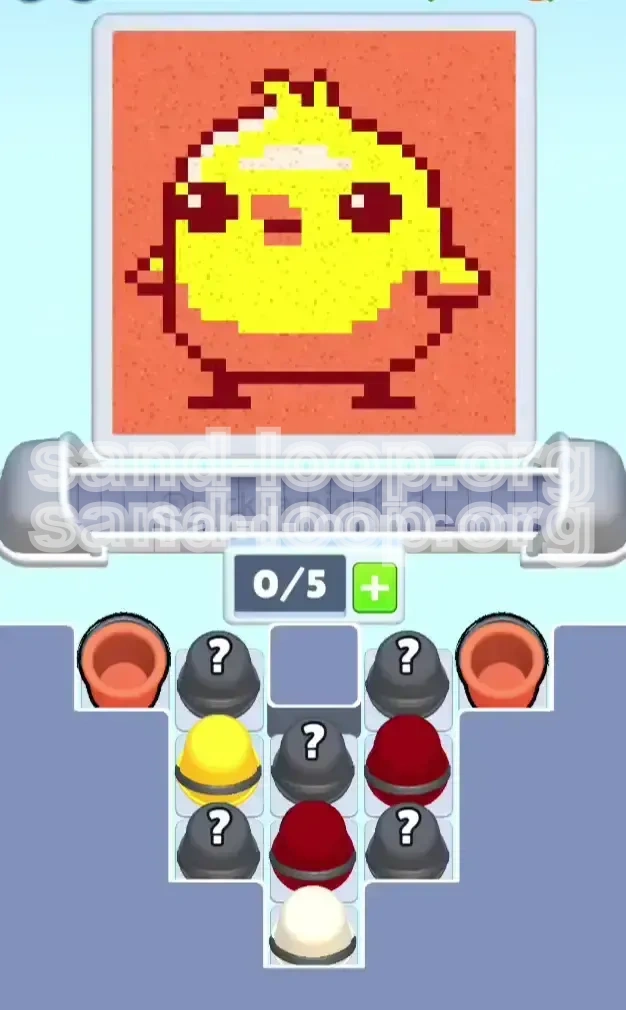
Sand Loop Level 6 is a masterclass in color discipline. Unlike previous levels where "flooding" the screen was a viable strategy, this level demands a strict adherence to the 60-30-10 rule of composition. The canvas is dominated by a Coral Orange background that requires a massive 60% of your sand volume. The central pixelated face, featuring bright yellow skin, accounts for 30%, while the fine details—the deep maroon eyes and mouth contours—make up the final, critical 10%. Understanding this ratio is crucial; if you treat the 10% detail zone with the same volume as the 60% background, you will fail.
The Coral Foundation Challenge
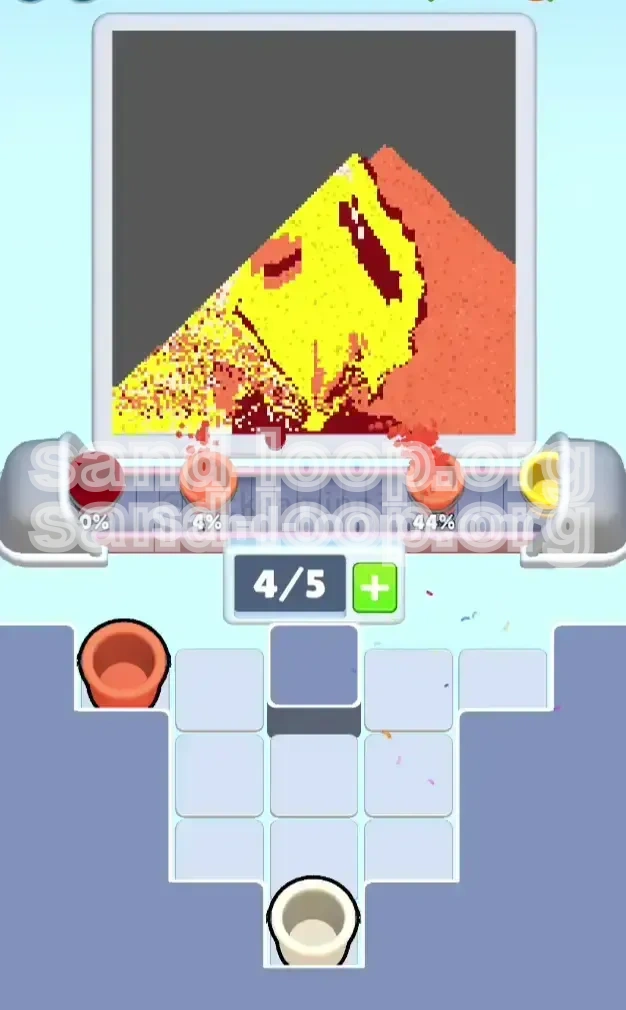
The first major hurdle is the sheer size of the Coral Orange zone. Because it covers the vast majority of the board, it is tempting to pour continuously until it looks full. However, the game's physics engine calculates volume based on depth. Over-pouring Orange leads to "spillage" into the Yellow and Red zones, effectively poisoning them. You must learn to stop pouring the Orange background when it is visually only about 85% full, allowing the physics to settle the rest without contaminating the inner features.
The Pixelated Precision Requirement
The visual style of this level shifts from organic shapes to blocky, pixel art. This sharp contrast creates natural barriers but also highlights pour accuracy. The Yellow zone is particularly unforgiving; it is surrounded by the Orange background, meaning any stray sand that rolls off the Yellow pile will instantly contaminate the Orange zone. While a little Orange in Yellow is tolerable, Yellow in Orange creates a muddy contrast that can prevent the "clean" completion bonus. Precision is prioritized over speed here.
Input Latency and Physics
Level 6 introduces a noticeable input lag of approximately 0.5 to 0.8 seconds between your tap and the sand physically leaving the nozzle. This delay is designed to punish "reactionary" play. You cannot simply tap when you see the meter move; you must tap anticipating the meter's movement. Furthermore, the sand physics in this level are "heavier," meaning sand piles form steeper cones (higher angle of repose). This increases the risk of side-spill, requiring you to use shorter, more frequent tap-bursts rather than long, continuous streams.
The Supply Tray Bottleneck
Your resource management is complicated by the tray layout. You are not given a linear queue of colors. Instead, the critical Yellow cup is buried deep in the stack, obscured by "Mystery Cups" and less critical Orange duplicates. The tray requires constant shuffling. If you ignore the tray to focus solely on pouring, you will inevitably find yourself with a full belt of useless colors while the required Yellow cup remains trapped in the tray, leading to a soft-lock state.
Clear Objectives for Completion
Primary Goal: Hit the 5/5 Volume Threshold
The win condition is strictly numerical: the progress meter at the bottom must reach 5/5. It is important to unlearn the instinct to "paint" the picture perfectly. The game does not check if you colored inside the lines; it checks if the *volume* of sand in the designated zones matches the required amount. You can win the level even if the canvas looks slightly messy, provided the volume counts are correct. Focus entirely on the numbers at the bottom of the screen, not the aesthetics of the pixel art.
Secondary Goal: Unlock the Yellow Supply
You cannot complete this level without accessing the Yellow cup buried in the stack. A major secondary objective is to clear the "garbage" cups (Mystery Cups and excess Oranges) clogging the tray. You must prioritize loading and cycling these useless cups onto the belt—even if you don't pour them—just to clear space in the tray to reach the Yellow. Failing to manage the tray inventory is the number one cause of restarts in this level.
Tertiary Goal: Maintain the "One Slot Open" Rule
To keep the supply chain moving, you must maintain at least one empty slot on your conveyor belt at all times. This empty slot acts as a "buffer" that allows you to shuffle cups from the tray onto the belt without waiting. If you fill all 5 slots, the belt locks up, and you cannot bring the critical Yellow cup into play. Your objective is a rhythmic flow: Pour, Cycle, Load, Repeat.
Negative Objective: Avoid Zone Contamination
You must strictly avoid filling the wrong color zones. If you accidentally pour Orange sand into the Yellow face zone, that sand is "dead weight"—it fills the volume of the zone but does not contribute to the Yellow meter. This means you will eventually run out of Yellow sand before the meter is full, forcing a restart. Vigilance against cross-contamination is just as important as filling the correct zones.
Efficiency Goal: Minimize Cycle Time
The "Conveyor Belt" mechanic is a timer in disguise. Every second a cup spends moving from the tray to the nozzle is wasted time. Your goal is to optimize the loading order so that the *next* color you need is already on the belt and approaching the nozzle as you finish pouring the *current* color. Minimizing the travel distance for your cups is the key to a high-score run.
Step-by-Step Walkthrough Guide
Phase 1: The Inventory Setup (Pre-Pour)
Before you pour a single grain of sand, you must organize your tray.
1. **Survey the Tray**: Identify the locations of the two primary Orange cups and the stack containing the Yellow cup.
2. **Load Orange #1**: Drag the first available Orange cup to Slot 1 (the front of the line).
3. **Load Orange #2**: Drag a second Orange cup to Slot 2.
4. **Clear the Path**: Look at the stack blocking the Yellow cup. There is likely a Mystery Cup or a third Orange cup on top. Drag this obstructing cup to Slot 3.
5. **The Mystery Buffer**: Do not load the Yellow yet. Keep Slot 4 and 5 empty for now. This setup ensures you have two Orange cups ready to go and have cleared the deck to access the Yellow later.
Phase 2: The Coral Foundation (Orange)
The level begins, and the belt starts moving. Your focus is the background.
1. **The First Burst**: When Orange #1 centers under the nozzle, **Tap and Hold** for exactly 2 seconds. Release immediately.
2. **Monitor the Meter**: Watch the Orange segment of the progress meter. You want to fill it to roughly 50%.
3. **The Settle**: Wait for the sand to spread. If the meter stops moving, proceed.
4. **Handling the Obstruction**: When the Mystery Cup (or obstructing cup) reaches the nozzle, **Do Not Pour**. Let it pass through untouched. This is crucial; you are cycling the belt to clear space.
5. **The Second Burst**: When Orange #2 arrives, Tap and Hold for another 1.5 seconds to top up the background to about 75-80%.
6. **Load Yellow**: While Orange #2 is pouring, immediately drag the **Yellow Cup** from the tray into the empty slot you just created by cycling the obstruction.
Phase 3: The Feature Construction (Yellow)
With the background mostly stable, the Yellow cup should be approaching.
1. **Precision Pouring**: When the Yellow cup centers, switch tactics. Do not hold the button.
2. **The Rhythm Tap**: Use a **Tap-Tap-Pause** rhythm. Tap once (sand flows), tap again immediately (sand piles), then pause.
3. **Watch for the "Roll-off"**: The Yellow zone is small. If you see the sand piling up into a steep cone, stop immediately and let it flatten.
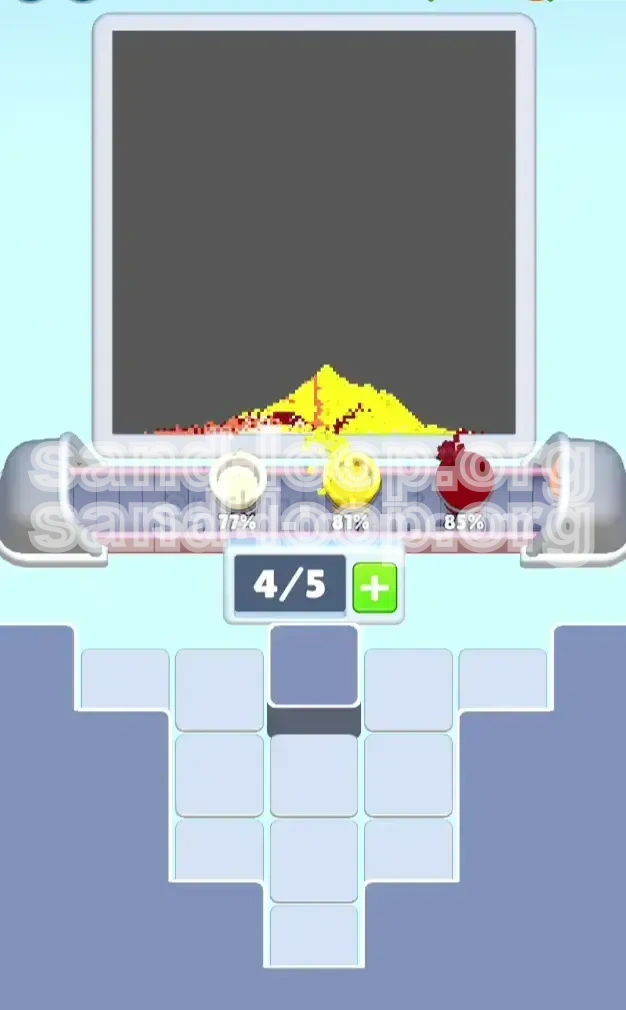
4. **Target Meter**: You want to fill the Yellow meter to 100%. If you are at 4/5 total and the Yellow meter is full, stop. You do not need to fill every pixel of the face, just satisfy the volume requirement.
5. **Cycle for Red**: While the Yellow cup is finishing, look back at the tray. You need to start cycling cups to find the Dark Red/Maroon cup. Load any obstructing cups onto the belt behind the Yellow cup.
Phase 4: The Final Details (Dark Red)
You should be at roughly 4.5/5 or 4.8/5 on the main meter. Only the Red remains.
1. **The Search**: Ensure a Dark Red cup is on the belt. If it's buried in the tray, keep loading and cycling useless cups until it enters the line.
2. **The Micro-Pour**: When the Red cup centers, prepare for a **Single Tap**. The Red zones (eyes/mouth) are tiny.
3. **Execute**: Tap the screen once. A small pile of Red sand should fall.
4. **Check Win Condition**: The level usually ends the moment the Red sand hits the zone, provided the previous colors were filled correctly.
5. **Recovery**: If it doesn't end, wait a split second for the meter to update. If still not finished, perform a second, very short tap (0.5 seconds).
Phase 5: Post-Game Cleanup
If you have poured all your Red and the meter is stuck at 4.9/5:
1. **Assess the Canvas**: Look for the "pixel gap"—a small area in the corners of the eyes or mouth that isn't filled.
2. **Scavenging**: Check if any stray cups remain on the belt.
3. **The Emergency Dump**: If you have a useless cup (like an extra Orange), you can try to tap it so a few grains fall into a safe corner of the Red zone, but this is risky.
4. **The Restart Call**: If you are out of Red cups and the meter isn't full, you have likely contaminated the zone earlier. It is faster to restart than to wait for a Red cup to respawn (if the mechanic allows) or try to fix it with other colors.
Color Order and Processing Strategy
The Strict Hierarchy: Background to Foreground
The golden rule for Level 6 is: **Big Zones First**.
1. **Orange (Background)**: Always pour the broad, surrounding color first. This creates a physical "dam" or barrier that contains the subsequent colors.
2. **Yellow (Mid-ground)**: Pour the secondary color into the center of the dam created by the first color.
3. **Red (Foreground)**: Pour the detail color last.
If you reverse this order (Red first, then Yellow), the subsequent heavy pours of the lighter colors will bury or wash away the delicate Red sand, forcing you to re-pour it. This wastes time and resources.
The "Mystery Cup" Algorithm
Mystery Cups (marked with a question mark) are not random; they follow a logic based on what you *need* least. In Level 6, they often contain Red or duplicate Orange. You must identify them early. Load them onto the belt when your main dispenser is busy (e.g., while Orange is settling). As soon as they pass under the nozzle, identify the color. If it's not what you need immediately, let it pass to keep the belt moving. Never let a Mystery Cup sit in Slot 1 if you are unsure of its contents.
Managing the "Slot Buffer"
Your conveyor belt has 5 slots, but you should operate as if it only has 4. Always keep **Slot 5 empty**.
* **Why?** If you have a full belt and a Mystery Cup turns out to be a color you desperately need (like Red), but it's stuck at the back behind three Oranges, you are in trouble.
* **The Strategy**: Keep the last slot open to act as a "loading bay." You can shuffle cups from the tray into this slot to inspect them, then move them forward or let them pass without clogging your active pouring pipeline.
The "Rhythm Tap" vs. "The Hold"
Adjust your tapping style based on the color zone size.
* **The Hold**: Acceptable **only** for the Coral Orange background (60% zone). Hold for 1-2 seconds max.
* **The Rhythm Tap**: Required for Yellow (30% zone). Tap-tap-tap. This prevents the "cone" from forming too high and spilling.
* **The Pulse**: Required for Red (10% zone). One single, sharp tap. Any deviation here ruins the level.
Reading the Progress Meter Dynamics
The progress meter is not linear.
* **0-2/5**: The meter fills fast. This is the "easy" volume phase (mostly Orange).
* **3-4/5**: The meter slows down. You are now filling the tighter Yellow zone. The game is stricter here.
* **4-5/5**: The meter crawls. This is the "pixel hunt." The game requires precise volume matching for the Red zones.
Understanding this curve helps you manage panic. If you are at 3/5 and the meter seems stuck, don't over-pour; it just means you are in a tighter zone requiring more precision.
Key Tips and Notes for Mastery
Tip #1: The "Cone Height" Visual Cue
Learn to judge volume by height, not just the meter. When pouring Orange, the sand cone can get quite high before spilling. When pouring Yellow, the cone must stay low. If you see the Yellow sand cone rising higher than the boundary walls of the pixel face, **stop immediately**. You are about to spill into the Orange. Wait 2 seconds for the cone to collapse and spread, then tap again.
Tip #2: Audio Cues for Efficiency
The game provides audio feedback for successful fills. Listen closely.
* **A continuous "shhh" sound**: Normal pouring.
* **A distinct "thud" or "click"**: The zone has hit its volume cap.
* **A higher-pitched "ding"**: Often indicates a sub-section (like an eye) is full.
Train yourself to stop pouring the moment you hear the "thud" or "click" of the meter ticking up. Do not wait for the visual animation to finish. This audio-reactive playstyle saves valuable seconds.
Tip #3: Handling the 0.8s Latency
Since there is a delay between your tap and the sand, you must "lead" your shots. If the meter is almost full and you tap "now," the sand that was *already in the nozzle* will still fall. This often causes overfills. **The Fix**: Lift your finger off the screen *before* the meter looks full. Anticipate the cutoff. If you think it needs one more tap, it probably doesn't. Trust the momentum of the sand already in the air.
Tip #4: The "Soft Reset" for Spills
If you spill a small amount of Orange into the Yellow zone, don't panic immediately. The game has a tolerance threshold (usually 5-10% contamination). If the spill is minor, stop pouring Orange immediately and switch to Yellow. Pouring Yellow *on top* of the Orange spill can sometimes "mask" the error if the volume of Yellow is high enough. However, this is a desperation move; prevention is always better.
Tip #5: Speed Loading Mechanics
You don't have to wait for a cup to disappear into the dispenser before loading the next one. As soon as a cup is halfway into the nozzle zone, the slot behind it is technically free. Use this time to drag the next cup from the tray into the approaching slot. This "pipelining" of your inventory ensures there is never a gap in the action.
Common Mistakes and Stuck Solutions
Mistake: The "Full Belt" Lockup
**The Problem**: You fill all 5 slots on the conveyor belt because you want to be "prepared." Suddenly, you realize the Yellow cup is still in the tray, but you have no slots to drag it into.
**The Solution**: You must "burn" a slot. Let a cup pass through the nozzle without pouring it. As it exits the belt, you free up a slot. Immediately drag the Yellow cup in. It is better to waste a useless cup than to soft-lock the level.
Mistake: Visual vs. Numerical Dissonance
**The Problem**: "The Yellow face still looks patchy/unpainted, so I'll keep pouring." You pour until the face looks perfect.
**The Consequence**: You overfill the volume limit. The sand spills into the Red zones (eyes/mouth). When you try to pour Red later, it won't register because the zone is full of Yellow.
**The Fix**: Ignore the visual gaps. If the Yellow meter is full, **stop pouring**. The game counts volume, not coverage. A "patchy" win is still a win.
Stuck Solution: The 99% Deadlock
**The Scenario**: You are at 4.9/5. You have one cup left: an Orange. You need Red. The level cannot be finished.
**The Fix**: You are in a deadlock state caused by poor resource management earlier (likely letting a Red cup pass without pouring it). At this point, your only option is to **Restart**. Trying to force a win with the wrong color is mathematically impossible. Use the restart to practice better tray management in the first 30 seconds.
Mistake: The "Double Tap" Overfill
**The Problem**: You are tapping rhythmically on the Red zone. You tap once, nothing happens. You tap again immediately.
**The Consequence**: The first tap's sand hadn't settled yet. The second tap adds more sand. Combined, they overflow the tiny eye socket.
**The Fix**: The "Micro-Pause." After every tap on the Red zone, wait a full 1-second count. Only tap again if the meter doesn't move. The physics in the small zones are slow to update.
Stuck Solution: Clearing a Contaminated Zone
**The Scenario**: You accidentally poured Orange into the Red eye socket. Now the Red meter won't go up.
**The Fix**: This is usually unrecoverable. However, if the contamination is very small (a few grains), you can try pouring the *correct* color (Red) aggressively. The game might prioritize the "newest" color or overwrite the volume. If this fails after 2 attempts, restart immediately to save time.
Speed Run Tips and Optimization
Advanced Loading: The "Pre-Stack" Method
To shave seconds off your time, don't wait for the belt to move to start organizing.
1. As the level loads, immediately identify the two Orange cups.
2. Drag them to Slot 1 and 2 instantly.
3. While the animation plays for the first cup, immediately shuffle the tray stack to find the Yellow.
4. **The Goal**: Have the Yellow cup in Slot 3 before the first Orange cup is even finished pouring. This eliminates the "searching" downtime mid-level.
The "Meter-Watch" Optimization
Speed runners do not watch the sand fall; they watch the **Progress Meter**.
* Locate the meter with your peripheral vision.
* As soon as the segment fills up, release the button.
* Do not wait for the sand pile to visually settle. The meter updates faster than the graphics. By reacting to the number, you gain a 0.5-second advantage on every single color switch.
Optimal Path: Skipping the Mystery
If you are confident in your aim, you can skip processing Mystery Cups entirely to save belt cycles.
* If the Mystery Cup is not blocking the Yellow in the tray, **leave it in the tray**.
* Only load the colors you strictly need: Orange -> Yellow -> Red.
* This reduces the number of cups you need to cycle through the nozzle, keeping the belt moving faster towards the finish line.
The "Burst Fire" Start
At the very start of the level (0:00), the dispenser is ready. Do not wait for the belt to fully align.
1. As soon as the level starts, tap the first Orange cup.
2. **Immediately** start tapping the second Orange cup to queue it behind the first.
3. This "Burst Fire" input clears the inventory queue faster, allowing you to reach the critical Yellow cup seconds earlier than a casual player would.
Exploiting the "Settle" Lag
There is a brief moment after a pour where the game calculates physics. During this 0.5s window, the UI is "locked."
* **The Trick**: Pour your Yellow. While the Yellow sand is settling (and you can't pour anyway), use that time to frantically drag the Red cup from the tray onto the belt.
* By the time the Yellow meter clicks up, your Red cup is already halfway to the nozzle. This eliminates the downtime between the Yellow and Red phases.