
Level 111
HARDHow to solve Sand Loop level 111? Get instant solution for Sand Loop 111 with our step by step solution & video walkthrough. Sand Loop 111 tips and guide.
Play Sand Loop Now
Experience the puzzle challenge firsthand
Game Screenshots

Sand Loop Level Guides
Level 111: Blue Hydrangea - Complete Strategy Guide
Welcome to the definitive walkthrough for Sand Loop Level 111, commonly known as the "Blue Hydrangea" challenge. This stage represents a significant spike in difficulty within the puzzle mechanics, transitioning from simple color matching to complex grid management and resource prioritization. In this level, you are not just filling colors; you are managing a bottlenecked supply chain behind a literal wall of ice.
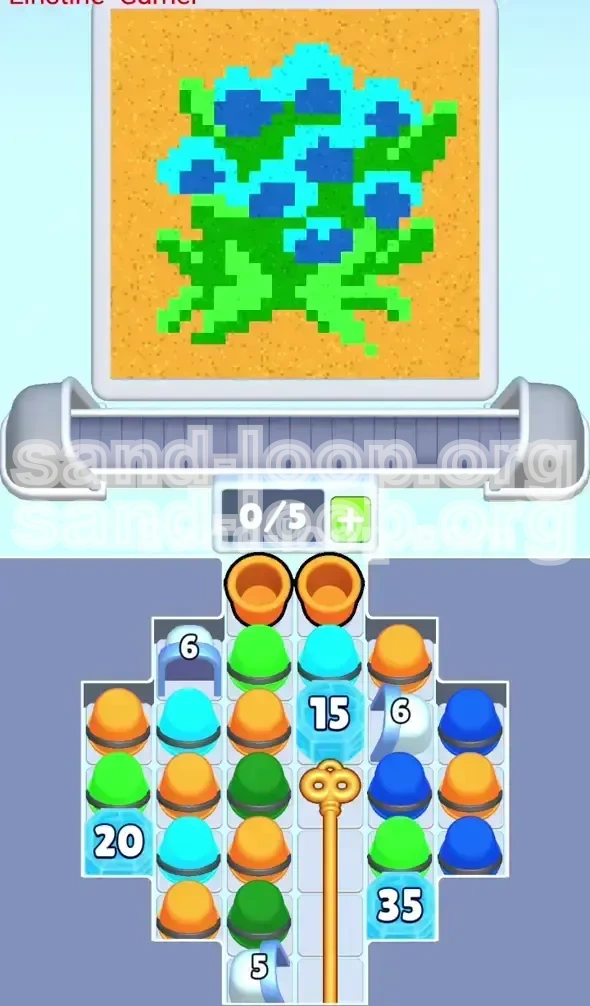
The visual target—a delicate floral arrangement of blue hydrangeas against a sandy background—is deceptive. The core challenge lies not in the artistic execution but in the logistical nightmare of the board layout. You are dealing with a "cross-shaped" grid that is bisected by a Vertical Gold Key and fortified by four distinct Ice Blocks. The most critical resource, your Royal Blue cups (needed for the flower centers), is locked behind the thickest defense in the game: an Ice-35 block. This guide will dismantle the level step-by-step, ensuring you never waste a pour or hit a deadlock.
Core Mechanics and Board Analysis
Before making your first move, it is vital to understand the structural traps built into Level 111. This level is designed to punish players who rush the center or ignore the periphery.
- The Grid Lock: The board is effectively split into two isolated zones. The left zone contains your starting resources (Green, Orange), while the right zone holds the critical Royal Blue reserves. These zones are connected only by the mechanism of the Gold Key.
- The Ice Wall Hierarchy: You face four ice blocks with varying durability: Ice-6, Ice-15, Ice-20, and the notorious Ice-35. The numbers indicate how many hits (or adjacent cup clears) are required to break them. Mistaking the order of operations here will lead to a soft-lock.
- The "Sandwich" Trap: The target image requires a checkerboard pattern of Light Blue (Cyan) and Royal Blue. Because these colors are visually similar, it is easy to mis-pour. Unlike other levels where you can flood-fill, this level demands precision.
- Conveyor Limitations: Your tray (conveyor belt) has a limit of 5 slots. In this level, keeping 2-3 slots open is mathematically safer than filling it, as you need space to catch newly unlocked cups from the right side.
Victory Conditions and Objectives
To achieve a 3-star completion and clear Level 111, you must adhere to a strict execution order. Your primary goal is to unlock the board, not just paint the picture.
- Unlock the Key: The vertical Gold Key must be rotated or removed to merge the left and right board sections. This is your first major milestone.
- Shatter the Ice-35: This is the bottleneck. You cannot finish the level until this block is gone, as it holds 60% of your Royal Blue supply.
- Color Accuracy: Maintain a 95%+ accuracy rate on the Blue/Cyan distinction. Wasting Royal Blue sand is the most common cause of failure.
- Efficiency Management: Complete the stage with fewer than 5 wasted cups to ensure high-tier scoring.
Resource Inventory
Let's breakdown the inventory you are managing. Think of these as currency.
- Orange/Yellow Sand: Abundant. Used for the background. Treat this as "filler" currency to clear board space.
- Deep Green Sand: Moderate supply. Used for leaves and stems. Located primarily on the left flank.
- Cyan (Light Blue) Sand: Abundant but dangerous. Used for the outer petals. Easily confused with Royal Blue.
- Royal Blue Sand: SCARCE. This is your gold. It is locked in the bottom right behind Ice-35. Do not pour a single drop of this until the center is prepared.
Phase 1: The Initial Breach
The opening moves of Level 111 are scripted. You cannot proceed effectively until you clear the top seal. This phase is about momentum—using the easy colors to generate movement.
The "Orange Opener" Maneuver
At the very top of the starting tray, you will notice two Orange Cups. These are your trigger points. Do not touch any other cups yet.
- Action: Tap both Orange Cups immediately.
- Strategic Reason: This isn't just about filling the yellow background. By clearing these top-row cups, you trigger a vertical slide of the entire grid below. This "gravity shift" is essential to bring the Ice-6 (top left) and Ice-15 (center) blocks into a reachable position.
- Timing: Do this while the sand stream is Yellow. If the stream is a different color, wait or swap cups carefully to ensure these specific Orange cups are processed first.
Managing the Left Flank (Green & Cyan)
Once the top shifts, your focus moves to the left side of the cross. You will see a stack of Green and Cyan cups resting atop an Ice-20 block.
- Target: The Ice-20 block.
- Method: Systematically clear the Green and Cyan cups here. Prioritize Green if the sand stream allows, as the leaves in the target image are largely unconnected to the complex blue center.
- The Warning: Do not overload your conveyor belt. Keep 2 slots empty. If you fill the belt, you block the generation of new cups needed to break the ice.
The Ice-6 Generator Risk
Breaking the top-left Ice-6 block releases a generator. This is a double-edged sword.
- The Benefit: It provides a steady stream of new cups.
- The Risk: It can clog your belt with unwanted colors while you are trying to set up a specific color match.
- Protocol: Monitor the belt speed. If the generator spits out a color you don't need (e.g., Red when you need Green), let that cup pass through without pouring it, simply to clear the slot.
Phase 2: The Key and The Wall
With the left flank cleared, you now face the central puzzle: The Vertical Gold Key. This barrier dictates the flow of the rest of the game.
Locating the Key Mechanism
The Gold Key runs vertically down the center-right. It acts as a wall preventing the right-side reserves (Royal Blue) from sliding left.
- The Lock: The key usually requires clearing specific adjacent cups to rotate. Look for the "head" of the key at the top of the column.
- The Obstruction: The head is likely guarded by frozen Cyan or Green cups.
- The Solution: You must clear the cups immediately surrounding the key head. This often requires intentionally matching a "hard" color just to clear the space.
The Board Reshuffle Moment
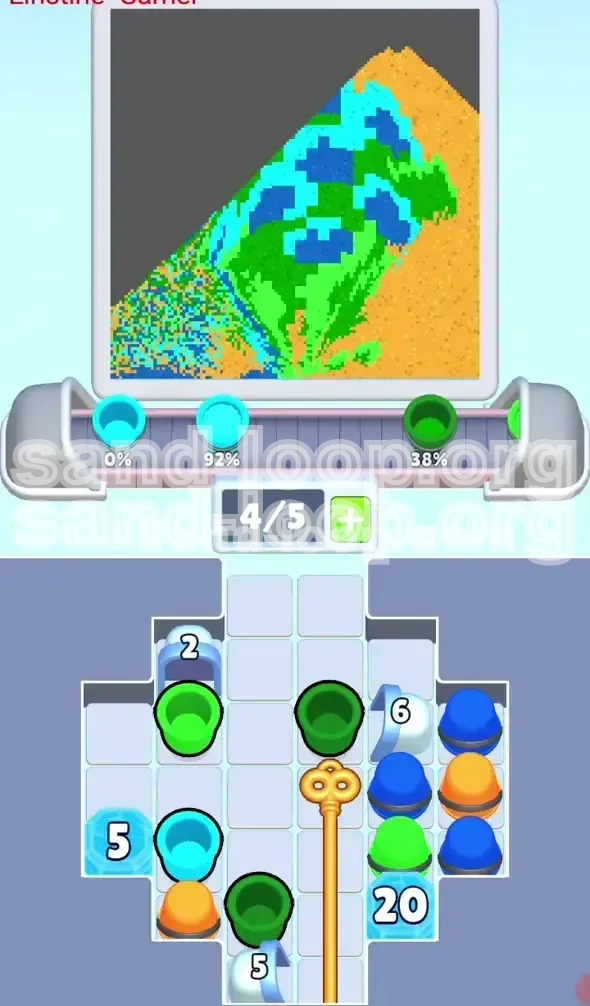
The moment the Key turns, the board state changes drastically.
- The Shift: The wall disappears. All cups on the right side (including your precious Royal Blue) will slide left to fill the vacuum.
- Reaction: Stop pouring for 2 seconds. Watch where the cups land. You need to identify the new position of the Royal Blue cups before the sand stream hits them.
- Tip: If you are in the middle of a pour when the key turns, finish it quickly, then pause. Do not start a new complex pour until the board settles.
Phase 3: The Ice-35 Grind
This is the hardest phase of Level 111. You must break the Ice-35 block in the bottom right corner without running out of other colors. This block requires high-volume activity.
Volume vs. Precision
Breaking Ice-35 isn't about hitting it once; it's about chipping away at it repeatedly.
- The "Chip" Strategy: You need to cycle cups rapidly. Even if a cup is not perfectly matched, pouring it near the ice block contributes to the "hit count" (if the game mechanics allow for splash damage or adjacent clearing).
- Generator Utilization: Use the White Cup Generator (marked '5' at the bottom) to create sacrificial pours. White cups are often neutral or versatile.
- Sand Stream Awareness: If the sand stream turns White or Yellow, use that time to aggressively target the bottom right area to damage the ice.
Avoiding the Deadlock
Many players fail here because they run out of cups while the ice is at 5% durability.
- Mistake: Trying to perfectly paint the flower petals while the ice is still blocking the Royal Blue reserves.
- Correction: Ignore the art for a moment. Focus purely on breaking the ice. It is better to have a messy board with broken ice than a perfect half-painted board with no way to finish.
- Buffer: Ensure you have at least 3-4 cups queued up on the left side before you commit to the final break.
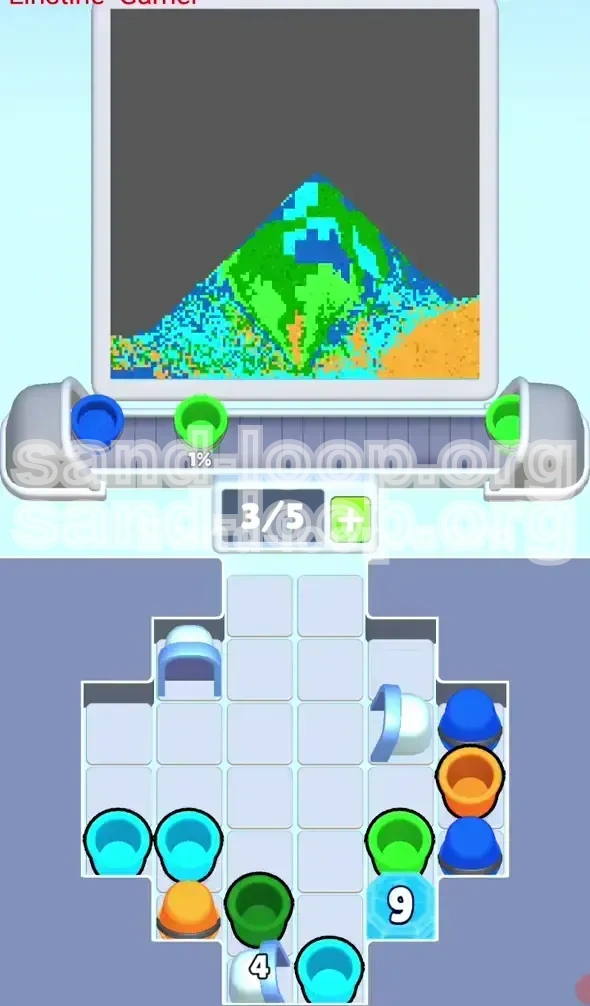
Phase 4: The Blue Hydrangea Assembly
The Ice-35 is gone. The Royal Blue cups are free. Now you must execute the final pattern with surgical precision.
The Color Order Strategy
Do not fill colors randomly. Follow this hierarchy to prevent contamination.
- Background (Orange/Yellow): Should be 95% complete already. Touch up if necessary.
- Leaves (Deep Green): Finish these now. Green sand is usually distinct and won't confuse the blues.
- Petals (Cyan): Fill the bulk of the flower petals.
- Centers (Royal Blue): LAST. Pour Royal Blue only into the specific center pixels.
Distinguishing the Blues
This is the final test. The difference between Cyan and Royal Blue on the small screen can be subtle.
- Visual Check: Cyan is bright/electric blue. Royal Blue is deep/navy blue.
- The Pour: When the sand dispenser turns Royal Blue, pause. Look at the cup. Ensure it is the Royal Blue cup, not the Cyan cup. Pouring Royal Blue into a Cyan slot wastes a valuable resource.
- The "Joker" Cups: If you run out of Royal Blue cups but still have spots to fill, check if the White Generator cups can be dyed or used as a substitute (level mechanic dependent), otherwise, you may need to restart the level.
Master Class: Optimization and Speed Running
For players looking to achieve a top-tier leaderboard time or simply master the logic of Sand Loop, here are advanced techniques.
Conveyor Belt "Juggling"
Advanced players never let the belt sit at 5 cups.
- The 3-Cup Rule: Keep exactly 3 cups on the belt. This gives you 2 slots of buffer to catch new items from the generators without clogging the flow.
- Pre-loading: If you know the sand is about to turn Green, ensure Green cups are in slots 1 and 2 before the color change hits.
Breaking Ice-35 with Speed
The fastest way to break the big ice block is to ignore the art entirely.
- Technique: During the "Grind" phase, stop looking at the top screen (the art). Look only at the bottom tray. Match cups solely to generate movement and volume.
- Combo Multipliers: Rapid matching triggers combo multipliers which increase the "damage" dealt to ice blocks. Aim for a 4x or 5x combo streak while targeting the Ice-35 zone.
Common Pitfalls Analysis
Why do players fail Level 111?
- Premature Blue Usage: Using Royal Blue on the background or leaves because the player wasn't paying attention to the sand color. Fix: Memorize the target image colors.
- Key Neglect: Focusing on the left side leaves too long and forgetting to unlock the Gold Key, leading to a resource shortage. Fix: Unlock the key as soon as the Ice-20 is broken.
- The "Full Belt" Stagnation: Letting the belt fill up completely stops new cups from spawning, effectively freezing your ability to break the ice. Fix: Never stop pouring.
Emergency Troubleshooting
Sometimes, despite best efforts, things go wrong. Here is how to recover.
Scenario: Out of Royal Blue, Ice Not Broken
You have used all your accessible Blue cups, but the Ice-35 remains.
- Diagnosis: You poured Blue into the wrong spots earlier.
- Recovery: You must now rely on the White Generator. Cycle White cups rapidly. If the game mechanics allow "overfilling" to clear adjacent blocks, pour White into any nearby slot to trigger splash damage on the ice.
- Last Resort: If the White generator is dry, you are likely in a deadlock state. Restart the level and focus more on Phase 2 efficiency.
Scenario: Wrong Color in Center Spot
You accidentally filled a Royal Blue center spot with Cyan.
- The Fix: Do not panic. Wait for the sand stream to turn Royal Blue again. Pour a fresh Royal Blue cup over the mistake. This will overwrite the color, but it wastes a cup.
- Prevention: This is why we keep the belt light. You need backup cups to fix these mistakes.
Level 111 is a test of patience and logistics. Follow this Sand Loop guide, manage your inventory strictly, and the Blue Hydrangea will be yours. Good luck!