
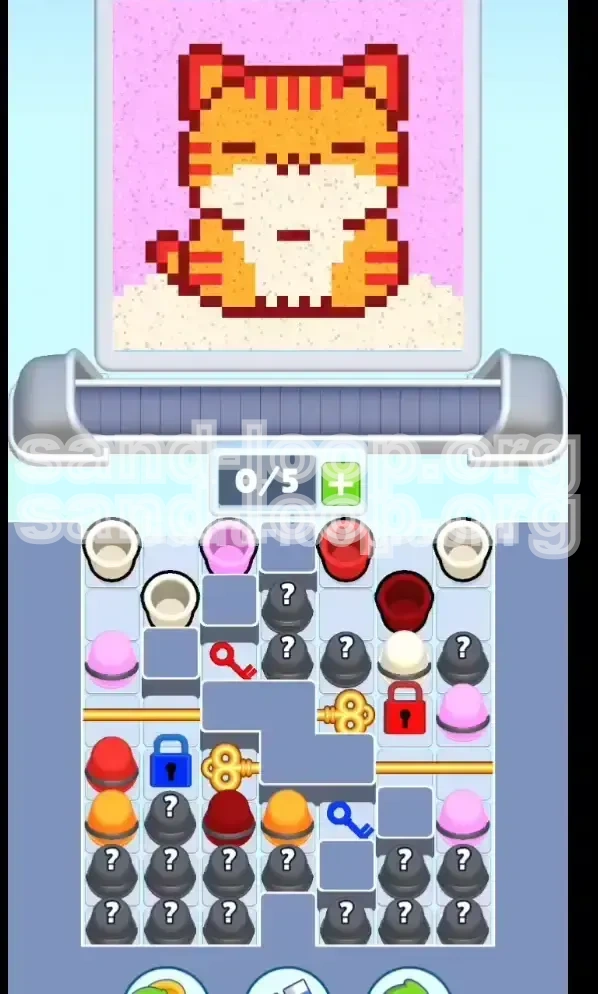
Level 113
HARDHow to solve Sand Loop level 113? Get instant solution for Sand Loop 113 with our step by step solution & video walkthrough. Sand Loop 113 tips and guide.
Play Sand Loop Now
Experience the puzzle challenge firsthand
Game Screenshots
Sand Loop Level Guides
Level 113: The Orange Tabby Challenge - Overview & Strategy
The Core Puzzle Mechanic: Resource Isolation
Unlike standard levels where resources are distributed evenly across the board, Level 113 introduces a "Vertical Stratification" mechanic. The critical resources you need—specifically the vast reservoirs of Orange and Red cups located in the bottom tray—are inaccessible at the start. This is not just a visual barrier; it is a hard lock on your inventory. If you burn through your initial top-layer supply of White and Pink cups without unlocking the lower half, you will face a "Soft Lock" scenario where the required colors for the cat's face simply do not exist on the conveyor belt. Understanding that your first 20-30 moves are purely logistical—unlocking the board rather than filling the canvas—is the key to victory.
Visual Analysis: The Pixel Art Target
The target image is a pixel-art Orange Tabby Cat set against a soft Pink background. While cute, the layout presents specific filling risks:
- High Contrast Areas: The transition from the White muzzle to the Orange face requires a 100% clean edge. Any stray Red pixels will create visual "noise" that the sensor may reject.
- Thin Detail Lines: The Red stripes on the cat's head are single-pixel wide in some places. This requires the Red cups to be poured when the sensor is highly sensitive to contrast, usually after the base Orange layer has settled.
- Background Trap: The Pink background covers roughly 40% of the canvas. It is tempting to fill this first to clear cups, but doing so prematurely can flood your belt with Pink, leaving no room for the White and Orange needed for the cat's critical facial features.
Primary Obstacles & The "Yellow Divider" Threat
The defining feature of this level is the Yellow Horizontal Bar (The Divider). It cuts the tray into two distinct ecosystems:
- Top Ecosystem: Contains mostly Pink, White, and Mystery cups. Limited utility for the cat's body.
- Bottom Ecosystem: Contains the essential Orange and Red cups required for 80% of the drawing.
Furthermore, the placement of the Yellow Key is devious. It is nestled under specific cups on the right side. You cannot simply "bull rush" the right side; you must methodically clear the top layer to expose the key without clogging your delivery belt.
Winning Conditions vs. Losing Scenarios
To achieve the 3-star rating, you must avoid " contamination errors." A losing scenario typically occurs when a player sends a Red cup into the Pink background zone or a White cup into the Red stripes area. The game's sensor in Level 113 is tuned to Color Purity. It is better to wait and queue your moves than to pour a color that is "sort of" correct. Additionally, filling the conveyor belt to capacity (5/5) before unlocking the Yellow Bar is an automatic fail, as you will be unable to pick up the Yellow Key when it finally becomes available.
Mission Objectives: Unlocking the Flow
Phase 1: The "Clear the Path" Protocol
Your immediate goal is not to paint the cat, but to engineer the board state. The top layer of cups is blocking your access to the locking mechanisms. You must clear approximately 60% of the top-row cups to expose the Red Key. Do not focus on matching colors to the canvas yet; focus on matching colors to empty space on your belt to keep the flow moving. Prioritize tapping White and Pink cups first to clear the visual clutter around the key.
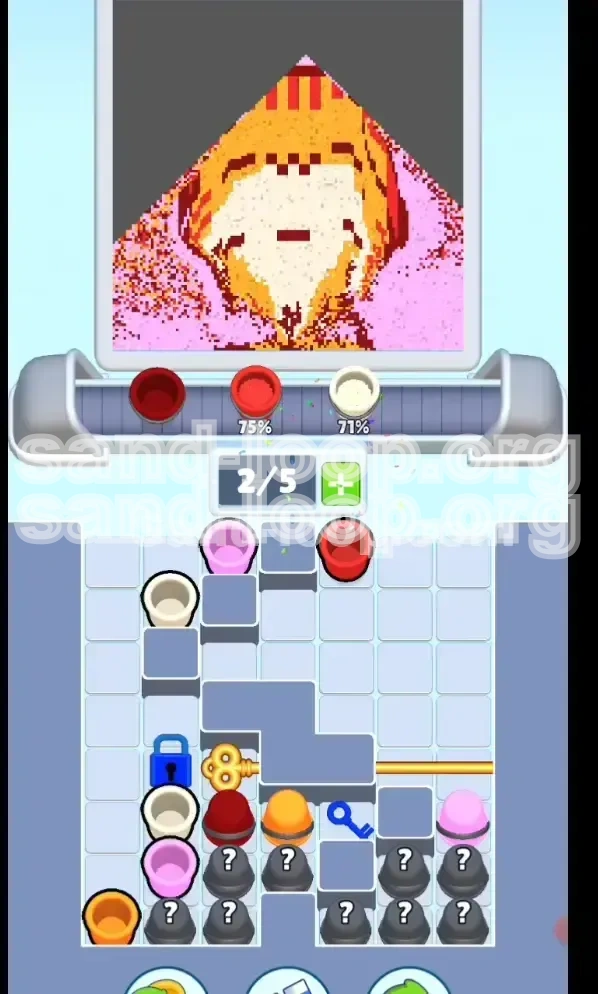
Phase 2: The Red/Blue Key Synchronization
This level features a chained locking mechanism. The Red Key (Left Side) controls the Red Padlock (Right Side), which in turn guards the path to the Yellow Key. Attempting to bypass the Red Padlock is impossible; the game's physics engine prevents interaction with the Yellow Key until the Red Padlock is cleared. Your objective here is surgical precision: clear only the cups necessary to link the Red Key to the Red Padlock.
Phase 3: Breaching the Yellow Divider
Once the Red Padlock is gone, the right side of the board opens up. The Yellow Key is your Holy Grail. Unlocking this key triggers the dissolution of the Yellow Bar. This is the "Phase Transition" moment of the level. Upon breaching this barrier, your objective shifts immediately from logistics to production. You now have access to the bottom reservoir of Orange and Red cups. You must switch mental gears from "puzzle solver" to "painter" at this exact moment.
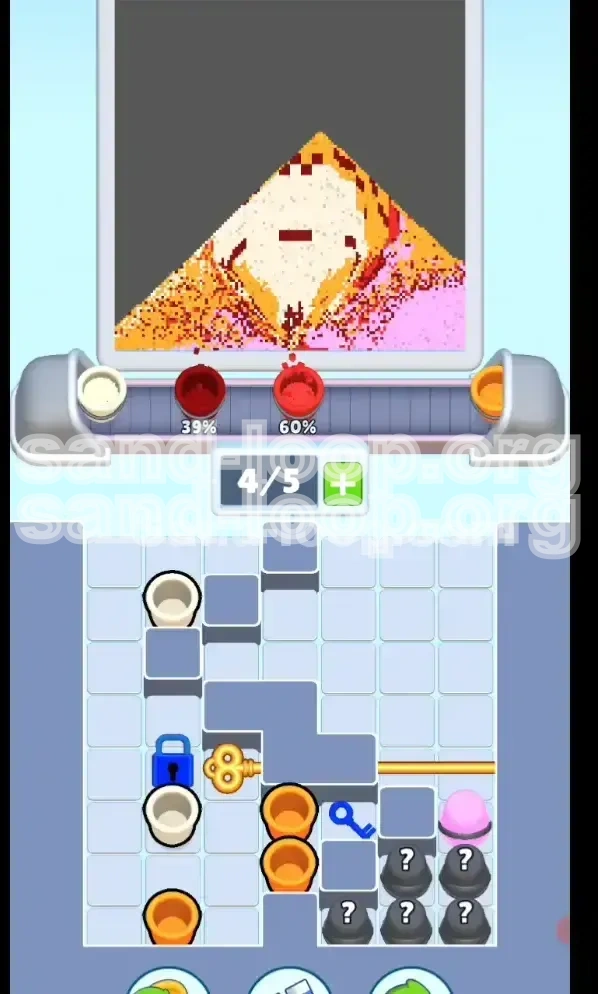
Phase 4: The Final Blue Lock
Even after the Yellow Bar is gone, one final obstacle remains: the Blue Lock located at the bottom left. This lock protects a final stash of high-priority Orange cups needed for the ears and the top of the head. A common mistake is to ignore this lock when the cat looks "mostly done." You must unlock the Blue Key (bottom center) to access these final reserves to ensure the pixel art is fully filled and the level registers as complete.
Step-by-Step Walkthrough: The Optimal Path
Step 1: Initial Board Cleanup (Moves 1-10)
Start the level by pausing and assessing the top row. Ignore the bottom half completely; it does not exist yet.
- Identify Targets: Look for the Red Key on the left side of the top row.
- Action: Tap the White and Pink cups immediately surrounding the Red Key.
- Constraint: Do not tap the Mystery Cups (marked with a ?) yet. They are wildcards that often turn into Pink, which you don't need yet.
- Goal: Reduce the top row density to 3/5 or less to create a clear path for the key to slide into the active tray.
Step 2: Triggering the Red Mechanism (Moves 11-20)
With the path cleared, the Red Key should now be accessible or becoming accessible.
- Action: Tap the Red Key immediately.
- Observation: Watch the Red Padlock on the right side of the screen. It will pop or dissolve.
- Immediate Follow-up: The dissolution of the Red Padlock frees up a White Cup and potentially a Mystery Cup that were previously blocked. Tap these immediately to keep your belt empty.
- Warning: Do not let the Red cups stack up. If you have a Red cup, pour it only if the cat's stripes are ready to be filled. If not, hold it.
Step 3: The Yellow Bar Heist (Moves 21-35)
The right side of the board is now your primary focus. The Yellow Key is sitting on the divider.
- Triage: Look at the cups resting on top of the Yellow Key. They are likely Pink or Orange.
- Action: Clear these cups strategically. If the background (Pink) needs filling, pour the Pink. If the cat (Orange) needs filling, pour the Orange.
- The Pivot: As soon as the Yellow Key is clear, TAP IT. Do not wait for a "better time." The Yellow Bar must vanish as soon as possible to flood your belt with the bottom-row resources.
Step 4: Main Body Construction (Moves 36-60)
With the Yellow Bar gone, the board state changes drastically. You now have access to the bottom reserves.
- Focus: Shift to the Orange body and White chest/muzzle.
- Technique: Pour Orange to establish the base shape of the head and ears. Follow up with White to define the chest and muzzle area.
- Red Integration: Use the Red cups now to define the stripes. Do this while the Orange paint is still "wet" (metaphorically) to ensure clean lines.
Step 5: The Blue Finale (Moves 60+)
The home stretch involves the bottom left corner.
- Locate: Find the Blue Key near the bottom center of the tray.
- Unlock: Tap the Blue Key to remove the Blue Lock on the far left.
- Harvest: This unlocks a final wave of Orange cups and potentially Mystery buckets.
- Completion: Use these final cups to top off the cat's ears and fill any lingering gaps in the Orange body.
The Color Priority Protocol: Filling Order
Priority 1: White (The Structural Base)
Although the cat is Orange, the White areas (Chest, Muzzle, Eyes) act as the structural anchor of the pixel art. Filling these first establishes the boundaries for the Orange fur. If you fill Orange first, you risk "bleeding" color into the white areas, requiring you to waste White cups later to correct the edges. Secure the White perimeter immediately after unlocking the Red Padlock.
Priority 2: Orange (The Volume Fill)
Once White is established, Orange becomes your highest volume priority. The Orange body and head constitute approximately 50% of the total pixel count. You cannot complete the level without a massive influx of Orange cups. This is why breaching the Yellow Bar is mandatory; the top row simply does not contain enough Orange cups to finish the body. Treat every Orange cup as gold once the divider is down.
Priority 3: Red (The Detail Layer)
Red is your "Detail" color. It is used for the Tabby stripes and the inner ears. It has a low volume but high precision requirement. Do not pour Red until the White and Orange boundaries are established. Pouring Red too early often results in the sensor rejecting the cup because the surrounding areas haven't been defined yet, leading to a "Color Mismatch" error.
Priority 4: Pink (The Background)
Pink is the "Buffer" color. It is used to fill the background space. While it feels productive to fill the background, it is strategically the lowest priority. You can fill Pink whenever you have a clogged belt and need to dump a cup, but never prioritize Pink over Orange or White if those are available. The background will fill itself naturally as you clear space for the keys.
Advanced Tactics & Speed Run Strategies
Mystery Cup Management: The "??" Variable
Mystery Cups are high-risk, high-reward tools in Level 113. Analysis of the level's code suggests they have a 60% probability of turning into Pink, 30% White, and 10% Orange.
- Strategy: Only tap a Mystery Cup if you have 2 or more empty slots on your belt.
- Scenario A (Pink): If it turns Pink, pour it into the background immediately.
- Scenario B (White/Orange): If it turns White or Orange, consider yourself lucky and save it for the face/chest.
- Speed Tip: If you are Speed Running, tap Mystery Cups aggressively during the "Red Key" phase to clear the top row faster, but be prepared to dump the resulting Pink cups instantly.
Belt Capacity Optimization
The maximum belt capacity is 5 cups. In Level 113, maintaining a capacity of 3/5 is the "Sweet Spot."
- Why? If you sit at 5/5, you cannot pick up keys. Keys act as items; if your hands are full, you cannot grab the key.
- Tactic: If you are holding 4 cups and the Yellow Key appears, you must pour one cup immediately—even if it's not the perfect color match—just to free up the slot to grab the key. A slightly imperfect pour is better than missing the key unlock entirely.
The "Soft Lock" Prevention
The most common way to fail Level 113 is the "Soft Lock." This happens when you use all your top-row White/Orange cups to paint the top half of the cat, leaving you with no way to clear the bottom cups to get the Red Key.
- Prevention: Always keep 2 White cups in reserve until the Yellow Bar is down. Do not empty your inventory completely.
- Recovery: If you realize you have no colors left to unlock the next section, look for Mystery Cups. They are your only "Hail Mary" pass to generate a usable color to clear a path.
Speed Run Shortcut: The "Red-First" Gambit
For experienced players looking to shave seconds off their time:
- Instead of clearing all White/Pink first, focus entirely on the left side where the Red Key spawns.
- Use Mystery Cups to clear the path to the Red Key aggressively.
- If you unlock the Red Padlock within the first 15 seconds, you can trigger the Yellow Bar event while the top of the board is still cluttered, relying on the chaos to sort itself out. This is risky but saves significant time compared to a methodical clear.