
Level 124
HARDHow to solve Sand Loop level 124? Get instant solution for Sand Loop 124 with our step by step solution & video walkthrough. Sand Loop 124 tips and guide.
Play Sand Loop Now
Experience the puzzle challenge firsthand
Game Screenshots


Sand Loop Level Guides
Sand Loop Level 124: Comprehensive Master Walkthrough
The Calico Cat Challenge Unveiled
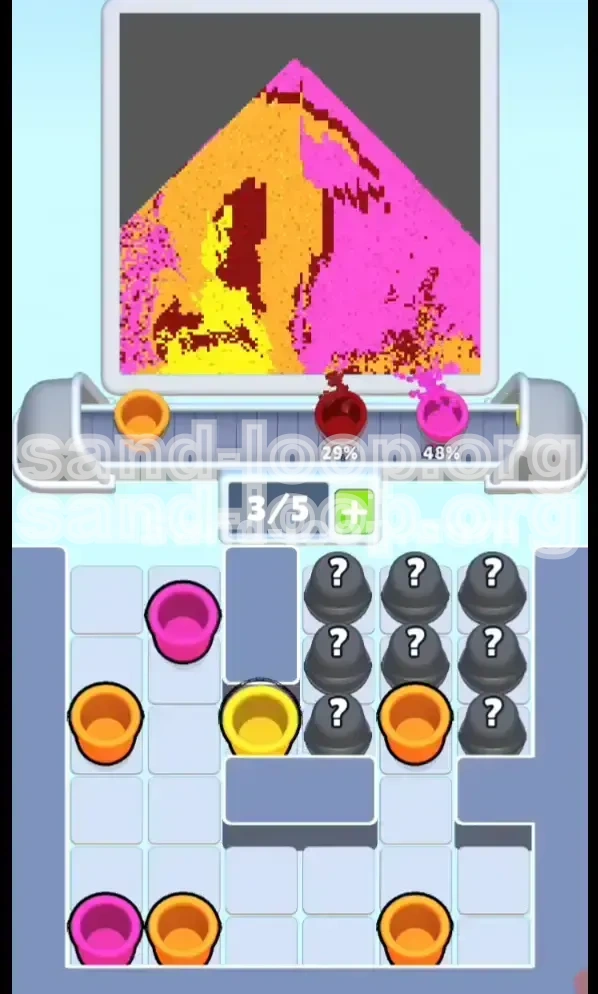
Sand Loop Level 124 is a deceptive masterpiece of level design that masquerades as a simple art task. On the surface, you are presented with a vibrant, pixel-art style illustration of a Calico Cat set against a stark Neon Pink background. However, beneath this cute aesthetic lies a rigorous resource management trial. This level forces players to adapt their strategies dynamically, shifting from a state of scarcity to a sudden flood of resources, all while maintaining a complex color layering sequence.
The "Rhythm Breaker" Mechanic
Unlike standard levels where you have full access to your color palette immediately, Level 124 operates on a "lock-and-key" system. This is a Rhythm Breaker stage. The game intentionally chokes your economy by locking away 50% of your essential supplies behind a massive, blue "Ice Block" barrier. This means you cannot simply paint by numbers; you must execute a precise opening sequence to survive the early game without ruining your canvas.
Visual Breakdown and Layout
The level is split into two distinct visual phases. The first phase involves building the structural integrity of the cat using warm tones. The second phase involves filling the void and adding details. The canvas is static, but your resource tray is dynamic. Understanding the geography of the cat—specifically the neck, chest, and floating facial features—is critical before you pour your first cup.
Primary Challenge: Scarcity vs. Precision
The core conflict in this level is the battle between tray management and the ticking clock of the Ice Block meter. You have a limited tray capacity of 5 slots, but you will be forced to hold onto specific colors (Maroon) while waiting for the counter to hit 15. If you fill your tray with the wrong colors, you will be forced to make game-ending mistakes, such as pouring the eyes too early.
The Gravity System
Sand Loop uses a realistic physics engine where sand accumulates from the bottom up. This is not a top-down coloring book. Pours made at the bottom will physically support pours made at the top. If you attempt to draw the eyes (Maroon) before you have built the cheeks and forehead (Yellow/Orange), the heavy dark sand will sink through the lighter canvas, ruining the pixel art placement.
Level Objectives and Clear Goals
Objective 1: Shatter the Ice Block
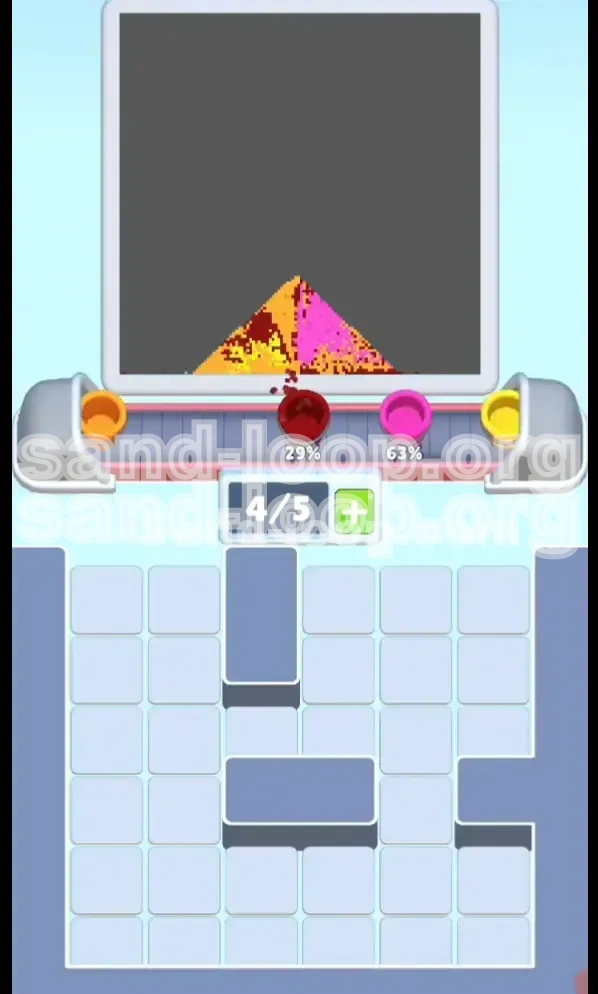
Your immediate, non-negotiable goal is to clear the "15" Ice Block counter. This is the gatekeeper of the level. You cannot access the right side of the board, which contains the Mystery Cups and background colors, until you have physically processed 15 cups through the conveyor belt. This number is fixed and cannot be bypassed.
Objective 2: Construct the "Sand Platform"
Before you can place the detail work (eyes and mouth), you must build a foundational "platform" using Solar Yellow and Sunset Orange. This platform needs to rise to approximately the 40% mark of the canvas's total height. Only when this bed of sand is solid can you safely place the darker pixels without them sinking.
Objective 3: Execute the Layering Sequence
You must follow a strict topological order to ensure the pixels land in the right coordinate zones. The order is: Base Layer (Neck/Chest) -> Secondary Layer (Cheeks/Face) -> Detail Layer (Eyes/Mouth) -> Background Layer (Pink Void). Deviating from this sequence will result in misaligned features.
Objective 4: Manage the Mystery Cups
Once the Ice Block shatters, you will be flooded with Mystery Cups (Black with Question Marks). Your goal here is to integrate these rapidly. In Level 124, these cups predominantly decode to Neon Pink, which serves as the background. You must use these to fill the negative space around the cat without burying the cat itself.
Objective 5: Clear the Tray Efficiently
The final objective is tray optimization. You cannot afford to have "dead cups" clogging your slots. You must cycle colors so that you are always ready to accept the next necessary color from the conveyor, ensuring a constant flow toward the 15-cup threshold.
Step-by-Step Walkthrough: The Early Game
Step 1: The Opening Move - Yellow and Orange
As soon as the level starts, identify the Solar Yellow (Left Face) and Sunset Orange (Right Face) stacks. These are your bread and butter. Do not touch the Maroon stacks yet. Begin by alternating these two colors. A good ratio to start with is 2 Orange cups for every 3 Yellow cups. This creates a mixed base that represents the fur of the cat's neck and chest.
Step 2: Tray Management Strategy
You will notice Maroon cups spawning early. Do not pour them. Instead, pick them up and hold them in your tray. This is a deliberate tactic. By taking up slots with Maroon, you prevent the game from spawning unwanted colors that you don't need, while also saving the Maroon for later. Keep 1 slot open at all times to cycle through the Yellow/Orange stacks.
Step 3: Monitoring the "15" Counter
Keep a close eye on the blue icon labeled "15". Every time you send a cup to the belt, this number decreases. Your focus in the early game is purely mathematical: burn through the Yellow and Orange stacks as fast as possible to lower this number. Accuracy is secondary here; volume is key. You need to unlock the right side of the board.
Step 4: Building the Neck Structure
Watch the canvas as you pour. The bottom of the cat (the neck) should be the first thing to form. Ensure that the Orange is slightly more dominant on the player's right side of the neck, as per the art design. If you pour purely Yellow, the cat will look washed out. If you pour purely Orange, it will look too dark. Balance is essential.
Step 5: The Maroon Dilemma
If your tray fills up with Maroon cups and you haven't hit the 15 mark yet, you have a problem. You cannot simply discard them. You must use a "waste" tactic. Look for any color that isn't critical and pour it off to the side (if the physics allows) or just bite the bullet and pour a Maroon cup, accepting that it will sink to the bottom and be covered up later by the chest fur.
Step-by-Step Walkthrough: The Mid-Game Transition
Step 6: Triggering the Shatter
Once you have poured roughly 12-14 cups, the game will slow down the spawn rate of Yellow and Orange. This is your cue to prepare. As soon as that 15th cup hits the belt, the Ice Block will shatter with a distinct visual effect. Pause for a second here. Do not panic-click. The board is about to change drastically.
Step 7: The Mystery Cup Flood
Immediately after the shatter, the right side of the board unlocks. You will see a wall of Mystery Cups. In Level 124, these are programmed to be Neon Pink (Background) with a high probability (approx. 80-90%). Start grabbing these. They are safe to use.
Step 8: Establishing the Eyes
Now that the Ice Block is gone and you have built up the neck (about 30-40% full), you can finally release the Maroon cups you have been hoarding. Pour them carefully. The "platform" of Yellow and Orange you built earlier will catch the Maroon sand, placing it precisely in the middle of the face where the eyes and mouth belong.
Step 9: Filling the Cheeks and Forehead
Continue to alternate Yellow and Orange, but now start aiming higher up the canvas. You are building the forehead and the cheeks. The "mountain" of sand should start to take the shape of a cat's head. The Maroon eyes should now be sitting comfortably in the middle of this face, not sliding down.
Step 10: Background Integration
With the face formed, start spamming the Pink Mystery Cups. The physics engine will cause the Pink sand to roll down the sides of the "Cat Mountain" you have built, filling the Neon Pink background naturally. This is the most satisfying part of the level, as the art seemingly completes itself.
Color Order and Processing Logic
Phase 1 Colors: Warm Tones
The first phase is dominated by Solar Yellow (Code: YEL-01) and Sunset Orange (Code: ORG-02). These colors have similar weights and physical properties in the game engine. They mix easily to form the base texture of the cat. You should process these colors until the "15" counter is at 0.
Phase 2 Colors: Dark Details
Deep Maroon (Code: MRN-05) is the heaviest sand in the level. It represents the eyes and mouth. Because of its weight, it has high "inertia" and will cut through lighter sands. This is why it must be processed second. If processed first, it acts like a stone sinking in water.
Phase 3 Colors: The Void
Neon Pink (Code: PNK-99) is the background color. While it is light, the volume is high. You process this last to fill the gaps. The game feeds this to you via Mystery Cups to force a random element, but in this level, it acts as a filler.
The Mixing Rule
Be careful not to mix the Pink background with the Orange face too early. If Pink touches Orange before the Orange is solid, it creates a muddy, undesired color that looks like a defect in the pixel art. Keep the Pink to the extreme left and right edges until the face is done.
Priority Queue
Think of your tray as a queue. Priority 1: Yellow/Orange (To unlock board). Priority 2: Maroon (To place eyes). Priority 3: Pink (To finish level). Never process a lower priority color while a higher priority one is available, unless forced by tray space.
Key Tips and Strategic Notes
Tip 1: The "Slot 5" Reserve
Always keep your 5th tray slot empty (or occupied by a "dummy" cup you are willing to hold). This gives you the flexibility to grab a color if the conveyor shifts suddenly. If all 5 slots are full of colors you need right now, you will miss the spawn of a color you need later.
Tip 2: Identifying the Art Layers
Zoom in on the target image. Notice that the eyes are not touching the bottom edge. This visual cue confirms the "Platform Strategy". You must physically build the sand up to the level of the eyes using the face colors before dropping the eye colors.
Tip 3: The Ice Block Timer
The game does not pause for you. While you are admiring your sand pile, the conveyor keeps moving. Efficiency is key. Don't spend too much time perfecting the shape of the neck in the early game. You can fix rough edges with the final background layer.
Tip 4: Mystery Cup Behavior
Don't be afraid of the Mystery Cups. In other levels, they can be dangerous. In Level 124, they are your friend. They are almost exclusively the background color. You can treat the right side of the board as a "Pink Button" once unlocked.
Tip 5: Recovery from Bad Spawns
Sometimes the game spawns 3 Maroons in a row early on. This is a "Bad Seed" scenario. If you must pour one, aim for the absolute center-bottom (the throat). It will be covered by the chest fur later. It is better to hide a mistake than to let a Maroon cup clog your tray for 10 turns.
Common Mistakes to Avoid
Mistake 1: Premature Eye Placement
This is the number one failure point. Players pour the Maroon (Dark Red) cups as soon as they appear because they want to "get them out of the way." The result is a cat with eyes on its chin or neck. Resist the urge. Let them clutter your tray if necessary.
Mistake 2: Ignoring the Orange/Yellow Ratio
Using only Yellow because it's brighter might seem like a good idea, but the Calico Cat pattern requires Orange contrast. If you don't use enough Orange, the level won't recognize the pattern correctly, and you might run out of sand before hitting the percentage complete threshold.
Mistake 3: Panic-Pouring at 15
When the Ice Block shatters, players often panic and start pouring everything they see. Take a breath. The board doesn't explode. Look at what unlocked. It's usually Pink. Don't pour Pink on top of the face you just spent 5 minutes building.
Mistake 4: Overfilling the Tray
Getting "Tray Locked" is fatal. This happens when you have 5 cups that you refuse to pour (e.g., holding 5 Maroons). The game stops giving you new cups. You must eventually bite the bullet and pour something, even if it's not perfectly placed, to keep the game moving.
Mistake 5: Neglecting the Background
Some players focus so hard on the cat face that they forget the background. The background counts for a large percentage of the level's completion. If you finish the cat and are only at 80% completion, you need to spam those Pink Mystery Cups to fill the void.
Solutions for When You Are Stuck
Problem: Stuck at 90% Completion
If the cat looks perfect but the level won't end, you are missing background pixels. The issue is likely the corners of the screen. The Pink sand has piled up against the cat but hasn't reached the top corners. Solution: Pour Pink cups aggressively into the center of the cat's forehead. The pile will grow higher and overflow into the corners, triggering the completion flag.
Problem: Eyes Keep Sliding
You built the base, but the eyes still slide down to the neck. Solution: Your base wasn't flat or wide enough. You need to build a "ledge" or a wider cheek structure. Pour Orange cups on the sides of the face to widen the "bucket" that holds the eyes, then try the Maroon again.
Problem: Out of Yellow/Orange
You used all your Yellow/Orange breaking the ice, and now you can't finish the face. Solution: This is a critical failure state. You must restart the level. The lesson here is to be more conservative with your Yellow/Orange usage during the "15" phase. Don't pour them just to pour them; pour them to build the structure.
Problem: Tray Clogged with Unwanted Colors
You have 3 Pinks and 2 Maroons, but you need Yellow. Solution: You must sacrifice. Pour the Pink off to the far side (background) immediately. It's better to place background pixels slightly early than to wait for Yellow and run out of time or moves.
Problem: The "Ice Block" Won't Break
You've poured 20 cups and the block is still there. Solution: You might be miscounting, or there is a lag. Ensure you are actually placing cups on the belt. If a cup gets "stuck" or bounces back, it doesn't count. Restart the client to ensure the physics engine is registering the pours correctly.
Speed Run Tips and Shortcuts
Shortcut 1: The "Maroon Hold" Reload
If you are speedrunning, you don't have time to carefully place every grain. As soon as the level loads, grab all Maroons immediately. Even if they clog your tray, it prevents them from spawning again later. This forces the game to spawn only Yellow/Orange/Pink, streamlining your decision-making process.
Shortcut 2: Bulk Pouring
Don't tap individual cups. If you have a stack of 3 Yellow, grab them all. Speed runs in Sand Loop rely on "bulk processing." Pour 3 cups at a time in a zig-zag motion across the neck. It's messy, but it's fast, and the Pink background will cover the mess later.
Shortcut 3: Ice Block Ignoring
Ignore the art quality for the first 15 cups. Treat the canvas as a trash can. Dump colors as fast as you can to break that ice block. The only thing that matters in the first 30 seconds of a speed run is hitting that "15" number. You can fix the art in the second half.
Shortcut 4: The Pink Finish
Once the face is recognizable (approx. 50% accuracy), stop caring about the face. Switch entirely to Pink cups. Spam them into the center. The physics will finish the job for you. This "physics-assisted completion" is much faster than manual placement.
Shortcut 5: Pattern Recognition
Learn the spawn pattern. The game typically spawns in waves: Wave 1 (Base), Wave 2 (Details), Wave 3 (Background). Anticipating these waves allows you to have your tray set up correctly before the colors even arrive, shaving seconds off your time.