
Level 127
HARDHow to solve Sand Loop level 127? Get instant solution for Sand Loop 127 with our step by step solution & video walkthrough. Sand Loop 127 tips and guide.
Play Sand Loop Now
Experience the puzzle challenge firsthand
Game Screenshots
Sand Loop Level Guides
Level Overview: The Sunset Landscape Challenge
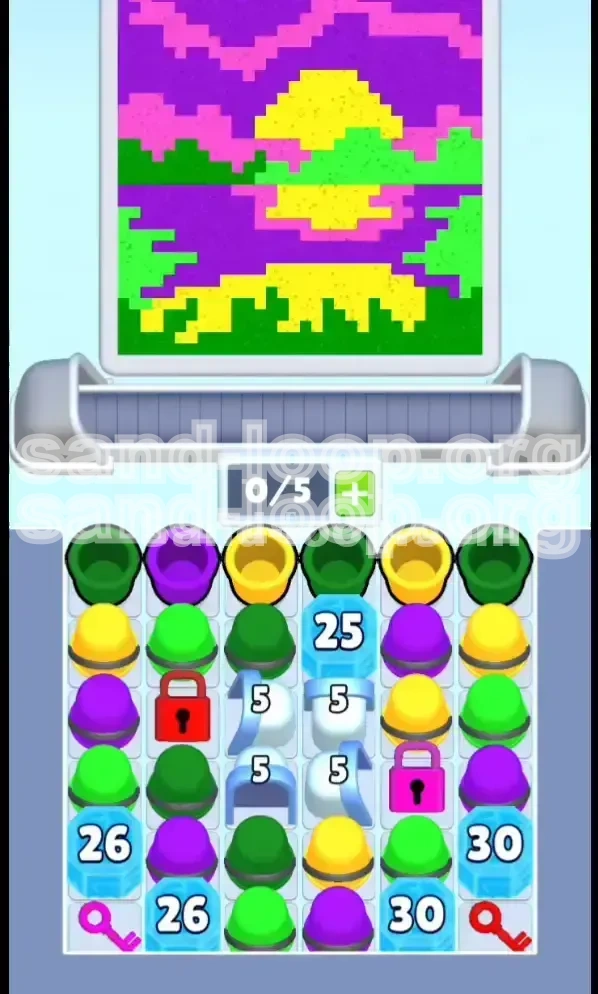
Welcome to the grueling yet visually stunning Level 127 of Sand Loop. This stage, titled "Sunset Landscape," is a deceptive masterpiece that combines pixel-art aesthetics with hardcore resource management mechanics. On the surface, you are painting a serene scene of a yellow sun setting over a purple ocean, framed by green hills. However, beneath this pretty facade lies a tactical nightmare of ice blocks, key dependencies, and conveyor belt management.
Unlike previous levels where you could focus solely on color matching, Level 127 is an "Ice Breaking" marathon. You start with a massive disadvantage: your most critical tools (the Red and Pink Keys) are locked behind high-HP ice barriers. This forces a playstyle where you must deliberately "grind" damage on specific blocks to unlock the board, all while managing a limited supply of sand and a strict slot capacity. Prepare yourself for a level where patience and board management are just as important as hitting the right colors.
Core Mechanics of Level 127
This level shifts the focus from speed to efficiency. You cannot brute-force your way through the colors because the physical board is locked. You must adopt a "clearance first, painting second" mentality to succeed.
The Generator Lock
The most critical feature of this level is the central "Generator" array. These white domes are responsible for spawning new cups, but they are initially blocked by a 25 HP Ice Block. If you do not clear this block early, you will run out of ammunition (cups) long before you finish the level.
The Double-Lock System
Access to the upper tiers of the puzzle is governed by a strict dependency chain. The Red Key unlocks the bulk of the board, but it is itself guarded by ice. You cannot access the Pink Key until the Red path is open. This creates a linear progression that dictates your entire early-game strategy.
Visual Aesthetics vs. Gameplay
The sunset theme is not just for show. The "Yellow Reflection" in the water creates a dangerous zone where yellow and purple blocks intermix. Recognizing these visual zones helps you plan your pours, but the mechanical barriers take precedence over the artwork in the early phases.
Resource Economy
Every cup counts in this stage. Since you are forced to use cups to break ice rather than fill the canvas, you are effectively "spending" resources to unlock the board. This means your margin for error is incredibly slim. You cannot afford to waste cups on wrong colors once the ice is broken.
Clear Objectives: Your Mission Goals
To conquer the Sunset Landscape, you need to move beyond simple painting and adopt a strategic checklist. Your primary goal is not just to fill the meter, but to liberate the board from its frozen constraints. Here is exactly what you need to achieve to clear Level 127.
Destroy the Central Ice Block (25 HP)
This is your immediate opening objective. The 25 HP Cyan Ice Block located in the top center of the board is blocking four Generator slots. Freeing these generators is non-negotiable; without a constant stream of new cups, your run will end prematurely. Do not worry about the painting accuracy while focusing on this block.
Acquire the Red Key
Located in the bottom right corner, the Red Key is trapped under a 30 HP Ice Block. This is the most durable obstacle in the level. Securing this key is your mid-game priority. It unlocks the Red Lock on the left side of the board, granting you access to the cups and space needed to reach the final key.
Unlock the Pink Key
Once the Red Lock is cleared, shift your focus to the bottom left corner. Here, a 26 HP Ice Block guards the Pink Key. This key opens the final section of the board (the Pink Lock on the right). Securing this item signifies the transition from the "Survival Phase" to the "Painting Phase."
Fill the Sky and Sun
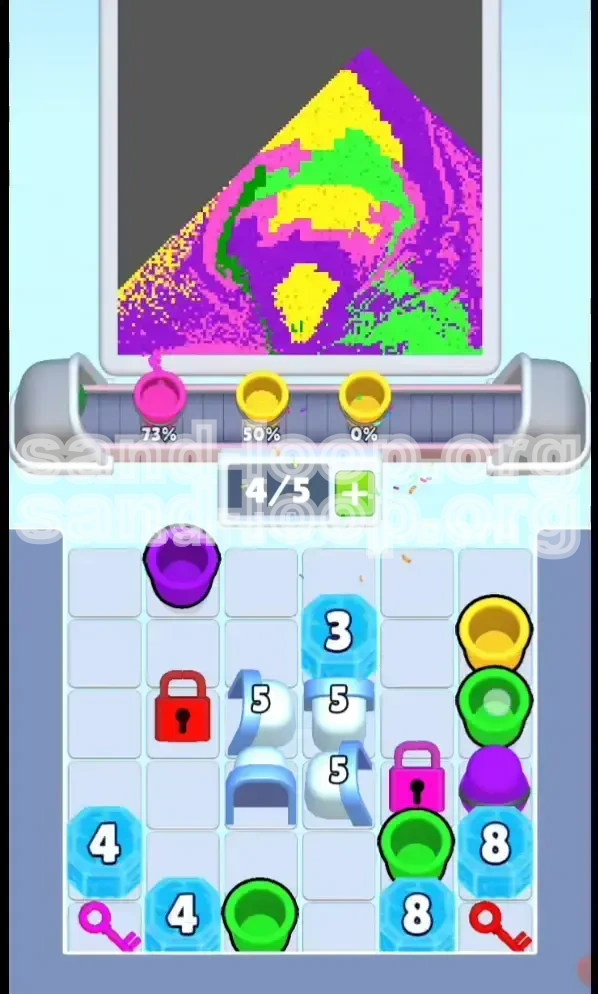
With the board fully unlocked, your final objective is precision. You must fill the top 30% of the canvas—comprising the Purple Sky and the Yellow Sun—without contaminating the water below. This requires careful timing and nozzle management to ensure the colors land exactly where they belong.
Manage Slot Capacity
A constant objective throughout the level is maintaining 1 or 2 empty slots in your tray. If the generators fill your tray to capacity (0/5 slots available), you cannot shift new cups from the conveyor, leading to a soft-lock. Always prioritize moving cups to the conveyor over perfect placement.
Complete with 90%+ Accuracy
Because the first half of the level involves grinding ice blocks, you will lose potential points. To secure a high rating, you must achieve near-perfect accuracy during the second half of the level. Minimize "waste" sand (sand poured into already filled areas) once the keys are secured.
Step-by-Step Walkthrough: The Survival Phase
The first 50% of this level is a battle against the board's layout. You must ignore the artistic urge and focus purely on breaking obstacles. Follow this action plan to navigate the opening chaos.
Phase 1: The Opening Grind (0% - 30%)
As the level starts, ignore the beautiful sunset. Your eyes must be glued to the top center. The Generators are your lifeline. Use your initial supply of Green, Purple, and Yellow cups to attack the 25 HP Cyan Ice Block. Do not worry about matching colors perfectly yet. The only thing that matters is chipping that block down to zero to activate the Generators.
Phase 2: Managing the Generator Flood
The moment the center block breaks, the Generators will begin spitting out cups. This is a critical danger point. Your tray can fill up instantly. Action: Rapidly shift cups from the tray to the conveyor belt, even if you don't need them immediately. Keep the flow moving. If you see a cup you need (like Yellow for the reflection), prioritize it, but otherwise, focus on cycle speed.
Phase 3: The Red Key Offensive (30% - 50%)
With Generators active, look to the bottom right. You will see the 30 HP Ice Block shielding the Red Key. This is a tank. Action: Clear cups adjacent to this block specifically. Do not waste moves on other parts of the board. It will take dozens of cups to break this. If you have a "Color Splash" or "Bomb" power-up, save it for this moment to shave off 10-15 HP instantly.
Phase 4: Unlocking the Left Flank
Once the Red Key is freed, a massive column of cups on the left side (behind the Red Lock) becomes accessible. Action: Clear these cups out. This serves two purposes: it gives you room to maneuver, and it physically opens the path to the bottom left corner where the Pink Key resides. Do not let the board clutter up during this transition.
Phase 5: The Pink Key Sprint
Move your attention to the bottom left. The 26 HP Ice Block here is the final hurdle. Since you have unlocked the Red section, you should have plenty of space and ammunition to grind this down. Action: Pour aggressively into the bottom left area. Once this breaks, grab the Pink Key immediately to unlock the final section of the board.
Phase 6: Stabilization Check
At this point, all keys are acquired and the board is open. Before you start painting the sunset, pause and check your tray. Action: Ensure you have a clean slate. Dump any useless Green cups into the already-filled green hills (bottom corners) to clear space. You want a fresh tray of Purples and Yellows for the final stretch.
Color Order Strategy: Precision Painting
Once the ice is gone, the level transforms into a test of color discipline. The layout of the sunset demands a specific processing order to avoid color contamination. Follow this hierarchy to ensure a clean fill.
Priority 1: The Green Hills (Bottom)
Although these are at the bottom of the screen, you should handle them early or use them as "dump zones." The Green Hills are large, solid blocks located on the far left and right. They are isolated from the delicate water and sky. Tip: If you have excess Green cups clogging your tray during the Ice Phase, pour them here immediately to get them out of the way.
Priority 2: The Purple Water (Middle-Low)
The water fills from the bottom up. This section includes the dangerous "Yellow Reflection" zone. Strategy: Start by filling the deep purple areas first. Hold off on the reflection until you have a steady stream of Yellow cups. If you pour purple over a yellow reflection spot, it is very hard to fix later.
Priority 3: The Yellow Sun & Reflection (Center)
This is the hardest part of the painting phase. The sun is high up, but its reflection stretches down into the purple water. Timing: Wait until your nozzle is hovering directly over the sun or its reflection path before unleashing Yellow cups. Do not "spray and pray." Yellow is a scarce resource in this palette; make every drop count.
Priority 4: The Purple Sky (Top)
The final 15% of the level is the sky. This is the easiest part, but also the most risky if you run out of cups. Strategy: By this point, the Generators should be keeping you supplied with Purple. Simply sweep the nozzle across the top rows. Since nothing borders the sky but the sun (which should already be yellow), you can be more aggressive with your pours here.
Handling the Interference Zones
The interface between the Yellow Sun and the Purple Sky is sharp. Avoid pouring Yellow when the nozzle is drifting into the sky, and vice versa. Tip: If you are moving fast, it is better to slightly under-fill the edge of the sun and touch it up later than to bleed Yellow into the Purple clouds, which looks messy and wastes correction sand.
Key Tips & Notes for Mastery
To truly master Level 127, you need to understand the hidden mechanics that govern the game's logic. These tips will help you optimize your gameplay and avoid the frustration of a failed run.
Generator Cap Management
The Generators operate on a cycle. They spawn a cup, wait, and spawn another. If your tray is full, the generator attempts to spawn, fails, and the "potential cup" is lost for that cycle. Tip: Never let your tray sit at 100% capacity. Always keep one slot open (4/5 or 5/6 depending on your tray size) to maximize the spawn rate and ensure you have a constant stream of ammo.
Adjacency Damage is King
You do not need to match the color of the Ice Block to damage it. You simply need to clear a cup *adjacent* to it. Tip: If you are trying to break the 30 HP Red Key block, look for the easiest cup to clear nearby, regardless of its color. Volume of moves matters more than color matching during the grind phase.
The "Soft-Lock" Danger
A "Soft-Lock" happens when the board is full of filled pixels, your tray is full of cups you don't need, and the Generators are stuck. You cannot make a move. Prevention: If your tray is full of Green and you only need Purple, pour that Green into a filled Green area to destroy the cup and free the slot. Desperation dumping is better than a soft-lock.
Conveyor Belt Awareness
Keep an eye on the conveyor belt at the bottom. It shows what is coming next. Tip: If you see a Red or Pink cup coming up (rare colors in this level), make an effort to free up space for it immediately, even if you don't need it right that second. You don't want to miss a key resource because your tray was full of common Purple cups.
HP Tracking
Memorize the HP values: 25 (Center), 30 (Right), 26 (Left). Tip: If you have a power-up that deals 15 damage, do not use it on the 26 HP block (leaving 11 HP). Use it on the 30 HP block (leaving 15 HP). Efficient use of power-ups can save you 20-30 turns of grinding.
Mid-Level Pausing
Level 127 is mentally exhausting due to the shift from grinding to painting. Tip: There is a natural lull when you pick up the Red Key. Take a second to breathe, reassess the board, and reorganize your tray before attacking the Pink Key. A rushed mistake here often leads to running out of sand at the 90% mark.
Common Mistakes to Avoid
Many players fail Level 127 not because they lack skill, but because they fall into traps set by the level design. Learn from these common errors to ensure your victory.
Mistake 1: Ignoring the Center Block
New players often see the sunset and start filling the bottom water or hills first. Why it fails: If you don't break the center 25 HP block within the first 10% of the level, the Generators won't activate. You will run out of cups, the conveyor will stop, and you will lose with 50% of the screen still empty.
Mistake 2: Precise Painting Too Early
Trying to keep the purple water perfect while you are still grinding for the Red Key. Why it fails: You will inevitably spill sand or be forced to dump cups to make room, ruining your careful work anyway. Focus on unlocking the board first. The "cleanup" phase comes later.
Mistake 3: Bleeding Colors in the Reflection
Pouring Yellow sand while the nozzle is drifting over the purple water sections. Why it fails: The "Yellow Reflection" in the water is narrow. Yellow sand landing in Purple water creates "pollution" that requires Purple sand to fix, wasting two cups instead of one. Wait for alignment.
Mistake 4: Letting Generators Overflow the Board
Breaking the center block and then ignoring the tray to focus on the side keys. Why it fails: The Generators will rapidly fill your tray. If you don't constantly shift cups to the conveyor, the new spawns will have nowhere to land, effectively pausing your resource intake and stalling your progress.
Mistake 5: Wasting Power-Ups
Using a high-damage bomb on a 5 HP ice chunk or a standard cup. Why it fails: This level is a marathon of HP grind. Using your heavy hitters on small targets leaves you with nothing for the 30 HP beast guarding the Red Key. Save your big guns for the high-value targets.
Solutions When You're Stuck
Hit a wall? It happens in Level 127. The state of the board can sometimes feel hopeless, especially if you are low on sand. Here are specific scenarios and how to salvage them.
Scenario: Out of Cups, Ice Still Standing
You are 5 HP away from breaking the Red Key block, but the conveyor is empty and your tray is empty. Solution: This usually means you didn't prioritize the Center Generators early enough. If there are *any* cups left on the board, clear them to trigger a spawn. If the board is truly empty, you are likely out of moves and will need to restart. Next time, ignore the art and hit the center block first.
Scenario: Tray Full of Junk, Need Critical Color
You need Yellow to finish the sun, but your tray is full of Green and Purple. The conveyor has a Yellow cup coming, but you have no space. Solution: Emergency Dump. Look for the largest, already-filled area of Green or Purple. Pour your excess cups there. It is "waste," but it frees the slot to grab the Yellow cup you actually need. The trade-off is worth it.
Scenario: "Polluted" Water Sections
You accidentally painted a section of the purple water yellow, and now you can't fix it because the nozzle won't stay in that small spot. Solution: Wait for the nozzle to swing back around. If the spot is too small to hit without spilling, focus on filling the *adjacent* purple areas first. Often, filling the surrounding area makes the "island" of wrong color easier to target, or it blends in enough that the game accepts it.
Scenario: Soft-Lock Imminent
Board is 95% full. Tray is full. Conveyor is full. No moves possible. Solution: This is the "Board Full" crisis. Look for a cup in your tray that matches a *barely* filled area near the top. Pour it there to clear the cup. If no such area exists, you must restart. In future runs, ensure you leave a "buffer zone" of empty pixels until the very end to allow for cup disposal.
Speed Run & Optimization Tips
Once you have beaten the level, you might want to go for a faster time or a higher score. These advanced strategies assume you are comfortable with the basics and want to optimize your efficiency.
Speed Run Tip: The "Center Rush" Opener
Do not wait for the "perfect" cup to break the center 25 HP block. Use whatever is in the top rows immediately. The Generators are the engine of the level; starting them 5 turns faster saves you 30 seconds of grinding later. Be messy, be fast, just break that ice.
Optimization: Pre-Positioning for Keys
While you are breaking the 30 HP block for the Red Key, try to clear cups on the *left* side of the screen as well if they are convenient. This means that the moment the key breaks, you don't have to clean up the board to find the Pink Key lock. Keeping the board "pre-cleared" shaves seconds off the transition phases.
Score Maximizing: Combo Chains
Once the board is unlocked, stop single-tapping. Try to chain your pours. If you have 3 Yellow cups in a row, find a way to drag the nozzle across the sun to use all three in one motion. Combo chains significantly increase your score multiplier compared to individual drops.
Advanced Timing: The "Nozzle Swing" Synchronization
The nozzle moves in a predictable arc. Advanced players time their cup drops so that the cup activates exactly when the nozzle is over the target. For the "Yellow Reflection" in the water, do not tap the cup the moment it is ready. Wait 0.5 seconds for the nozzle to align with the reflection strip, then unleash the cup. This prevents misfires.
Resource Forecasting
Look at the top of the conveyor belt. If you see a wave of Green coming, but you are working on the Yellow sun, immediately switch targets to the Green Hills to "ride the wave." Switching targets to match the incoming cup flow is faster than waiting for the specific colors you need.