
Level 140
HARDHow to solve Sand Loop level 140? Get instant solution for Sand Loop 140 with our step by step solution & video walkthrough. Sand Loop 140 tips and guide.
Play Sand Loop Now
Experience the puzzle challenge firsthand
Game Screenshots
Sand Loop Level Guides
Sand Loop Level 140: The Autumn Leaf Master Guide
Welcome to the ultimate strategic breakdown of Level 140 in Sand Loop, famously known as the "Autumn Leaf" stage. This guide is designed to take you from a confused beginner to a master puzzler by explaining the logic behind the chaos. Unlike previous levels where speed was your primary adversary, Level 140 is a test of logic, patience, and resource management. The game introduces a hard physical constraint: your most critical resource is locked away, forcing you to complete the background before you can even touch the foreground.
Core Concept: The "Reverse Layering" Logic
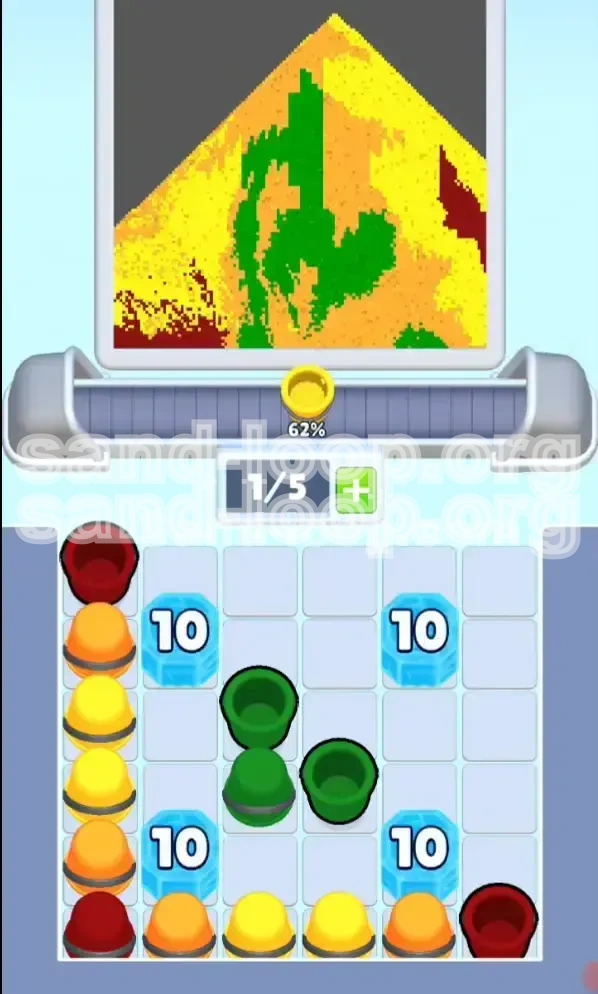
The defining feature of this level is the separation of resources. The supply tray is segregated into an "Outer Ring" and a "Inner Core". The Autumn Leaf artwork requires a mottled yellow/orange background with a distinct green stem and leaf structure in the dead center.
However, physics is your enemy here. If you were to access the Green cups first, the sand would fall to the bottom of the screen, burying itself under the yellow background colors. The level forces a "Background-to-Foreground" painting approach. You are essentially painting the window before you paint the curtain.
The Supply Tray Layout
Understanding your toolset is the first step to victory. The tray is arranged in a specific bullseye pattern:
- Outer Ring (The Wall): This contains the Yellow, Orange, and Red cups. These are your "keys" to unlock the level.
- The Barrier: Surrounding the center are four massive Blue Ice Blocks. These are not just walls; they are health gates.
- Inner Core (The Prize): Four Forest Green cups sit trapped in the center. These are essential for the final 20% of the art but are inaccessible initially.
Understanding the "HP 20" Mechanic
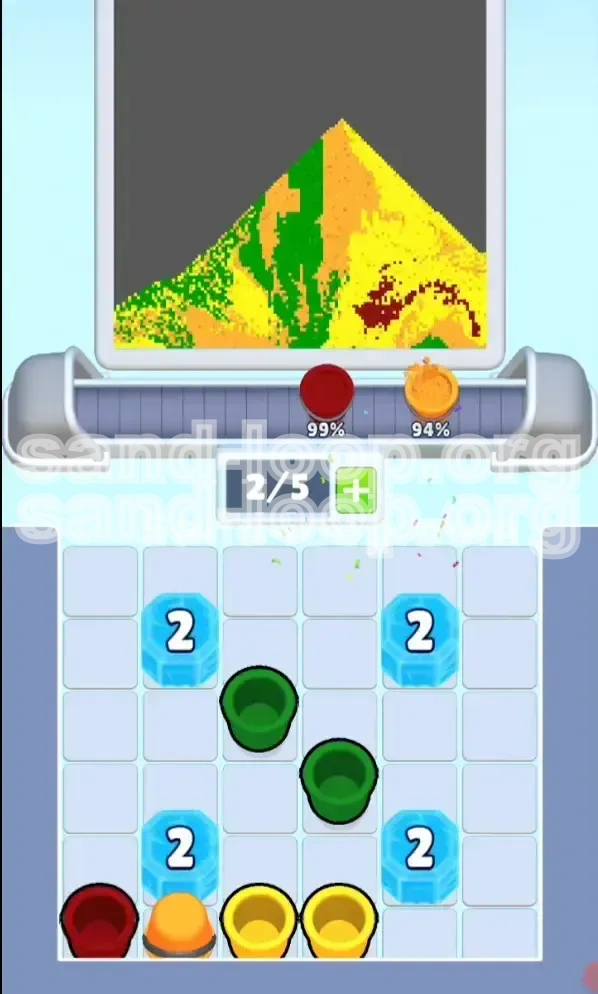
The Blue Ice Blocks are not static walls; they are dynamic obstacles with a health pool of 20 hit points each. Every time you successfully clear a cup from the Outer Ring that is adjacent to an Ice Block, the block's health decreases.
This creates a math problem for the player: You must clear approximately 20 cups to break the ice. This means you must pour the background colors. You cannot rush the center. The game effectively turns the background painting process into a "grind" to unlock the foreground.
Why You Cannot Cheat the Order
Many players try to find a shortcut to the Green cups. It is impossible. The Ice Blocks prevent any interaction with the center cups. Furthermore, even if you could cheat the order, the art requires the Green leaf to sit on top of the Yellow background. Attempting to pour Green first would result in the leaf being invisible, buried under the subsequent layers of Autumn colors.
Victory Conditions
To clear Level 140 with a high score, you must achieve three specific goals:
- Layer Integrity: Ensure the bottom layer is 100% Yellow/Orange mix.
- Contrast: Place the Green leaf centrally so it pops against the background.
- Accuracy: Finish the four corners with Dark Red without spilling into the center.
Strategic Objectives: How to Tackle the Level
Before you tap a single cup, you need a game plan. Level 140 is a marathon divided into three distinct phases. Treat these phases as separate mini-levels to maintain mental clarity.
Phase 1: The Ice Breaker (The Grind)
Your immediate goal is to reduce the Ice Block health from 20 to 0. During this phase, you should ignore the aesthetic of the art entirely. Focus purely on clearing cups from the conveyor belt efficiently. You are playing a resource management game here. You need to cycle through the Outer Ring colors as fast as possible without clogging your limited slots.
Phase 2: The Canvas Foundation
While breaking the ice, you are simultaneously building the canvas. You must ensure that the sand falling to the bottom of the screen creates a flat, consistent bed of "Autumn Noise" (the mix of Yellow and Orange). If you focus too much on one side, the sand pile will become lopsided, making it difficult to place the central leaf later. Keep the pile level.
Phase 3: The Green Reveal
The moment the Ice Blocks shatter is the most critical moment in the level. The strategy shifts from "Churning" to "Precision". You must stop pouring background colors immediately and assess the canvas. This phase requires you to switch your brain from high-speed clicking to calculated, deliberate taps to release the Green cups.
Phase 4: Corner Control
With the leaf placed, the final challenge is the corners. Dark Red is a high-contrast color that ruins the "soft" autumn vibe if it touches the center. The final phase is about surgical strikes—dropping Red sand only into the extreme corners of the screen.
Resource Management: The 0/5 Bar
A common failure point is running out of space. You have a 5-slot capacity on your conveyor belt. If you let this fill up, the game stops feeding you new cups, stalling your progress. Never let the bar sit at 5/5. If you are holding onto a cup, hoping to use it "later", you are likely hurting your overall flow.
The "Outside-In" Rule
Adopt the "Outside-In" mindset. Every action you take should prioritize the edges of the screen and the outer edge of the supply tray. Only when the edges are satisfied should you look inward. This applies to both the supply tray (breaking ice) and the canvas (filling corners).
Step-by-Step Walkthrough: The Action Plan
This section provides the exact sequence of actions required to beat the level. Follow these steps in order.
Step 1: The "Pulse" Start (Yellow & Orange)
Begin by rapidly tapping the Yellow and Orange cups located at the bottom of the supply tray (the 6 o'clock position). Do not worry about perfect placement yet. Your goal is to initiate the sand flow.
Use a "Pulse" tapping technique: tap, wait 0.5 seconds, tap again. This prevents the sand from clumping in a single mound and encourages a wider spread at the base of the canvas. Watch the Ice Block numbers drop. You want to see them go from 20 -> 19 -> 18 rapidly.
Step 2: Sweeping the Sides
Once the bottom row is cleared, move your attention to the Left (9 o'clock) and Right (3 o'clock) sides of the Outer Ring. Continue alternating between Yellow and Orange.
As you pour these side cups, the sand will begin to pile up against the sides of the screen. This is good. It creates a "bowl" shape that will help catch the Green leaf later. Keep an eye on the Red cups in the corners. If they pop up, grab them, but do not pour them yet. Hold them if you have space, or use them only if the background pile is high enough to reach the bottom corners.
Step 3: The Red Corner Setup
The Dark Red cups are tricky. They appear randomly in the Outer Ring. When you get a Red cup, look at your sand pile.
- Is the sand low? If the sand pile is only covering the bottom 20% of the screen, do not pour Red. It will bury itself in the middle and ruin the background.
- Is the sand high? If the pile has risen to cover 50% of the screen, pour the Red into the
. Aim for the "floor" of the level.
Step 4: The Ice Break (The Critical Pause)
Eventually, you will clear the specific cup that deals the final damage to the Ice Blocks. The screen will flash, and the Blue barriers will vanish. Stop tapping immediately.
This is the most common mistake players make: they keep tapping background colors out of habit. Take your finger off the screen. Assess the situation. Your canvas should be roughly 50% full of Yellow/Orange mix, with the bottom corners likely Red.
Step 5: Operation Green Leaf
Now, tap the newly exposed Green cups in the center. There are four of them. You need to pour them in a sequence that builds the stem and the leaf body.
Tap two Green cups quickly to build the central height. This creates the "stem" effect. Then, tap the remaining two Green cups slightly slower, allowing the sand to spill over the central yellow mound. This creates the "leaf" shape. The contrast of the Forest Green against the Golden Yellow is what solves the puzzle.
Step 6: The Background Filler
With the Green leaf placed in the center, you will likely have the top 20% of the canvas still empty (transparent). You will also likely have some residual Yellow/Orange cups on the belt.
Resume pouring Yellow and Orange to fill the upper background. Since the Green leaf is already in place and heavy, the new background sand will flow around it, tucking the leaf into the center of the composition.
Step 7: The Red Finale
The final step is filling the top corners. If you have any remaining Red cups, pour them now. The sand pile should be high enough that the Red sand flows directly into the top-left and top-right corners without touching the Green center. If you run out of Red cups, you may need to wait for the respawn mechanic to cycle them back in.
Color Order and Processing Guide
Not all colors are created equal in Level 140. Understanding the hierarchy of color processing is the difference between a chaotic mess and a masterpiece.
Priority Tier 1: Golden Yellow & Pumpkin Orange (70%)
These are your "Workhorse" colors. They make up the vast majority of the image. They are also your "Weapon" against the Ice Blocks. You should process these colors with almost zero thinking. Just tap and pour. The order between Yellow and Orange does not matter; they are visually interchangeable in the "Autumn Noise" texture of the background.
Priority Tier 2: Forest Green (20%)
This is your "Focus" color. It is the subject of the painting. However, it has the lowest processing priority in terms of timing. You must process it last (or rather, middle-last, just before the top background). It cannot be touched until the Ice Break happens.
Priority Tier 3: Dark Red (10%)
This is your "Utility" color. It is used sparingly for framing. Because it is so dark, it is visually "heavy". If you place it too early or in the wrong spot, it draws the eye away from the leaf. Process Red only when the specific corner slots are ready to receive it.
The "Color Collision" Risk
Be aware of how colors interact. Green falling on Red looks muddy. Red falling on Green looks like a bruise. You want clean separation: Red on the edges, Green in the center, Yellow/Orange as the buffer between them.
Timing the respawns
The game respawns cups in the Outer Ring after you clear them. If you focus too much on Green in Phase 2, the Outer Ring might respawn with all Reds, leaving you with no Yellow/Orange to finish the top background. Always keep a mental inventory of what is coming next.
The "Perfect Pour" Visualization
Imagine the canvas is a bucket. You fill the bottom 1/3 with Yellow/Orange. You place the Red stones in the corners. You place the Green "rock" in the middle. You fill the rest of the bucket with Yellow/Orange until the Green rock is buried up to its midpoint. This is the visual you are aiming for.
Common Mistakes and How to Avoid Them
Even experienced players fail Level 140 because of bad habits. Here is a checklist of errors to avoid.
The "Green Obsession" Trap
This is the #1 killer of runs. Players see the Green cups and want to use them because they represent the "main object". Resist the urge. Trying to force the Green early wastes time, clogs your slots, and is mathematically impossible due to the Ice Blocks. Ignore the Green until the game explicitly tells you (by breaking the ice) that you can use it.
The "Red Spill" Error
Using Red cups too early is fatal. If you pour Red when the sand pile is low, it lands in the center of the screen. Later, when you pour the Green leaf, it will sit on top of the Red spot, creating a dark, ugly blotch instead of a crisp yellow transition. If you accidentally spill Red early, you might as well restart the level immediately.
Slot Clogging (The 5/5 Deadlock)
Do not hoard cups. If you have a Red cup and the corners aren't ready, do not hold it for 30 seconds. If you fill your 0/5 bar, the conveyor stops. You stop breaking Ice. You stop progressing. If you have a cup you can't use, you must clear it (even if it means "wasting" it on a less-than-perfect spot) to keep the flow moving.
The "Speed Run" Panic
This level looks like it needs speed, but it needs rhythm. Tapping frantically causes you to misplace pours. A misplaced pour in the center with the wrong color forces a restart. Tap deliberately. Speed comes from smoothness, not from frantic energy.
Ignoring the Sand Physics
Sand piles up. It creates slopes. If you pour everything in the center, you get a pyramid. A pyramid is bad for this level (which needs a flat layer). You must pour from the sides to flatten the top of the sand pile. If you find the Green leaf is sitting too high or leaning to one side, you likely ignored the side-pours earlier in the level.
Abandoning the Level Too Early
If you make a small mistake (like a single pixel of Red in the wrong place), don't quit immediately. The "Pulse" tap method later in the guide can sometimes fix small errors. Only restart if the core structure (Green location or massive Red spill) is compromised.
Advanced Tips: Stuck Solutions & Speed Runs
So you know the basics, but you want to optimize? Here is the advanced tech for Level 140.
The "Pulse" Tap Method (Surgical Repair)
If you reach the end of the level and have 98% completion but are missing a single pixel in a corner, do not pour a full cup. A full cup will overfill the area. Instead, use the "Pulse" method. Tap the cup for a split second and release. Watch the sand fall. Repeat. This allows you to drop individual grains of sand into tiny holes without flooding the neighborhood.
Speed Run Strategy: The "Side-Swipe" Technique
For players aiming for the leaderboard, the bottleneck is the Ice Breaking phase. To optimize this, do not tap cups one by one. Wait for two cups of the same color (e.g., two Yellows) to be adjacent on the belt. Tap them in rapid succession.
This "Side-Swipe" creates a heavier stream of sand that builds the background pile faster and clears the belt slots faster, allowing new Ice-Breaking cups to spawn sooner. This can shave 10-15 seconds off your time.
What to Do If You Get Stuck at 80%
If you are stuck with a mostly full screen but the level won't end, check the top corners. The "Dark Red" requirement is often the culprit. Players often fill the bottom corners but forget the top ones. If your sand pile isn't high enough to reach the top corners, you need to pile more Yellow/Orange into the center to raise the "water level" of the sand, allowing the Red to flow into the top corners.
The "Reset" Maneuver
If you realize you have completely messed up the color order (e.g., Green is at the bottom), don't wait for the timer. The "Retry" button is your friend. Level 140 is short. A bad run is rarely fixable. Recognizing a failure state early (within the first 10 seconds) saves more time in the long run than trying to salvage a broken canvas.
Mental Fatigue Management
Level 140 requires high focus. The "Grind" to break the ice is hypnotic and it is easy to go "brain-dead" and just tap. This is when mistakes happen. If you feel your focus slipping, take a breath after the Ice Breaks. The transition from Phase 1 to Phase 2 is where 90% of errors occur. A conscious reset of your attention here guarantees the win.
Pre-Level Visualization
Before you hit "Start", close your eyes for two seconds. Visualize the Ice breaking. Visualize the Green cup appearing. If you start the level with this image in your mind, you are less likely to panic when the Ice Blocks don't break immediately. You know it is coming, so you can focus on the process, not the result.