
Level 155
HARDHow to solve Sand Loop level 155? Get instant solution for Sand Loop 155 with our step by step solution & video walkthrough. Sand Loop 155 tips and guide.
Play Sand Loop Now
Experience the puzzle challenge firsthand
Game Screenshots
Sand Loop Level Guides
Level Overview: The White Rabbit Challenge
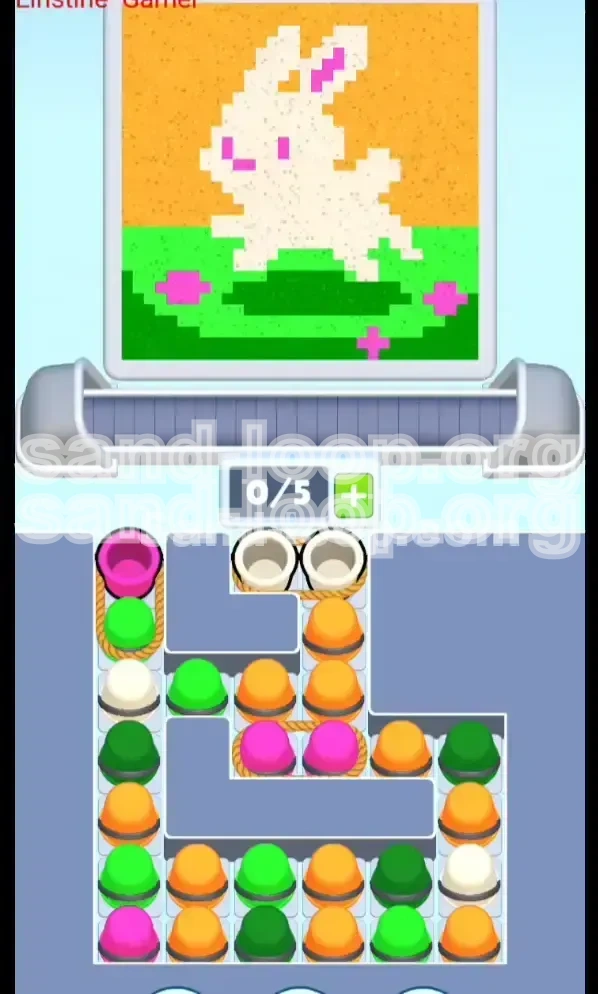
Welcome to the comprehensive walkthrough for Sand Loop Level 155. This stage presents a deceptively complex logic puzzle disguised as a cute pixel-art scene featuring a White Rabbit in a grassy field. While the artwork suggests a simple pastoral scene, the underlying mechanics are strictly governed by stringent inventory limits and tricky rope physics.
The primary difficulty in this level stems from the "Roped Cup" mechanic. Unlike standard levels where you can freely pull from the tray, Level 155 ties critical colors together. This forces you to manage your conveyor belt slots with extreme precision. With only 5 slots available and some pulls taking up 2 slots at once (40% of your capacity), one wrong move can jam your belt and force a restart. Furthermore, the sheer volume of the Orange background creates a supply bottleneck that must be managed carefully to prevent blocking the flow of essential detail colors.
The Core Challenge: Slot Management
The defining feature of this level is the strict 0/5 slot capacity limit. In many levels, you can get away with being slightly disorganized, but here, the game forces you to be methodical. The presence of roped pairs—specifically the White-White and Pink-Pink combinations—means that pulling a single color effectively consumes double the resources. If your belt has 3 cups on it and you pull a roped pair, the belt will jam because the total (5) exceeds the remaining open slots. This mechanic turns the level into a logic puzzle about ordering and timing rather than just reflex.
Visual Breakdown: Layer Analysis
To succeed, you must view the image as a series of stacked layers, not just a drawing. The bottom layer is the massive Orange sky. The middle layer consists of the Green grass and Dark Green shadows. The top layer is the White rabbit and Pink details. Because sand physics work by piling material on top of existing material, you generally need to pour background elements first. However, due to the rope entanglement at the top of the tray, accessing the background colors requires solving the "gatekeeper" puzzle first.
The Rope Mechanic Explained
The supply tray in this level is rigged. The two White cups at the top center are tied together with a strong knot. Directly beneath them, two Pink cups are also tied. This creates a vertical dependency column. You cannot access the deeper cups in the stack until these roped pairs are cleared. Since White is a primary color for the Rabbit, you are forced to pull these bulky pairs early, which fills your belt rapidly. You must plan your pulls so that these large pairs arrive when your belt is completely empty to maximize throughput.
Supply Distribution Risks
There is a heavy imbalance in the color distribution. The Orange cups, needed for the sky, are numerous and located deep in the "L" shape of the tray. If you focus solely on clearing the top ropes first, you risk flooding your belt with Orange cups later, leaving no room for the vital Green and Pink cups needed for the foreground details. Balancing the flow of Orange background sand with the precise application of the Rabbit's details is the key strategic decision you will face.
Why Speed is Not the Answer
Attempting to "speed run" this level by tapping furiously will result in an immediate failure. The game's physics engine cannot process the volume of sand if you dump all the Orange cups at once while trying to place Pink pixels. The nozzle requires time to traverse the canvas for detailed work. Therefore, this guide emphasizes a slow, rhythmic approach: Pull, Pour, Clear, Repeat. Patience is your greatest asset in the White Rabbit challenge.
Clear Objectives and Goals
Before you make your first move, understand the specific win conditions for Level 155. You are not just filling a canvas; you are managing a logistical pipeline.
Objective 1: Decode the Pour Order
Your primary goal is to establish the correct fill order. Based on the layer analysis, the ideal sequence is:
- Step 1: Establish the Light Green grass base.
- Step 2: Add the Dark Green shadow depth.
- Step 3: Construct the White Rabbit body.
- Step 4: Apply Pink details (Ears, Eyes, Flowers).
- Step 5: Flood the background with Orange.
Objective 2: Clear the "Gatekeeper" Ropes
You must successfully remove the top-center White and Pink roped pairs without jamming your conveyor belt. This requires creating a "window of opportunity" where your belt has 0 or 1 slots open exactly when these pairs become available. Failing to clear these blocks the rest of the tray, stopping the flow of Orange cups needed for the sky.
Objective 3: Maintain Slot Flow
You must keep at least 2 slots open on your conveyor belt at all times to accommodate the roped pairs. If you let the belt fill up with 4 or 5 single cups, you become unable to pull the critical White or Pink pairs when they surface. The goal is to keep the fluid dynamic of the belt moving, ensuring no bottlenecks occur.
Objective 4: Precision Detailing
You must successfully place the Pink flowers and Rabbit eyes. These are small targets. If you pour Green or White over these areas too aggressively, or if the nozzle is moving too fast, you will "paint over" these pixels, resulting in a failed level. The goal is to reserve Pink cups for the very end of the detailing phase so they sit on top of the existing layers.
Objective 5: The Orange Flood
After the details are set, you must clear the remaining tray, which will be mostly Orange. The objective here is efficiency—pouring the massive volume of background sand without accidentally spilling remnants of other colors into the sky area.
Step-by-Step Walkthrough
Follow this exact sequence of actions to beat Level 155. Deviating from this order increases the risk of a jammed belt or a misplaced pixel.
Phase 1: The Initial Setup and Left Flank
At the start of the level, do not touch the center. Your eyes must be on the far left column of the supply tray.
Action 1: Identify the Pink cup located at the very top left of the tray. It is often looped with a Green cup or sitting above a stack. Tap this Pink cup first. Why? Because the Pink flowers are the smallest details in the grass. Getting this cup on the belt early ensures you don't forget it, and it clears the way for the Green cups behind it.
Action 2: Immediately pull the Light Green cups from the left column. You need these to start filling the bottom portion of the canvas (the grass). Move the nozzle to the bottom center and begin pouring the Green base. Do not fill it to the top yet; leave room for the Dark Green shadows.
Phase 2: Managing the "L" Shape and Orange
Once the left column is cleared, the right side (the "L" shape) becomes accessible.
Action 3: Begin pulling Orange cups from the right edge. Even though the sky is at the top, pouring a bit of Orange early helps establish the boundaries. However, be very careful: do not let the Orange cups dominate your belt yet. Pull only one or two, pour them into the upper corners, and then stop.
Action 4: Check your belt count. You should have 2 or 3 slots open. This is the safety buffer you need before attempting the next phase.
Phase 3: The White Rabbit Rope Pair
This is the most critical moment in the level. Look at the top center of the tray.
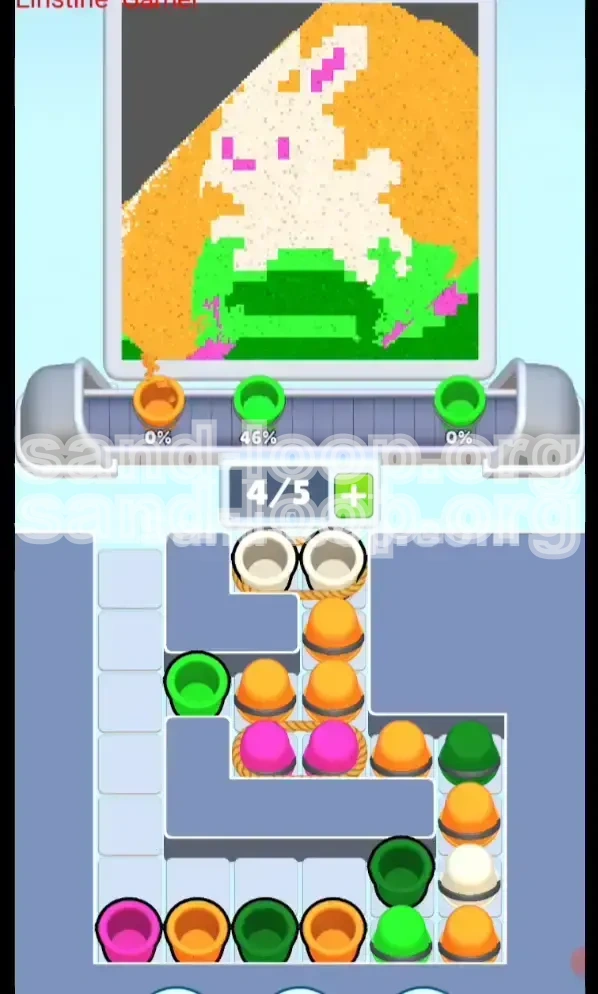
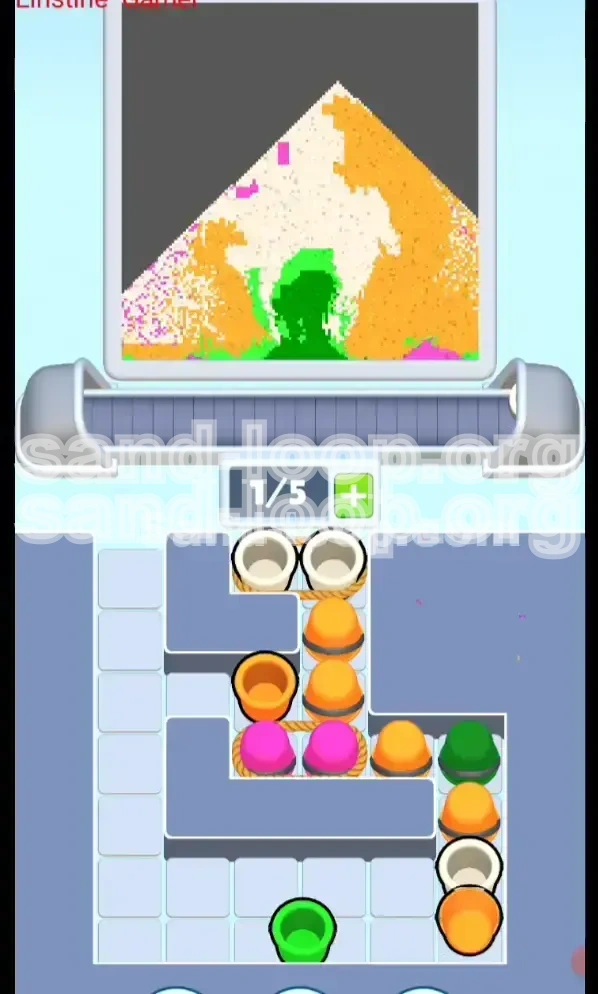
Action 5: Wait until your conveyor belt is nearly empty (1 cup or less). When you are ready, tap the two White cups that are tied together at the top. They will slide onto the belt as a pair.
Action 6: Immediately move the nozzle to the center of the canvas. The Rabbit's body needs to be built on top of the grass you poured earlier. Pour the White sand. Since these are large cups, they provide a heavy volume of sand, which is perfect for building the body up quickly. Ensure you shape the sand into a rabbit-like mound, keeping the bottom wider than the head.
Phase 4: The Pink Detail Pair
Directly below the White cups you just pulled, you will find two Pink cups tied together.
Action 7: Again, ensure you have space. Tap the Pink pair. These are for the Rabbit's ears, eyes, and the finer flower details.
Action 8: With the nozzle still hovering over the White rabbit, pour the Pink sand. Target the top of the white mound for the ears, and the center for the eyes. Because you are pouring Pink onto fresh White sand, it will adhere perfectly. If you wait too long, the White sand might settle or you might run out of belt space.
Phase 5: The Dark Green Shadow
Now that the rabbit is formed, you need to ground it.
Action 9: Look for the Dark Green cup (distinguishable from the Light Green by its hue). Pull it when available.
Action 10: Pour the Dark Green sand strictly at the base of the White rabbit, where it meets the Light Green grass. This creates the shadow effect. Be precise—do not let this dark sand touch the rabbit's body, or it will look like dirt.
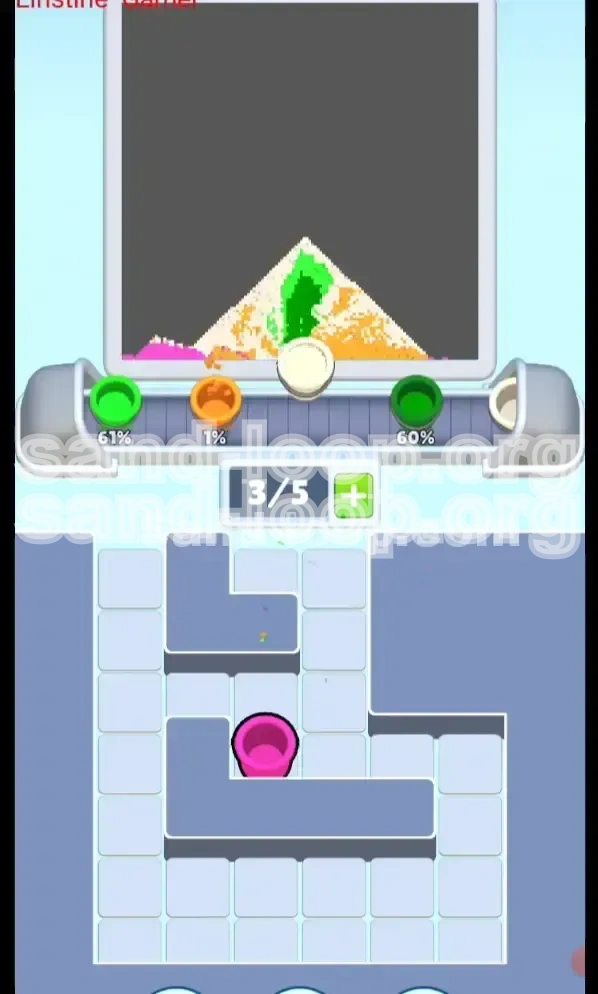
Phase 6: The Great Orange Flood
With the details complete, the rest of the tray is yours to clear.
Action 11: Aggressively pull the remaining Orange cups. The sky takes up the top 60% of the image. Move the nozzle to the top left and pour continuously, moving across the screen to the right. Since all detail work is done at the bottom, you can be fast and loose here.
Action 12: Finish the level by pouring any remaining cups. Ensure the grass is fully covered where needed and the sky is solid orange. Check for any "holes" in the orange background and patch them with the final cups from the tray.
Key Tips and Strategic Notes
Here are advanced strategies to ensure a 100% completion rate. These tips address the specific physics and UI quirks of this level.
The "Empty Belt" Rule
Memorize this rule: Never pull a roped pair unless you have 3 or more empty slots. Since a roped pair counts as 2 items, pulling them onto a belt with 3 existing items (Total = 5) leaves you with zero room to maneuver. If you need to pull a single cup afterwards to unblock the tray, you will be stuck. Always aim to pull roped pairs when the belt count is 0 or 1.
Visualizing the Stacking Order
Sand Loop physics dictates that the last color poured sits on top. This is why Pink (details) must be poured last, or at least after White. If you pour Pink first and then cover it with White, the Pink details will disappear. Always prioritize "Background" -> "Mid-ground" -> "Foreground" colors in your logistical planning, even if the supply tray offers them in a different order.
Handling the Orange Volume
Do not fear the massive stack of Orange cups. They are the "filler" material of this level. The only danger they pose is clogging the belt so you can't get to the Whites and Pinks. If you see the belt filling up with Orange, stop pulling them. Switch to the Green or Pink stacks to drain the belt, then return to the Orange. It is a balancing act between two different supply piles.
Nozzle Discipline
Keep your nozzle moving. When pouring the White rabbit, do not hover in one spot too long, or the sand will pile up into a tower rather than a body. Use gentle side-to-side motions to shape the sand. When pouring the Orange sky, you can use faster, sweeping motions to cover the large area quickly.
The "Reset" Safety Net
If you realize you have made a mistake—for example, you poured Pink before the White and it's now buried—do not try to fix it by digging. Sand is hard to remove once placed. It is usually faster to manually restart the level (or hit the reset option if available) and apply the correct order from the start. A clean restart is better than a messy struggle.
Recognizing the "L" Jam
Sometimes, the cups in the "L" shape reserve (bottom right) can get stuck if the top knots aren't cleared. If you tap an Orange cup and it doesn't move, it means the ropes above it are creating a physical block in the tray physics. You must clear the White and Pink ropes first to "unlock" the Orange column.
Common Mistakes to Avoid
Learning what not to do is just as important as learning the correct steps. Here are the pitfalls that trap most players on Level 155.
Mistake 1: The "Slot Lock" Jam
This is the number one cause of failure. Players tap the roped White pair when the belt has 3 cups already on it. The pair arrives, bringing the total to 5. The belt is now full. However, because the White pair is tied, it behaves as a single unit in some calculations or simply blocks the flow. If you then need to pull a Green cup to finish the grass, you can't. The belt is full, and the game won't let you pull. You are now deadlocked.
Mistake 2: Burying the Pink Flowers
The Pink flowers in the grass are tiny targets. A common error is pouring the large volume of Light Green grass after pouring the Pink flowers. Green sand is heavy and will flow over the light Pink sand, burying it completely. Always pour your Green base first, place the Pink, and then stop pouring Green near the Pink areas.
Mistake 3: Confusing Dark and Light Green
The tray contains both Dark Green (Shadow) and Light Green (Grass). In the heat of the moment, it is easy to grab a Dark Green cup thinking it is Light Green. If you pour Dark Green over the main grass area, your rabbit will look like it's sitting in a dark swamp rather than a sunny field. Always double-check the cup shade before pulling.
Mistake 4: Ignoring the Rope Sequence
Some players try to bypass the roped pairs by pulling single cups from the sides. While this seems safe, it leaves the dangerous pairs in the tray. Eventually, you will have to pull them. If you wait until the very end of the level to pull the White pair, you might not have enough room on the canvas to pour the White Rabbit properly because the Orange sky might already be encroaching on that space.
Mistake 5: Over-pouring the Sky
Since Orange is abundant, players often start pouring the sky too early. If the Orange sand spills down into the Rabbit's area before the Rabbit is formed, you will have to bury the Rabbit in Orange to make it disappear, then rebuild it. This wastes massive amounts of time and sand. Keep the Orange high up on the canvas until the Rabbit is fully rendered.
Solutions for When You Are Stuck
If you are in the middle of the level and feel like nothing is moving, or if you have messed up a step, use these troubleshooting solutions.
Solution 1: The Belt is Full and Won't Move
Problem: You have 5 cups on the belt, and the next cup you need is stuck in the tray.
Fix: You must clear space immediately. Look at the cups on your belt. Is there a color you absolutely don't need right now? Perhaps an extra Orange cup? If so, you have two choices: 1) Pour it into a "disposal" area of the canvas (a corner you plan to cover up later), or 2) If the game allows, drag the cup off the belt to discard it. Usually, you must pour it. Pour it quickly in a safe spot to free up the slot.
Solution 2: The Rabbit Looks Like a Blob
Problem: You poured the White sand, but it just looks like a messy pile, not a Rabbit.
Fix: This is a shaping issue. Use the nozzle to cut into the sand. If you pour White sand in a focused circle, it builds height. Pour the body wider, then lift the nozzle slightly to build the head higher. If it's already messed up, pour the Pink eyes and ears in the correct relative positions (e.g., eyes on the side of the heap). The visual cues of the eyes can define the shape even if the sand pile is imperfect.
Solution 3: Trapped Ropes
Problem: You tapped the White pair, but only one came out, or they didn't move at all.
Fix: This indicates a glitch in the rope physics or a physical blockage. Usually, it means the tray hasn't "settled." Stop tapping for 2 seconds. Let the cups settle. Then, tap the very center of the rope connecting the two cups. Tapping the cup itself might register as a single pull attempt; tapping the rope ensures you are pulling the pair.
Solution 4: Ran Out of Green
Problem: You poured the grass, but it's not high enough, and you are out of Green cups.
Fix: You can use the Dark Green to extend the height of the grass, but only at the very bottom edge where the shadow is. Alternatively, if the Orange sky hasn't been poured yet, you can accept a lower grass line and just make the Rabbit smaller to fit. Adapting the art to the available sand is a valid strategy if you run short.
Solution 5: "Ghosting" Colors
Problem: You poured a color, but it disappeared or looks transparent.
Fix: This usually happens when you pour a thin layer over a contrasting color. If you pour Pink over White, it needs to be thick enough to be seen. If the Pink stream is too thin, the White shows through, making it look light pink or white. Slow down the pour speed (or pause momentarily) to let a heap of Pink build up so the color is vibrant.
Speed Run Tips and Optimization
Once you have beaten the level and want to achieve a faster time (3 stars or speed run goals), you can optimize the standard walkthrough.
Tip 1: Pre-Loading the Pink Pair
In the standard guide, we advise clearing the belt. For a speed run, try to pull the Pink pair just before you finish the last Green cup. As the last Green sand is falling, tap the Pink pair. This way, the Pink cups are traveling down the conveyor belt while you are still occupied with the previous color. This shaves seconds off your clock.
Tip 2: Bulk Pouring the Sky
Instead of pouring the Orange sky in small segments, wait until you have 3 or 4 Orange cups on the belt. Then, move the nozzle to the top left corner and lock it in place. Let the cups pour one after another without moving the nozzle. This builds a massive pyramid of Orange sand that you can then quickly spread to the sides. It is much faster to pour in bulk than to move the nozzle for every single cup.
Tip 3: Ignoring Minor Details
Perfectionism is the enemy of speed. If a flower is slightly misshapen or the shadow is a bit lopsided, keep moving. The game's pass condition is usually generous. As long as the color blocks are roughly in the right place (e.g., White in the middle, Green at the bottom), the level will clear. Don't waste time fixing pixel-perfect errors.
Tip 4: The "Tap and Drag" Shortcut
If the game interface allows it, drag from one cup to the next instead of tapping individual buttons. For example, if you need to pull three Orange cups in a row, a quick swipe across all three is faster than three distinct taps. This is particularly useful for clearing the "L" shape reserve at the end of the level.
Tip 5: Nozzle Movement Optimization
Minimize the distance your nozzle travels. When filling the Rabbit, go from the body to the ears in one smooth motion. Don't jump back and forth. Plan your path: Start at the bottom (Grass), move up to the middle (Rabbit Body), move to the top (Ears/Eyes), and then jump to the top left (Sky). Following a logical spatial path reduces travel time.