
Level 158
HARDHow to solve Sand Loop level 158? Get instant solution for Sand Loop 158 with our step by step solution & video walkthrough. Sand Loop 158 tips and guide.
Play Sand Loop Now
Experience the puzzle challenge firsthand
Game Screenshots
Sand Loop Level Guides
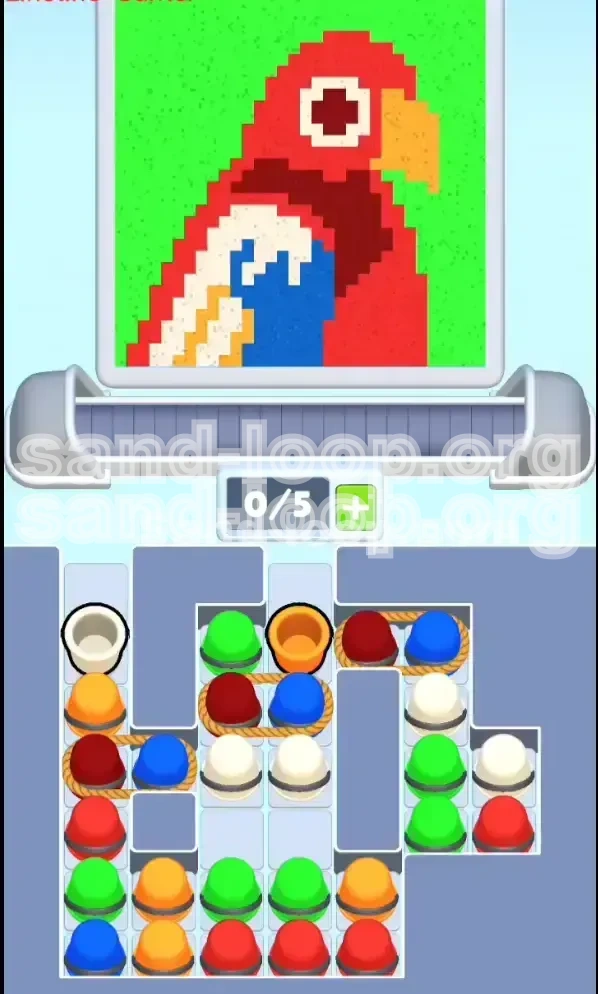
Level 158 Overview: The Parrot Puzzle
Welcome to Level 158 of Sand Loop, commonly referred to by players as "The Parrot Challenge." This stage marks a significant spike in difficulty, shifting the focus from simple color matching to resource management and spatial logic. Unlike previous levels where you could simply pick up any color available, Level 158 introduces a restrictive mechanic: Roped Pairs.
In this level, you are tasked with filling a vibrant pixel-art illustration of a parrot. The visual complexity is high, featuring distinct color zones that bleed into one another. The primary challenge lies not in the speed of your reflexes, but in the capacity management of your 5-slot conveyor belt. With the introduction of tethered buckets, you are forced to accept "junk" colors to get the ones you need, potentially clogging your workflow and ending your run prematurely.
The Core Mechanics
The defining feature of this level is the "Roped Pair" mechanic. You will notice that several Red buckets are tied to Blue buckets. This creates a forced dependency: you cannot take the Red without also taking the Blue. Since Red is a primary color for the Parrot's body and Blue is only a minor accent color, these Blue buckets essentially act as space-wasters. If your conveyor belt is full, attempting to pick up a Roped Pair will result in a blockage, costing you precious time or causing a game over.
Visual Breakdown
The canvas is divided into specific color zones with distinct boundaries. The background is a large Green area, while the Parrot itself dominates the center with Red body feathers. The difficulty comes from the fine details—the White eye patches, the Orange beak, and the Blue wing tips—which are surrounded by contrasting colors. A single slip of the finger can pour Green into the Red body, creating a mess that is difficult to correct.
Belt Management
Your conveyor belt only has five slots. In this level, those five slots are your most valuable resource. You must constantly maintain at least two empty slots to accommodate the Roped Pairs. If you find yourself with 4/5 slots full, you must prioritize pouring immediately before you can interact with any more buckets in the tray.
Why It’s Difficult
The "Sand Loop" aspect of this game means you are constantly rotating colors. The difficulty in Level 158 stems from the specific arrangement of the tray. The colors you need most (Red and Green) are buried under layers of colors you need less (Blue and White). You have to perform a delicate dance of clearing the top layer to reach the bottom layer without flooding your belt with unusable colors.
Success Metrics
To clear this level efficiently, you need to aim for a completion rate of 100% with minimal spillage. A successful run typically involves filling the Red body first (approx. 40% of the canvas), followed by the Green background (approx. 35%), and finishing with the details (approx. 25%). Failing to prioritize the Red body early often leads to being stuck with unusable Blue buckets at the very end.
Clear Objectives: Your Mission Goals
Before you even tap the first bucket, you need a clear plan of attack. Randomly tapping colors will result in a jammed belt and a failed level. Your primary goal is to manage the flow of traffic on your conveyor belt while systematically filling the pixel art from the largest color blocks down to the smallest details.
Establish the Red Base
Your first and most critical objective is to secure and pour the Red color. The Parrot's head and body are the largest single-color blocks in the puzzle. Establishing this base early anchors the rest of the level. If you delay taking Red to chase small details like the beak, you risk filling your belt with garbage colors that prevent you from picking up the necessary Red buckets later.
Clear the "Junk" Colors
White and Orange are secondary colors in this level. While necessary for completion, they are dangerous in large quantities. Your objective regarding these colors is to treat them as "fillers." Use them to fill the small gaps only when you have a spare slot on the belt, but never prioritize them over Red or Green. Do not let them accumulate on the conveyor.
Handle the Tethers
You must accept the Roped Blue buckets as a "tax" for getting Red. Your objective is to mitigate the impact of these unwanted Blue buckets. This means strategically dumping the Blue color onto the canvas in a safe zone (the wing tip) or, if necessary, allowing the bucket to fall off the end of the belt without pouring if it risks contaminating a large color block.
Background Green Filling
The Green background covers the corners and edges of the canvas. Your objective is to save the bulk of Green pouring for the mid-to-late game. Green is useful for "cleaning up" the belt because it covers a large area and is forgiving if you slightly overshoot. However, be careful not to pour Green while the Parrot's beak (Orange) is still empty, as the Green background borders the beak directly.
Precision Finishing
The final 10% of the level is purely about precision. You will likely be left with a messy mix of single buckets. The objective here shifts from management to accuracy. You must time your pours perfectly to hit the remaining pixels without spilling over into adjacent colors. Patience is key here; wait for the bucket to align perfectly under the target zone.
Step-by-Step Walkthrough: The Action Plan
This section provides a turn-by-turn guide on how to navigate the tray and canvas. Follow these steps in order to maximize your chances of success.
Phase 1: The Tray Clear
At the start, the tray is cluttered with single White and Orange buckets blocking access to the good stuff below.
- Step 1: Immediately tap the White bucket located at the top-left of the tray. This clears the first column.
- Step 2: Tap the Orange bucket located in the top-center.
- Step 3: Tap the Green bucket situated near the top-right.
- Result: Your conveyor belt should now have 3 distinct items (White, Orange, Green). This opens up the physical space in the tray to reveal the Roped Pairs underneath. Do not pour these yet unless you have a direct target ready.
Phase 2: The Red Extraction
Now that the top layer is gone, you see the Roped Red/Blue pairs.
- Step 4: Locate the Roped Pair (Red + Blue) in the center column. Ensure you have at least 2 empty slots on your belt (or make space by pouring the White/Orange you just picked up).
- Step 5: Tap the Roped Pair. Both Red and Blue will load onto the belt.
- Step 6: Maneuver the belt so the Red bucket is under the nozzle. Pour it over the Parrot's head and body. This is your primary color.
- Step 7: With the Red poured, you are left with the Blue bucket. Move the belt so the Blue bucket is over the small Blue wing patch. If the alignment is risky, it is better to discard the Blue bucket than to spill it on the Red body.
Phase 3: Green Mining
With the Red body established, look for Green buckets to clear the background.
- Step 8: Scan the tray for the Green columns revealed in the middle and bottom rows.
- Step 9: Load 2-3 Green buckets onto the belt. Green is safe because the background is large and connected.
- Step 10: Pour Green into the top-left and top-right corners of the canvas. This clears the belt space completely.
- Step 11: Use the empty belt space to dig out any remaining Red buckets buried at the very bottom of the tray.
Phase 4: Detail Work
You are now in the cleanup phase. The main colors are done.
- Step 12: Look for the White buckets remaining. These are needed for the eye and facial markings.
- Step 13: Load a single White bucket. Pour carefully into the White pixel area. Avoid the Red surrounding it.
- Step 14: Retrieve the final Orange bucket. This is for the beak.
- Step 15: Align the Orange bucket precisely over the beak. Pour. The beak borders Green and Red, so accuracy is critical here.
Phase 5: The Final Sweep
Check the canvas percentage.
- Step 16: If you are at 95-98%, you likely have single-pixel gaps.
- Step 17: Do not pick up new pairs. Pick up single buckets to fill these tiny gaps.
- Step 18: If a stray Blue bucket remains and you have no Blue pixels left, let it pass through the belt without pouring to clear the tray.
Color Order Strategy: The Logic of Filling
The order in which you fill the colors is not just a suggestion; it is a necessity for Level 158. Filling colors in the wrong order is the number one cause of failure.
Priority 1: Red (The Anchor)
Red occupies approximately 40-45% of the canvas. Because it is the largest contiguous block, it acts as the anchor for the entire image. Furthermore, the game mechanic forces you to pick up Red (tied to Blue). Since you are forced to interact with Red frequently, you must pour it immediately to keep your belt empty. If you save Red for last, your belt will be perpetually clogged with Blue buckets you have no use for.
Priority 2: Green (The Background)
Green is the "dump" color. It covers about 35% of the canvas but is mostly in the background. You fill Green second because it is forgiving. It touches the edges of the screen, meaning you have more room for error when pouring. You also use Green to clear your belt. If you have a mixed belt and need to pour something to make space, Green is the safest bet because overshooting slightly usually just hits more background.
Priority 3: Orange (The Beak)
Orange is a high-risk color. It covers less than 10% of the canvas but is situated right in the center, sandwiched between Red and Green. You must fill Orange carefully. If you fill Green too aggressively before the Orange beak is done, you will cover the beak pixels and have a very hard time fixing it later. Fill Orange only when you have a clear belt and can focus on precision.
Priority 4: White (The Details)
White is for the eye and small wing feathers. Like Orange, it is a detail color. It should be done mid-game, after the main Red body is established, but before you get too aggressive with the Green background. The White eye is surrounded by Red, so doing it while the Red is still "fresh" in your mind helps with precision.
Priority 5: Blue (The Tax)
Blue is the lowest priority. It is a minor detail on the wing. Because you are forced to pick it up with Red, you will have it on your belt often. However, you should only pour it when you have a clear shot at the wing patch. If you have no immediate use for Blue, discard it. Never hold onto a Blue bucket hoping to use it "later"—it takes up valuable space needed for Red and Green.
The "Sand Loop" Cycle
In Level 158, the optimal flow is: Load Red/Blue Pair -> Pour Red -> Dump/Use Blue -> Load Green -> Pour Green -> Repeat. Following this cycle ensures that you are constantly churning the belt, preventing the "jammed" state where you have 5 buckets but none of them are useful for the remaining empty pixels.
Key Tips and Common Mistakes
Even with a strategy, small errors can compound in Level 158. These tips are designed to help you avoid the pitfalls that trap most players.
Mistake: The "Full Belt" Trap
The most common way to lose this level is by tapping a Roped Pair when your belt has 4/5 slots filled. The game will try to add two items (Red + Blue) but only has space for one. This causes a blockage that can take seconds to clear, ruining your flow. Always count your slots before tapping a tethered pair. If you have 3 or more items, pour something first.
Mistake: Green Overspill
Players often get frustrated with the Roped Pairs and start spamming Green to clear the belt. This leads to "Green Overspill," where you accidentally paint the Green background over the Parrot's Beak or Face feathers. Since the Beak is small and bordered by Green, one misaligned Green pour can wipe out the Beak pixels, forcing you to redo them with Orange later.
Tip: Use the "Skip" Mechanic
Did you know you don't have to pour every color? If you pick up a Roped Pair and you pour the Red, but the Blue bucket aligns perfectly over your Red body, do not pour it. Let the Blue bucket travel to the end of the belt and drop off. It is better to lose a single color pixel (which might auto-fill later) than to contaminate a huge Red section with Blue.
Tip: Pre-Positioning
Don't wait until the bucket is under the nozzle to decide where it goes. As the bucket is moving from the tray to the belt (or moving along the belt), look at the canvas. Identify the target zone immediately. If you wait until the last second, you might panic and pour in the wrong spot. For the Red body, you can be loose. For the Beak, you must be tight.
Tip: Tray Scanning
Keep your eyes on the tray, not just the canvas. While a bucket is pouring, scan the tray to see what is becoming available. If you see a Red bucket becoming uncovered, plan your next move to grab it. If you see the tray is about to force a Blue bucket on you, check your belt capacity immediately.
Mistake: Ignoring the Small Pixels
Some players focus so hard on the Red body that they leave the single-pixel details (like the eye glint) for the very end. This is risky because single pixels require a specific color bucket to be isolated on the belt. If you have 4 random colors on the belt and need one specific White pixel, you might not have the belt space to fetch that White bucket. Try to clear small details when you naturally have the correct color on the belt.
Solutions and Speed Run Tips
For those looking to optimize their time or struggling to break a deadlock, these advanced strategies will help.
What to Do When Stuck
If you are stuck with a belt full of colors you don't need (e.g., you have Blue and White, but need Red), do not panic-pour. Instead, identify the "least harmful" color to pour. Usually, this is Green. Pour Green into the background to free up a slot. Then, use that slot to pick up a Roped Pair. You might have to cycle through a few bad buckets to get to the good ones.
Speed Running: The Two-Bucket Rule
For speed runners, the key is minimizing belt movement. Try to group your pours. If you have two Green buckets on the belt, don't pour one, move the canvas, and pour the other. Pour the first one, then immediately slide the canvas to the second Green zone and pour the second one while the animation is still settling. Keeping the flow continuous is faster than stop-start.
The "Body-First" Shortcut
Ignore the beak and eye completely for the first 30 seconds of the level. Pretend they are not there. Focus 100% of your energy on filling the Red Body and Green Background. These two colors account for 80% of the level. Once those are solid, you can slow down and take your time with the details. Trying to alternate between Body and Details is slow and inefficient.
Handling the Roped Pairs Fast
When you tap a Roped Pair, the Red bucket is usually positioned first or second on the belt. To speed up, tap the pair, and as soon as it hits the belt, tap the pour button if the nozzle is already over a Red zone. You don't need to wait for the bucket to stop moving completely if your timing is good. This "pour on the fly" technique saves milliseconds that add up over the level.
Final Completion Strategy
When the level is at 95% complete, stop picking up pairs. Picking up a pair gives you two items, but you likely only need one specific color. Look for single buckets in the tray corners. If no singles are available, you must pick up a pair, pour the color you need, and deliberately dump the other color off the end of the belt to keep your slots open for the final few pixels.