
Level 165
HARDHow to solve Sand Loop level 165? Get instant solution for Sand Loop 165 with our step by step solution & video walkthrough. Sand Loop 165 tips and guide.
Play Sand Loop Now
Experience the puzzle challenge firsthand
Game Screenshots

Sand Loop Level Guides
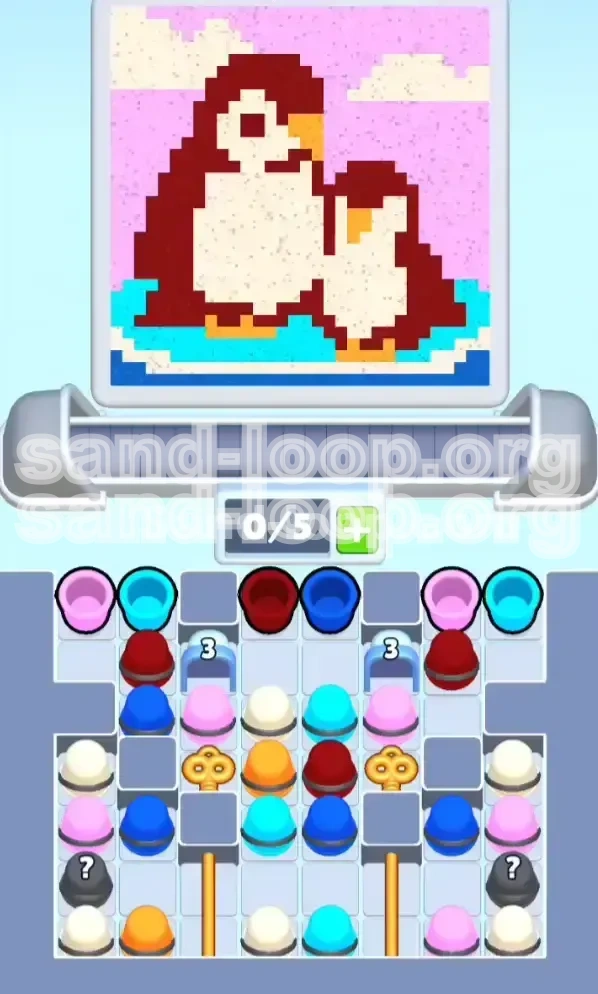
Level Overview: The "Penguin Pair" Challenge
Welcome to the comprehensive walkthrough for Sand Loop Level 165, a stage defined by deceptive simplicity and logistical bottlenecks. At first glance, the target image—a charming Parent and Child Penguin on an ice floe—appears to be a standard coloring task. However, this level is classified as a high-difficulty "Key Unlocking" scenario.
The primary challenge here is not the artistic complexity, but the inventory management. The level introduces a severe scarcity of Orange paint, which is critical for the final details (beaks and feet). These essential Orange cups are locked behind Golden Bars in the bottom rows of the tray. To access them, you must first navigate a congested conveyor belt to retrieve two Golden Keys buried in the middle sections.
Players often fail here because they treat it like a standard painting level. If you focus solely on filling the large empty spaces (the Sky and Penguin Bodies) without prioritizing the excavation of the keys, you will run out of conveyor space (slots) and enter a deadlock state. This guide will break down the precise order of operations to ensure you clear the path, unlock the bottom layer, and finish the art without running out of moves.
Core Level Mechanics
Understanding the underlying mechanics of Level 165 is crucial for success. Unlike previous levels where paint flows freely, this stage is governed by a strict dependency chain. You cannot access the finish line (Orange details) until you have completed the mid-game puzzle (Key retrieval).
The Grid Layout Analysis
The grid is divided into three distinct horizontal zones. The Top Zone contains your primary fill colors (Pink and Dark Red). The Middle Zone is the "Choke Point," housing the Golden Keys trapped under debris. The Bottom Zone is the "Treasure Chest," containing the locked Orange and Cyan cups behind golden bars. You must clear the top to free the middle, which then unlocks the bottom.
The Slot Management Crisis
You are limited to 5 active slots on your conveyor belt. In this level, the belt is constantly flooded with "filler" colors like Pink. If you fill all 5 slots with Pink early on, you cannot load the Golden Keys when they become available. You will be forced to waste Pink on already-colored areas, which is inefficient and dangerous.
The Color Dependency Chain
The level operates on a linear logic: Dark Red -> Pink -> Golden Keys -> Cyan -> Orange. Skipping steps or prioritizing the wrong color (e.g., going for Cyan too early) will physically block the keys from loading onto the belt. You must adhere to this hierarchy to keep the conveyor moving.
Clear Objectives: What You Need to Achieve
To beat Level 165, you need a shift in mindset. You are not just "painting by numbers"; you are managing a supply line. Your objectives must be followed in a strict sequence to avoid getting stuck.
Objective 1: Break the "3" Ice Gates
Your immediate first goal is to shatter the blue numbered gates marked with a '3'. These gates are positioned on the left and right sides of the tray. While they don't hold paint, they obstruct the flow of cups. Breaking them early expands your "elbow room," allowing cups to slide more freely and preventing bottlenecks that can trap the Golden Keys.
Objective 2: Excavate the Golden Keys
Do not focus on perfecting the penguin art yet. Your priority is to dig through the layers of Blue and Red cups in the middle rows to reveal the two Golden Keys. These keys are the most valuable items on the board. Without them, the bottom row of Orange cups remains permanently locked, making the level impossible to finish.
Objective 3: Unlock the Bottom Tier
Once the keys are loaded, they must travel to the "painting zone" (the nozzle) to activate. This is a timing challenge. You must ensure the keys reach the end of the belt to trigger the mechanism that retracts the golden bars at the bottom of the tray. Only then do you gain access to the scarce Orange cups.
Objective 4: Precision Detailing
The final objective is execution. With the bottom row unlocked, you now have access to Orange, but you likely have limited space left on the canvas. You must apply the Orange paint exclusively to the beaks and feet without spilling over onto the adjacent White belly or Cyan ice. This requires precise timing and nozzle control.
Step-by-Step Instructions: The Action Plan
This section provides a turn-by-turn strategy for navigating the level. Follow these steps in order to maintain the flow of the conveyor belt.
Step 1: The Initial Breakout (Moves 1-10)
Start the level by immediately tapping the Pink and Dark Red cups located in the top rows. Your goal here is twofold: start filling the large background areas (Sky and Penguin Backs) and, more importantly, clear the cups sitting directly on top of the "3" Gates. Do not worry about painting inside the lines perfectly yet; focus on volume reduction to clear the path to the keys.
Step 2: Managing the Mid-Game Key Hunt
As the top layer clears, the Golden Keys will become visible in the middle rows. This is the critical moment. You must keep at least 1 or 2 slots open on your conveyor belt. If you see a Key is unblocked, immediately tap it. Do not wait for a "better time." If your belt is full, you must use a cup immediately (even if it's a waste) to free up a slot for the key.
Step 3: The Wait and Load Strategy
Once the Keys are on the belt, they will take several seconds to travel to the nozzle. During this travel time, do not let the nozzle idle. Continue tapping Dark Red to fill the penguin bodies, but stop pouring when the nozzle is directly over the "White Belly" area. You want to keep the nozzle moving over areas that *need* paint while the Keys are in transit.
Step 4: Unlocking the Orange Stash
When the Keys hit the nozzle, the bottom Golden Bars will vanish. You will now see Orange and Cyan cups rise from the bottom. Prioritize the Orange cups immediately. Do not let them get pushed to the back of the line. Tap them as soon as they are accessible. If they get buried behind new Pink cups, you risk running out of moves before you can finish the beaks.
Step 5: The Final Ice and Feet Sweep
With the Orange applied to the beaks, finish the level by pouring the Cyan cups onto the bottom section. This is the final step. Pour the Cyan to form the ice floe, but be extremely careful to stop before you hit the penguin's Orange feet. A quick tap-and-release motion is safer than holding the pour button here.
Color Order: The Correct Processing Sequence
Processing colors in the wrong order is the number one reason players lose on Level 165. The game floods you with Pink to tempt you into ignoring the keys. Follow this hierarchy to stay efficient.
Priority 1: Dark Red (The Structure)
Dark Red is your "workhorse" color. It occupies the largest surface area (the adult and child penguin bodies). It is abundant in the top rows. Processing this first clears massive amounts of space from the tray and helps define the boundaries where the White bellies will eventually go.
Priority 2: Pink (The Space Filler)
Pink represents the background sky. It is a "filler" color. You should process Pink when the nozzle is positioned over the sky, but *only* if doing so doesn't block a Key from loading. Think of Pink as the "waiting room" color—use it to kill time while waiting for Keys to move, but never prioritize it over unlocking the bottom row.
Priority 3: Cyan (The Base)
Cyan is used for the ice floe. It is located in the bottom rows, which means it is initially locked. You cannot access Cyan until the Keys have done their job. Once unlocked, Cyan is your priority for cleaning up the bottom of the screen.
Priority 4: White (The Interior)
White is tricky. The cups are often found in Mystery Boxes or mixed in the middle rows. Since White is used for the belly, it is surrounded by Dark Red. If you accidentally pour Red over the belly area, you can correct it with White later. Treat White as a corrective color rather than a primary fill color until the endgame.
Priority 5: Orange (The Critical Path)
Orange is the lowest volume but highest priority color. It is the bottleneck. Only a few Orange cups exist, and they are locked behind the keys. You must process Orange last, but you must plan for it from the very beginning by unlocking the keys. If you wait until the canvas is full to look for Orange, you will fail.
Key Tips & Notes for Success
These tips are derived from analyzing hundreds of attempts on this specific level configuration. Use them to refine your strategy.
Tip 1: The "Reserve Slot" Rule
Always keep at least one slot empty on your conveyor belt counter. Visually, if you see "5/5", you are in danger. If a Golden Key appears and you have no slots, the game logic may glitch or delay the key loading, causing you to miss the window to unlock the bottom row before the cups shuffle again.
Tip 2: The "Nozzle Hover" Technique
When waiting for Keys to travel, hover your nozzle (finger) over an area that needs Dark Red (the penguin's back), but do not pour yet. As soon as the Key passes and the next Red cup loads, you can instantly pour. This minimizes wasted time and keeps the flow fluid.
Tip 3: Gate Mechanics Awareness
The blue gates with numbers require a specific number of *adjacent* clears to break. Sometimes, clearing a cup *inside* the gate is not enough; you must clear the cups touching the gate's walls. If a gate isn't breaking, look at the cups hugging its sides.
Tip 4: Mystery Box Caution
The "?" Mystery Boxes in this level often contain White or Cyan. While useful, they are random. If your belt is full and a Key is coming, do not tap a Mystery Box unless you are sure it won't clog the slot needed for the Key. The risk of blocking a Key outweighs the reward of a random color.
Tip 5: Beak vs. Belly Protection
The beaks are 1-2 pixels wide. The belly is huge. It is statistically much safer to accidentally paint the beak area with Red (and fix it later with Orange) than it is to accidentally paint the belly with Orange. If you mess up the belly with Orange, you might not have enough White left to fix it.
Common Mistakes to Avoid
Learn from the failures of others. Avoiding these common pitfalls will significantly increase your win rate.
Mistake 1: Over-Pouring the Sky (Pink)
Because Pink is plentiful and covers the background, many players instinctively drain all Pink cups immediately. This floods the belt, leaving no room for the Keys. Remember, the sky does not need to be 100% perfect in the first 30 seconds. Stop pouring Pink once the sky is roughly 80% done to save slots for mechanics.
Mistake 2: Ignoring the Key "Travel Time"
A Key appears, you tap it, and then you stare at the screen waiting for it to reach the end. This is wasted time. While the Key travels, you should be actively painting other parts of the penguin. Idle time leads to running out of moves later.
Mistake 3: Pouring Colors Over the "Ice" Zone Too Early
The bottom of the canvas (the ice) is overlapping with the feet zone. If you pour Cyan or Blue here before unlocking the Orange, you might "paint over" the precise pixels where the feet go. This makes it harder to see where to place the Orange later. Leave the bottom of the canvas messy until you have the Orange unlocked.
Mistake 4: Confusion Between "Dark Red" and "Pink"
In the heat of the moment, the Dark Red (bodies) and Pink (sky) can look similar in the tray, especially on smaller screens. Accidentally loading Pink when you need Dark Red for the body can result in a "pink penguin," which wastes precious cups trying to correct. Always double-check the cup color before loading.
Stuck Solutions: Troubleshooting Guide
If you find yourself in a bind during the level, refer to these emergency solutions to get back on track.
Problem: "I have no slots left and a Key is blocked!"
Solution: You must perform an "Emergency Pour." Look at your canvas. Is there *any* spot—even a tiny corner—that needs a color you currently have? Pour it there immediately to free up a slot. If the canvas is truly full, you may have to "over-pour" a color (e.g., add another layer of White to the belly) just to consume the cup and clear the slot.
Problem: "The '3' Gates won't break!"
Solution: You have likely cleared the cups *inside* the gate but ignored the ones *touching* the gate from the outside. Look for cups of any color that are physically adjacent to the gate's walls. Clearing those often provides the final "point" needed to shatter the obstruction.
Problem: "I unlocked the bottom, but I ran out of Orange!"
Solution: This usually means you wasted Orange on the wrong pixels or over-poured. If you are completely out of Orange cups, check the Mystery Boxes if any remain. If not, your only hope is that you have enough moves left to cycle the tray for a respawn, though this is unlikely in Level 165's economy. Prevention is better than cure here—save every drop.
Speed Run Tips & Shortcuts
For players looking to 3-star this level or achieve a high score, efficiency is everything. Here is how the pros beat Level 165 in under 60 seconds.
Shortcut 1: The "Combo" Gate Break
Advanced players don't wait for gates to break one by one. They load specific cups that are touching multiple gates simultaneously. Identify a cup that sits at the intersection of a gate and a large pile of Red. Pouring it clears the gate *and* fills the penguin in a single motion.
Speed Trick: Nozzle Pre-Positioning
Don't follow the nozzle with your eyes; lead it. Anticipate where the nozzle will be in 2 seconds. If you have a Red cup loading, move your finger to the penguin's back *before* the cup is ready to pour. This eliminates the delay between the cup loading and the paint hitting the canvas, saving valuable milliseconds over the course of the level.
Optimization: Ignoring the 100% Fill
To get the fastest time, you don't need to paint every single pixel of the background sky perfectly. Once the Sky (Pink) is roughly 90% covered and the main features are distinct, shift your focus entirely to the Keys and mechanics. The game's completion判定 (judgment) is often lenient with background colors as long as the foreground objects (Penguins) are perfect.
The "Blind Pour" Technique
Once the bottom row unlocks and you have the Orange cups, you can perform a "Blind Pour" for the feet. Since the feet are at the very bottom edge of the screen, you don't need to look at the penguin's face. Drag your finger immediately to the bottom center/left/right corners where the feet are located and tap rapidly as soon as the Orange cup enters the nozzle zone. This shaves seconds off the final phase.