
Level 170
HARDHow to solve Sand Loop level 170? Get instant solution for Sand Loop 170 with our step by step solution & video walkthrough. Sand Loop 170 tips and guide.
Play Sand Loop Now
Experience the puzzle challenge firsthand
Game Screenshots


Sand Loop Level Guides
Level Overview: The Synthwall Challenge
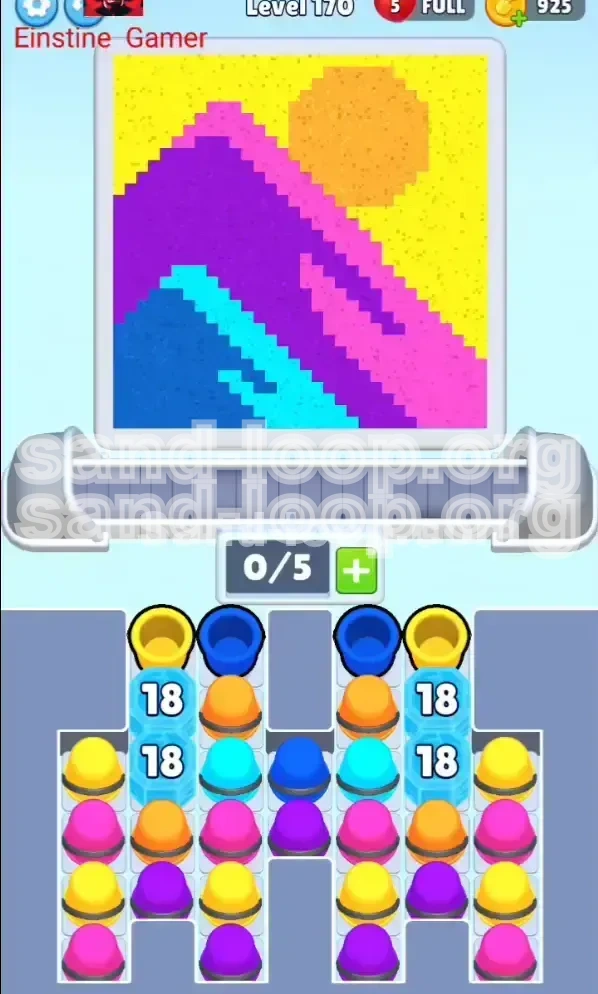
Welcome to Level 170, a stage that creates a beautiful visual deception. While you are busy admiring the retro "Synthwave Sunset" aesthetic—featuring a neon grid, a glowing orange sun, and a striking purple mountain range—the game is quietly setting a difficult trap. This level is not just about painting a picture; it is a resource management crisis disguised as an art project.
The Visual Layout
The canvas is dominated by three distinct zones. The top 70% is a bright, pixelated yellow sky. The bottom 15% features a reflective water pattern in cyan and deep blue. Sandwiched in the middle is the mountain range: dark purple shadows with diagonal pink highlights running across the slopes. The sun itself acts as a distinct circular object on the right side, requiring precise color isolation.
The Core Mechanic: High Durability Ice
Unlike previous levels where ice was a minor nuisance, Level 170 introduces two massive Ice Blocks with a durability rating of 18. This is an exceptionally high number for this stage. These blocks are not placed randomly; they are strategically positioned to seal off your most critical colors. You cannot brute-force your way through; you must play the outer columns to dismantle the center.
The Resource Scarcity Problem
The primary difficulty here is the lock-out of primary structural colors. The Ice Blocks sit directly on top of the Purple (Mountain) and Orange (Sun) stacks. This creates a "poverty" state where you have plenty of trivial colors (Yellow, Pink) but a desperate lack of the colors needed to finish the level. You must grind the trivial colors to generate the "heat" required to melt the ice.
Slot Management Crisis
Because you are forced to use trivial colors to break the ice, your 5 available cup slots will be under constant pressure. If you fill your slots with Yellows and Cyans too early without clearing them, you will have no space to accept the Purple and Orange cups once the ice finally breaks. Balancing the "mining" of ice with maintaining empty slots is the key to victory.
Why This Level Fails Beginners
New players often fail because they try to paint the picture "logically" (e.g., starting from the top down). In Level 170, painting logically leads to a deadlock. If you fill the sky with Yellow without aggressively chipping the ice, you will run out of moves while the Purple and Orange cups remain frozen forever. You must prioritize ice-breaking over painting accuracy.
Strategic Analysis: The Color Priority
To beat Level 170, you need to stop thinking like an artist and start thinking like a engineer. You must execute a rigid color processing order that ignores the visual composition of the painting in favor of resource generation.
Tier 1: The Icebreakers (Yellow & Cyan)
Priority: CRITICAL
Yellow and Cyan are your most important tools, despite being background colors. Every Yellow or Cyan cup you pull and clear reduces the Ice Block counter by 1. You need to clear approximately 18-20 of these combined to unlock the rest of the board. Do not treat these as paint; treat them as fuel.
Tier 2: The Structure (Purple)
Priority: HIGH
Purple is the "base" of your mountain. However, it is locked behind the Ice. Once the ice breaks (around the 50-60% progress mark), Purple becomes your immediate focus. You must fill the large dark void in the center of the canvas before moving to anything else. If you delay Purple to paint Pink highlights, you will clog your slots.
Tier 3: The Accents (Pink)
Priority: MEDIUM
Pink is used for the diagonal synthwave lines on the mountain. It is accessible from the outer columns early on. However, painting Pink before the Purple base is ready is inefficient. Only pull Pink cups when you have a spare slot and your conveyor belt is moving fast. Do not hoard them.
Tier 4: The Boss Color (Orange)
Priority: LOW (Until End)
Orange is the final boss. The sun is small, isolated, and surrounded by Yellow sky. If you pull Orange cups too early, they will likely hit yellow pixels and fail, wasting a slot. You must wait until the Yellow sky is 90% finished and the nozzle is naturally drifting toward the top-right corner before inviting Orange into the mix.
Step-by-Step Walkthrough: The Mining Phase
This phase is all about speed and volume. Your goal is to clear the trivial colors as fast as possible to bring down the Ice Block health from 18 to 0.
Step 1: Aggressive Yellow Loading
As soon as the level starts, look at the far left and far right columns. They are stocked with Yellow cups. Pull 3 Yellow cups immediately. Send them to the conveyor. Don't worry about precision; just get them flowing. The yellow sky is large, so you have plenty of margin for error, but the volume is needed to tick the ice counter down.
Step 2: The Water Flank (Cyan/Blue)
While the Yellows are filling, look at the center column. It contains Blue and Cyan cups for the water. Pull 1 Cyan cup. This is your "water" cup. Use it to fill the bottom-left corner. As you clear this cup, it contributes to the ice-breaking total. Keep this cycle going: Yellow in the edges, Cyan in the middle.
Step 3: Monitoring the "18" Counter
Keep one eye on the Ice Block overlay in the supply tray. You need to clear roughly 18 cups to shatter it. If you see the counter stuck at "5" or "6" but your slots are full, you are stalling. Immediately dump any low-priority colors (like Pink) to make room for more Yellow/Cyan to finish the job.
Step 4: Managing the "Slot Lock"
A common issue in this phase is having 4 slots filled with slow-filling cups while the Ice Block is at 1 HP. To avoid this, try to keep 1 slot empty or rotating rapidly. Do not let your slots become a parking lot for slow colors. Speed is the only thing that breaks the ice.
Step 5: The Transition Point
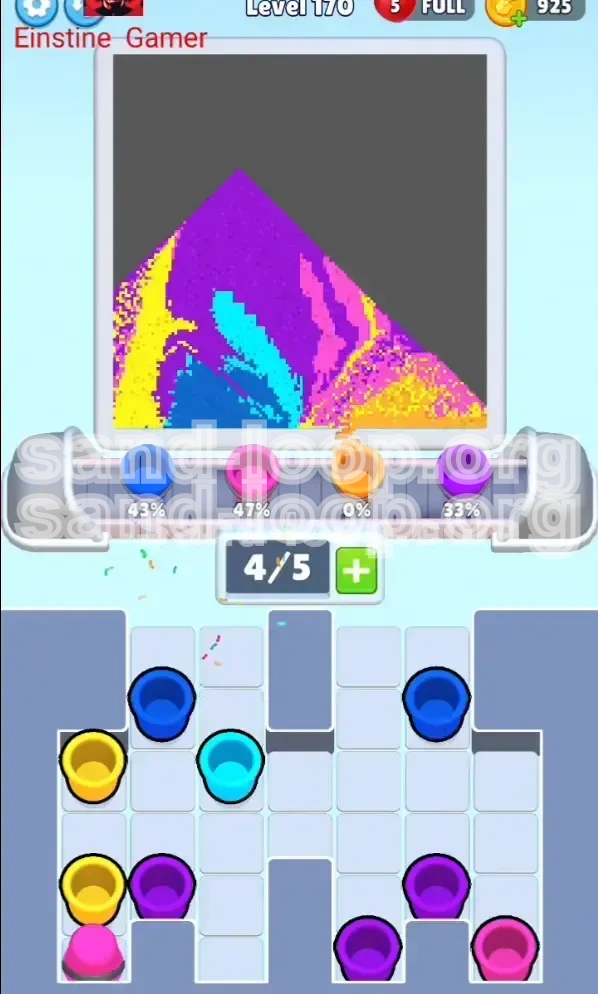
Once the Ice Block shatters, stop pulling Yellow and Cyan immediately. Do not over-farm background colors. The screen is likely about 60% yellow and 20% water. You need to pivot instantly to the newly unlocked columns. This is the most dangerous moment in the level; if you keep pulling background colors, you will miss the Purple unlock.
Step-by-Step Walkthrough: The Execution Phase
The ice is broken, and the middle columns are open. This phase requires precise coordination to paint the mountain and the sun without causing a traffic jam on the conveyor belt.
Step 6: The Purple Flood
With the ice gone, the inner columns reveal a massive stack of Purple cups. The mountain base is a large, contiguous black shape. Pull 2 to 3 Purple cups back-to-back. Flood the center of the canvas. Since the mountain is so big, you can be less precise with Purple and focus on just getting the volume out. This clears your slots quickly for the next color.
Step 7: Integrating the Pink Highlights
Now that the Purple base is down, you will see diagonal stripes across the mountain that need to be Pink. You can likely pull Pink cups from the outer columns now. Pull 1 Pink cup and alternate it with your Purple flow. The Pink pixels are "on top" of the Purple pixels in the game logic, so they won't conflict, but they are smaller targets, so take your time aiming.
Step 8: The Sun Strategy (The Final 10%)
Do not pull Orange yet. Look at the top-right corner. Is the Yellow sky completely finished around it? If there is still yellow pixels near the sun, an Orange cup will likely fail by hitting the yellow sky. Wait until the nozzle is positioned over the sun area and the surrounding sky is 100% clear.
Step 9: The Orange Release
When the time is right, pull 1 Orange cup. The sun is a solid circle, so you can usually pour it continuously until the cup is empty. Because the sun is small, you might need 2-3 Orange cups depending on how pixelated the sun is in this specific level iteration. Once the sun turns orange, the level is effectively beaten.
Step 10: Cleanup
Sometimes, breaking the ice leaves you with 1 or 2 stubborn pixels in corners (often top-left sky or bottom-right water). Use your remaining slots to pull single cups of whatever color is missing. Do not fill all slots; just pull what you need to patch the holes.
Master Class: Pro Tips & Common Mistakes
To achieve a high score or a speed run on Level 170, you need to understand the hidden mechanics that cause players to get "Stuck in the Loop."
Mistake: The "Precious Cup" Syndrome
Many players treat every cup like it's precious and refuse to discard them. In Level 170, you must be ruthless. If you have a Pink cup in your slot but the Ice Block is at 1 HP, and you need a Yellow cup to break it—discard the Pink cup. Pull the Yellow. Breaking the ice is worth infinitely more than one Pink cup.
Mistake: Premature Orange Deployment
This is the level killer. Players see the Orange cups unlock and immediately pull them. Then, they try to pour Orange on a canvas that is still 50% Yellow sky. The Orange cup hits yellow pixels, fails, and sits in your slot taking up space for the rest of the level. Rule of thumb: No Orange until the sky is dry.
Tip: Use the "Gap" Method
When transitioning from Purple to Orange, leave a 1-second gap between dispensing the cups. Let the machine process the last of the Purple liquid before introducing the Orange. This prevents the nozzle from "dribbling" Purple onto the Orange sun, which would ruin the contrast and waste the cup.
Tip: Visualizing the "Ice Math"
If the Ice Block says "18," count your pulls. If you pull 5 Yellow and 5 Cyan, that's 10. You need 8 more. Don't guess; count. If you lose track, focus on the visual crack in the ice. When it looks like it's about to shatter (big cracks appearing), get ready to switch columns instantly.
Speed Run Strategy: The Left-Right Rock
For speed runners, don't wait for cups to travel the full belt. Use the "Left-Right Rock": Pull from the far left, then immediately tap the far right. Then Center. This rhythm prevents the nozzle from dragging across unpainted areas and keeps the flow constant. Constant flow is the fastest way to reduce the Ice Counter.