
Level 175
HARDHow to solve Sand Loop level 175? Get instant solution for Sand Loop 175 with our step by step solution & video walkthrough. Sand Loop 175 tips and guide.
Play Sand Loop Now
Experience the puzzle challenge firsthand
Game Screenshots


Sand Loop Level Guides
Level Overview: The Winter Cottage Challenge
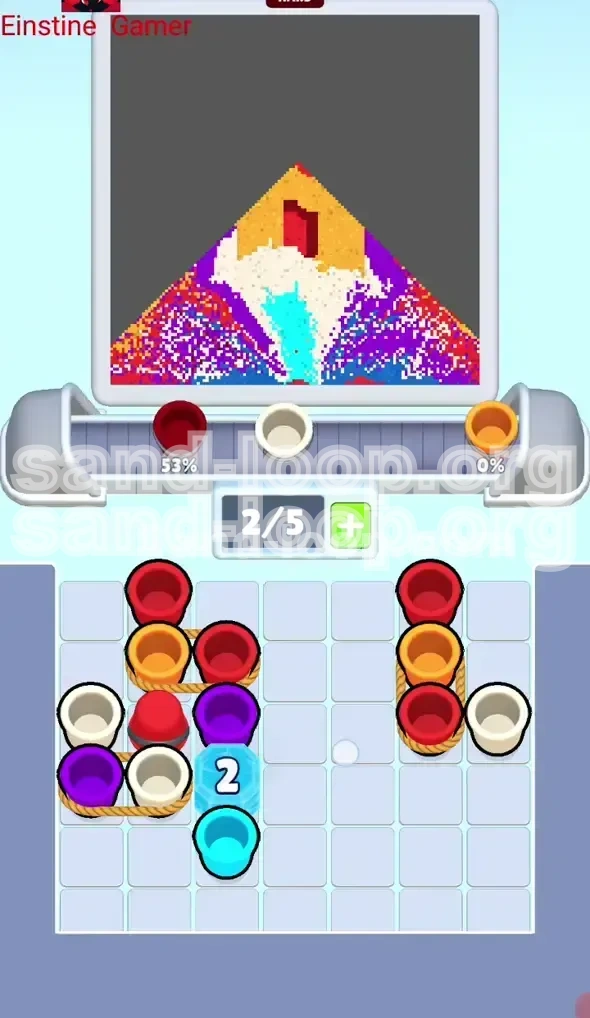
Sand Loop Level 175 presents a deceptive puzzle that tests your ability to manage logistics rather than just color matching. The goal is to paint a picturesque scene featuring a cozy cottage with a red roof, yellow walls, and a burgundy door set against a backdrop of purple mountains and a deep blue sky. While the image appears charming, the gameplay is defined by a congested supply tray and a strict conveyor limit of five slots.
The primary difficulty in this stage is the "Tray Knot." Many of the essential colors, specifically the Reds and Cyans needed for the roof and snow, are buried under layers of less critical colors like Cream and Orange. Players frequently fail because they clog their conveyor belt with easily accessible but low-priority colors early in the game, leaving no room to maneuver when the critical colors finally become unblocked.
The Color Palette Breakdown
Understanding the volume requirements for each color is crucial for prioritizing your queue.
- Blue (Background): High volume. Requires a continuous flow but is often overfilled early by mistake.
- Cyan (Snow/Foreground): High volume. Critical for the snowy landscape, yet often buried in the tray.
- Red (Roof/Accents): Medium volume. Essential but often trapped under other cups.
- Cream/White (Snow Trim): Low-Medium volume. Abundant in the tray; dangerous if hoarded.
- Purple (Mountains): Medium volume. Needed in the mid-game phase.
- Orange/Yellow (Walls): Low-Medium volume. Usually not a bottleneck.
- Dark Red/Maroon (Door): Low volume. Needed late game.
The Slot Economy Constraint
Your conveyor belt has a maximum capacity of 5 units. In Level 175, maintaining 3-4 active cups is the optimal strategy. Keeping all 5 slots filled at all times creates a "traffic jam" where you cannot react to newly unblocked colors. You must always leave at least one buffer slot open to accommodate critical colors as they are freed from the stack.
The Mystery Cup Variable
Scattered throughout the tray are mystery cups (marked with a question mark). In this level, mystery cups are high-risk, high-reward. They can potentially clear space by being a color you need, or they can duplicate a color you have already maxed out (like Blue), wasting a pour and valuable time.
Win Condition Metrics
To clear the level, you must reach 100% completion on the canvas without exhausting your cup supply. This means every pour must contribute to progress. Wasting more than 2-3 cups on already-full colors usually results in a failed attempt. Efficiency is measured by how quickly you can unblock the Red and Cyan cups while keeping the Blue flow steady.
Step-by-Step Walkthrough Guide
This guide is divided into chronological phases to help you manage the game from start to finish. Follow these steps to maintain control over the board.
Phase 1: The Cold Open (First 10 Seconds)
The opening moments are frantic but must be controlled. Your immediate goal is to secure the background colors without eating up your belt slots.
- Step 1: Immediately tap the two Blue cups located in the top row. They are unblocked and ready.
- Step 2: Load only one Cyan cup next. Even if you see more, load just one to gauge the timing.
- Step 3: Pause. Do not fill the remaining slots immediately. Let the first Blue cup pour.
- Step 4: As the first Blue is pouring, assess the tray. Look for where the Red cups are buried.
Phase 2: The Unblocking Strategy (Seconds 10-30)
This is the most critical phase. You must deliberately pick up "blocking" colors to get to the good stuff.
- Step 1: Identify the pile where Red cups are located. It is likely covered by Cream or Orange.
- Step 2: Load exactly one Cream cup to clear the top of that stack.
- Step 3: Once the path is clear, load the newly revealed Red cup onto the belt immediately.
- Step 4: If a Mystery Cup is blocking a high-priority color, do not tap it yet. Look for an alternative stack to clear.
Phase 3: Mid-Game Management (Seconds 30-60)
By now, you should have Blue, Cyan, and Red cycling. It is time to introduce Purple and manage the "gap" on your belt.
- Step 1: Locate the Purple cups. They are needed for the mountains.
- Step 2: Add one Purple to the belt. Your belt should now be cycling Blue, Cyan, Red, and Purple.
- Step 3: Monitor the progress bars. If Blue is filling faster than Cyan, stop loading Blue temporarily.
- Step 4: Use the "Gap Strategy": If you have a full belt of 5, let one cup cycle back to the tray without pouring if its color bar is >80% full.
Phase 4: The End-Game Sprint (Final 20%)
In the final stretch, precision beats speed. You are likely missing small amounts of Orange, Dark Red, or Purple.
- Step 1: Slow down your tapping. Load one cup at a time.
- Step 2: Check which color is lagging behind (usually under 80%).
- Step 3: If you have a Mystery Cup left, only tap it if you are desperate for a specific color.
- Step 4: Prioritize Dark Red for the door and Orange for the walls to finish the cottage details.
Optimal Color Order and Priority
Processing colors in the wrong order is the leading cause of failure in Level 175. The tray forces you to take colors you don't need yet, so you must be diligent about what you actually pour.
The Tier 1 Priority: The Flow Colors
These colors must be on the belt at all times to ensure steady progress.
- Blue: Keep 1-2 Blue cups active. Never let the belt run dry of Blue, but do not stack 3 at once.
- Cyan: This is your most critical mid-game color. If you see Cyan available, grab it immediately. It runs out faster than Blue in the tray.
The Tier 2 Priority: The Structure Colors
These define the house and mountains. They should be cycled in as soon as Tier 1 is stable.
- Red: Needed for the roof. Only load one at a time. It pours slowly.
- Purple: Needed for the mountains. Load these when you have a spare slot after Blue/Cyan.
- Dark Red: Save this for the very end. If you pour it too early, it might max out and block a slot needed for Cyan.
The Tier 3 Priority: The Fillers
Grab these only to unblock other colors or to fill small gaps.
- Cream: Only use to unblock Reds. Do not rely on it for points.
- Orange: Usually available late game. Pick up when Blue/Red are full.
The Processing Logic
Always follow this logic chain before tapping a cup:
- Is the color currently needed on the canvas (progress bar < 90%)?
- Is this cup blocking a Tier 1 or Tier 2 color?
- Do I have an empty slot on the belt?
Key Tips for Mastery
Mastering Level 175 requires understanding the hidden mechanics of the conveyor belt and tray generation.
Tip 1: The "Recycle" Technique
If you have a Blue cup on the belt but the Blue bar is already at 95%, don't panic. Let the cup travel all the way around the belt back to the tray (if the game allows) or just let it pour into the full zone. Better to waste one cup than to jam your belt trying to swap it out when you have no space.
Tip 2: Tray Scanning Patterns
Don't look at the whole tray. Focus on the "top layer." Scan specifically for the corners of the stacks. That is where Red and Cyan usually hide. If you see a Mystery Cup on top of a Red stack, you must clear the Mystery Cup first, or accept that you cannot access the Red yet.
Tip 3: The "Plus" Booster Usage
The level provides a booster (extra slot). Do not use this in the first 30 seconds. Save it for the "Emergency Phase" (around 50% completion) when you realize you have 4 full cups on the belt and the Cyan you need is finally unblocked. The extra slot allows you to grab that Cyan without waiting for a cup to pour.
Tip 4: Managing "Lead Time"
There is a roughly 2-second delay between tapping a cup and it reaching the pour point. Account for this! If Blue is at 98% and you tap another Blue, it will likely pour and waste because by the time it arrives, Blue will be 100%. Stop tapping a color 3 seconds *before* you think it is full.
Common Mistakes and Stuck Solutions
Even experienced players can get tripped up by the specific layout of Level 175. Here is how to handle the common failure points.
Mistake 1: The "Cream Glut"
The Scenario: You loaded three Cream cups early because they were easy to reach.
The Result: Your Cream bar is 100%, but your Red and Purple are at 20%. Your belt is full of Cream.
The Fix: Stop loading Cream entirely. Let the existing Cream cups pour and waste. It is painful, but you must cycle them out. Do not try to "save" them. Clear the belt to make room for Red and Purple.
Mistake 2: Premature Mystery Cup Popping
The Scenario: You tapped a Mystery Cup to clear a stack, and it turned out to be Blue (a color you already have too much of).
The Result: You now have a useless cup taking up space and you still haven't unblocked the color underneath.
The Fix: Ideally, avoid Mystery Cups until the end. If you are already stuck, use your Booster to create a 6th slot, allowing you to carry the mistake while you grab the necessary color from beneath it.
Mistake 3: Ignoring the Sky
The Scenario: You focused so hard on the Cottage (Red/Orange) that you ignored the Sky (Blue).
The Result: You reach the end with the cottage done but a massive 40% void in the sky, and no Blue cups left in the tray because you buried them under other stuff early on.
The Fix: Always keep one Blue cup cycling in the background. It is your safety net. Do not let the Blue progress bar drop below the pace of the other colors.
Solution: I am stuck at 90% completion
If you are stuck at 90%, you are likely missing Dark Red (Door) or Orange (Walls). These are usually in the very bottom layer of the tray. Look for stacks that haven't moved much. You may need to waste a few cups of other colors just to dig down to the bottom layer to find that last elusive Orange cup.