
Level 185
HARDHow to solve Sand Loop level 185? Get instant solution for Sand Loop 185 with our step by step solution & video walkthrough. Sand Loop 185 tips and guide.
Play Sand Loop Now
Experience the puzzle challenge firsthand
Game Screenshots
Sand Loop Level Guides
Level Overview: The Pine Tree Landscape Challenge
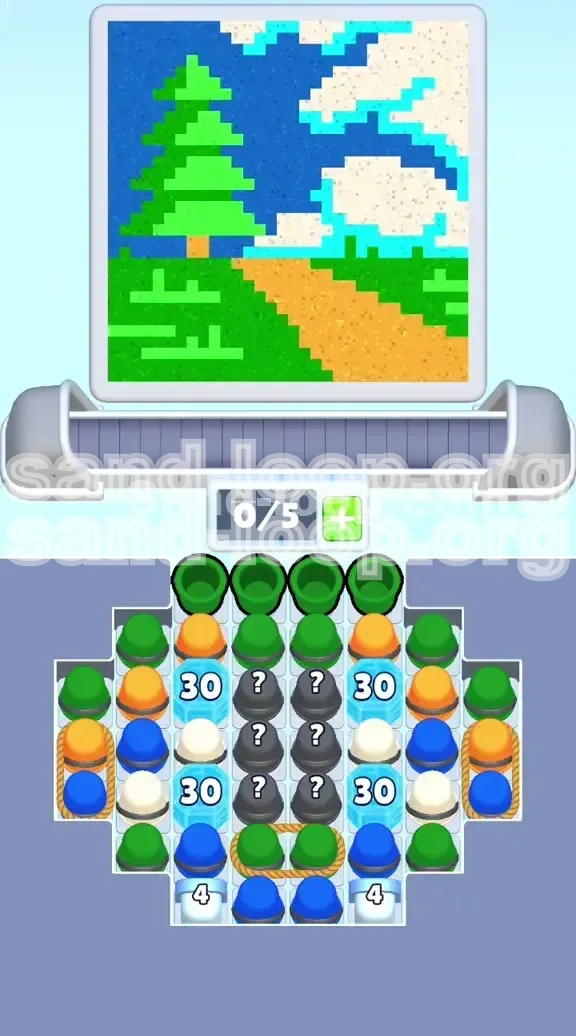
Welcome to the definitive walkthrough for Sand Loop Level 185. At first glance, this level appears to be a serene pixel art scene featuring a classic landscape: a majestic green pine tree standing tall on the left, a winding dirt path cutting through the center, and a cloudy blue sky overhead. However, do not let the calm imagery fool you. Beneath this peaceful facade lies a Logic Puzzle that will test your ability to manage resources and prioritize targets efficiently.
This stage is classified as a Logic Level rather than a Speed Run. The primary difficulty stems not from finding colors, but from accessing them. The board is aggressively segmented by massive defensive obstacles known as "30-HP Ice Blocks." These barriers wall off your primary color reserves, forcing you to dismantle the board's defenses layer by layer before you can even begin filling the more intricate sections of the painting. You must balance clearing the conveyor belt with strategically chipping away at these ice walls to avoid a deadlock.
The Core Mechanics
Understanding the board layout is the first step to victory. The playing field is divided into three distinct zones. The Left Wing hosts the Pine Tree and grassy areas, the Right Wing holds the sky and clouds, and the Center is currently inaccessible due to the Ice Pillars. The conveyor belt acts as your lifeline, but it has a limited capacity of 5 slots. Managing this space while simultaneously attacking the ice blocks is the central challenge of the level.
The Ice Block Obstacle
The defining feature of Level 185 is the pair of Ice Blocks labeled "30". These are not standard obstacles that vanish after one move. The number 30 represents their structural integrity or "Health Points." You cannot destroy them with a single action. Instead, you must erode them by clearing cups that are physically adjacent to the ice. Every time you successfully pour a cup touching one of these blocks, the counter decreases. Your early game strategy must revolve entirely around lowering this number from 30 to 0 to access the center.
Color Distribution Analysis
The painting requires a balanced mix of colors, though availability is skewed. Green is the most abundant, needed for roughly 40% of the canvas (the tree and grass). Orange is required for the dirt path, acting as a secondary objective. The Blue (sky) and White (clouds) are the most volatile colors, trapped behind the ice blocks and mixed into mystery cups later in the game. Recognizing this hierarchy is vital; you cannot focus on the sky until the ground work is laid.
Winning Conditions
To complete Level 185, you must fill the pixel art canvas to 100% completion. This involves clearing the initial Green cups, breaking the Ice Walls to access the center reserves, and managing the mystery cups that appear in the late game. There are no time limits, but your move efficiency determines whether you run out of space on your conveyor belt. If the belt fills up with unusable colors before you break the walls, you will fail.
Clear Objectives: Your Mission Goals
Before you make your first tap, you need a clear plan of attack. Wandering into this level without a set of priorities will lead to a clogged conveyor belt and an inevitable game over. The following objectives outline the roadmap to your victory, moving from the immediate opening moves to the final satisfying pour.
Primary Objective: Shatter the Ice Walls
Your most critical goal in the first half of the level is to destroy the "30" Ice Blocks. This is not a passive task; it must be your active focus. Every move you make should be questioned: "Does this help me break the ice?" If the answer is no, you might be making a mistake. The ice blocks are the gatekeepers to the rest of the board. Until they are gone, you are playing with half a deck.
Secondary Objective: Establish the Green Foundation
While breaking the ice, you must also keep the board clear to prevent stagnation. The Green cups for the Pine Tree are your primary resource for this. You need to pour Green cups consistently to keep the conveyor belt moving. This serves a dual purpose: it fills the largest section of the painting and clears space on the belt so you can pull new cups closer to the ice blocks.
Tertiary Objective: Unlock the Mystery Center
Once the ice shatters, the board state changes drastically. The center column, previously blocked, will reveal Grey Mystery Cups. Your goal then shifts to managing these unknowns. You must use these mystery cups to finish the Sky and Clouds without running out of belt space. This phase requires quick adaptation and color prioritization.
Final Objective: Clear the "4" Locks
At the bottom of the board, you will notice White Locks labeled "4". These naturally unlock as you clear the columns above them. You do not need to focus on these early on, but in the final stages, ensure you are clearing the specific columns required to drop these final locks. They act as the final gate to your 100% completion score.
Step-by-Step Instructions: The Complete Walkthrough
This section provides a turn-by-turn strategy for navigating the Pine Tree Landscape. Follow these steps in order to ensure a smooth flow from the opening tap to the final victory screen. We have broken this down into three distinct phases: The Opener, The Grind, and The Endgame.
Phase 1: The Green Opener (Moves 1-15)
As the level loads, look at the top row of your conveyor belt. You will almost certainly see four Green Cups sitting at the entry point. These are your starting fuel.
- Step 1: Tap all four Green Cups immediately. Do not hesitate.
- Step 2: Watch as the Pine Tree on the left begins to fill in rapidly.
- Step 3: Clearing these top greens pushes the "Next" row forward. This exposes the "Shoulder Cups"—the Orange and Blue cups that are sitting directly adjacent to the Ice Blocks.
- Step 4: Do not worry about the Sky or Clouds yet. If you see White or Blue cups now that are not touching the ice, ignore them if your belt is full.
Phase 2: Grinding the Ice (Moves 16-50)
Once the initial greens are gone, you enter the most dangerous part of the level. This is a war of attrition against the Ice Blocks.
- Step 1: Scan the conveyor belt for any cup (Orange, Blue, or Green) that is physically touching the "30" blocks.
- Step 2: Tap these adjacent cups. Every pour chips away at the ice. Treat every cup touching the ice as a "Gold Priority" target.
- Step 3: Avoid the "Roped Pairs" on the far edges unless you have at least 2 empty slots on your belt. These roped pairs (often Orange tied to Blue) are traps that can clog your belt if pulled too early.
- Step 4: Monitor the Ice HP. You need roughly 30 successful "hits" to clear a wall. Keep the belt moving to ensure fresh cups slide into position against the ice.
Phase 3: The Mystery Center (Mid-Game)
The moment the Ice Blocks shatter, the board opens up. The center column fills with Dark Grey Mystery Cups marked with a "?".
- Step 1: Clear the remaining cups that were previously trapped behind the ice.
- Step 2: Start tapping the Grey Mystery Cups. These are crucial.
- Step 3: Ideally, these mystery cups reveal White or Blue, which you need for the sky. If they reveal Green, and the Pine Tree is already full, simply pour them onto the completed tree to clear the slot (waste is better than a jammed belt).
- Step 4: Use the revealed colors to patch the holes in your Clouds and Sky.
Phase 4: The Final Polish
With the center empty and the sky filling up, you are in the home stretch.
- Step 1: Focus on the bottom row. The "4" Locks should be opening now.
- Step 2: Pour the remaining White cups into the clouds.
- Step 3: Finish the Dirt Path with any remaining Orange.
- Step 4: The level ends when the last pixel of the Pine Tree or Sky is filled. Victory is yours.
Color Order Strategy: Processing the Palette
One of the most common fail points in Level 185 is processing the wrong color at the wrong time. Because the belt capacity is limited (0/5), the order in which you accept or pour colors dictates your success. This section outlines the specific hierarchy you should follow to maximize efficiency.
Priority 1: The Green Stream
Green is your "bread and butter." It occupies the largest area (approx. 40%) and is the most plentiful color in the queue.
- When to Tap: Always. Unless a Blue or White cup is actively blocking a critical Ice Block hit, tap the Green cups first.
- Why: The Pine Tree is a massive pixel area. It takes a lot of paint to fill. If you ignore Green to chase smaller Blue/White patches, you will flood your belt with unpourable Green cups later.
- Placement: Focus on the left side of the canvas. Keep the Green flow consistent.
Priority 2: The "Ice Breaker" Colors
Blue and Orange cups often sit adjacent to the ice walls. In the early game, their value is not in the paint they provide, but in their position.
- Blue Strategy: You need Blue for the sky, but in Phase 2, treat Blue as a "weapon" against the ice. If a Blue cup is touching the ice, tap it immediately even if the sky isn't ready for it yet. It's better to over-pour slightly (waste a bit) than to leave the ice standing.
- Orange Strategy: Use the Dirt Path Orange cups to keep the belt clear. The path is a solid block, so it's easy to fill. Use Orange to bridge the gap between Green heavy phases.
Priority 3: White and The Sky Danger Zone
White is the most dangerous color in the level. The Clouds are interspersed with the Blue sky, making them easy to mess up.
- The Risk: If you pour White over a Blue sky area, or vice versa, you create "holes" that are hard to fix later.
- The Rule: Only tap White cups when you are 100% sure of the landing spot or when you are in the final "Mystery Cup" phase.
- Efficiency: Don't stress about the perfect Cloud shape until the Ice is gone. Just get the paint on the canvas.
Handling Mystery Cups
When the Grey Mystery Cups appear, your color order strategy goes out the window. You are now at the mercy of RNG (Random Number Generation).
- Reaction: Tap the Mystery Cup.
- Result: If it turns to a color you need (Blue/White), find a spot. If it turns to Green (and you are done with Green), pour it on the tree anyway to clear the belt.
- Key Tip: Never let a Mystery Cup sit on the belt if you can avoid it. They take up valuable space needed for new cups to enter.
Key Tips & Common Mistakes
To truly master Level 185, you must understand the pitfalls that trap casual players. This section highlights the specific errors that lead to "Game Over" screens and provides pro-tips to avoid them. Pay close attention to the belt management advice; it is the single most important skill for this level.
Mistake #1: The Spam Tap Trap
The most common way to fail is by tapping too fast without looking at the board state.
- The Scenario: You see three cups in a row and tap them all rapidly.
- The Consequence: Your conveyor belt (max 5 slots) fills up with colors you can't use yet (e.g., White when the Ice isn't broken). The belt stops moving, and you have no moves left.
- The Fix: Tap 2, Wait, Tap 2. Always leave one slot open if possible to let the cups shuffle forward. This ensures new cups slide into the "Ice Touching" positions.
Mistake #2: Ignoring the "Touch" Rule
Players often focus on the picture (the tree) rather than the mechanics (the ice).
- The Error: You see a Green cup that isn't touching the ice, and a Blue cup that is touching the ice. You tap the Green because "it's safe."
- The Result: The Ice HP remains at 5. You run out of moves with the board still locked.
- The Fix: Prioritize position over color. If a cup is touching the Ice Block, it is the most valuable cup on the screen, regardless of its color.
Mistake #3: The Rope Jam
The Roped Side-Pairs on the left and right edges are mechanical traps.
- The Mechanics: These cups are tied together. Pulling one requires 2 empty slots on your belt to accommodate the pair.
- The Fail State: Trying to pull a roped pair with a full belt (4/5 or 5/5 slots). The game will refuse the move, or worse, pull one and leave the other stuck, jamming the entry point.
- Pro Tip: Only touch the roped pairs when your belt is relatively empty (0/5 or 1/5).
Mistake #4: Wasting Mystery Greens
In the late game, when the Mystery Cups are flowing, players often get frustrated by getting Green when they need Blue.
- The Panic: "I need Blue for the sky! Why is it giving me Green?!"
- The Stalling: Leaving the Green cup on the belt hoping a Blue comes.
- The Solution: Pour the Green anywhere on the finished tree. It doesn't matter if it overfills slightly. Clearing that slot is the only way to get the next cup, which might be the Blue you need.
Stuck Solutions & Speed Run Tips
So, you've followed the guide, but you're staring at a screen that refuses to budge. Or perhaps you are a veteran player looking to optimize your time. This final section covers troubleshooting for those "deadlock" moments and advanced strategies for completing the level in record time.
Solution: The "Deadlock" Board
Symptom: Your belt is full, no cups are touching the ice, and every cup on the belt is a color you can't use (e.g., all White, but the sky is full).
The Fix: You must make a "Sacrifice Pour." Look at your canvas. Is there any section, even a completed one, where you can pour a "useless" color to clear a slot? Often, pouring a bit of White onto the edge of the Green tree (wasting it) is better than restarting. Clearing one slot might shuffle the belt enough to bring a usable cup into range.
Solution: Ice Wall at 1 HP
Symptom: The Ice Block is down to "1" HP, but no cups are touching it. It just sits there taunting you.
The Fix: Check the Roped Pairs. Sometimes, the only way to generate a cup that touches the ice is to clear the side pairs. Use the "Tap 2, Wait" method on the roped pairs. Clearing them will drop new cups from the top row into the Ice Zone, delivering the final blow needed to shatter the wall.
Speed Run Strategy: The Rush Down
If you are aiming for a 3-star score or a fast time, do not wait for the ice to break naturally.
- Technique: Hyper-focus on the "Shoulder Cups" (the ones touching the ice).
- Sacrifice: Intentionally over-pour the Dirt Path (Orange) or the Pine Tree (Green) if it means you can pull a cup touching the ice faster.
- Movement: Keep your belt low (2-3 cups max). This minimizes the animation time for cups to slide into position.
- Timing: The difference between a slow run and a fast run is how quickly you transition from "Filling the Tree" to "Attacking the Ice." Do not finish the tree before starting on the ice. Start attacking the ice the moment you see the first adjacent cup.
Speed Run Strategy: The Mystery Guess
When the Ice breaks and the Mystery Cups appear, speed runners don't read the color; they just tap.
- Why: Reading the color takes mental processing time. Tapping immediately is faster.
- Risk: You might tap a Green when you need Blue.
- Mitigation: Since the Tree is so large, "wasting" Green on it has almost no penalty. You can aggressively tap Mystery Cups and pour the result immediately. If it's not the color you wanted, it clears the slot for the next tap. This high-speed recycling is faster than carefully picking colors.