
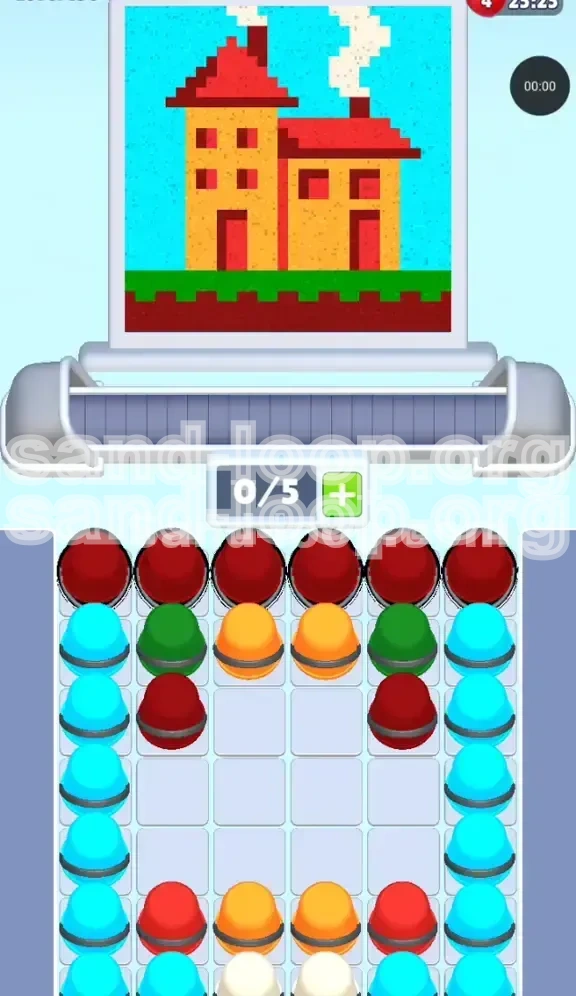
Level 196
HARDHow to solve Sand Loop level 196? Get instant solution for Sand Loop 196 with our step by step solution & video walkthrough. Sand Loop 196 tips and guide.
Play Sand Loop Now
Experience the puzzle challenge firsthand
Game Screenshots
Sand Loop Level Guides
Sand Loop Level 196: The Country House - Comprehensive Walkthrough
Stage Overview
Sand Loop Level 196, titled "The Country House," is a medium-to-high difficulty puzzle that tests your ability to manage limited inventory space under pressure. Unlike timed stages or ice-breaking levels, this is a pure Logic and Excavation challenge. The visual output—a charming pixel art house with a red roof, tan walls, and a smoking chimney—belies the complexity of the sand supply mechanism. The defining feature of this level is the "Inverted Supply" mechanic. Crucially, the visual top layer of the painting (the white smoke) is located at the absolute bottom of the sand tray, while the background elements are at the top.
Players face a strict 0/5 Slot Capacity. This means you can only queue five sand colors at any given time. If you accidentally queue a sixth color that cannot be immediately poured, your conveyor belt will jam, forcing a restart. The level requires a rhythm of "Tap-Wait-Tap" rather than frantic tapping, demanding about 70% patience and 30% quick reflexes.
Primary Objectives
- Excavate the Center: Your main goal is to dig through the top layers of Deep Red and Orange sand to reach the bottom-center of the tray.
- Manage Side Columns: You must carefully dismantle the vertical Cyan columns on the left and right edges without clogging your limited slots.
- Preserve Slot Space: Always keep at least one or two empty slots in your conveyor belt to accommodate the color changes as the painting shifts focus.
- Finalize Details: Successfully pour the White smoke and Red dirt layers last to complete the pixel art masterpiece.
Understanding the Color Palette and Supply Zones
Zone 1: The Top Row (The Red Wall)
The top row of your sand tray is dominated entirely by Deep Red cups. This corresponds to the largest visual element in the painting: the Roof. In addition to the roof, this red sand is also used later for the windows, door, and the bottom dirt layer. You will need to clear approximately 80-90% of this top row before the game logic allows you to access the colors sitting directly underneath them.
Zone 2: The Side Columns (Cyan Sky)
On the far left and right edges of the tray, you will see tall, vertical stacks of Cyan cups. These are your "Sky" colors. They are dangerous because they are static walls; they do not collapse inward when you remove center blocks. You must tap these manually. The challenge is that the Sky requires a large volume of sand, but if you tap too many at once, you will fill your slots with Cyan while the painting actually wants Red for the roof, causing a jam.
Zone 3: The Middle Row (Walls and Grass)
Beneath the initial Red wall lies a mix of Orange (House Body) and Green (Grass). The Orange cups are the priority here. The Green cups are a trap if tapped too early. The "Grass" strip is located at the very bottom of the canvas image, meaning the game will not accept Green sand until the Roof, Sky, and House Body are nearly finished. Tapping Green early is the most common cause of failure.
Zone 4: The Bottom Center (The Finish Line)
Deep at the bottom center of the tray lie the White and final Red cups. The White cups are used for the "Smoke" effect. Because smoke appears at the top of the image visually, players often panic when they can't find it early. You must accept that you cannot pour White until everything else is done. These are your "finishing move" colors.
Phase 1: Breaking the Surface and Roof Construction
Step 1: The Initial Red Sequence
When the level starts, do not tap randomly. Look at the top row of the tray. It is a solid line of Deep Red.
- Action: Tap exactly 3 Deep Red cups from the top row.
- Reasoning: The painting always starts with the top-left pixel. This is part of the red roof. Sending 3 cups is usually enough to trigger the "Roof" algorithm without overcrowding your belt.
- Wait: Watch the dispenser. Do not tap more until the first batch has started pouring.
Step 2: The Sky-Roof Alternation
As the red sand begins to fill the roof, the game will quickly shift its requirement to the background Sky (Cyan). If you ignore this, the red sand will just pile up unused.
- Action: Tap 1 or 2 Cyan cups from the side columns.
- Reasoning: This provides the necessary background color. By keeping the number low (1 or 2), you ensure that as soon as the roof needs Red again, your slots will free up.
- Rhythm: Establish a pattern of Red-Red-Cyan or Red-Cyan-Red.
Step 3: Clearing the Red Blockade
You cannot reach the Orange house walls until the top Red row is significantly thinned out.
- Action: Aggressively target the remaining top-row Deep Red cups.
- Tip: Once the roof is about 60% complete, the game will temporarily stop asking for Red. This is your window to clear the remaining top reds to expose the row underneath.
- Warning: Do not let your slots fill up with only Red. If the roof is done and you have Red queued, you are stuck until you find another color.
Phase 2: Excavating the House Body and Managing Grass
Step 4: Transitioning to Orange
Once the top row of Red is gone, the "Middle Row" is revealed. This contains the Orange/Tan cups for the house walls.
- Action: Immediately tap 2 to 3 Orange cups.
- Observation: The painting focus will shift from the Sky/Roof to the main body of the house.
- Strategic Pause: The Orange layer is thick. You can safely queue a few more Oranges here (up to 4) because the house body requires a lot of sand to fill.
Step 5: Avoiding the Green Trap
You will see Green cups sitting right next to the Orange cups in the newly exposed row.
- Action: DO NOT TAP GREEN YET.
- Reasoning: The grass is at the bottom of the image. The game logic will not pour Green sand while the House Body (Orange) and Windows (Red) are still incomplete.
- Consequence: If you tap Green now, the cup will enter your conveyor belt, take up a slot, circle around, and return to the tray, wasting time and space.
Step 6: Mid-Game Cyan Refill
While you are pouring the Orange walls, the Sky progress bar might stall if the background isn't fully dark.
- Action: Check the side Cyan columns. If the sky looks incomplete, tap 1 Cyan cup to top it off.
- Caution: Only tap one at a time during this phase to ensure the Orange keeps flowing.
Phase 3: The Final Dig and Finishing Touches
Step 7: Exposing the Bottom Layer
By now, the Orange walls should be finished, and the Green cups are exposed. The game is ready for the ground elements.
- Action: Now you can tap the Green cups.
- Simultaneous Action: Look at the bottom center of the tray. You should see the final Deep Red cups (for the dirt/door).
- Strategy: Alternate between Green and Red. The grass and the dirt are at the same vertical level on the canvas, so the game will often swap between these two requirements rapidly.
Step 8: The White Smoke Reveal
You have likely cleared most of the tray. All that remains in the bottom center are the White cups.
- Condition: The game will not accept White sand until the Roof (Red), Sky (Cyan), and House Body (Orange) are 100% finished.
- Action: Wait until the "pours" stop. If you tap White and it just circles, it means the upper layers aren't done yet. Check for any missed pixels in the roof or walls.
Step 9: The End-Game Sequence
This is the final sprint. You likely have 3-4 White cups and maybe 1-2 Red cups left.
- Action: Tap all remaining White cups (usually 2 to 3 puffs).
- Visual Confirmation: Watch the chimney. The white smoke will puff out, layering over the red roof and cyan sky.
- Completion: Once the smoke appears, the level is complete.
Pro Tips, Common Mistakes, and Speed Run Strategies
Common Mistakes to Avoid
- The "Early Bird" Error: Tapping White or Green in the first 10 seconds. This is the fastest way to clog your 5-slot belt. Remember: Top colors first, bottom colors last.
- The "Side Stack" Overload: Tapping all 4 Cyan cups on the left side at once. The sky doesn't need that much sand immediately. Tap them one by one as the sky progress bar slows down.
- Ignoring the Red Windows: Sometimes the roof is done, but the game still wants Red for the door/windows. If you switch purely to Orange/Green too early, the leftover Red requirement will jam your belt.
What to Do If You Get Stuck
- Belts Full of "Wrong" Colors: If your 5 slots are full of Green but the game wants Red, you have no choice but to wait for the Green to cycle and fail to pour. Use this time to plan your next tap. Do not panic-tap.
- Can't Find the Last Pixel: If the level won't end, zoom in (visually) on the house. Is there a gap in the red roof? Is the sky fully blue? Usually, it's a single missed pixel in the corner or the chimney base that needs a specific color.
- Soft Lock: If the dispenser simply stops moving, it means you have tapped the wrong color order. Restart the level and focus on the "Top-Down" excavation rule.
Speed Run Tips
- Pre-loading: While the first set of Red is pouring, you can immediately tap the next set of Reds. Get familiar with the timing so the next cup hits the dispenser exactly as the previous one finishes.
- Batch Processing: During Phase 2 (Orange), the house body takes a massive amount of sand. You can safely tap 4-5 Orange cups in a row here without risking a jam, provided the Sky is already 90% done.
- Peripheral Vision: Don't look at the cup you are tapping; look at the *next* cup you want to tap. Keep your eyes on the Orange/Green boundary to transition instantly from the walls to the grass.