
Level 201
HARDHow to solve Sand Loop level 201? Get instant solution for Sand Loop 201 with our step by step solution & video walkthrough. Sand Loop 201 tips and guide.
Play Sand Loop Now
Experience the puzzle challenge firsthand
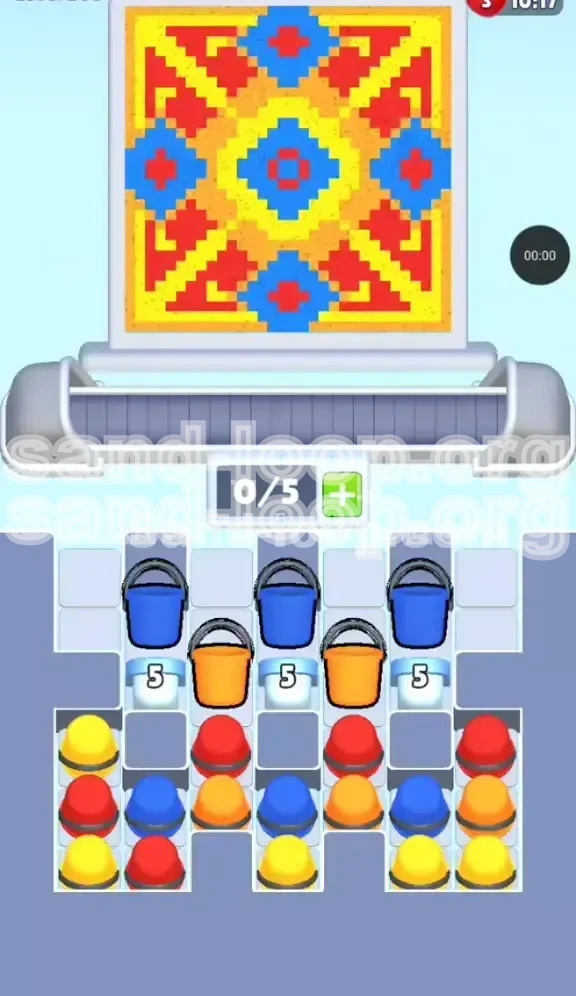
Game Screenshots
Sand Loop Level Guides
Level Overview: The Inventory Management Puzzle
The "Persian Rug" Logic Challenge
Level 201 shifts the gameplay mechanics significantly from previous levels. This is not a test of reaction speed or dexterity; it is a pure logic and inventory management puzzle. The visual design resembles a complex, pixelated Persian rug or a geometric mosaic. However, the aesthetic beauty hides a "trash layer" problem. Your screen will be flooded with colors you do not need immediately, specifically a massive surplus of Blue and White blocks, while the colors you actually need (Red and Yellow) are buried deep in the inventory queue.
The "Trash Block" Mechanic
In this stage, approximately 40% of the blocks appearing in your tray are functionally useless for the immediate painting steps. These are "trash blocks"—colors that must be processed simply to clear space in your inventory. The primary challenge here is preventing the game from ending due to a full inventory tray while you wait for the correct blocks to cycle in. You must be aggressive in discarding or processing unwanted blocks to keep the flow moving.
Analyzing the Artwork Structure
The target image is dense and symmetrical. It consists of three distinct layers:
- Base Layer (40% coverage): A solid field of Yellow serving as the background.
- Middle Layer (35% coverage): Red geometric brackets in the corners and edges.
- Top Layer (25% coverage): A complex cluster of Blue diamonds in the center, bordered by Orange outlines.
Understanding this layering is critical. Because the Blue diamonds are small and centrally located, they require precise nozzle alignment, unlike the broad swipes needed for the Yellow background.
The Health Bar Barrier
The most significant unique feature of Level 201 is the "Countdown Barrier." You will notice three White Blocks labeled with the number '5' sitting directly in the middle of your supply tray. These are not paintable cups; they are indestructible obstacles that block access to the lower half of your inventory. They function like a boss health bar. You cannot remove them by painting; you can only destroy them by processing adjacent paint buckets. Every time you clear a cup touching a White Block, the number decreases. This mechanic forces you to prioritize specific colors (Orange and Red) that border these obstacles.
Clear Objectives and Strategic Goals
Primary Goal: Clear the White Barriers
Your immediate priority from the start of the level to the midpoint is the destruction of the three White '5' Blocks. As long as these stand, they occupy critical slots in your inventory and block the flow of the essential Red and Yellow cups needed for the background. You must achieve this by strategically processing the Orange buckets sandwiched between them. Do not focus on painting the corners or edges until these barriers are gone.
Secondary Goal: Precision Diamond Painting
Once the barriers are down, the difficulty shifts to precision. The Blue diamonds are small targets. If the nozzle is even slightly misaligned, or if you queue too many blocks at once, the paint will spill over into the Orange outlines or the Yellow background, ruining the "perfect score" potential. You must clear the conveyor belt completely before attempting the final Blue pours.
Inventory Management Goal
You must maintain a "Conveyor Buffer." Never fill your conveyor belt to its maximum capacity (5 slots) during the barrier-breaking phase. Always keep at least one slot open (4/5 capacity). This allows you to quickly pull necessary blocks from the sides of the barriers without triggering a "Game Over" due to a clogged tray.
Step-by-Step Walkthrough Guide
Phase 1: The Blue Cap (Start - 0:45)
The game forces your hand immediately. At the very top of the level setup, you have three Blue Buckets stacked above the White Barriers. You cannot access anything else until these are moved.
- Action: Immediately tap all three Blue Buckets to move them onto the conveyor belt.
- Timing: Do not queue any other colors behind these Blue buckets yet. Let them pour. The nozzle will align itself to paint the central Blue diamond cluster.
- Wait: Watch the pour complete. The Blue layer must be finished before you introduce the next color to avoid mixing.
Phase 2: Cracking the Shield (0:45 - 2:30)
With the Blue buckets cleared, the three White Barriers (labeled '5') are now exposed, along with two Orange Buckets trapped between them.
- Action: Immediately pull the two Orange Buckets onto the belt.
- Effect: As these Orange buckets are processed, they will deal damage to the adjacent White Barriers.
- Tactic: You will likely run out of immediate Orange buckets. Look to the sides of the barriers. You will see Red and Yellow cups peeking through.
- Execution: Pull the Red and Yellow cups that are physically touching the White Blocks. Processing these will chip away the remaining health of the barriers. Prioritize any cup that is adjacent to a White Block over cups that are further away.
Phase 3: The Floodgate Opens (2:30 - 4:00)
Once the three White Barriers shatter, the bottom half of the tray unlocks. This is where the level gets chaotic. A flood of Red and Yellow buckets will surge up.
- Assessment: Check your canvas. You likely have a messy mix of Blue, some Orange, and patches of unpainted Yellow and Red.
- Strategy: Do not tap randomly. Group your colors.
- The Yellow Batch: Look for clusters of 3 or 4 Yellow buckets. Tap them in a sequence so they enter the belt one after another. This creates a continuous stream of paint that fills the large background areas efficiently.
- The Red Corners: Switch to Red buckets. Since the Red paint is needed for the corners and edges, ensure the nozzle has time to swing to the edges of the canvas. Don't rush the Red pours immediately after a long Yellow stream, or the nozzle might lag.
Phase 4: Final Polish and Detailing (4:00+)
The main fields are done. Now you are hunting for the last 10% of completion.
- Cleanup: Scan the tray for any remaining small Orange or Blue cups that might have been buried.
- Correction: If the Blue diamonds look "thin" or incomplete, you may need to pull one last Blue bucket if it appears.
- Emptying: If the level is 95% done and you have random trash blocks left, just process them to clear the board. The game often gives you extra useless blocks at the end to test your patience.
Optimal Color Processing Order
1. Blue (The Diamond Core)
Why First? Even though Blue covers the least surface area, it is at the top of the inventory stack. Furthermore, painting the center first prevents you from accidentally splashing Red or Yellow over the delicate diamond details later. The nozzle is most precise when the canvas is blank.
2. Orange (The Outline)
Why Second? Orange is your "key" color. It is required to destroy the White Barriers. By processing Orange early (Phase 2), you unlock the rest of the level. Additionally, Orange serves as a border between the Blue and Red/Yellow zones, so it acts as a buffer.
3. Yellow (The Background)
Why Third? Yellow is the "filler" color. It covers the largest area but is the least forgiving if you make a mistake because it sits right next to the Orange border. You do Yellow in Phase 3, once the obstacles are gone and you can focus on broad, sweeping strokes without worrying about inventory management.
4. Red (The Corners)
Why Last? Red occupies the extreme corners of the canvas. If you paint the corners first, the subsequent swings of the nozzle for the large Yellow background might accidentally drag Red paint across the screen. Painting Red last ensures that once the corners are done, you don't need to pass over them again.
Key Tips and Mistakes to Avoid
Tip: Maintain the "4-Slot Rule"
The single most important rule for Level 201 is inventory discipline. Never let your conveyor belt reach 5/5 capacity until the White Barriers are destroyed. If the belt is full, you cannot pull the specific side-buckets needed to damage the barriers. Always keep one slot open to allow for tactical pulls.
Mistake: Panic-Tapping
When the Yellow and Red floodgates open in Phase 3, many players panic and start tapping wildly. This leads to "color stuttering," where the nozzle constantly switches between Yellow, Red, and stray Blue cups. This wastes time and creates patchy paint. Instead, pause, look at the tray, and tap only the color you are currently focusing on (e.g., only tap Yellows until the background is mostly done).
Tip: Use the "Nozzle Lag" to Your Advantage
The sand pouring nozzle has a physical travel time. When you switch from painting the center (Blue) to the corners (Red), there is a delay. You can use this delay to your advantage. Queue a Red bucket while the nozzle is still finishing a Yellow pour in the center. By the time the Yellow pour stops, the nozzle will have traveled to the side, ready for the Red paint.
Mistake: Ignoring the Trash
Some players try to save the Blue or White blocks, thinking they might be needed later. They are not. The White blocks are purely obstacles (HP bars), and once the Blue diamonds are painted, any extra Blue cups are trash. Process them immediately to get them out of your tray. Hoarding them will clog your inventory and force a game over.
Speed Run and Stuck Solutions
What to Do If You Are Stuck on the Barriers
Symptom: The White Blocks are at '1' or '2' HP, but you have no Orange cups left.
Solution: Stop looking at the center of the tray. Look at the extreme left and right edges of the supply columns. There are likely Red or Yellow cups that are technically "touching" the White Blocks. Pull those edge cups. The game physics allow side-adjacent cups to deal damage to the barriers. Pulling these will finish the job.
Speed Run Strategy: The "Pre-Load" Method
To finish under 2 minutes, you must use the "Pre-Load" technique.
- While the Blue buckets are pouring (Phase 1), visually scan the tray underneath.
- Identify exactly where the two Orange buckets are located.
- As soon as the Blue pour finishes, tap the Orange buckets instantly.
- While the Orange is pouring, already have your finger hovering over the Red/Yellow side cups needed to break the barriers.
- Eliminate the pause time between phases.
Dealing with a Clogged Inventory
If your tray is full and you cannot move, look for "isolated" colors. If you have a single Blue cup surrounded by Reds, and you don't need Blue, you might be stuck. The solution is to process the color you have the most of, even if it's not the perfect color, just to clear space. For example, if you have excess Yellow, tap three Yellows rapidly to clear them from the tray and free up slots for the Red cups you actually need.