
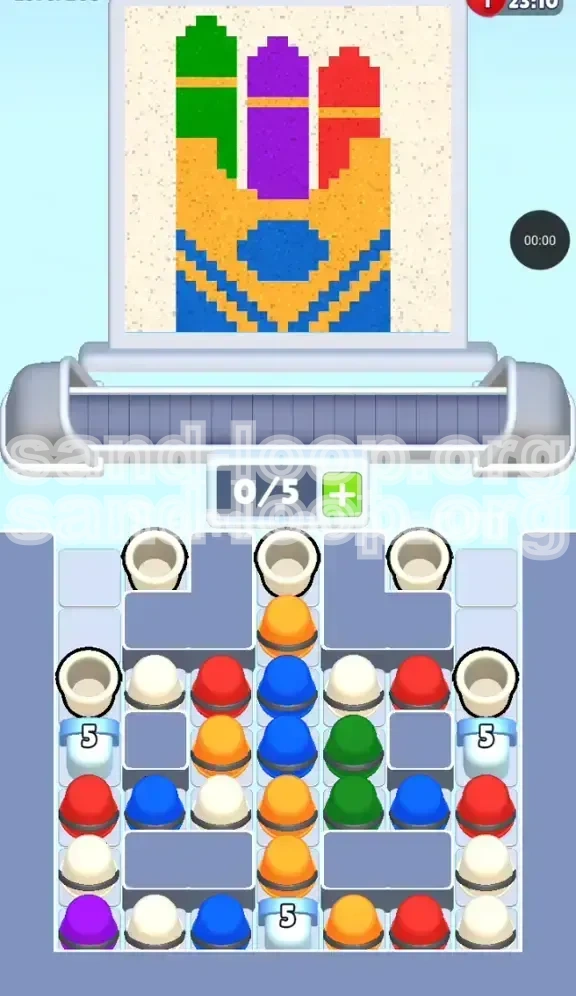
Level 203
HARDHow to solve Sand Loop level 203? Get instant solution for Sand Loop 203 with our step by step solution & video walkthrough. Sand Loop 203 tips and guide.
Play Sand Loop Now
Experience the puzzle challenge firsthand
Game Screenshots
Sand Loop Level Guides
Level 203: The Three-Tower Castle - Complete Walkthrough
Welcome to the definitive guide for Level 203, commonly known as "The Three-Tower Castle." This level is a significant hurdle in the Sand Loop saga, testing not just your reflexes but your ability to manage limited inventory space under pressure. The stage features a complex image of a castle structure with three distinct colored towers (Green, Purple, Red) resting on a golden Yellow base with Blue architectural details. The difficulty here stems from a "Logic Puzzle" element hidden beneath the surface: you are restricted to a 5-slot conveyor belt while facing three heavy "Number 5" blockers that guard your essential color reserves. You cannot brute force this level; you must follow a precise order of operations to clear the board.
Level Features & Core Mechanics
Before diving into the strategy, it is vital to understand the unique constraints of this level. Unlike previous stages where you could simply grab and pour, Level 203 requires resource management.
- The Layout: The target image is divided vertically. The bottom 40% is a mix of Yellow and Blue (the foundation and archway). The top 60% consists of the Yellow base rising into three distinct towers.
- The Constraint: You are limited to 5 active slots on your conveyor belt. This is your most critical bottleneck.
- The Blockers: There are three separate "5-hit" blockers located in the Left, Middle, and Right columns of the sand dispensers. These must be destroyed to access the necessary color cups.
- The Risk: The "Blue vs. Yellow" contrast at the bottom of the canvas is prone to bleeding. If Yellow touches the Blue archway, the contrast is ruined.
Primary Objectives for Success
To secure a victory on Level 203, you must stop thinking about "painting" immediately and start thinking about "unlocking." Your goals are:
- Clear the Path: Your first priority is not painting, but breaking the three '5' blockers clogging your dispensers. Consider this a "trash phase" where you are cycling cups purely to clear space.
- Establish the Base: Accurately render the Yellow and Blue foundation without color bleeding. This requires about 60% of your total Yellow resource.
- Isolate the Towers: Successfully execute the final 20% of the level by pouring Green, Purple, and Red in quick succession without overlapping.
Why Players Fail Here
Many players get stuck on this level for extended periods because they misunderstand the opening moves. Here is why most attempts fail:
- Hoarding Colors: Trying to save Green, Purple, or Red cups on your belt too early. Since these colors are only needed for the very top of the towers, holding onto them for the entire level wastes 1-2 precious slots on your belt.
- Ignorning Blockers: Focusing on the picture while the blockers are still up. This leads to a "soft lock" where you have no space on the belt to pick up the cups needed to break the blockers.
- Sloppy Base Work: Pouring Yellow too aggressively over the Blue archway, creating a greenish tint that ruins the score requirement.
Phase 1: The "Trash Run" & Breaking the Blockers
This is the most counter-intuitive part of the level. For the first 60-90 seconds, you are not trying to paint the picture beautifully. You are trying to clear the "Number 5" blockers. These blockers are sitting on top of the Blue, Red, and Purple reserves. You cannot access the colors you need until these are gone.
Understanding the 5-Slot Limitation
Your conveyor belt only holds 5 cups. The blockers take up space in the dispensing columns. If you fill your belt with "maybe later" colors, you will have no room to pick up the cups needed to hammer the blockers.
- The Rule: Keep 2 slots empty at all times during Phase 1.
- The Action: Do not worry if you pour a color incorrectly or waste a cup. Wasting a cup is better than having a full belt and no moves.
- The Math: You need to dispense and pour approximately 15-20 "trash" or "filler" cups just to reduce the blocker numbers from 5 to 0.
Step-by-Step: Clearing the Middle Blocker
The middle column contains your Blue reserves and some Yellow/Orange. This is the lifeline of the level.
- Priority 1: Target the center blocker (marked with a '5').
- Technique: Tap the dispenser to grab a cup. If it's a color you don't need right now (like an early Red or Green), pour it immediately onto the canvas—even in the wrong spot—to clear the cup from your belt.
- Recycling: Grab the next cup. Pour it. Repeat this cycle until the center blocker shatters.
- Result: Once broken, you unlock a steady stream of Blue cups, which are essential for the next phase.
Dealing with Side Blockers (Left & Right)
While the middle is your priority, you will naturally run out of moves. You must then address the sides.
- Left Side: Contains Purple reserves. Clear this blocker second. Purple is needed for the middle tower.
- Right Side: Contains Red reserves. Clear this blocker third. Red is for the right tower.
- Tip: Use White or excess Yellow cups to chip away at these. Do not hold onto Purple or Red cups once the blockers break; put them back or pour them into temporary spots if you must, but keep the belt flowing.
Phase 2: Establishing the Foundation (Blue & Yellow)
Once the center blocker is down, the real level begins. You now have access to Blue. The bottom of the castle requires a delicate dance between Yellow (the base color) and Blue (the shadows/archway).
The Yellow-Blue Dance
The bottom of the image features a golden yellow base with a blue archway recessed into it. The challenge is the "zig-zag" pattern where they meet.
- Order of Operations: Always pour Blue first in the specific archway areas. It is easier to cover dark blue with yellow edges than it is to fix yellow spilled into a blue zone.
- Technique: Use short taps. Do not hold the pour button. The sand stream is wide; holding it will cause the Blue to bleed into the Yellow zones.
- Visual Guide: Look for the pixelated "bricks" at the bottom. Fill the "mortar" lines with Blue carefully.
Building the Golden Block
Once the archway is defined, you need to fill the massive yellow block above it.
- Resource Check: You will need approximately 60-70% of your total Yellow sand for this section.
- Straight Lines: Pour Yellow in steady vertical lines to fill the main body of the castle base.
- Avoid the Towers: Stop pouring Yellow exactly where the three towers begin. If you overfill, you will have to painstakingly fix the Green/Purple/Red areas later. Leave the top 30% of the canvas blank for now.
Managing the Mid-Game Belt
By now, your blockers are gone, but the belt is still tight.
- Active Colors: You should only have Yellow and Blue on your belt.
- Banned Colors: Do not pick up Green, Purple, or Red yet. Even though they are now available, picking them up now will clog your belt when you are trying to finish the Yellow base.
- Cycling: If a Green or Red appears, pour it into a waste corner or swap it out immediately. Do not let it sit on the belt.
Phase 3: The Three-Tower Finale (Green, Purple, Red)
With the base fully painted and the bottom 70% of the canvas complete, you enter the final phase. This is the "Speed Run" moment. You have three towers to paint, and you have to do it quickly to clear the board.
Final Color Order Strategy
Does the order matter? Yes. While you can technically do them in any order, the risk of "bleeding" (where two wet colors mix) is high at the top.
- Recommended Order: Green (Left) -> Purple (Middle) -> Red (Right).
- Reasoning: Green and Red are complementary; if they mix, it creates a muddy brown that is very hard to fix. Purple is the dominant central tower. By doing Green first (Left), then Red (Right), you can leave a small gap of unpainted canvas between them, then fill with Purple in the middle to buffer.
- Alternative Strategy: If you are confident in your aim, you can do all three simultaneously by rapidly tapping, but this is high-risk.
Executing the Tower Paints
This section is about precision. The towers are thin structures.
- Green Tower: Grab the Green cups (usually located in the middle-right reserve). Pour a thin stream up the left tower. Watch the edges; Green can easily splash onto the Yellow roof if you are not careful.
- Purple Tower: Grab the Purple cups (bottom left reserve). This is the tallest of the three. Ensure the Purple connects cleanly to the Yellow base below it.
- Red Tower: Grab the Red cups (bottom right reserve). This is the final piece. Pour swiftly.
- The Gap Rule: As mentioned in the "Action-by-Action" section, maintain a 1-cup gap between pours if possible. Don't pour Red and Green at the exact same second.
Final Polish and Error Correction
You are at 95% completion. Now you clean up the mess.
- Bleeding Check: Look at the borders between the towers. Is there a brown line where Red met Green? If yes, use the specific color (Green or Red) to carefully over-paint the bleed.
- Base Touch-ups: Check the bottom Yellow/Blue line. If Blue splashed on the Yellow bricks, grab a Yellow cup and spot-correct it.
- Congratulations: The "Three-Tower Castle" is complete. The blockers are gone, the colors are distinct, and the level is finished.
Advanced Tips & Speed Run Strategies
For players looking to achieve 3-star ratings or fast completion times, here are the pro strategies.
Speed Run Tip: The "Pre-Load" Maneuver
Can you shave 20 seconds off your time? Yes, by optimizing the blocker phase.
- Technique: As you are pouring your last few Yellow cups for the base, manually tap the dispensers for Green, Purple, and Red. Don't wait for the base to be 100% perfect.
- The Benefit: By the time you finish the Yellow base, the Purple and Red cups will already be traveling down the conveyor belt, waiting for you. This eliminates the "wait time" usually spent searching for these colors in Phase 3.
Key Tips for 100% Accuracy
- Calibrate Your Tap: Learn the "weight" of the sand. Yellow sand pours heavier than Blue. Adjust your tap speed accordingly—tap faster for Blue, slower for Yellow.
- Don't Fear the Undo Button: If you accidentally pour a massive Red streak over a Green tower, don't try to fix it with more paint. Undo immediately. It saves time in the long run.
- Focus on the Center: The middle of the canvas is the most crowded area (Yellow meets Purple meets Blue). Spend 80% of your attention there; the outer edges are more forgiving.
Solutions for When You Are Stuck
Stuck at 90% completion with no moves?
- The "Cup Jam": If your belt is full and you can't pick up the color you need, look for a color on the belt that you have an excess of on the canvas (usually Yellow). Pour that excess Yellow onto an already Yellow area just to consume the cup and free up the slot.
- The "Missing Color" Glitch: Sometimes a cup hides behind a dispenser. Shake your device or tap the background aggressively to unstick the UI if a color isn't spawning.