
Level 206
HARDHow to solve Sand Loop level 206? Get instant solution for Sand Loop 206 with our step by step solution & video walkthrough. Sand Loop 206 tips and guide.
Play Sand Loop Now
Experience the puzzle challenge firsthand
Game Screenshots
Sand Loop Level Guides
Sand Loop Level 206 Complete Walkthrough: Mastering the Retro Telephone
Welcome to the definitive guide for Sand Loop Level 206. This stage is a significant jump in difficulty, testing your ability to manage logistics rather than just your clicking speed. At its core, this level is a test of resource management under pressure. You are tasked with painting a nostalgic Retro Rotary Phone, but the real challenge lies in navigating the complex supply chain to uncover the Golden Key buried deep within the puzzle. If you find yourself constantly running out of belt space or failing to clear the board, this guide is designed to get you back on track.
Understanding the Board Layout
Before you make your first move, take a moment to analyze the battlefield. The board is divided into three distinct zones, each with its own purpose and danger level.
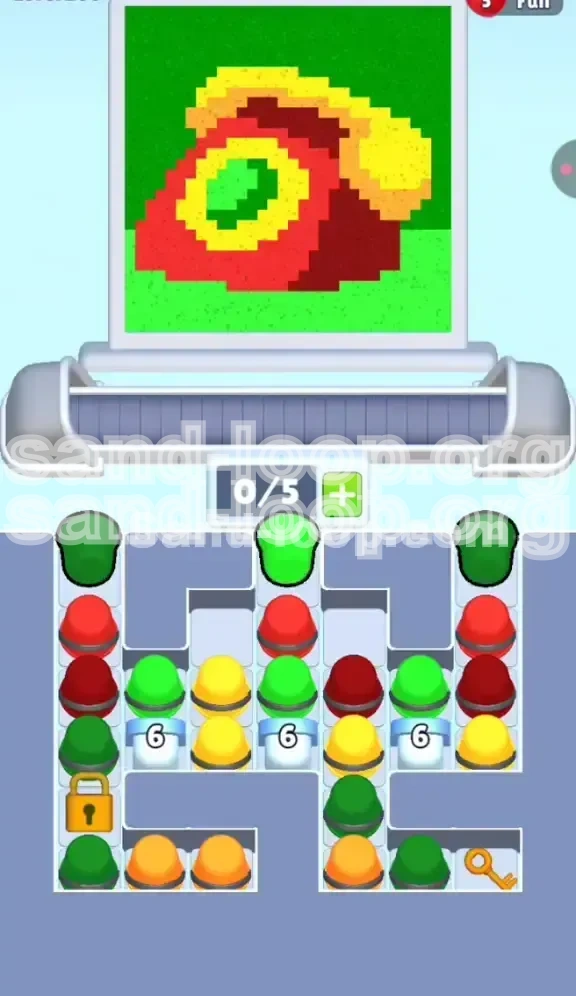
- The Left Flank (Background Supply): This area is your safest zone. It is primarily populated with Green cups designated for the background field. This stack is your "dumping ground"—use it to clear machine cycles when your main belt is congested.
- The Center Trap (The Countdowns): The middle of the tray is guarded by three white cups marked with the number "6." These are Countdown Barriers. They act as a lid, sealing away valuable secondary colors. You cannot brute-force these immediately; they must be worn down by processing surrounding cups.
- The Right Column (The Key Vault): This is the critical danger zone. Buried at the very bottom of the tallest stack on the right side is the Golden Key. However, it is guarded by a complex sequence of colors. The stack here is roughly 6 layers deep, and given that your belt only holds 5 items, digging straight down will result in an instant game over.
Analyzing Color Demands
Success in Level 206 depends on understanding the "economy" of colors. Not all sand cups are created equal, and treating them the same is the fastest way to fail.
- Green (High Volume, Low Risk): This makes up approximately 60% of the level. The background and the center dial require massive amounts of green sand. Because the demand is constant, you can almost always move a Green cup onto the belt without fear of it getting stuck.
- Signal Red (Medium Volume, Structural): Used for the main body of the phone. This is your secondary priority. It is less frequent than Green but required in steady bursts to complete the phone's silhouette.
- Safety Yellow (Low Volume, High Risk): This is your bottleneck color. It is used only for the handset and the dial ring. If you pull a Yellow cup before the printer is ready for that specific section, it will sit on your belt, blocking valuable space. Only extract Yellow when you see the corresponding yellow areas on the canvas opening up.
- Dark Red (Rare, Specific): Used for shading. This is a "late-game" color. It appears late in the right-center stack and is needed only after the main red body is established.
Core Mechanics: The Belt Limit
The primary constraint in this level is the 5-slot conveyor belt limit. Unlike earlier levels where you could click freely, Level 206 punishes greed. If you click a new cup while the belt is full (5 slots), the game ends. You must adopt a rhythmic playstyle: Extract -> Pour -> Extract. You cannot simply load your belt and then think. You must think while the sand is pouring.
Strategic Objectives for Victory
To achieve a three-star completion or simply to survive Level 206, you need a structured approach. Do not aimlessly click; follow these strategic pillars.
Objective 1: Trigger the Printer Early
Your first goal is to get the sand pouring immediately. An idle printer is a wasted opportunity. Within the first 3 seconds, you should have cleared the top layer of Green or Red cups. As long as sand is flowing from the dispenser to the canvas, your belt capacity is regenerating. Avoid pauses where the printer sits waiting for input while you stare at the board.
Objective 2: Manage the "6" Barriers Indirectly
Do not focus your attention on breaking the white "6" cups in the center. This is a common newbie trap. These barriers are linked to the total number of cups processed or specific sand interactions. By clearing the top layers of the Left and Right columns, you will naturally generate the activity needed to crack these barriers. Focusing on them directly only wastes clicks and mental energy.
Objective 3: Secure the Golden Key
The Golden Key is your ticket to the final third of the level. It is located at the base of the Right Column. You cannot win without retrieving it. However, retrieving it requires clearing the 5 cups sitting on top of it. This requires a synchronized effort where you are clearing space on the belt (by pouring Green/Red) exactly when you need to dig deeper into the Right Stack.
Objective 4: Unlock the Left Reserves
Once the Key is secured, you must use it immediately on the Gold Lock located at the bottom left. This will unleash a massive wave of final colors (mostly Greens and Oranges) needed to finish the background and the phone's base. Timing this unlock is crucial—you don't want to unleash these cups until you have cleared the initial backlog from the center screen.
Step-by-Step Walkthrough
Follow this exact sequence to navigate the chaos of Level 206. We have broken this down into four phases.
Phase 1: The Top Layer Clearance
The start of the level is a race to establish flow. We want to activate the machine without clogging it.
- Step 1: Immediately tap the Top Left Green Cup. This is safe. The printer will immediately start filling the green background.
- Step 2: Quickly tap the Top Center Green Cup. This exposes the "6" barriers beneath.
- Step 3: Move to the Top Right Green Cup. This is the start of your "Key Hunt."
- Step 4: Wait. Watch your belt. As the first Green cup finishes pouring, your slot will open up.
- Step 5: Tap the Top Right Red Cup (Layer 2 of the right stack). The printer will switch to filling the phone body.
Phase 2: The Right-Side Drill Down
Now we are in the danger zone. We are digging for the Key, but we must control the flow.
- Step 6: Check the Canvas. Is the phone body (Red) mostly done? Is the background (Green) open?
- Step 7: If yes, tap the Second Red Cup (Layer 3 of the right stack).
- The Warning Point: Underneath this Red is a Yellow Cup. DO NOT TAP IT YET.
- Step 8: Switch your focus to the Left Column. Tap Green cups here to keep the belt moving. This buys time for the printer to need Yellow.
- Step 9: Once the Yellow handset/dial area on the canvas opens up (usually around 40% completion), then tap the Right-side Yellow Cup.
- Step 10: Follow the Yellow immediately with the Final Green Cup protecting the Key.
Phase 3: The Lock and Load
You have exposed the Golden Key. Now you must secure it and use it.
- Step 11: Tap the Golden Key. It will fly to the lock on the bottom left.
- Step 12: The Lock shatters, revealing a new stack of cups.
- Step 13: Do not spam the newly unlocked cups. Assess your belt status.
- Step 14: The center "6" barriers should be close to breaking (or already broken) due to your previous activity. If they break, they reveal White/Light Blue highlight cups.
- Step 15: Prioritize the Dark Red cup from the middle-right stack if it appears. It is often buried under the debris of the right column and is easy to miss.
Phase 4: The Final Polish
The home stretch. It's a race to clear the remaining board.
- Step 16: Focus on clearing the Left Side reserve. These are mostly filler Greens to finish the vast background areas.
- Step 17: Use the White/Light Blue cups from the center for the phone's shine and glare effects.
- Step 18: Keep an eye on the Yellow remaining. There might be a second Yellow cup needed for the dial details.
- Step 19: If the belt gets full with Green, you are safe to just let them pour. Green is the dump stat.
- Step 20: Finish the final Dark Red shading to complete the 3D effect of the phone body.
Advanced Tactics & Speed Run Tips
Once you have beaten the level, you will want to optimize your time. These tips are for players looking to achieve a high score or fast time.
The "Rhythmic Tapping" Technique
Don't click randomly. Develop a rhythm based on the sound of the sand pouring. As soon as you hear the "pouring" sound stop for one cup, your next finger should be tapping the next cup. This minimizes the downtime between the machine finishing a cup and receiving the next one. In Level 206, efficiency is measured in milliseconds.
Pre-loading the Queue
If you know a color change is coming (e.g., you see the Red section of the phone ending and the Yellow dial starting), try to have a Yellow cup already on the belt waiting in the second or third slot. This prevents the printer from stalling while you hunt for a Yellow cup in the maze. Always keep your "next needed color" within arm's reach on the conveyor.
Visualizing the Buried Stack
Spend your first run memorizing the stack order in the Right Column: Green -> Red -> Red -> Yellow -> Green -> Key. Once you have this memorized, you don't need to look at the colors as closely. You can tap based on rhythm, knowing exactly what is coming next. This muscle memory is essential for Speed Runs.
Using the "6" Barriers as a Timer
The white "6" cups act as a natural progress indicator. If you have processed 15-20 cups and the barriers haven't dropped yet, you might be too focused on one side of the board. Use their destruction as a signal to shift your strategy from "Digging" to "Clearing."
Ignoring the Noise
Visually, this level is noisy. The bright Red and Green can be distracting. For a speed run, try to soften your gaze. Don't look at individual cups; look for shapes. Look for the shape of the Red body vs the Green background. Let your peripheral vision handle the cup colors while your focus remains on the belt capacity meter.
Troubleshooting & Common Mistakes
Every player fails at Level 206 the first few times. Here is how to fix specific errors you might be encountering.
Mistake: The "Full Belt" Crash
Symptom: You tap a cup, and the level fails instantly because the belt is full.
Cause: You are clicking faster than the printer is pouring. You likely pulled Yellow or Dark Red too early, and they sat on the belt, taking up space while you tried to dig for more Greens.
Fix: Slow down. Never let the belt reach 5/5 capacity. Try to keep it at 3/5 or 4/5 max. If you see a "stuck" cup (like a Yellow waiting to be used), stop digging and start clearing Greens from the Left to cycle the machine until that Yellow is processed.
Mistake: The "Buried Key" Stall
Symptom: You are at 90% completion, but the level won't end. The Key is still visible on the board.
Cause: You successfully exposed the Key but forgot to tap it, or you tapped it but the belt was too full to accept the resulting explosion of cups from the Left Lock.
Fix: Make sure you actually tap the Golden Key to trigger the lock break. Also, ensure you have cleared at least 2 slots on your belt before breaking the lock, so the newly released cups don't overflow your system.
Mistake: The Color Blind Trap
Symptom: You keep tapping Red cups when the printer needs Green, or vice versa.
Cause: The intensity of the Red and Green in this level is very similar in saturation. In the heat of the moment, they can blur together.
Fix: Look at the Pattern, not just the color. The Red is concentrated in the center blob (the phone). The Green is everywhere else (the field). If you are filling the center, go Red. If you are filling the edges, go Green.
Mistake: Ignoring the Dark Red
Symptom: The phone looks flat or unfinished, or you have one cup left on the board that you can't reach.
Cause: The Dark Red cup is often sandwiched in the middle-right stack. If you clear the outer layers of the center stack, the Dark Red can become isolated.
Fix: Make a mental note to grab the Dark Red as soon as the "6" barriers break. Don't leave it until the very end, or it might be trapped behind other cups you have already cleared.
Level 206 is a marathon disguised as a sprint. Keep your belt moving, respect the Yellow cups, and that Golden Key will be yours in no time. Good luck!