Level Overview: The Logistics Puzzle of Stage 211
The Visual Composition
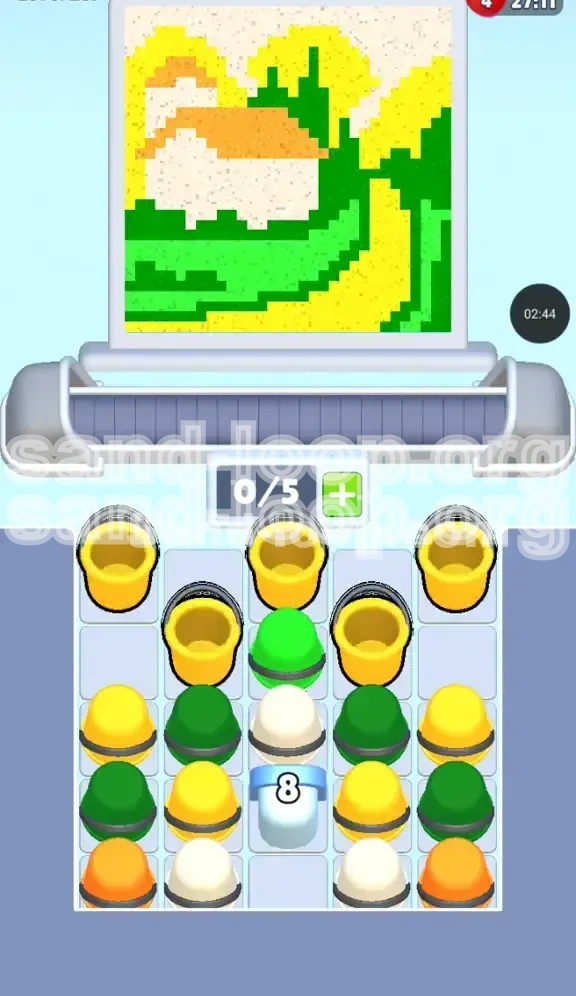
Sand Loop Level 211 presents a deceptively complex image that resembles a dense digital forest. At first glance, the canvas appears to be a straightforward landscape composed of large, sweeping areas of green foliage interspersed with bright yellow highlights. However, the complexity lies in the specific boundaries between these zones. Unlike previous levels where colors might have wide, forgiving borders, this level features jagged, pixel-tight edges between the greenery and the yellow accents. The background is a mix of small white and orange clusters that serve as "noise" to distract you from the main objective. Understanding this visual density is the first step toward formulating a winning strategy, as it dictates that you cannot simply pour paint continuously; you must be surgical with your application to avoid bleeding colors into restricted zones.
The Supply Tray Bottleneck
The primary difficulty of this level is not the canvas itself, but the chaotic state of the supply tray. In Level 211, the game developers have intentionally inverted the standard cup stacking order to test your logistical planning. You will notice immediately that the Green cups—your most critical resource—are not sitting on top waiting for you. Instead, they are buried deep beneath a layer of Yellow cups in the center column and blocked by White cups on the sides. The Orange cups are relegated to the difficult-to-reach bottom corners. This arrangement forces you into a specific opening sequence: you must clear the "garbage" colors (Yellow and White) off the top of the stack before you can even hope to access the Green supply needed for the bulk of the level. This is a logistics puzzle as much as it is a timing game.
Conveyor and Capacity Constraints
Your conveyor belt begins with a standard capacity of 5 slots. While this might seem like ample space, the specific loading order required to solve this level means you will often feel like you are playing "Tetris" with your cups. Because you need to pull multiple Yellow cups first to unbury the Greens, you risk clogging your conveyor with colors you aren't ready to use yet. If you fill the belt with 4 or 5 Yellow cups early on, you will have no room to load the Green cups when they finally become accessible, leading to a deadlock where you are forced to pour colors in the wrong order. Mastering the rhythm of loading, holding, and pouring is essential to navigating this capacity constraint without wasting time or overfilling the belt.
Win Conditions and Progress Metrics
To secure a three-star rating on Level 211, you must achieve near-perfect efficiency. The progress meters are skewed heavily towards Green, requiring approximately 55-60% of the total sand volume to be this single color. Yellow follows as a secondary requirement, needing about 25-30% coverage. The remaining 15-20% is split almost evenly between White and Orange. The win condition triggers only when the specific pixel counts for these colors are met exactly. This means that simply "finishing" the green areas isn't enough; if you have accidentally bled Green into the Yellow zones, the game will fail to register the Yellow progress, leaving you stuck at 95% completion. Precision is paramount.
Why This Level Stalls Beginners
New players often stall on Level 211 because they try to attack the canvas colors in the order they see them, rather than the order the cups are stacked. The instinct is to start pouring Green immediately because it dominates the image. When players find they can't reach the Green cups, they panic and start randomly pouring whatever is in their hand, usually Yellow. This leads to a "contaminated" board where the Yellow zones are overfilled and the Green zones remain untouched. The level becomes a soft-lock state where you have the wrong colors on your belt for the remaining work. Recognizing that you must work in "layers"—clearing the tray stack first, painting the canvas second—is the key to breaking out of this beginner trap.
Strategic Analysis: The Green Cup Foundation
The 65% Dominance Rule
In Level 211, Green is not just a color; it is the foundation of the entire puzzle. Analyzing the canvas reveals that roughly 65% of the pixels require green sand. This overwhelming percentage dictates your entire strategy. If you run out of Green cups or fail to pour them efficiently, you cannot win. The challenge is that the game buries this essential resource behind the Yellow cups. You must adopt a mindset that treats the first 10-15 seconds of the level not as "painting time," but as "resource acquisition time." Your primary goal in the opening moves is to clear the Yellow cups out of the tray as fast as possible to expose the Green layer beneath.
Unburying the Supply Stack
The supply tray in this level is a classic example of "last-in, first-out" blocking. The Green cups are located in the second and third rows of the center stack, covered by Yellow cups. To reach them, you must physically load the Yellow cups onto your conveyor. You cannot pour them onto the canvas yet (unless there are tiny yellow accents), so you must use your conveyor slots as temporary storage. This is a calculated risk. You need to pull 3 Yellow cups in quick succession. This fills 60% of your belt immediately. It feels counterintuitive to fill your belt with a color you don't desperately need yet, but it is the only way to mechanically unlock the Green cups hidden underneath.
The Risk of Early Overflows
Because you are forced to load multiple Yellow cups to clear the stack, the risk of early overflow is significant. The Yellow zones on the canvas are not large; they account for perhaps 25% of the total area. If you have 3 or 4 Yellow cups on your belt and you start pouring them aggressively to clear space, you will inevitably overfill the Yellow zones. Once a zone is full, you cannot pour more sand into it without spilling into neighboring areas. This creates a dilemma: you need the Yellow cups gone to get to the Green, but you can't pour them all without ruining the canvas. The solution is the "Hold and Wait" tactic, which we will discuss in the walkthrough section.
Managing the White Cup Obstacle
Adding to the complexity is the placement of the White cup. It sits in the middle tier, slightly offset. If you clear the Yellow cups and blindly grab everything available, you might accidentally grab the White cup before you are ready. The White areas are small and specific (about 10% of the canvas). Grabbing the White cup too early takes up a valuable slot on your conveyor that could be used for Green. You must leave the White cup in the tray (or treat it as a "blocker") until you have established a solid rhythm with your Green pours. Only once the Green foundation is laid should you pivot to handling the White accents.
Step-by-Step Walkthrough: The Unblocking Method
Phase 1: The Tray Clearing Sequence (Seconds 0-10)
As soon as the level starts, do not look at the canvas. Look at the tray. You will see a stack of Yellow cups covering Green cups.
1. **Action:** Rapidly click and drag the top 3 Yellow cups onto your conveyor belt. Your belt should now have 3 Yellow cups and 2 empty slots.
2. **Critical Note:** Do not pour these yet unless you see a massive, obvious Yellow area that needs immediate filling.
3. **Result:** By removing the top layer of the stack, you have revealed the Green cups. You now have access to the resource you actually need.
Phase 2: Establishing the Green Rhythm (Seconds 10-30)
Now that the Greens are visible, shift your focus entirely to loading them.
1. **Action:** Fill the remaining 2 empty slots on your conveyor with Green cups.
2. **Strategy:** You should now have a belt configuration of 3 Yellow cups followed by 2 Green cups (or mixed, depending on how you dragged them).
3. **Execution:** Start pouring the Green cups immediately. Ignore the Yellow cups sitting on the belt for now. Treat them as "passengers."
4. **Canvas Focus:** Target the large, sweeping green areas first. Do not worry about the edges or small details yet. You want to get the bulk Green meter up to 30-40% as quickly as possible. As you pour the Green cups, slots will empty up.
Phase 3: The "Juggling" Act (Seconds 30-50)
This is the most technically difficult part of the level. You have poured your initial Greens, freeing up 2 slots. You still have Yellow cups on the belt that you haven't used.
1. **Action:** Do not reload more Greens yet. You must clear the Yellow "passengers" first.
2. **Tactics:** Pour the Yellow cups into their designated zones. Be very careful to stop before the meter hits 100%. You want to leave about 10-15% headroom in the Yellow zones for final touch-ups later.
3. **Reloading:** As you pour the Yellow cups, you create space. Immediately reload this space with more Green cups from the tray. Your goal is to keep the conveyor moving: Green pours -> frees slot -> load Green -> pour -> frees slot -> pour remaining Yellow -> load Green.
Phase 4: The White Cup Insertion
Once your Green meter is past the 50% mark and your Yellow meter is around 80%, you can introduce the White cup.
1. **Action:** Check your conveyor slots. You should have 1 or 2 Greens remaining.
2. **Load:** Grab the single White cup from the tray.
3. **Pour:** Pour the White cup into the small white highlight areas (usually flowers or sparkles in the foliage).
4. **Why Now?** Waiting until the mid-game ensures you don't waste a belt slot early on. The White zones are small enough that one cup usually handles 100% of the requirement.
Phase 5: The Orange Corner Cleanup (Final 20%)
The Orange cups are in the bottom corners of the tray. They are the final hurdle.
1. **Status:** Your Green and Yellow should be nearly done (90%+).
2. **Action:** Use your remaining conveyor slots to dig out the Orange cups. You might need to shuffle remaining cups if the tray is messy.
3. **Precision:** The Orange zones are very small. Pour carefully. If you have multiple Orange cups, you likely only need to pour one and a half cups to finish the level.
4. **Winning Move:** Once the Orange hits 100%, the level should end immediately, provided your other colors are also sufficiently filled.
Key Tips for Operational Efficiency
The "Passenger Cup" Technique
This is the most important tip for Level 211. A "Passenger Cup" is a cup that you load onto your conveyor not to pour immediately, but to move it out of the way so you can access cups beneath it in the stack. You must treat your conveyor belt like a temporary road. You are loading Yellow cups (passengers) to drive them from the Tray (warehouse) to the Canvas (destination), but you are in no rush to unload them. Keeping them on the belt allows you to access the Green cups underneath without pouring the Yellow paint where it doesn't belong yet.
Visualizing the "Last Pour" Percentage
Don't trust your eyes; trust the numbers. When you are filling the Yellow zones, stop pouring when the meter hits 85%. The residual sand in the air and the slight visual lag of the game often means that if you pour until it *looks* full, you have actually overfilled. Leaving that 10-15% buffer is crucial because you might need to use that color again for a tiny pixel you missed, and you don't want to be blocked from pouring it.
Conveyor Slot Management Mathematics
Ideally, you want to keep your conveyor at 4/5 or 5/5 capacity constantly. An empty belt is a waste of travel time. However, the *composition* of those cups matters. A safe configuration for this level is **2 Green - 1 Yellow - 1 Green - 1 Yellow**. This alternating sequence ensures that no matter what color the canvas needs next, you have it available or will have it available within seconds. It prevents the "lockout" where you have 5 Green cups but the canvas needs a Yellow touch-up, forcing you to wait.
Handling Tray Disarray
By the mid-game, the neat rows of the tray will be gone. You will have a scattered mess of cups. When this happens, do not click randomly. Pause for a split second and identify the color you need most (usually Green). Hover your hand over that cup. Is it blocked? If so, grab the blocking cup, load it, and set it aside. Do not try to "force pick" a cup that is visually glitching or stuck; the game physics might register it as a misclick. Clear the path, then grab the prize.
Common Mistakes and Stuck Solutions
Mistake #1: The "Yellow Lock" (Early Game)
**The Scenario:** You loaded 3 Yellow cups to get to the Green, but you immediately poured them all into the small Yellow zones.
**The Consequence:** The Yellow zones are now at 100% capacity. You still have 2 Green cups on the belt and the tray is offering more Yellow. You have no space to load the Green because the Yellow zones on the canvas are full and won't accept more sand.
**The Solution:** You must restart the level. As mentioned in the walkthrough, load the Yellow cups but *hold* them. Do not pour Yellow until you have established a flow of Green and have empty slots to manage the consequence.
Mistake #2: Ignoring the Small Details (End Game)
**The Scenario:** You have 95% completion. You are frantically pouring Green on the big bushes, but the percentage won't move.
**The Consequence:** You are ignoring the tiny, single-pixel flowers or dots hidden in the corners. Often, the last 5% of a level is not about filling the big obvious areas, but finding the one pixel you missed in a cluttered part of the image.
**The Solution:** Stop pouring on the big areas. Scan the edges of the canvas and the boundary lines between colors. Look for a single pixel of White or Orange that you missed. Pouring a massive cup of Green on a full zone does nothing.
Solution: What to Do If You Run Out of Moves
If you find yourself with no cups on the belt and the tray is empty but the level isn't finished, you have likely suffered from a "Waste" issue. This usually happens if you overfilled a zone, effectively deleting that sand from the usable total. Since you cannot retrieve sand, your total available volume has dropped below the requirement. Unfortunately, if this state occurs, the level is mathematically impossible to finish. The only solution is to restart and practice stricter "Stop Pouring" discipline on the color meters to prevent overflow waste.
Solution: Dealing with Stuck Cups
Sometimes a cup in the tray refuses to move, or the game doesn't register your click. This is often a physics glitch where two cups are overlapping slightly.
**The Fix:** Don't keep clicking the same spot frantically. Move your mouse away and click a different part of the tray or canvas to "reset" the game's click registry. Then, try clicking the very center of the cup's rim. If it still won't move, try clicking *next* to it to see if the game thinks the hitbox is shifted.