
Level 215
HARDHow to solve Sand Loop level 215? Get instant solution for Sand Loop 215 with our step by step solution & video walkthrough. Sand Loop 215 tips and guide.
Play Sand Loop Now
Experience the puzzle challenge firsthand
Game Screenshots
Sand Loop Level Guides
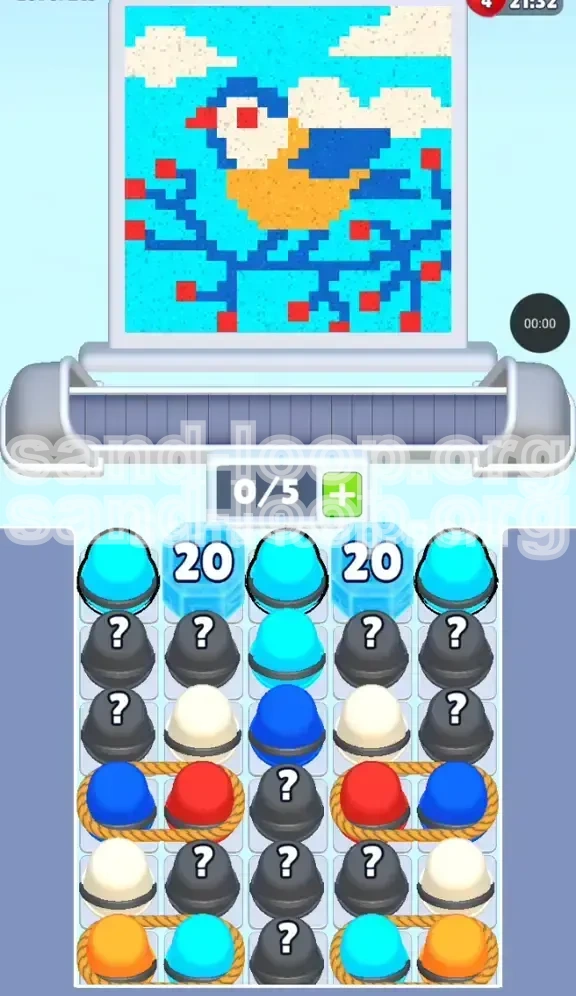
Level Overview: The "Pixel Bird" Challenge
Welcome to the comprehensive walkthrough for Level 215 of Sand Loop. This stage represents a significant shift in pacing, transforming a standard puzzle into a logistical test of resource management. Unlike previous levels where you could simply tap cups rapidly, Level 215—the "Pixel Bird" stage—requires a calculated, mathematical approach to your inventory management.
The visual composition features a stylized Blue Jay perched on a dark branch against a vast Cyan sky. While the artwork appears serene, the underlying mechanics are aggressive. You are dealing with a dual-threat system: "Ice Block Counters" that artificially gate your progress and "Roped Pairs" that destroy your fluid dynamics if mishandled. This guide will break down exactly how to dismantle this level layer by layer.
The Core Mechanics
This level is defined by three specific mechanics that work against the player's natural instinct to tap fast. Understanding these is the difference between a swift clear and a restart.
- The Conveyor Limit: Your cup holder is strictly limited to 5 slots. In a fast-paced level, this is a very tight margin for error.
- The Ice Gates: Two massive Ice Blocks labeled "20" sit in the upper tray. You cannot access the middle columns until these are cleared by processing adjacent cups.
- The Rope Mechanic: Certain colors are tied together. Pulling one cup forces you to take a second, instantly consuming 40% of your total inventory space.
The Color Palette Analysis
The distribution of sand in this level is uneven, which dictates your strategy. You cannot treat all colors equally.
- Dominant Color (Cyan): Comprises approximately 50% of the canvas. This is your background and must be managed constantly.
- Structural Colors (Dark Blue & White): These define the branch and the bird. They are medium-volume colors.
- Detail Colors (Red & Orange): These are low-volume but high-risk. The Red berries are pixel-perfect dots that are easy to over-pour.
Winning Condition
To achieve 100% completion and the three-star rating, you must fill the canvas without spilling over the lines. This means you cannot simply pour Red while the nozzle is hovering over a Blue branch. You must learn to "ride the belt"—letting cups cycle through the machine without pouring to wait for the correct nozzle position.
Difficulty Spike
Level 215 is considered a difficulty spike because it punishes impulsivity. If your conveyor belt is full (5/5 cups), and you pull a Roped Pair, the game will lock up, or you will be forced to pour the wrong color, leading to an immediate retry. Patience is the skill you must hone here.
The "Dead Zone" Trap
Pay attention to the columns covered by the "20" Ice Blocks. Until these shatter, columns 2 and 4 are inaccessible. Trying to force these columns will only waste your time and cups. Focus your energy on the accessible outer columns until the path clears naturally.
Strategic Objectives and Goals
Before we dive into the button-by-button walkthrough, you need to understand the strategic goals of this level. Randomly tapping cups will lead to a "Game Over" screen due to inventory clogging.
Primary Objective: Thaw the Ice
Your immediate goal is not to paint the bird, but to break the Ice Blocks. These blocks have a hidden counter of 20. Every time you process a cup adjacent to them (or in the columns below them), the counter decreases. Breaking these ice blocks is the only way to unlock the rest of your color supply.
Secondary Objective: Inventory Management
Always keep your eye on the "0/5" counter. A critical rule for this level is to maintain at least 2 empty slots on your conveyor belt at all times. Why? Because when the Roped Pairs appear, you need to pull two cups at once. If you have 4 cups and pull a pair, you overload the system. Keep it lean.
Tertiary Objective: Order of Operations
You must process colors in a specific hierarchy to avoid cross-contamination. You cannot paint the Red berries while the nozzle is over the Cyan sky, or vice versa. You need to group your painting efforts: handle the sky first, then the branch, and finally the fine details.
Understanding the Roped Pairs
This level introduces specific pairings that complicate your life:
- Pair A: Dark Blue + Red (The Hazard Mix)
- Pair B: Cyan + Orange (The Cleanup Mix)
Understanding which colors are linked allows you to plan your inventory space. If you see a Red cup coming up, ensure you are ready to handle a Dark Blue cup simultaneously.
Step-by-Step Walkthrough
This section provides the exact sequence of moves you need to execute to clear Level 215. Follow these steps in order.
Phase 1: The Cyan Opener
The start of the level is scripted. Do not deviate from this path.
- Tap the Top-Row Cyan Cups: You will see three Cyan cups available at the very top (Left, Center, Right). Tap all three immediately.
- Why? This clears the top layer of the supply tray, allowing you to access the cups underneath. It also begins filling the massive Cyan sky background, which is the safest place to pour.
- Monitor the Nozzle: Let the machine pour these three cups. Do not interrupt the flow. The nozzle should be moving across the top 50% of the canvas painting the sky.
Phase 2: Clearing the Ice Blockade
Once the initial Cyan cups are cleared, you will face the "20" Ice Blocks and a row of Mystery (?) cups.
- Ignore the Mystery Cups: Do not tap the Mystery cups yet. They contain high-risk colors like Red or White that you are not ready to use.
- Focus on Adjacent Clears: Look for cups in columns 1 and 5 (the outer edges). Processing these will chip away at the Ice Blocks in the center.
- Wait for the Shatter: Continue processing cups from the outer edges until the "20" counters hit zero and the Ice Blocks shatter. This opens up the center of the tray.
Phase 3: Handling the First Rope Trap
With the Ice gone, you will expose the first Roped Pair: Dark Blue and Red.
- Check Your Slots: Ensure you have only 2 or 3 cups on your belt. Do not pull this pair if you have 4 cups.
- Pull the Pair: Tap the Roped Pair to load both Dark Blue and Red.
- The Strategic Wait: The nozzle is likely still on Cyan or White. You must skip pouring the Dark Blue and Red cups until the nozzle moves over the branch area (Dark Blue) or the berry spots (Red).
- Execute Dark Blue: Pour the Dark Blue to fill the branch system.
- Micro-Management for Red: Wait for the nozzle to pass precisely over the tiny berry dots. Tap the Red cup to pour in short bursts. Stop immediately if the nozzle starts moving away from the berries.
Phase 4: The Bottom Tray and Final Details
The final phase involves the bottom of the tray, where the final Roped Pair (Cyan + Orange) and the remaining Whites reside.
- Pull Cyan + Orange: This is your "Cleanup" pair. The Cyan is useful for any missed spots in the sky, and the Orange is for the bird's belly.
- Paint the Belly: Use the Orange sand to fill the bird's central chest area.
- Final White Touches: Use any remaining White cups to finish the bird's chest markings and the upper clouds. Since White is shared between the sky (clouds) and the bird, ensure you are precise with your timing.
Phase 5: Endgame Management
In the last 10% of the level, the game often slows down cup generation.
- Keep Belts Rolling: Don't let the machine stop. Keep cycling any remaining cups to trigger the final spawns.
- Precision Over Speed: At this stage, the background is full. One wrong move with Red or Orange can spill over onto the Cyan background. Slow down and verify every pour.
- Clear the Queue: Ensure your belt is empty as the final pixels fill in to secure your victory.
Color Order and Processing Guide
One of the most confusing aspects of Level 215 is knowing which color to prioritize when multiple cups are available. This hierarchy dictates your decision-making process.
The "Safe" Colors (Tier 1)
These colors have high volume and are located in the background. They are the most forgiving.
- Cyan (Priority: High): Always pull Cyan if you see it. The sky is huge, and you can never have enough Cyan sand. It acts as a "buffer" cup—you can pour it almost anywhere in the top half of the screen.
- Dark Blue (Priority: Medium-High): The branch system is large and connects the bird to the bottom of the screen. It is safer to pour Dark Blue earlier in the level before the branch gets crowded by other colors.
The "Bridge" Colors (Tier 2)
These colors require you to be more aware of the nozzle's position.
- White (Priority: Medium): White is tricky because it appears in two distinct places: the clouds (top) and the bird's chest (center). Always check where the nozzle is before pouring. If the nozzle is on the branch, do not pour White.
- Orange (Priority: Medium): Restricted to the bird's belly. It is a contained area, so it's relatively safe, but you must ensure the nozzle isn't drifting over the Red berries or the Blue branch.
The "Lethal" Colors (Tier 3)
These colors are the "Game Over" risks. They require pixel-perfect timing.
- Red (Priority: Low/Last): The Red berries are the smallest detail in the game. If you pour Red while the nozzle is over the branch or sky, you fail. Only tap Red when the nozzle is directly over a berry cluster.
The Processing Algorithm
When in doubt, follow this mental checklist when deciding which cup to tap next:
- Is the nozzle currently over a safe zone for the color I want to tap?
- Do I have enough slots on my belt (keep 2 open)?
- Will tapping this cup help break an Ice Block or clear a jam?
Managing the Mystery Cups
The row of "?" cups is a gamble.
- The Risk: They can turn into Red, which is dangerous early on.
- The Strategy: Only tap a Mystery cup if you already have a "safe" cup (like Cyan) currently pouring on the belt. This way, if the Mystery cup reveals a bad color, you can let it ride the belt without pouring until the nozzle is safe.
Common Mistakes and Stuck Solutions
Even experienced players can find themselves frustrated by Level 215. Here is how to troubleshoot the most common failure points.
Mistake #1: The "Full Belt" Deadlock
The Problem: You have 5 cups on the belt. You try to tap a Roped Pair, but nothing happens, or the game stalls.
The Solution: You must plan ahead. Never let your belt reach 5 cups unless you are absolutely certain no Roped Pairs are available in the supply tray. If you are currently stuck (5/5 cups), look at the cup currently being poured. Once it finishes, you will have 4/5. Immediately pour the next cup that matches the nozzle position to free up a slot. Do not tap new supply cups until you have cleared the backlog.
Mistake #2: Spilling Red on the Branch
The Problem: You poured Red sand while the nozzle was passing over the Dark Blue branch. Now you have red pixels contaminating the wood texture.
The Solution: Unfortunately, there is no "erase" button in Sand Loop. This mistake usually forces a restart. To prevent it, adopt theTrigger Finger" technique: hover your finger over the Red cup, but do not tap it until the nozzle is physically touching the berry pixels. As soon as the nozzle moves away, lift your finger or stop pouring.
Mistake #3: Ignoring the Ice Counters
The Problem: You are focusing on the bird details, but the game feels slow, and you aren't getting new colors.
The Solution: You are neglecting the Ice Blocks. The game throttles your supply until the "20" counters are depleted. Stop trying to paint the bird perfectly. Go back to columns 1 and 5 (the sides) and aggressively tap any cup there to hammer the Ice Blocks. Once they shatter, the supply flow will return to normal.
Solution for: "I'm out of Cyan!"
It is common to run out of Cyan for the sky before the level ends.
- Check the Bottom Tray: The final Roped Pair is Cyan + Orange. Make sure you haven't missed pulling this pair.
- Mystery Cups: Late in the game, Mystery Cups have a higher chance of spawning Cyan since it's the dominant color. If you are desperate for sky touch-ups, tap the Mystery cups.
Solution for: "The Nozzle is stuck on White"
Sometimes the nozzle hovers over the White clouds, but you need to paint the Orange belly.
- Forced Cycling: You must let the White cup pass without pouring (tap the "Skip" or just wait for it to cycle if the game allows non-pouring). Once the White cup leaves the nozzle position, the machine will move to the next color in your queue. This is why keeping your belt organized (grouping colors) is vital.
Speed Run and Pro Tips
For players looking to achieve a top time or maximize their efficiency, these advanced strategies will help you shave seconds off your run.
Optimizing the "Cyan Dump"
Don't wait for the nozzle to perfectly paint every single Cyan pixel.
- The 80% Rule: Pour Cyan until the sky is roughly 80% full. You can finish the remaining spots later with the Cyan + Orange roped pair or final Mystery cups. Moving to the next phase (breaking Ice) sooner is more important than perfecting the sky immediately.
Pre-loading the Belt
This is a pro-move. While the nozzle is pouring a long color (like the Dark Blue branch), use that time to scan the supply tray.
- The Action: While one cup is pouring, tap the next necessary cups to load them onto the belt. By the time the current cup is empty, you want the next required color to be already sitting in the nozzle position, ready to go. This eliminates the "downtime" between pours.
The "Double Tap" for Roped Pairs
When you are ready to pull a Roped Pair (like Dark Blue + Red), do it with confidence.
- The Technique: Ensure you have 3 empty slots. Tap the pair immediately. Don't hesitate. Hesitation leads to misreading the nozzle position. As soon as they hit the belt, identify which one you need first (usually Dark Blue) and prepare to skip the other until needed.
Visualizing Nozzle Paths
The nozzle moves in a predictable pattern: usually zig-zagging or spiraling from the top down.
- Prediction: If the nozzle is at the top (Cyan sky), don't tap a cup that is needed at the bottom (Orange belly). Tap cups that are needed where the nozzle will be in 3-4 seconds. Anticipating the nozzle's movement is the key to Speed Running Sand Loop.
Handling "Waste" Colors
Sometimes you are forced to pull a color you don't need.
- The Strategy: If you pull a Red cup but the nozzle is over the sky, treat it as a "Waste" slot. Just let it sit on the belt. Do not pour it. Let it cycle through the machine and come back around. Pouring a "Waste" color just to clear the belt is the fastest way to lose the level.
Final Sprint Technique
In the last 10% of the level, stop worrying about Ice Blocks or Ropes.
- The Focus: Pure reflexes. Tap anything that isn't a "Waste" color. Your belt should be empty, allowing you to process cups instantly. Keep the flow moving. The bottleneck here is usually the player's hesitation, not the game mechanics.