
Level 219
HARDHow to solve Sand Loop level 219? Get instant solution for Sand Loop 219 with our step by step solution & video walkthrough. Sand Loop 219 tips and guide.
Play Sand Loop Now
Experience the puzzle challenge firsthand
Game Screenshots
Sand Loop Level Guides
Sand Loop Level 219: Mastering the Carrot Garden
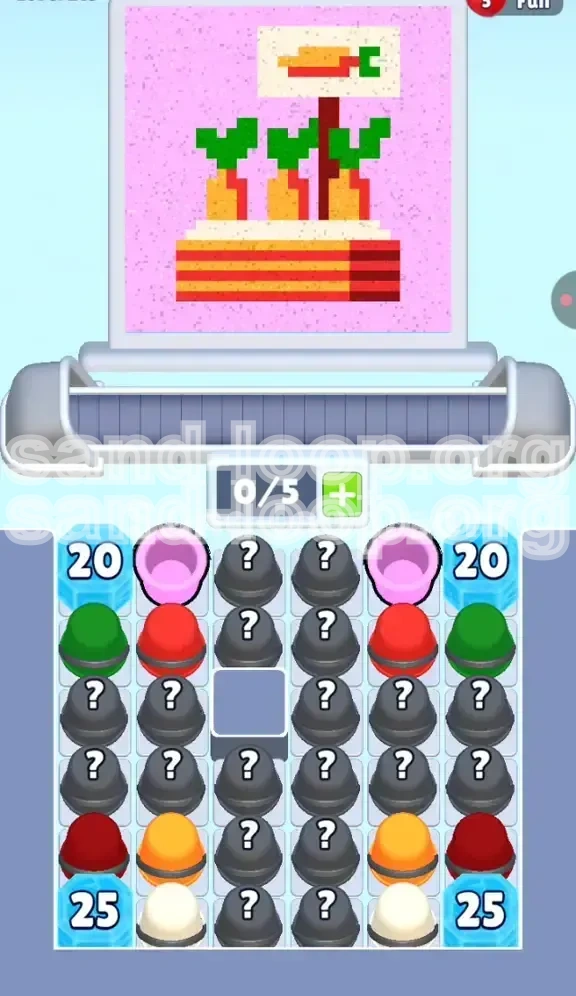
Welcome to the ultimate walkthrough for Level 219, commonly known as the "Carrot Garden" challenge. This stage is not designed for high-speed reflexes but rather for strategic patience and resource management. In this level, you are tasked with assembling a charming pixel art scene featuring three carrots growing in dark soil, topped with vibrant green leaves and accompanied by a rustic wooden signpost.
The primary difficulty in Level 219 lies in the restrictive board layout. Unlike standard stages where all resources are immediately available, this level utilizes a "Dependency Chain" mechanic. Your most critical colors—Green for the foliage and Red for the soil base—are locked behind thick Ice Blocks in the four corners of the screen. This forces you to navigate a chaotic sea of Mystery Cups in the center of the board before you can access the tools needed to finish the art. Prepare for a battle of attrition where managing your queue slots is just as important as your tapping accuracy.
Stage Layout Analysis
The board is divided into two distinct zones: the "Chaos Center" and the "Frozen Periphery." Understanding the geography of the level is the first step toward victory.
- The Central Grid: The middle 60% of the screen is occupied by Mystery Cups (marked with a black "?"). These cups dispense random colors required for the bulk of the painting.
- The Top Corners (Ice '20'): Located in the upper left and right, these blocks shield the Green Cups. You cannot clear them until you have performed a specific number of actions or cleared adjacent blocks.
- The Bottom Corners (Ice '25'): These guard the Red Cups. The higher number indicates these are the final barriers you will break, likely unlocking just as you finish the main body of the carrots.
- The Target Canvas: The image requires 50% Pink background, 25% Orange for carrots, 15% Yellow/Red for soil, and 10% Green/White for details.
Strategic Objectives
To achieve a three-star rating and complete the level without running out of moves, you must adhere to the following strategic goals:
- Preserve Early Moves: Do not waste your initial taps on unnecessary Mystery Cups. Focus only on colors that build the foundation.
- Manage Queue Capacity: You start with limited slots (typically 5 total). Never fill your slots with "junk" colors (colors you don't immediately need) when a critical color is about to enter the belt.
- Trigger Ice Melts Early: Aggressively clearing the center grid is the only way to lower the counters on the corner Ice Blocks. Speed in the center phase dictates your success in the final phase.
- Avoid Contamination: The soil stripes at the bottom are thin. Spilling Orange into a Red soil stripe will force a restart or cost you precious corrective moves.
The Resource Denial Mechanic
This level introduces a psychological pressure known as "Resource Denial." Because the Green and Red cups are visible but unclickable behind ice, players often panic and tap Mystery Cups recklessly.
- The Safety Mechanic: Treat the Ice Blocks as a timing tool. Since you physically cannot access Green yet, you don't need to worry about the leaves until the very end. This reduces the cognitive load during the first half of the level.
- The Bottleneck: The real danger occurs when the Ice Blocks break. If your queue is full of garbage when the Red and Green cups unlock, you won't have space to pick them up, causing them to cycle off the screen and be lost forever.
- Counter Strategy: Keep two slots empty at all times once the Ice Block counters drop below 10.
Level Difficulty and Duration
Level 219 is rated as Hard difficulty within the Sand Loop community.
- Average Completion Time: 2:30 to 3:30 minutes.
- Mistake Margin: Low. You are allowed approximately 2-3 major overflows before the pixel art becomes too messy to correct.
- RNG Factor: High. Since you rely on Mystery Cups for the mid-game carrots, bad luck (getting too many Whites or Pinks early) can delay your Orange acquisition significantly.
Step-by-Step Walkthrough: The Execution Phase
This section details the exact sequence of actions required to conquer the Carrot Garden. Follow these steps in order to minimize backtracking and maximize efficiency.
Phase 1: The "Pink" Foundation
Upon starting the level, ignore the temptation to tap the Mystery Cups immediately. Look for the guaranteed Pink spawns.
- Initial Tap: Locate the two visible Pink Cups in the top row of the conveyor belt. Tap them instantly.
- Why Pink First? The Pink background constitutes the largest area of the canvas (approx. 50%). Pouring Pink first establishes the borders of the carrots and soil, creating a "negative space" map that makes it easier to aim subsequent colors.
- Flow Control: Pour Pink until the background is 80% complete, then stop. Do not overfill the edges, or you will lose definition for the carrot tops later.
- Clearing the Belt: Dumping Pink immediately clears your queue, allowing you to grab Mystery Cups as they appear from the center chute.
Phase 2: Excavating the Mystery Grid
With the background drying, you must enter the "Mining" phase. Your queue capacity is now your most valuable asset.
- Slot Management: Adopt a "2-Slot Reserve" rule. Keep 2 out of your 5 available slots empty at all times. This prevents you from being forced to pour a color you don't want.
- Fishing for Orange: Start tapping the Black Mystery Cups in the center column. You are strictly hunting for Orange (Carrots) and Yellow (Soil Base).
- Dealing with Junk: If you reveal White or Red (before the ice breaks), hold the cup. Do not pour it. Let it sit in your slot until the Mystery Cup cycles back around and disappears, or until you absolutely need that slot.
- The Soil Base: As soon as you pull a Yellow cup, pour the bottom layer of the soil. This creates a solid foundation for the Red stripes that will come later.
Phase 3: The Carrot Construction
This is the core visual phase. You need to build the three carrots before the soil is fully finished.
- Orange Stacking: Pour the Orange color vertically to form the carrot bodies. Ensure there is a small gap between the carrot and the soil line.
- Don't Touch the Leaves: The top of the carrots connects to the Green leaves. Do not try to "connect" them with Orange. Leave the pixels bare (Pink background) for now. Spilling Orange into the future Green zone is a common error.
- Monitoring Ice Counters: While pouring Orange, keep an eye on the corner counters. They should be dropping with every Orange pour you complete.
- Precision vs. Speed: Take your time here. A fat carrot looks bad. The pixel art requires slender, slightly tapered shapes. Use short taps to define the sides of the carrots.
Phase 4: Breaking the Perimeter (The Ice Event)
Once you have filled the central grid and completed the Orange carrots, the board state will change dramatically.
- The Cascade: Clearing the final Mystery Cups in the center usually triggers the Ice Blocks to shatter. The Top Corners (Green) and Bottom Corners (Red) will unlock almost simultaneously.
- Priority Grab: The Green cups are rarer and harder to aim. If the belt offers both Green and Red, grab Green first. The Red soil is more forgiving of small spills than the Green leaves are.
- The "Red Rush": Once you have the Red cups, flood the bottom soil layer. Create the distinct horizontal stripes. Do this while the soil is still damp from the Yellow phase to help the colors blend slightly at the edges, creating a crisp line.
Phase 5: The Green Finale and Signpost
The endgame is a test of fine motor skills. You have large areas of color done, and now you must apply small, precise details.
- Leaf Application: Switch to Green. Use the "Tap and Release" method. Do not hold the cup down. Tap once to release a small cluster of pixels onto the carrot tops.
- The Signpost: If you have remaining White and Red cups, tackle the signpost. The sign requires a White background with a tiny Red carrot drawing inside it.
- Final Polish: Use any remaining moves to fix "fuzzy edges" where the Pink background might have encroached on the Orange carrots.
- Completion: Once the Green leaves are perched on the Orange carrots and the soil stripes are distinct, the level will trigger the completion sequence.
Color Processing Order: The Hierarchy of Flow
Understanding the hierarchy of colors is crucial for preventing "pixel bleeding," where one color seeps into the zone of another. The following order is mathematically determined to minimize contamination risk.
Tier 1: Backgrounds (Pink)
Pink is the "Ocean" in which everything else sits. It is Tier 1 because it has the largest surface area and the lowest risk of collision.
- Volume: Highest (~50% of canvas).
- Risk: Lowest. It is very hard to mess up the Pink background because it touches everything.
- Tip: Fill Pink to about 90% completion in the first 30 seconds. Once it is done, you never have to think about it again.
Tier 2: Structure (Yellow & Orange)
These colors form the solid objects in the scene. They must be wet when the detail colors (Red/Green) are applied so that the details adhere to the edges, but they must be kept separate from each other.
- Yellow (Soil Base): Apply first. It acts as the container for the Red stripes.
- Orange (Carrots): Apply second. Keep Orange away from the Yellow soil. There should be a 1-pixel gap of Pink between the Carrot and the Soil.
- Reasoning: If you spill Orange on Yellow, it looks like a mess. If you spill Yellow on Orange, it looks like a rotting carrot. Strict separation is key.
Tier 3: Detail (Red & Green)
These are the "High Voltage" colors. They are potent, small in volume, and ruin everything if they touch the wrong spot.
- Red (Soil Stripes & Sign): Red must be applied on top of Yellow. If you apply Red before Yellow, the subsequent Yellow pour will bury the Red stripe.
- Green (Leaves): Green must be the absolute last color. It sits on top of Orange and Pink. If you pour Green first, the Orange carrots will cover it up, wasting your effort.
The "Wet Paint" Theory
In Sand Loop physics, "Wet Paint" behaves differently than "Dry Paint."
- Layering: Always pour light colors first, then dark colors. If you pour a dark color (Red) and then a light color (Yellow) over it, the light color often fails to stick, or pushes the dark color out of its intended pixel lines.
- Edge Stability: Pouring Green last ensures the edges of the leaves "grab" onto the dry Orange carrot and dry Pink background. This results in sharp, jagged leaf edges that look like pixel art.
Forbidden Sequences
Never process colors in this order:
- Green before Pink: The Pink background will swallow the Green leaves.
- Red before Pink: The Red will bleed into the vast Pink background, creating a messy fog.
- White (Sign) too early: White is very light. If you pour White first, the subsequent soil colors will muddy the signpost, making it look brown and dirty.
Key Tips for Level 219 Success
These tips are distilled from hundreds of test runs. They address the specific pain points of the Carrot Garden level.
The "Soil Stripe" Technique
The bottom of the screen features alternating stripes of Yellow, Red, and Orange. This is the hardest part of the level visually.
- Horizontal Swiping: When pouring the Red soil stripes, swipe your finger horizontally across the bottom of the canvas. Do not tap in the center of the soil.
- The Boundary: Stop the swipe exactly when the color touches the carrot line. Any further and you risk rounding the bottom of the carrots, making them look like blobs rather than root vegetables.
- Cheating the Line: If you have a steady hand, you can slightly overlap the Red onto the bottom of the Orange carrot. This mimics the "shadow" of the carrot buried in soil and actually improves the final look if done perfectly.
Mystery Cup Management
Dealing with the RNG (Random Number Generator) of the Mystery Cups requires mental discipline.
- The "3-Tap" Rule: If you tap a Mystery Cup and get a color you don't need (e.g., White when you are working on Carrots), count to 3. If the belt moves a needed color into view, abandon the bad cup and grab the good one.
- Queue Juggling: It is better to hold a "useless" cup in your slot (blocking the slot) than to pour it onto the canvas in a random spot. A random spill of White in the middle of the Green zone is fatal. Holding the cup forces you to wait, which slows down your pace but preserves your accuracy.
Dealing with the Signpost
The signpost is small, located at the top, and requires White and Red.
- Ignore Until the End: The signpost is a trap. If you work on it while the belt is moving fast, you will miss cups for the main carrots.
- Batching: Wait until you have both a White cup AND a Red cup in your queue simultaneously. Pour the White background, then immediately switch to Red for the icon. This prevents the soil colors from splashing onto the sign while you wait for the Red cup to arrive.
Ice Block Anxiety
Players often panic when the Ice Counters are high (e.g., Ice '25').
- Don't Watch the Numbers: The counters drop based on your clears. The faster you clear the center Mystery Cups, the faster the ice melts. Watching the counter doesn't make it go down.
- Focus on Flow: Treat the Ice Blocks as a natural timer. If you are playing efficiently, the ice will break exactly when you are ready for the Green/Red phase. If it breaks too early, you haven't prepped the background enough. If it breaks too late, you are tapping too slowly.
Common Mistakes and How to Fix Them
Even experienced players fail Level 219 due to these specific errors. Recognizing the mistake is the first step to recovery.
The "Bleeding Soil" Error
The Mistake: You poured the Red soil stripes too aggressively, and the color bled upwards into the Orange carrots or sideways into the Yellow base.
The Solution: Damage control. If the Red bleeds into the Orange, you must carefully "over-paint" the Orange carrot body to cover the bleed. Be careful not to make the carrots too skinny. If Red bleeds into Yellow, you may have to restart the level, as there is no "Eraser" tool in Sand Loop, and covering Red with Yellow often results in a muddy brown color that ruins the garden aesthetic.
The "Missing Green" Panic
The Mistake: The Ice Block breaks, revealing Green cups, but your queue is full of Pink and Orange. You scramble to dump them, but in your haste, you accidentally pour Pink onto the dry canvas, creating a blotch.
The Solution: Stop. Pause for one second. If you have a "Clear" or "Undo" item (if available in your game version), use it. If not, look for the largest area of unfinished Pink and dump your unwanted Pink cup there. If no such area exists, you must sacrifice a small corner of the artwork to empty the slot so you can grab the Green cup before it disappears.
The "Mystery Cup Gamble" Fail
The Mistake: You keep tapping Mystery Cups hoping for Green, but you get five Whites in a row. Your board is now full of White spills, and you haven't even started the carrots.
The Solution: Stop tapping Mystery Cups. Shift your strategy. If you have excess White, build the Signpost immediately to clear the cups. If you don't have the Red for the sign yet, you must bite the bullet and pour the White into the Pink background (it blends in reasonably well) or restart the level if the error is too severe. Do not keep gambling; it only gets worse.
Queue Clogging
The Mistake: You picked up three colors (Pink, Orange, Yellow) and are holding them, waiting for the perfect moment to pour. The belt stops moving because your queue is full.
The Solution: You must pour. The game cannot generate new cups if your hand is full. Prioritize the color that is most "blocked." For example, if you need to pour Yellow on the soil, but Pink is blocking your view of the soil, pour the Pink first. Always keep the flow moving.
Signpost Detailing Errors
The Mistake: Trying to draw the tiny Red carrot on the sign while the belt is moving at 2x speed.
The Solution: Wait for a "slowdown" moment or clear the rest of the board first. The signpost is only worth about 5% of the total score. A perfect carrot field with a blank sign is better than a messy carrot field with a perfect sign. Leave the sign for the last 10 seconds of the timer.
Stuck Solutions and Recovery Strategies
If you find yourself mid-level with a ruined canvas or no moves left, use these recovery strategies.
The "Soft Reset" Maneuver
If you realize you have made a mistake in the first 30 seconds (e.g., wrong color order), do not finish the level.
- Action: Hit the pause menu and select "Restart Level" immediately.
- Why: Playing through a ruined level wastes 3 minutes. Restarting takes 5 seconds. In Sand Loop, momentum is key. If the flow is broken, reset.
- Cost: You lose one "Life" or energy unit, but you save your sanity.
Recovering from "Bad RNG"
Sometimes the Mystery Cups simply refuse to give you Orange. You have ten seconds left, and the carrots are still bare.
- The "Big Pour" Strategy: Abandon precision. Grab whatever Orange you have and pour it in the general vicinity of the carrots. It won't look pretty, but it might be enough to pass the percentage threshold.
- The "Empty the Queue" Tactic: Pour everything you have onto the background to clear your slots. Rapidly tap the remaining Mystery Cups. Sometimes, clearing a large amount of junk cups forces the game to spawn the "Rare" colors you need.
Dealing with Glitched Physics
Occasionally, sand physics glitch, and a color refuses to fill a corner despite pouring directly on it.
- The "Swipe-Under" Fix: Don't pour on top of the empty pixel. Pour on the color *next* to it and swipe quickly into the empty spot. This forces the physics engine to calculate the flow into the gap.
- The "Zoom" Trick: If your device supports it, zoom in slightly on the target area. This changes the hitboxes of the pixels and often allows you to pour into tight corners that the standard view ignores.
Speed Run Tips for Advanced Players
If you are aiming for the leaderboard or a gold trophy, speed is essential.
- Pre-loading: While the "Level Start" animation is playing, hover your finger over the first Pink Cup. Tap the millisecond the level begins.
- The "Combo" Pour: Look for areas where two colors touch. For example, where the Green leaf meets the Orange carrot. You can pour Green, and while it is spreading, quickly switch to Orange to touch up the edge, creating a perfect blend in half the time.
- Ignore Perfection: A speed run requires 80% visual accuracy. Don't fix the tiny pixel gaps. Move to the next cup immediately. The "Check" phase at the end of the level is often lenient on minor gaps if the major color blocks are correct.
Final Preparation Checklist
Before you tap "Start" on Level 219, ensure you have the right mindset and setup.
- Environment: Play in a room with good lighting. The Orange and Yellow carrots can look very similar on a dim screen.
- Device: Ensure your screen is clean. Smudges can cause taps to register incorrectly, leading to pouring the wrong color.
- Focus: Silence notifications. This level requires 100% attention on the queue belt during the "Ice Break" phase.
- Confidence: Trust the process. Follow the Pink -> Orange/Yellow -> Red/Green order, and the Carrot Garden will bloom perfectly.