
Level 23
HARDHow to solve Sand Loop level 23? Get instant solution for Sand Loop 23 with our step by step solution & video walkthrough. Sand Loop 23 tips and guide.
Play Sand Loop Now
Experience the puzzle challenge firsthand
Game Screenshots
Sand Loop Level Guides
Level Overview: The Pixel Duck Puzzle
Welcome to the Sand Loop Level 23 guide. This stage is a significant difficulty spike, primarily due to its unique "Ice Breaker" mechanic. Unlike previous levels where you could play freely across the screen, this level locks approximately 50% of your resources behind unbreakable ice blocks at the start.
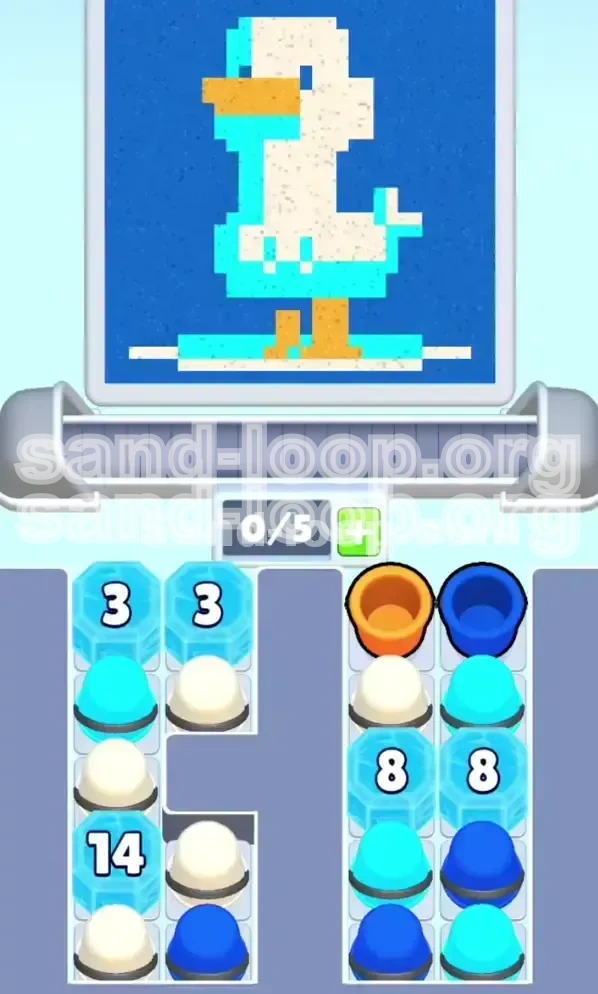
The visual theme features a cute Pixel Duck with a white body, orange beak and feet, and a cyan outline against a dark blue night sky. The aesthetic is retro and clean, but the gameplay requires you to be methodical rather than creative.
The core challenge here is resource starvation. Because the left side of the tray is frozen, you cannot access critical colors (mainly Cyan and White) until you have cleared enough cups on the right side. This creates a "timing puzzle" where you must fill the canvas correctly using only the available colors while waiting for the rest of the board to unlock.
Why this level is hard:
- Asymmetrical Start: The board is heavily unbalanced.
- Color Dependency: You need specific colors (like Orange for feet) before the board is fully open.
- Inventory Management: Managing the conveyor belt slots (5 slots) becomes crucial to avoid getting stuck when ice blocks shatter.
Level Objectives and Core Strategy
To achieve a three-star rating on Level 23, you need more than just completion; you need efficiency. The level demands a specific sequence of operations to prevent "Color Bleeding" (when you run out of a specific color and the wrong sand pours into a section).
Primary Goal: Shatter the Ice
Your first and most important objective is not to paint the picture, but to clear the board. The Numbered Ice Blocks act as a countdown. Every time you clear a cup from the active (right) side, the counters on the ice blocks decrease.
- Ice Block 3 (Top Left): Requires 3 clears.
- Ice Block 8 (Mid Right): Requires 8 clears.
- Ice Block 14 (Bottom Left): Requires 14 clears. This is the final gate.
Secondary Goal: Orderly Filling
You must fill the canvas in a specific "bottom-up" order because the sand physics are permanent.
- Feet Layer: Must be Orange.
- Body Layer: Must be White.
- Outline/Sky: Cyan and Dark Blue.
Efficiency Target
For a speed run or high score, aim to keep your conveyor belt moving. Never let the belt sit idle. If the belt is full and you are waiting for colors, you are losing time. Ideally, you should be tapping a new cup every 1-2 seconds.
Avoid "Paintovers"
A common mistake is painting the background or body before the feet. Since the feet are at the bottom, if you paint them White or Blue first, you will have to overpaint them with Orange later. This wastes time and reduces your score accuracy. Patience for Orange is key.
Step-by-Step Walkthrough: Phase 1
This phase covers the opening moves, often called the "Scripted Start" because you have very few options.
Assess the Frozen Landscape
Upon starting, do not tap anything immediately. Look at the Supply Tray. Notice that the entire left column (Column A) is covered in Ice Blocks with numbers 3 and 14. The right side (Column B) is free.
- Observation: You cannot access the Cyan or White cups on the left yet.
- Action: Ignore the left side completely visually. Focus your eyes 100% on the right column.
The Initial Tap: Orange Priority
At the very top right, you will see an Orange Cup. This is the most critical cup in the level.
- Why: The duck's feet are at the bottom of the canvas. If the sand starts pouring and Orange isn't on the belt, the sand will default to whatever color is active (usually White or Blue), ruining the feet.
- Action: Tap the Orange Cup first.
- Follow-up: Immediately tap the Dark Blue Cup located next to it. This starts the background fill and contributes to the "Clear Count" needed to break the first Ice Block.
Managing the "3-Block" Countdown
As you tap the first few cups, watch the Ice Block labeled "3" at the top left.
- Mechanic: Every cup you clear from the right reduces this number.
- Strategy: Once you clear the top row (Orange + Dark Blue), the "3-Block" will shatter. This reveals a White Cup and potentially more Cyan.
- Timing: Do not let the conveyor belt get clogged with the first two cups. Make sure you have space (3/5 slots empty) before the 3-block breaks, so you can grab the newly revealed White cup immediately.
Establishing the Belt Flow
After the first row is cleared, you should have Orange and Dark Blue on the belt. The duck's feet should be filling with Orange.
- Warning: Do not overfill the feet. A 50% fill is usually enough to secure the base shape. Once the feet look orange, switch your focus to the background (Dark Blue) to keep the belt moving while you wait for more blocks to break.
- Inventory Tip: Try to keep 1 slot open at all times during this phase. You never know exactly when the next ice block will shatter.
Waiting for the "8-Block"
The mid-game is a grind. You are using the right-side cups to whittle down the Ice Block labeled "8".
- The Cup Cycle: You will likely encounter a mix of Dark Blue and maybe a stray White or Cyan if the 8-block is near breakage.
- Background Work: Use this downtime to fill the top 40% of the canvas (the sky) with Dark Blue. It is better to fill the sky now than to accidentally fill the duck's body with the wrong color.
Step-by-Step Walkthrough: Phase 2
Once the "8-block" shatters, the pace picks up. We are now transitioning into the late game.
Unlocking the Mid-Board Resources
When the 8-block breaks, it typically reveals a cache of Cyan and White cups. This is your turning point.
- Action: Immediately tap the White Cup. The duck's body needs to be the next priority.
- Action: Tap the Cyan Cup. This is for the outline.
- Strategy: If both are available, prioritize White to build the body's core, using Cyan only for the outer edge.
The "14-Block" Final Boss
The bottom-left corner holds the Ice Block labeled "14". This is the hardest barrier because it requires the most clears.
- The Trap: Players often clear all available cups on the right and then sit waiting for the 14-block to break. It won't break on its own.
- The Solution: You must aggressively cycle cups. Even if you have enough Blue for the sky, keep tapping Blue cups to clear the tray and reduce the counter.
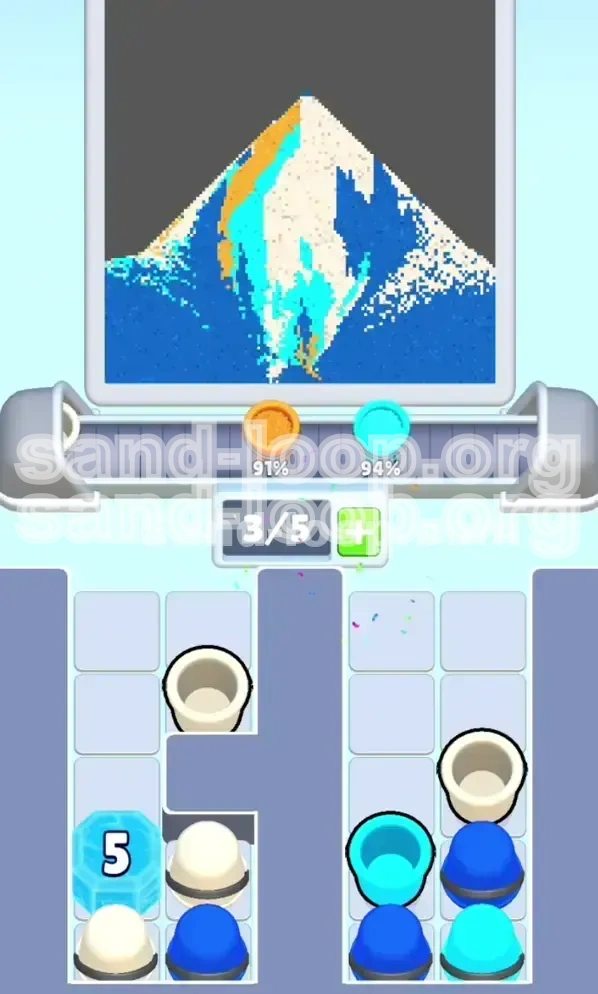
- Macro Tip: The 14-block usually breaks when you have about 70% of the canvas filled.
Managing the 5-Slot Conveyor Belt
As the 14-block gets close to breaking (counter showing 1 or 2), you must prepare for the "Final Unlock."
- The Rule: Keep 2 slots empty on your belt.
- Reasoning: When the 14-block breaks, it often releases 2 or 3 cups at once (usually the final high-value Cyan cups). If your belt is full (5/5), those new cups get stuck in the tray, or worse, you can't click them because the belt isn't moving.
- Action: If you have 5 cups, stop tapping new colors. Let the sand pour to clear a slot.
The Final Color Mix
Once the 14-block shatters, the level becomes a race to finish.
- Finish the Body: Use the remaining White to fill the chest and head area.
- Detailing: Use the final Cyan to sharpen the outline and the beak connection.
- Cleanup: If there are leftover Blue cups, use them to finish the corners of the sky.
Key Tips and Color Logic
This section breaks down the logic behind the color choices and provides specific percentages for filling to help you optimize.
Understanding Color Hierarchy
In Level 23, not all colors are equal. Some are "Structural" and some are "Atmospheric."
- Tier 1 (Critical): Orange. If you miss this, the level is mathematically impossible to 100%.
- Tier 2 (Structural): White. This defines the object.
- Tier 3 (Boundary): Cyan. This separates the object from the background.
- Tier 4 (Filler): Dark Blue. Used for the sky.
The "Bottom-Up" Fill Logic
Sand Loop physics dictate that sand settles at the bottom. Therefore, your painting order must strictly follow gravity.
- Fill Feet (Orange) to 100%.
- Fill Body (White) to 80%.
- Fill Outline (Cyan) to trace the White.
- Fill Sky (Blue) around the object.
Percentage Fill Targets
Don't guess how much sand to pour. Use these targets:
- Orange: Pour until the "feet" pixels are solid. Stop immediately if the sand level rises above the duck's legs.
- White: Fill until the body is distinct. Leave the very top of the head empty (approx 5%) to allow for final blending if needed.
- Cyan: Only aim for about 15-20% coverage. This is just an outline. Overusing Cyan will make the duck look blue.
Dealing with "Locked" Cups
Sometimes you will see a cup you need (like Cyan) trapped under a high-number block (like the 14).
- Mistake: Staring at the cup and waiting.
- Correct Play: Look at the opposite side of the board. There is almost always a "clearable" cup (like Dark Blue) on the free side that reduces the counter. Clear the free cups to free the trapped cups.
Sound Cues
Listen to the game audio. The sound of ice shattering is distinct.
- Audio Tip: If you hear a crack but are focused on the top of the screen, pause. Look at the bottom left (the 14-block area). A new cup has likely entered the tray. Retrieve it before it gets buried by new cups from the top right.
Common Mistakes and Stuck Solutions
Even with a guide, things can go wrong. Here is how to fix the most common failure points.
Mistake: The "Full Belt" Panic
Symptom: Your conveyor belt has 5 cups. The ice breaks, releasing a critical Cyan cup, but it spawns in the tray. You can't click it because the belt is full, and the cups on the belt are wrong colors.
Fix: You must sacrifice. Pick a cup on the belt that is the least useful (usually Dark Blue if the sky is mostly done). Click it to pour it out (even if it's a waste) to free up a slot. Then grab the Cyan from the tray. Losing a little sand is better than restarting.
Mistake: Painting the Feet Blue
Symptom: You didn't get Orange fast enough, and now the duck has blue feet.
Fix: You can correct this, but it costs time. You must pour exactly enough Orange to cover the Blue. Since Orange is a darker/rare color here, if you run out, the level is failed. Prevention is the only cure. Restart if you miss the first Orange cup.
Mistake: Ignoring the 14-Block
Symptom: You have painted 90% of the duck, but you are missing the final bit of the neck outline. The 14-block is still at "1".
Fix: You are in a "Soft Lock." You need to clear one more cup to break the ice. Look for any remaining cup on the right side. Tap it to put it on the belt, then tap it again to pour it out immediately (wasting it). This "Clear Action" is what triggers the final block break.
Mistake: Overfilling the Background
Symptom: You poured so much Dark Blue that it started overlapping the White body of the duck.
Fix: Stop pouring Blue immediately. You need to build a "dam" of White and Cyan. Focus entirely on White and Cyan to build the opacity of the duck back up. You cannot erase the Blue, you can only cover it.
What to Do if You Run Out of Sand
In Sand Loop, running out of sand usually means you didn't clear enough cups.
- Check the Tray: Are there cups you ignored because they were "wrong colors"?
- Action: Use them. Pour them into the corner of the canvas where they do the least damage (e.g., top corners). You need the inventory turnover.
Speed Run Tips and Advanced Shortcuts
For players looking to achieve a top leaderboard time, here are the advanced techniques.
The "Pre-Load" Tap
This is a pro-level move. As the ice block counter hits "1", you can hover your mouse over the trapped cup underneath.
- The Trick: If you click the exact millisecond the block shatters, you save the 0.5 seconds it takes for the game to register the cup as "clickable."
- Risk: If you click too early, nothing happens. Practice the timing of the shatter animation.
Batch Processing
Don't tap cups one by one slowly.
- Technique: Tap Orange -> Blue -> Blue in a rapid triple-click rhythm.
- Why: This loads your belt instantly. It allows you to sit back and just manage the pouring for 5-10 seconds while the ice blocks break in the background. This is much faster than "Tap -> Wait -> Tap -> Wait."
Minimize Micro-Management
Beginners try to guide every grain of sand.
- Speed Run Tip: Pour roughly. 90% accuracy is fine for the background and main body. Only be precise with the Cyan outline and the Orange feet. Pouring fast is better than pouring perfectly in this level.
Visualizing the "Z-Order"
Understand that the game renders layers back-to-front.
- Shortcut: You don't need to fill the whole background. You can leave the bottom corners (behind the feet) empty or messy. Since the feet (Orange) cover that area, no one will see if the background is unfinished there. This saves you 5-10 seconds of sand pouring.
Optimized Path for Sub-30 Seconds
Here is the ideal timeline:
- 0:00-0:05: Tap Orange, Blue, Blue. (Belt Full)
- 0:05-0:12: Pour Orange (Feet) + Blue (Sky Top). 3-Ice breaks. Tap revealed White.
- 0:12-0:20: Pour White + Blue. Clear right column aggressively. 8-Ice breaks.
- 0:20-0:25: Tap revealed Cyan/White. Pour into body outline.
- 0:25-0:30: Clear remaining trash cups to break 14-Ice. Final cleanup.