
Level 27
HARDHow to solve Sand Loop level 27? Get instant solution for Sand Loop 27 with our step by step solution & video walkthrough. Sand Loop 27 tips and guide.
Play Sand Loop Now
Experience the puzzle challenge firsthand
Game Screenshots
Sand Loop Level Guides
Level 27 Walkthrough: Mastering the Ocean Floor Challenge
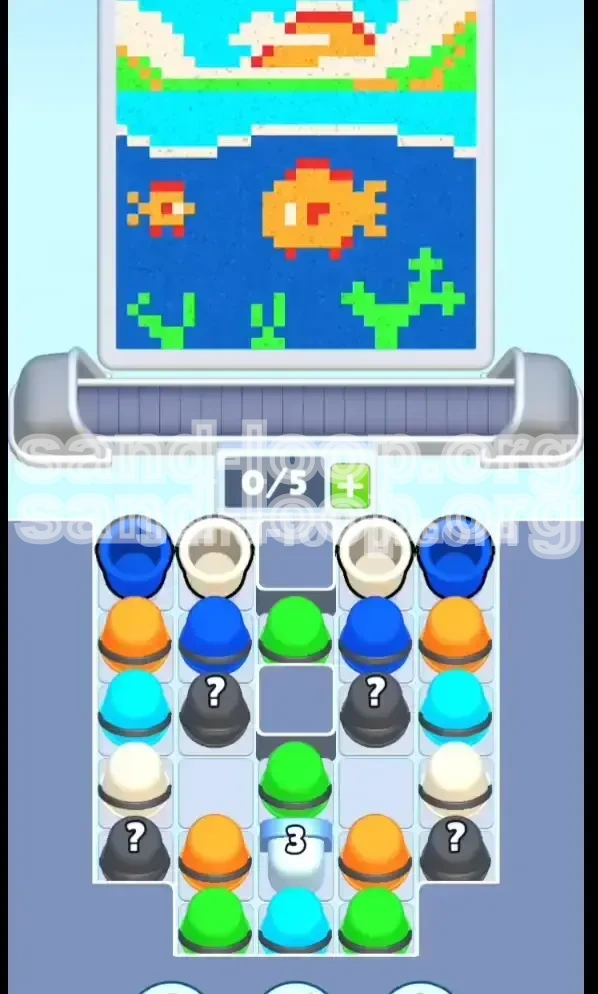
Welcome to the definitive guide for Sand Loop Level 27, commonly known as the "Ocean Floor" challenge. This stage represents a significant difficulty spike compared to previous levels, moving away from simple color matching and into the realm of strategic resource management. On the surface, you are creating a serene underwater scene with orange fish and swaying seaweed. However, beneath the surface, this level is a brutal test of your ability to manage a restrictive 5-slot conveyor belt while navigating a trapped supply column.
In this level, you are not just painting; you are engineering a landslide. The physics engine here is unforgiving. If you prioritize the wrong color, you will bury critical elements under layers of sand, forcing a restart. The primary bottleneck is the limited capacity of your processing machinery combined with a supply tray that actively works against you by hiding essential colors behind obstacles.
Stage Mechanics Overview
Before we discuss the solution, it is vital to understand the specific constraints of this level. Unlike earlier stages where you could pull cups freely, Level 27 requires a "less is more" approach.
- The Conveyor Belt Limit: Your belt holds a maximum of 5 slots. In this level, hitting capacity is a death sentence. You must keep 1 to 2 slots open at all times to allow for maneuvering.
- Gravity and Layering: The canvas is deep. The bottom layers (Seaweed) must be established first. If you pour the top water layers too early, the seaweed will be buried under hundreds of pixels of blue sand, making it impossible to complete the level requirements.
- The Ice Block Obstacle: A number "3" Ice Block sits at the base of the main column. This prevents you from accessing fresh supplies until you clear the cups sitting on top of it and then break the ice itself.
Visual Breakdown of the Canvas
To succeed, you must deconstruct the image in your mind. The canvas is divided into four distinct horizontal zones. Your pouring strategy must respect these zones from bottom to top.
- Zone 1: The Seaweed (Green) - Absolute bottom. High priority.
- Zone 2: The Deep Water (Dark Blue) - Surrounds the lower half of the fish.
- Zone 3: The Subjects (Orange Fish) - Floating in the middle-center.
- Zone 4: The Atmosphere (Cyan & Beige) - Top layers and highlights.
Strategic Objectives
Your goal is not just to "fill the bar." Your goal is to clear the board without getting gridlocked. To achieve 100% completion, you must adhere to three core objectives:
- Prevent Gridlock: Do not let the conveyor belt fill up with colors you aren't ready to use.
- Unlock the Column: You must free the Ice Block early to access the mid-game color supply.
- Maintain Color Separation: Ensure the orange fish pop against the blue background by keeping the colors distinct in the pouring queue.
Why This Level Is Hard
Many players fail here because the game tempts you with Cyan and Beige cups immediately. Pulling these too early clogs your belt with "top layer" colors while you desperately need "bottom layer" colors like Green and Dark Blue. Furthermore, the "Mystery Cups" (?) can introduce unwanted colors into your precise sequence, turning a perfect run into a chaotic mess in seconds.
Step-by-Step Execution Plan
This section provides the exact sequence of moves required to clear Level 27. Follow these steps in order. Do not rush. Precision is more valuable than speed here.
Phase 1: The Foundation (Green & Seaweed)
Priority: CRITICAL
The level begins, and your eyes might naturally drift to the fish, but ignore them for now. Your immediate focus is the bottom of the screen. The seaweed forms the foundation of the image.
- Scan the Tray: Look for Green cups. They are usually located on the periphery of the tray or just above the center column.
- Pull Green: Drag 2 to 3 Green cups onto the conveyor belt immediately.
- Pour and Hold: Let the green sand pour. It will settle at the very bottom of the canvas.
- Do Not Overfill: Do not pull more than 3 cups total in this first phase. You need to keep slots open for the unlocking process.
Phase 2: The Unlock (Clearing the Ice)
Priority: HIGH
You cannot access the bulk of your Dark Blue and Orange supplies because of the stack sitting on the "3" Ice Block. You must clear this debris to break the ice.
- Identify the Blockers: Look at the cups directly resting on the Ice Block. These are typically Orange and Cyan.
- Relocate Blockers: Pull these blocking cups onto the conveyor belt.
- If you pull Orange, let it pour. It's time to start the fish anyway.
- If you pull Cyan, try to keep it on the belt without pouring if possible, or pour it only if the green layer is substantial. Ideally, you want to save Cyan for Phase 4.
- Break the Ice: Once the column is clear, rapidly tap the Ice Block (3) three times. This will shatter it and free up the supply line behind it.
Phase 3: The Mid-Game (Orange & Dark Blue)
Priority: MEDIUM
With the ice gone, you should have access to a steady stream of Dark Blue and Orange. This is the "meat" of the level where the image takes shape.
- Establish the Fish: Pull Orange cups consistently. The fish needs to be prominent. If you stop pouring orange now, the blue water will bury the fish's outline.
- Fill the Deep Water: Intermix Dark Blue pulls. The goal is to have the dark blue fill the space around the fish.
- The Rhythm: Try a 2:1 ratio. For every 2 Orange cups, pull 1 Dark Blue cup. This keeps the fish slightly ahead of the background water, ensuring it doesn't get drowned out.
- Mystery Cup Warning: Only pull a Mystery Cup (?) if your belt is nearly empty (1 or 2 items). If it turns into Beige or White too early, it will clog your machine. If it turns into Blue, you are safe.
Phase 4: The Upper Atmosphere (Cyan & Beige)
Priority: LOW (but necessary)
Once the fish is fully formed and the dark blue water reaches the middle of the screen, you must switch gears to finish the top layers.
- Stop Pulling Dark Blue: Your deep water is done. Pulling more now will just waste belt space.
- Introduce Cyan: Now you can pull those Cyan cups you saved earlier (or new ones from the tray). Pour them to create the lighter, upper water layer. This creates the depth effect.
- The Sky/Sand: Pull Beige/White cups. These are for the very top edge of the canvas (the surface shimmer or distant sand).
- Cleanup: At this stage, the level is basically won. You can simply pull any remaining cups and pour them to top off the percentage meter.
Phase 5: The Final Polish
Priority: FINISHER
You are in the 90-95% range. Don't get complacent.
- Check for Holes: Look for small pixels of background color showing through the fish or the seaweed.
- Use Leftovers: If you have a single Green or Orange cup left sitting on the belt from earlier, pour it now to patch those holes.
- Empty the Belt: Ensure the conveyor is completely empty before the final pixel lands to maximize your score and completion time.
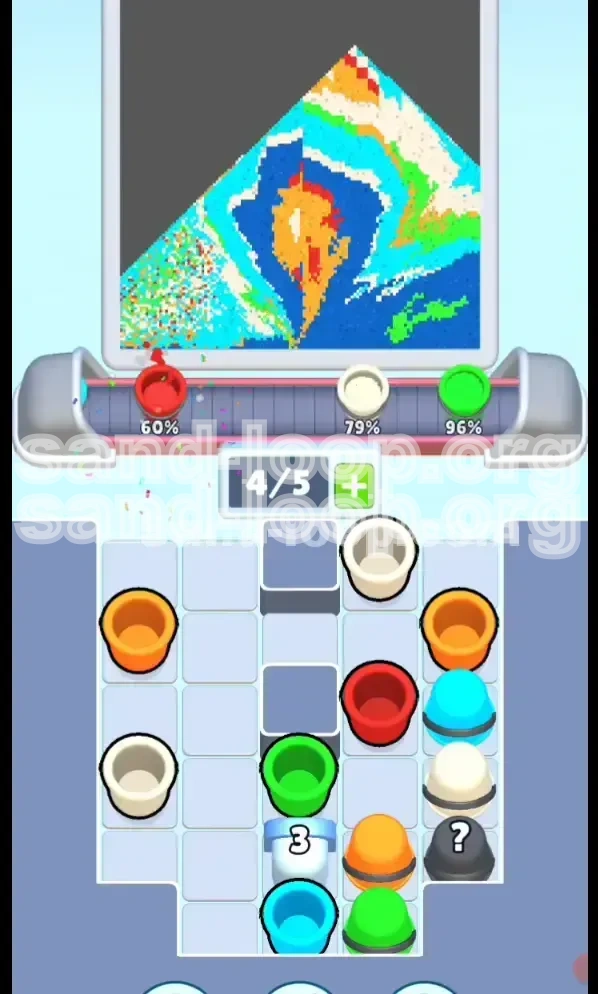
The Essential Color Order
Understanding *what* to paint is half the battle. Understanding *when* to paint it is the victory. The physics of Sand Loop dictate that the first color you pour hits the bottom of the "tank," while subsequent colors layer on top. However, because this is 2D pixel art logic layered with gravity simulation, we must follow a strict Bottom-to-Top protocol.
1. The Anchor Layer: Green
Why First? The seaweed is drawn at the absolute bottom Y-axis of the screen.
The Logic: If you pour Blue first, it fills the bottom. When you finally pour Green, it will sit *on top* of the Blue, making it look like the seaweed is floating in mid-water rather than rooted to the floor. To ground the image, Green must be the first substance to settle on the canvas floor.
2. The Subject Layer: Orange
Why Second? The fish are centrally located.
The Logic: The fish need to "swim" in the space you are creating. If you pour the background (Blue) before the foreground (Fish), the fish risk being buried or obscured. By pouring Orange second, you build the "mountain" of fish in the center of the screen, which allows the subsequent Blue water to flow around it naturally.
3. The Depth Layer: Dark Blue
Why Third? This creates the ocean environment.
The Logic: This is your filler. It fills the void around the Green seaweed and behind/around the Orange fish. Pouring this third ensures that the contrast between the Dark Blue water and the Orange fish remains sharp. It forms the "walls" of your underwater scene.
4. The Highlight Layer: Cyan
Why Fourth? Lighter water sits higher in the column.
The Logic: Cyan represents the sun-drenched upper water. It must sit *above* the Dark Blue. If you pour Cyan too early, the heavier Dark Blue will sink beneath it, muddying the colors and creating a brownish/gray sludge in the middle of the ocean. You want that crisp line where the deep ocean meets the lighter surface.
5. The Cap Layer: Beige/White
Why Last? This is the very top of the canvas.
The Logic: This color has the least "weight" visually and physically in the composition. It caps the surface. Pouring it last ensures it remains distinct from the water and doesn't contaminate the fish or seaweed.
Pro Tips & Player Notes
Here are the finer details of strategy that separate a novice from an expert. These tips focus on the mechanical manipulation of the game interface.
Conveyor Belt Management
The 5-slot limit is the biggest enemy. Think of your belt as a queue, not a storage unit.
- The 3-Slot Rule: Try never to have more than 3 cups on the belt unless you are actively pouring a 4th. This gives you a 2-slot buffer to pull a blocker cup or accept a mystery cup reward.
- Don't Pre-Pull: Do not pull a cup onto the belt "just in case." Only pull a cup when you have the immediate capacity to process it. A clogged belt leads to panic, and panic leads to failed levels.
Handling Mystery Cups (?)
The Mystery Cup is a gamble. In Level 27, the probability weighting is often skewed toward colors you *don't* need (like White) when you need Blue or Orange.
- Safe Zones: Only tap a Mystery Cup if you have fewer than 3 cups on the belt.
- The Emergency Stop: If a Mystery Cup turns into a color you don't need (e.g., it turns into Cyan when you are still working on the Green/Orange phase), you have two choices: let it pour into a corner where it won't hurt the main art, or restart the level if you are aiming for a perfect score.
The Ice Block Timing
The "3" Ice Block is a mechanic designed to waste your moves.
- Don't Wait: Do not wait until the board is 50% full to clear the ice. The blockage prevents you from refreshing the tray, meaning you'll run out of essential colors while your belt is full of garbage.
- Triple Tap: Be ready to tap it three times in rapid succession the moment the path is clear.
Visual Calibration
Sometimes colors look similar when wet. Dark Blue and Cyan can look identical in the pouring stream if the lighting is dim.
- Check the Cup Icon: Don't rely solely on the sand color in the chute. Look at the icon on the cup itself. The Dark Blue cup is usually darker; the Cyan cup looks like a light blue sky.
Troubleshooting & Common Pitfalls
Even with a plan, things can go wrong. This section helps you diagnose why you might be failing and how to fix it.
Mistake #1: The "Buried Seaweed" Error
Symptom: You are at 80% completion, but the Green Seaweed percentage is stuck at 30%, and you can't find any green cups.
Diagnosis: You poured Blue water before the Green was established. The Green sand is now buried at the very bottom of the pixel stack, invisible and unmeasured by the game's logic, or the Blue has physically covered the Green zones.
Fix: In your next run, force yourself to pull Green cups until the conveyor belt is half-full of Green before you pull a single Blue cup. Ensure the green hits the canvas first.
Mistake #2: The "Fish Fade"
Symptom: Your Orange fish look small, washed out, or incomplete.
Diagnosis: You mixed too much Dark Blue in with the Orange too early. The colors blended, or the Blue volume simply overwhelmed the Orange volume.
Fix: Be aggressive with Orange. You need a *lot* of orange sand to build the fish up so they protrude from the background. Do not alternate evenly; prioritize Orange 2:1 over Dark Blue.
Mistake #3: The "Gridlock" Stall
Symptom: Your conveyor belt is full (5 slots), the supply tray is full of colors you don't need, and the Ice Block is still active.
Diagnosis: You pulled too many cups from the wrong columns early on. You filled your belt with Cyan/White while the Green/Orange you needed became inaccessible.
Fix: You are likely stuck. Unless you have a Mystery Cup that saves you, you might need to restart. The preventative fix is to strictly ignore the top-layer colors until the bottom layers are 60% done.
Mistake #4: Breaking the Ice Too Late
Symptom: You run out of Dark Blue cups. The tray shows only Green and Cyan, but you need Blue.
Diagnosis: The Dark Blue cups were trapped behind the Ice Block, and you didn't clear the cups on top of it in time.
Fix: Prioritize clearing the column *above* the Ice Block (usually Orange/Cyan) even if you don't want to pour those colors yet. You have to sacrifice the temporary space to free up the supply line.
Speed Run & Optimization Guide
Once you have beaten the level and understand the mechanics, you might want to improve your time or achieve a three-star rating. Speed in Sand Loop isn't just about tapping fast; it's about flow.
Optimizing the Opening
The first 10 seconds determine the pace of the run.
- The Pre-Load: While the "Level Start" animation is fading, visually locate the Green cups. Be hovering your finger over them.
- Chain Pulling: Pull 3 Green cups in a row immediately. Don't wait for the first one to finish pouring. Queue them up.
Minimizing Downtime
Dead time is when the conveyor belt is moving but you aren't pulling cups.
- The Look-Ahead: While the Green is pouring, your eyes should be scanning the center column for the Ice Block blockers. Plan your next pull while the current sand is flowing.
- Belt Chaining: Never let the belt have fewer than 2 cups if you can avoid it. Keep the flow constant. If you wait for the belt to empty completely before pulling more, you are losing valuable seconds.
Shortcuts for Advanced Players
If you are confident in your color memory, you can take risks.
- Ignoring the Seaweed Cap: If you have poured enough Green to hit 90% of the seaweed target, you can stop pulling Green entirely, even if it's not 100%. Let the overflow from other colors fill the gaps naturally.
- Mystery Cup Rush: If your belt is empty, tap Mystery Cups rapidly. The probability of getting a useful color is high enough to risk it rather than waiting for specific cups to spawn. This is faster but relies on RNG (Random Number Generation) luck.
Endgame Rushing
When you hit 90% completion, the game becomes a race to clear the board.
- The Dump: Stop worrying about aesthetics. If you have 2 cups of Cyan and 1 cup of White left, pull them all. Pour them as fast as possible. The exact placement matters less than clearing the tray.
- Combo Finishing: Try to time your last pour so that the moment the last pixel lands, the "Level Complete" screen triggers instantly.