
Level 39
HARDHow to solve Sand Loop level 39? Get instant solution for Sand Loop 39 with our step by step solution & video walkthrough. Sand Loop 39 tips and guide.
Play Sand Loop Now
Experience the puzzle challenge firsthand
Game Screenshots
Sand Loop Level Guides
Sand Loop Level 39: The Night Pyramids Master Walkthrough
Welcome to the ultimate guide for Sand Loop Level 39, "The Night Pyramids." This stage is a critical turning point in the game, shifting the focus from simple color matching to resource management and logistical planning. While the visual of a serene desert night under a moonlit sky suggests calm, the gameplay is a tense battle against limited inventory and locked supplies.
In this level, you are not just an artist; you are a supply chain manager. The "Ice Block" mechanics here are designed to throttle your progress, forcing you to make difficult choices about which colors to prioritize and which to temporarily ignore. This guide will break down the exact logistics required to break the prison of ice and paint the masterpiece.
Level Overview & Mechanics
Level 39 is classified as a "Logistics Puzzle." The core challenge is not the dexterity required to pour sand, but the logic required to unlock your dexterity.
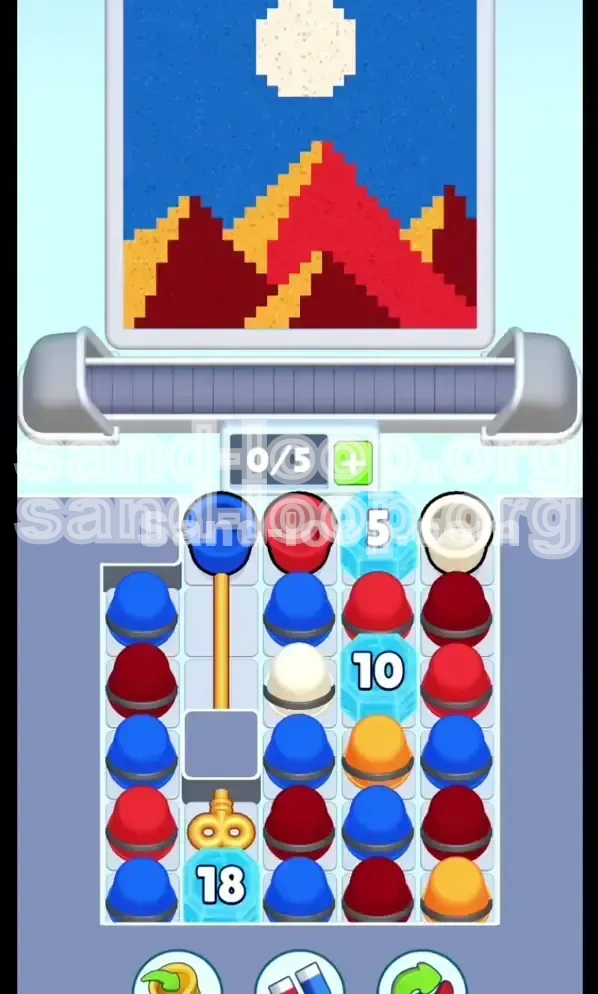
- The Visual Setup: The target image features a multi-layered composition. The bottom 40% is the desert floor (Dark Red), the middle 30% consists of jagged pyramids (Bright Red), the upper 20% is the sky (Blue), and the top 5% is the moon (White).
- The Lockdown: Unlike previous levels where all cups are accessible, here the Grey Gate on the right seals away your bulk supplies. You start with a "hand-to-mouth" existence, with only a few cups available in the active zone.
- The Ice Mechanics: This level introduces "Counter Ice." These blocks (marked 5, 10, and 18) do not melt by sand proximity; they shatter only after you have successfully processed a specific number of cups through the conveyor belt.
- The Win Condition: You must clear 18 cups to free the Golden Key, which opens the Grey Gate to release the Blue sky cups. Only then can you finish the painting.
Primary Objectives for Success
To conquer the Night Pyramids, you need a clear roadmap. Your objectives change dynamically as the level progresses.
- Objective 1: The Ice Breaker Grind. Your immediate goal is to generate "processing counts." You need to feed the conveyor belt rapidly with low-risk cups to tick the counters down from 18 to 0.
- Objective 2: Foundation Layering. You must complete the Red and Dark Red pyramid layers using only the limited supply of cups available behind the "5" and "10" ice blocks. You cannot afford to waste these.
- Objective 3: The Key Retrieval. Reaching 18 processed cups is the bottleneck. Once the Golden Key drops, you must immediately pivot your strategy from "scarcity" to "abundance."
- Objective 4: Sky and Moon Execution. After the gate opens, you will be flooded with Blue cups. You must manage the flood to paint the sky without contaminating the white moon.
Core Concept: Why Order Matters
Why is this level hard? Because physics and logistics are fighting each other. If you try to paint the sky before the pyramids, the blue sand will fall into the empty red zones, creating a muddy purple mix that fails the level precision check.
- Gravity Logic: Sand fills from bottom to top. If you paint the Blue sky first, the sand will spill over into the Red pyramid zones.
- The Bottleneck: The "18" Ice Block acts as a hard stop. You cannot access the bulk of your Blue paint until this is gone.
- Inventory Management: With only 5 slots on the conveyor belt, every slot counts. Loading a "useless" color too early can clog your machine and halt production.
Phase 1: The Early Game Logistics (Count 0-5)
The start of the level is a tactical puzzle. You are resource-poor, and every move must be calculated to shatter the first ice barrier.
Step 1: Analyze the Available Cups
Do not tap "Start" immediately. Pause and look at the cups available in the un-iced columns.
- Identify the Dark Red and Bright Red cups. These are your fuel.
- Locate the Yellow cups. These are secondary fuel.
- Ignore any Blue cups that are visible unless they are blocking a Red cup you need.
Step 2: Load the "Pyramid Mix"
Your conveyor belt has 5 slots. You need to fill them efficiently to start racking up the count.
- Load 3 Red Cups (1 Dark Red, 2 Bright Red).
- Load 1 Yellow Cup (for pyramid highlights).
- Load 1 Filler Cup (Any color that is accessible, even Blue, just to get the count moving—though Red is safer to prevent accidental spills).
Step 3: Execute the "Grind Pours"
Start the belt. As the cups reach the pouring mechanism:
- Dark Red: Pour this into the bottom-most pixels of the pyramid. This establishes the floor.
- Bright Red: Layer this on top of the dark red. Don't worry about perfection yet; you are just trying to build the base and reduce the Ice Counter.
- Yellow: Carefully drizzle this on the upper edges of the red piles.
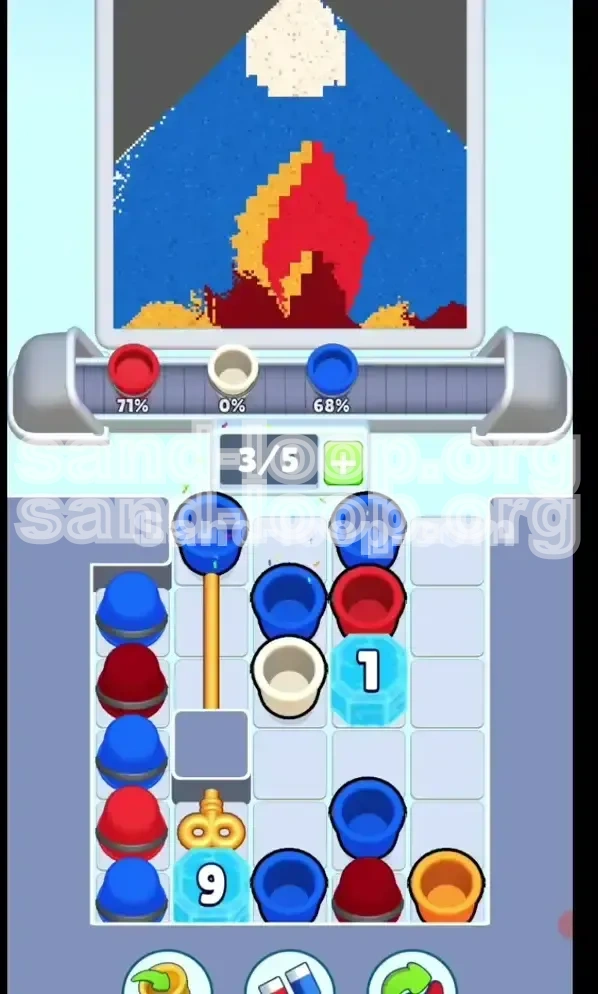
Note: As these cups finish processing, the "5" Ice Block on the right will shatter.
Step 4: The First Unlock
Once the "5" block breaks, a new set of cups becomes available.
- Immediately check if new Red or Yellow cups have appeared.
- If White cups appear in the new slot, DO NOT LOAD THEM. The White cup is a trap in the early game; it takes up a slot that is needed for Reds to break the next ice block.
Phase 2: The Mid-Game Resource Crunch (Count 5-18)
You are now in the "Grind." The "10" Ice Block is active, and the massive "18" block still looms. You are likely running low on Reds. This is the hardest part of the level.
Step 5: Chipping Away at the "10" Block
The strategy remains the same, but the resources are tighter.
- Keep the conveyor belt moving. The machine must never stop.
- Use the newly unlocked cups to replace the empty slots on your belt.
- Priority: Dark Red > Bright Red > Yellow > Blue.
- You are aiming to reach 18 total processed cups. Keep a mental (or written) tally if the game doesn't show it clearly.
Step 6: Pyramid Detailing
While you are waiting for the counter to tick up, refine your painting.
- Use this time to fix the shape of the pyramids.
- Ensure the Bright Red forms sharp, jagged peaks.
- Use the Yellow to define the "lit" side of the pyramids. Accuracy here saves you from having to fix it later when Blue sand is falling everywhere.
Step 7: Avoiding the White Trap
As you approach count 15, the pressure mounts.
- The White Cup (Moon) is often located in the middle column.
- CRITICAL: If you accidentally load the White cup now, it will sit on the belt. If it cycles through and pours while you are still working on the pyramids, you will ruin the contrast.
- Strategy: If you see a White cup, try to "bury" it behind a Grey Gate or avoid clicking its column until the Gate opens. Or, load it last on the belt so you can pause the game before it pours.
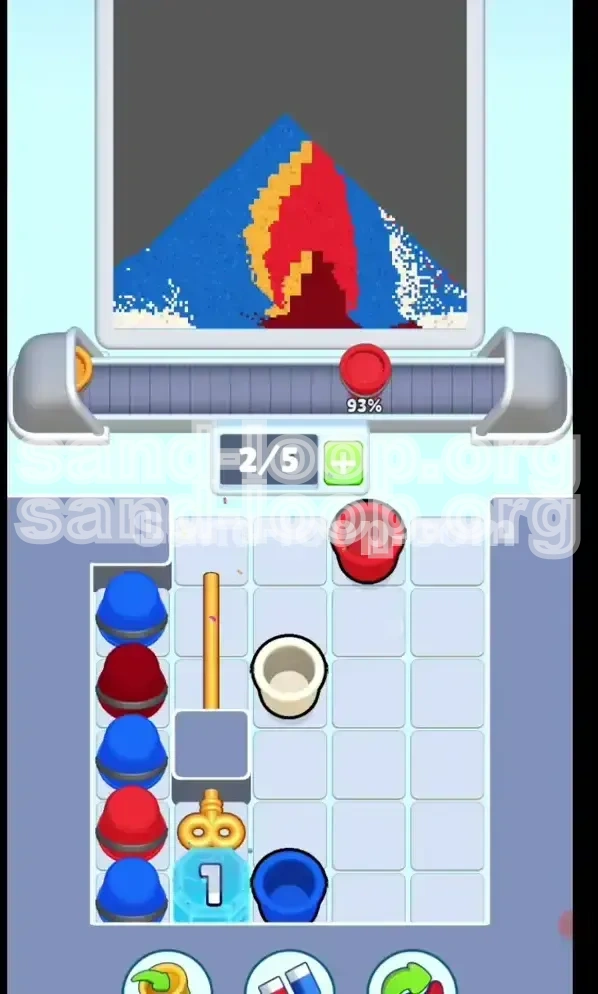
Step 8: Breaking the "18" Barrier
This is the climax of the logistics phase.
- As your 17th and 18th cups are processing, position your cursor over the Grey Gate area.
- The moment the 18th cup finishes, the "18" Ice Block shatters, and the Golden Key drops.
- The Grey Gate retracts.
- Celebration: You have just unlocked the floodgates. The hard part is over.
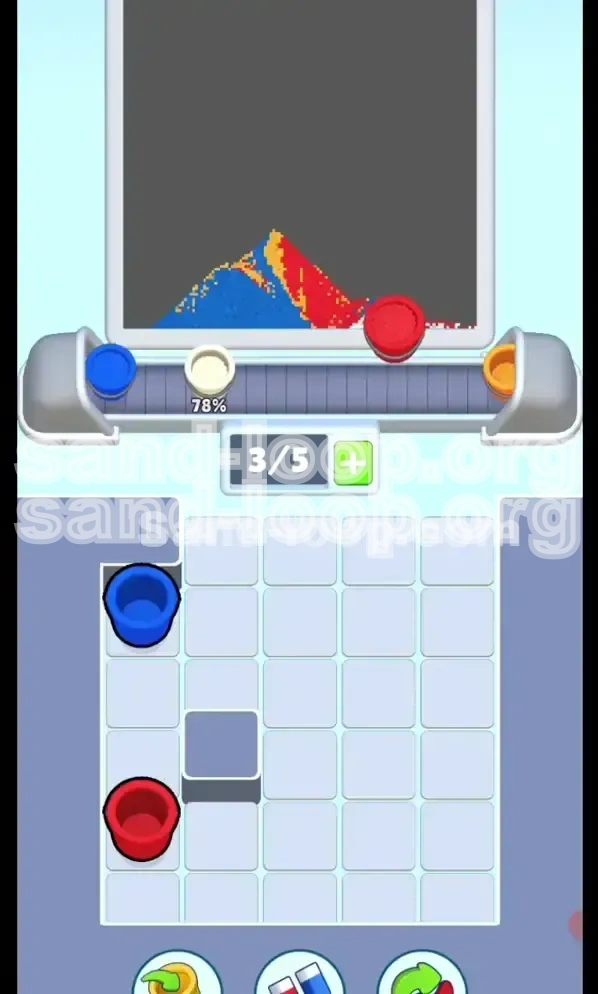
Phase 3: The Flood & The Finish (Post-Gate)
The gate is open. You will likely see a massive stack of Blue Cups (and potentially the trapped White cup). The pace shifts from "Careful Scarcity" to "Aggressive Abundance."
Step 9: The Sky Transition
Immediately clear any remaining Red or Yellow cups from your mental queue. Your new color is Blue.
- Load 3 to 4 Blue Cups onto the belt.
- Start pouring them into the upper section of the canvas.
- Because the pyramids are already tall and solid, the Blue sand will stack on top of them naturally. You don't need to be as careful with the edges as you were with the Red.
Step 10: Managing the Moon
You have one final, delicate task.
- Identify the White Cup. It is often located in the middle column, possibly mixed in with the Blues.
- Load the White cup onto the belt last.
- Wait until the Blue sky is about 90% filled.
- Let the White cup pour. It needs to land in the empty space at the very top (the Moon).
- Tip: If the Blue sky is too full, the White sand will just turn the sky light blue. If the Blue sky is too empty, the White sand will fall into the Blue and disappear. Aim for a "Blue bowl" effect.
Color Order & Processing Logic
Processing the colors in the wrong order is the number one reason players fail Level 39. Here is the definitive processing hierarchy.
The Priority Hierarchy
Think of your conveyor belt as a ranking system. Top priority gets the slot immediately; bottom priority waits.
- Tier 1: Dark Red (Shadows). Essential for the base. Without this, the pyramids float. Process this first.
- Tier 2: Bright Red (Structure). This is the main volume of the level. Process this constantly.
- Tier 3: Yellow (Highlights). Needed for detail, but requires less volume than Red.
- Tier 4: Blue (Background). Useless until the pyramids are done and the Gate is open. Ignore until then.
- Tier 5: White (Moon). The final touch. Highest risk of accidental discharge. Process last.
The "Sand Physics" Interaction
Understanding how the sand stacks is vital for the "Sky" phase.
- Red sand has high friction. It builds steep cliffs (the pyramids).
- Blue sand is fluid. It wants to spread flat.
- When pouring Blue over Red, the Blue will initially slide down the Red slopes. You must pour enough Blue to create a flat "table" on top of the Red peaks before the sky looks correct.
The "Inventory Lock" Logic
The game locks the Blue cups behind the "18" count specifically to force the "Background First" logic.
- If you could access Blue early, you might be tempted to fill the empty space at the top.
- However, doing so would mean you couldn't pour Red later without burying the Blue under Red.
- The level forces you to build Bottom -> Top (Dark Red -> Bright Red -> Yellow -> Blue -> White).
Expert Strategies & Speed Run Tips
Once you have beaten the level, you will want to optimize your score or time. These tips are for players looking to 3-star Level 39 or achieve a personal best time.
Speed Running the "Grind"
The slowest part of this level is waiting for the 18-count to finish. Here is how to speed it up:
- Pre-loading: As soon as the level starts, tap the available cups in rapid succession to fill the belt before the first cup even finishes pouring.
- The "2+2" Method: Instead of filling the belt with 5 Red cups, fill it with 2 Reds, 2 Yellows, and 1 Blue. As long as the Red and Yellow hit the pyramids, the Blue can be "wasted" or poured into a corner just to cycle the belt faster. Getting to 18 is more important than perfection in the early game.
Accuracy Maximization
To get the highest score (based on color accuracy), you must minimize overlap.
- The "Dry Brush" Technique: When pouring the Yellow highlights, tap the pour button instead of holding it. This drops small "dollops" of sand rather than a stream, allowing for pixel-perfect highlighting on the pyramid peaks.
- Moon Separation: To keep the Moon pure white, stop pouring Blue about 1cm below the target Moon area. Let the last bit of Blue sand spread naturally, then drop the White cup precisely in the center of the remaining gap.
Recovery Strategies
Made a mistake? Here is how to save the run.
- "Blue Bleed": If Blue sand falls into the Red zone, don't panic. Immediately load a Bright Red cup and pour it directly over the "contaminated" area. Red is visually dominant and will cover the Blue if you pile it high enough.
- "Moon Spill": If you pour White too early and it vanishes into the Blue sky, you have two options: 1) Restart, or 2) If you have a huge excess of White cups, keep pouring. Sometimes a double-layer of White can brighten the sky enough to fake the moon effect, though this is risky.
Troubleshooting & Common Pitfalls
Even with a guide, things can go wrong. This section addresses the most common complaints and fail states for Level 39.
Problem: "I ran out of Red paint!"
Cause: You likely used Red cups to break the early ice blocks but weren't accurate with your pouring, forcing you to use more cups to fix the shape.
Solution: In the "Grind" phase (Count 5-18), be extremely stingy with your Red. Only pour to build height. Do not pour to "pretty up" the edges until after the Gate opens and you have verified you have spare Reds.
Problem: "The Golden Key didn't drop."
Cause: You haven't actually processed 18 cups. You might have loaded them, but if the game lagged or you paused, the counter might not have ticked.
Solution: Count out loud. "One... Two... Three..." Ensure you see the ice block crack. Sometimes cups get stuck on the belt; make sure the belt is actually moving.
Problem: "My Moon looks like a cloud."
Cause: You poured the White sand while the Blue sand was still wet (loose). The physics engine blended them.
Solution: You have to build the Blue sky up to the very bottom of the Moon circle, creating a "bowl" or "plate" of Blue, and then gently place the White on top. If you pour White from a great height into a loose Blue pile, they will mix 100% of the time.
Problem: "The White cup is buried under Grey Gates."
Cause: The level generation randomized the White cup into a column that is locked by an Ice Block you haven't reached yet.
Solution: This is rare but possible. You must break the specific ice block covering that column. Usually, the White cup is in the middle column, which opens with the "5" or "10" block. If it is locked behind the "18" block, you are in "Hard Mode"—just focus on getting to 18 as fast as possible.