
Level 41
HARDHow to solve Sand Loop level 41? Get instant solution for Sand Loop 41 with our step by step solution & video walkthrough. Sand Loop 41 tips and guide.
Play Sand Loop Now
Experience the puzzle challenge firsthand
Game Screenshots
Sand Loop Level Guides
Sand Loop Level 41: Complete Strategy & Walkthrough
Level Overview: The Snowy Peak Challenge
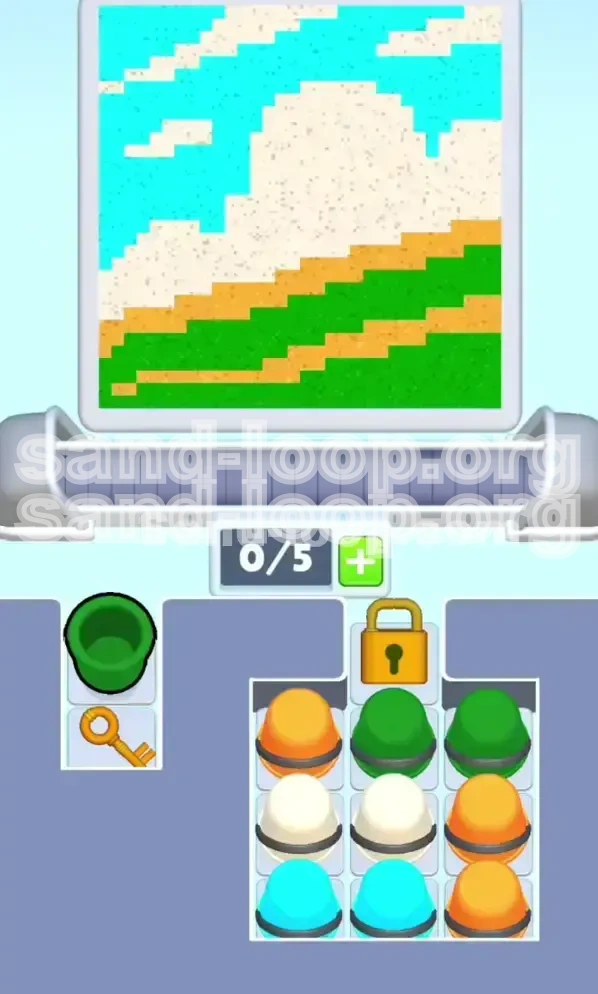
Sand Loop Level 41, often referred to as "The Snowy Peak," is a complex logic and resource management puzzle disguised as a simple art task. Unlike previous levels where you could simply tap cups in any order, Level 41 introduces a strict "Supply Chain" mechanic. The visual goal is to create a pixelated landscape featuring a cyan sky, a massive central white mountain, and a striped foothill of green and orange.
The challenge lies not in the difficulty of the shapes, but in the restriction of your workspace. You are limited to a 5-slot conveyor capacity. However, your paint supply is locked behind a grid system containing 9 different cups. If you unlock the grid too early without a plan, you will flood your conveyor belt, causing a deadlock that forces a restart. This level is a test of patience, spatial reasoning, and your ability to execute a specific pouring rhythm.
Clear Objectives for Completion
To successfully beat Level 41 and achieve the highest rating, you must accomplish the following goals without jamming your machinery:
- Unlock the Grid: Clear the initial "Guardian" cup to release the Golden Key and access the main paint supply.
- Manage Capacity: Maintain a flow of cups that never exceeds the 5-slot limit of the conveyor belt.
- Layer Correctly: Pour colors in an order that prevents "bleeding," where lighter colors accidentally contaminate darker zones.
- Striped Foundation: Precisely alternate Green and Orange sand to create the distinct stepped-hill effect at the bottom of the image.
- Fill the Sky: Complete the top cyan section last to ensure crisp borders around the mountain peak.
Analyzing the Landscape Layout
Before tapping a single cup, you must analyze the target image. The canvas is divided into three distinct horizontal zones. The top 20% is the Cyan Sky. The middle 50% is dominated by the White Mountain, a large triangular shape. The bottom 30% consists of the Earth, which is a checkerboard pattern of Green and Orange.
Understanding this geometry is vital because the White Mountain acts as a barrier. You cannot simply fill from top to bottom. If you pour the White Mountain first, it will spill over into the bottom Green/Orange zones, creating a muddy mix that is impossible to fix. You must build the image from the most difficult section (the striped bottom) upwards to the easiest section (the open sky).
The Color Order Theory: Why Sequence Matters
The "Bottom-Up" Strategy
In most sand puzzles, gravity dictates that sand piles up. However, in Level 41, the order of operations is dictated by "Pixel Dominance." You must treat the image as a series of layers. The bottom Green and Orange stripes are the most critical because they have sharp, zig-zag edges.
If you pour White sand into the center before the bottom is ready, the white sand will cover the areas where the Green and Orange need to go. By securing the bottom stripes first, you create a "floor" or boundary that catches the white sand afterwards. This prevents the colors from mixing and ensures the sharp definition of the mountain edge against the hills.
The Role of the Cyan Sky
Why save the Cyan sky for last? Cyan is the "background" color of the top section. It occupies the two upper corners. If you pour Cyan first, the subsequent White mountain sand will pour right on top of it. While this works visually, it creates a risk of overflow if your aim is slightly off. By pouring Cyan last, you act as a "clean-up crew." Any minor imperfections in the top corners are neatly filled by the sky sand, and you don't have to worry about the Cyan affecting the dense White mountain below it.
Understanding Capacity Throughput
The logic of color order is also tied to your 5-slot belt limit. The bottom section requires 4 specific cups (2 Green, 2 Orange) to be poured in a specific rhythm. If you try to juggle these while also processing the large White mountain cups, you will exceed your 5-slot limit. The strategy groups the pours by color family: first the "Earths" (Green/Orange), then the "Structure" (White), and finally the "Atmosphere" (Cyan).
Phase 1: The Unlock Protocol & Start
Identifying the Trigger
When the level loads, ignore the large 3x3 grid in the center. It is locked by a Golden Gate. Your focus is entirely on the left side of the screen. You will see a single tray holding one Green Cup. This is the trigger for the entire level. Do not touch anything else.
Executing the First Pour
Tap the solitary Green Cup immediately. This sends it to the dispenser. Watch the conveyor belt. This cup counts as 1 out of your 5 available slots. The goal here is to get this cup to the dispenser, pour the green sand into the bottom-left corner of the canvas, and let the cup disappear.
The Golden Key Drop
Once the Green Cup has finished dispensing sand, it will be destroyed. This action automatically drops the Golden Key hidden underneath it. Collecting this key is the only way to open the 3x3 grid. Crucial Tip: Wait until the green sand has fully settled and the cup is gone before you tap the grid. You want your belt to be completely empty (0/5 slots used) before you unleash the main supply.
Preparation for the Grid
With the key collected, the Golden Gate vanishes. You now have access to 9 cups simultaneously. This is the "Danger Zone" where 90% of players fail. Do not tap rapidly. Take a deep breath. You need to select specific cups from specific rows to avoid a traffic jam. We will begin by harvesting the "Earth" colors required for the bottom of the painting.
Phase 2: The Striped Earth Foundation
Locating the Earth Resources
Look at the newly unlocked 3x3 grid. We are focusing on the bottom part of the painting (Green and Orange stripes). You need to identify the cups that correspond to these colors.
- Top Row: Contains [Orange], [Green], [Green]. These are your primary Earth resources.
- Middle Row: Contains [White], [White], [Orange]. The rightmost Orange is a secondary resource.
- Bottom Row: Contains [Cyan], [Cyan], [Orange]. Ignore these for now.
The "Staggered Pour" Technique
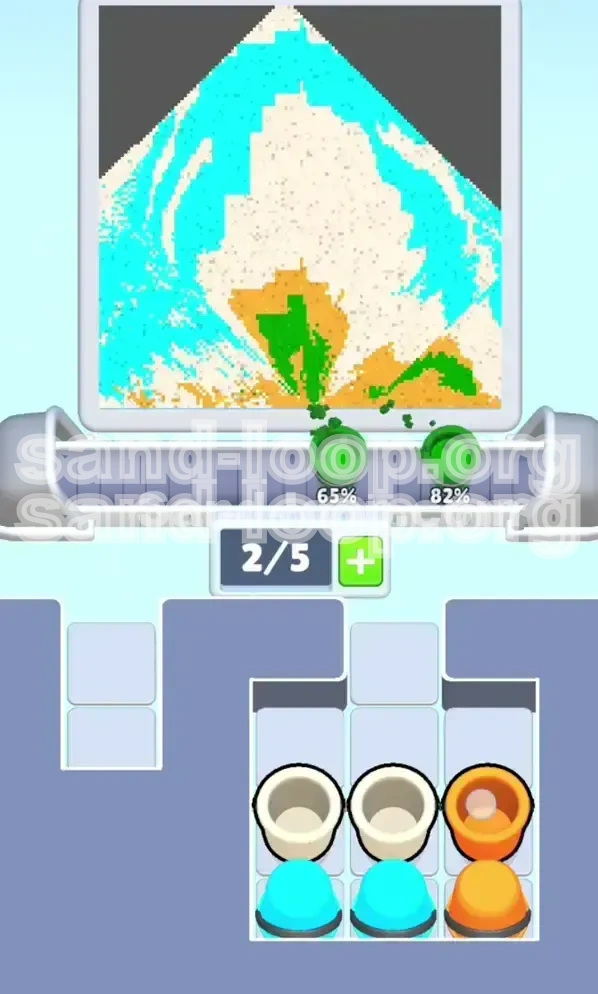
We will now load the conveyor with the Earth colors. You have 5 empty slots. We will use 4 of them. Order: Tap the Top-Left Orange, then the Top-Center Green, then the Top-Right Green. Finally, tap the Middle-Right Orange.
You now have 4 cups on the belt: Orange, Green, Green, Orange. This specific ordering allows the dispenser to alternate colors as it moves across the canvas, creating the perfect striped "staircase" effect for the hills without you having to manually aim.
Managing the Belt Flow
After tapping these 4 cups, STOP. Do not tap anything else. Watch the cups move to the dispenser. Because the bottom section of the image is small and detailed, these pours will be relatively quick. You must wait for these cups to clear the belt and return your slot count to 0/5 or 1/5 before introducing the next color (White). If you rush, the White cups will crash into the Orange cups, jamming the machine.
Phase 3: The Core Mountain Structure
The White Mountain Block
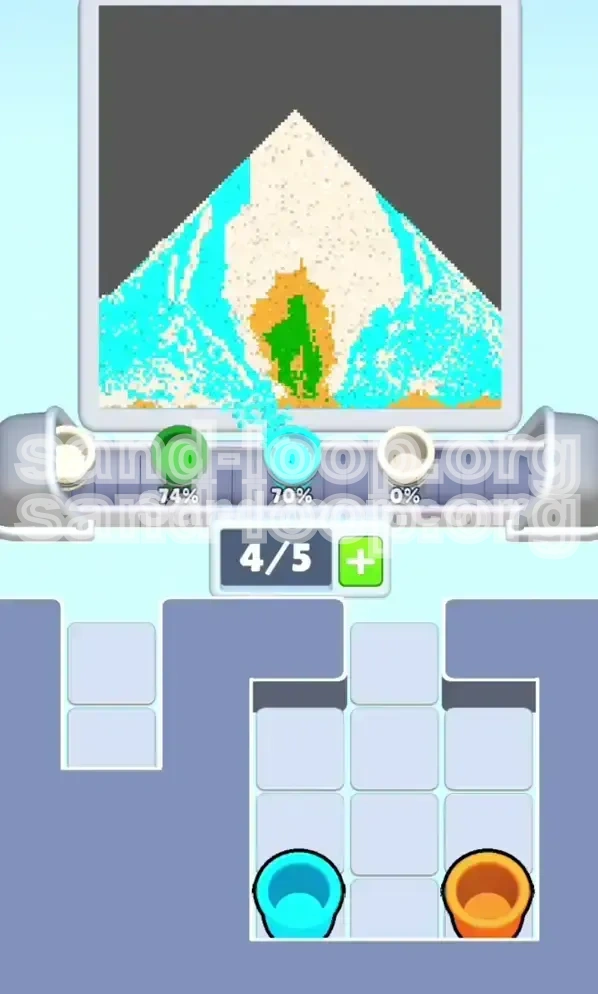
With the striped hills finished at the bottom, the middle section of the canvas is empty. This is the domain of the White Mountain. This shape is a large, forgiving triangle. It requires a significant volume of sand, meaning the pouring process will take longer than the previous Earth phase.
Efficient Bulk Pouring
Locate the two White Cups in the middle of the grid (Middle-Left and Middle-Center). Unlike the Earth phase, where we had to stagger colors, the White Mountain is a single solid block. Therefore, you can tap these two White cups back-to-back.
Tap White Cup 1, then immediately tap White Cup 2. This queues them up on the conveyor. The dispenser will continuously spray white sand, building the mountain peak rapidly. Since there are no other colors competing for this space, you don't need to worry about precision timing here—just let the flow happen.
Monitoring Fill Levels
As the White cups are processing, keep an eye on the middle of the canvas. The sand will pile up high. Ensure the White sand completely covers the bottom of the "sky" area. If you under-pour here, you might see gaps between the mountain and the sky later. It is better to slightly overfill the white zone than to underfill it, as the Cyan sky (next step) can cover up slight overflows, but it cannot fix gaps in the mountain.
Phase 4: The Sky Completion & Troubleshooting
Finishing with the Cyan Sky
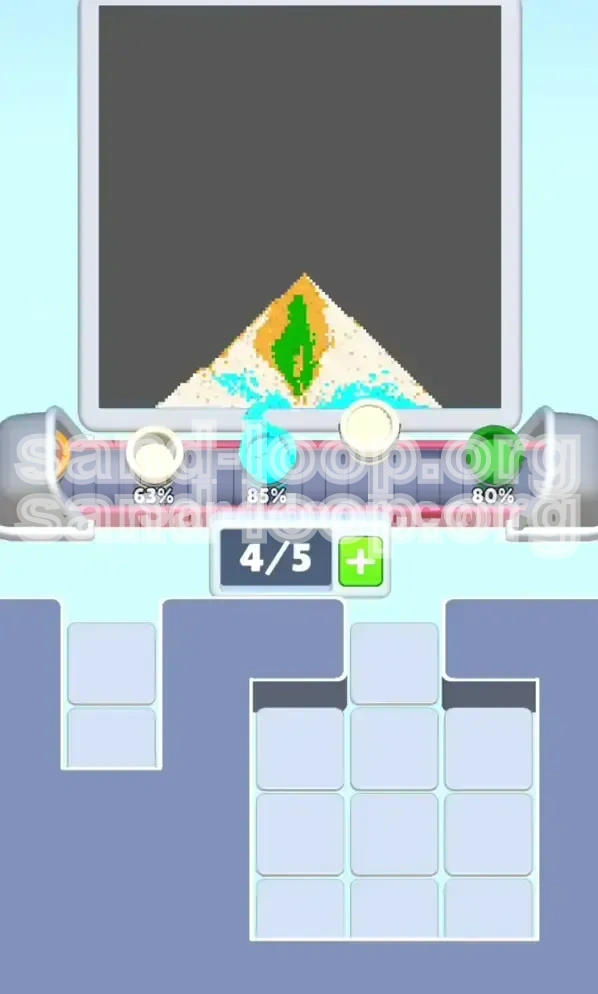
You are in the home stretch. The bottom is striped, the mountain is built. Now you just need to fill the top corners. Locate the two Cyan Cups in the bottom row of the grid (Bottom-Left and Bottom-Center).
Tap both Cyan cups onto the belt. The dispenser will move to the top of the canvas. Since the Mountain and Hills are already occupying pixels in the center, the Cyan sand will only fill the remaining empty space in the top corners. This is the most satisfying part of the level, as the image snaps into focus instantly.
Common Mistakes to Avoid
- The Panic Tap: Tapping all 9 cups at once. This guarantees a jam. Remember, only tap the next group of cups when the current group has mostly cleared the belt.
- Ignoring the Stripes: Pouring White before finishing Green/Orange. This results in a muddy, brown-looking bottom section because the White sand invades the Orange stripes.
- Forgetting the Trigger: Staring at the grid wondering why it won't open. Always check the separate tray on the left for the "Key" cup first.
Solutions for When You Are Stuck
If you find yourself stuck with a full belt and the dispenser isn't moving, you have encountered a deadlock. Unfortunately, in Sand Loop, a deadlock usually means you have to restart the level. However, if you are just "stuck" on the puzzle logic, remember the acronym G-O-W-C: Green (Key), Orange/Green (Stripes), White (Mountain), Cyan (Sky). If you deviate from this order, the puzzle becomes significantly harder.
Speed Run Tips
For players looking to achieve a high score or fast time, the key is "Rhythmic Tapping." Don't wait for the sand to completely finish falling before tapping the next cup. As soon as the current cup enters the dispenser chamber, you can tap the next required cup.
Optimized Sequence: Tap Left Green -> (Wait 1s) -> Tap Top Orange -> Tap Top Green -> Tap Top Green -> Tap Middle Orange. While these 4 are moving, quickly scan the grid. As soon as the first White slot opens up, tap the two White cups immediately. By the time the Earth phase is done, the White cups will be queued and ready to flow, shaving precious seconds off your time.