
Level 228
HARDHow to solve Sand Loop level 228? Get instant solution for Sand Loop 228 with our step by step solution & video walkthrough. Sand Loop 228 tips and guide.
Play Sand Loop Now
Experience the puzzle challenge firsthand
Game Screenshots
Sand Loop Level Guides
Level Overview: The Snowy Cabin Strategy
Visual Breakdown and Theme
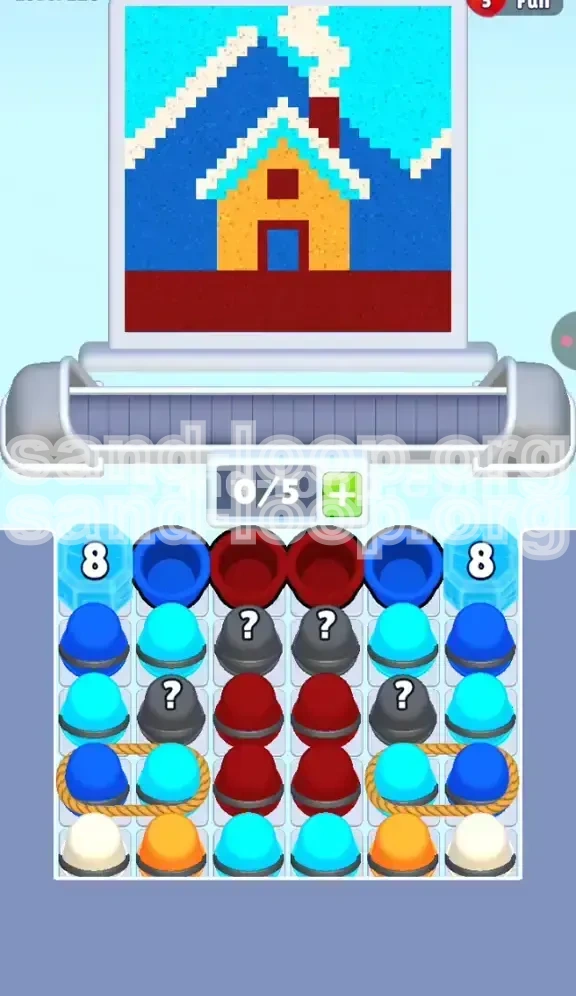
Sand Loop Level 228 presents a picturesque "Snowy Cabin" scene set against a serene blue mountain backdrop. This level is not a test of speed, but rather a test of precision and inventory management. The visual composition is dominated by large swaths of Red (ground) and Blue/Cyan (sky), which provide a steady rhythm, while the focal point—the Orange cabin with White snow details—requires careful late-game execution. The pixel art is charming, but the cluttered board layout disguised beneath this beauty can easily lead to early mistakes.
Core Mechanics: Digging and Blocking
This stage is classified as a "digging" level. The primary challenge is that the essential colors required to finish the main subject (the cabin) are buried deep at the bottom of the supply tray. You are immediately greeted by a cluttered board full of blockers and mystery elements. The game forces you to clear the upper layers of "common" elements before you can access the specific resources needed for the detailed work on the house.
The Ice Counter Challenge
Unlike standard ice blocks that shatter upon adjacency, this level features Ice Blocks equipped with "Counters (8)." These are effectively timers. Placed in the top corners, they block the leftmost and rightmost columns completely. They only break after you have successfully cleared 8 other cups from the board. This mechanic creates a significant bottleneck, forcing you to fight for space in the center columns during the opening moves.
Difficulty Assessment
Level 228 is rated as a medium-difficulty puzzle. It is not "hard" in terms of reflexes, but it is mentally taxing because it requires you to resist the urge to clear everything randomly. The difficulty spikes if you trigger Mystery Cups prematurely, clogging your limited 5-slot conveyor belt with unusable colors. Success here depends on your ability to forecast which colors will be needed 3-4 moves in advance.
Win Conditions
To secure victory, you must fill the canvas to 100% completion. This involves three distinct phases: clearing the Red ground, filling the Blue sky, and then meticulously painting the Orange house and White snow details without overfilling the small "danger zones" like the windows and chimney smoke. A single overflow in a small pixel area can waste a critical White cup, leading to a failure.
Clear Objectives and Color Priority
Primary Objective: Clear the Path
Your immediate goal is to reduce the clutter on the board. The "Ice Counters" are your first boss. You cannot access the sides of the board until these break. Therefore, your objective is not necessarily to "paint" perfectly in the first 10 moves, but to generate enough clear events (8 total) to shatter the ice and unlock the full board width.
Secondary Objective: Manage the Conveyor Belt
You have a strict limit of 5 slots on your conveyor belt at the bottom of the screen. A major objective is to prevent a deadlock. If your belt is full of Red cups but the canvas is ready for Blue, you stall. You must constantly balance the intake of new sand from the tray against the rate you are pouring onto the canvas.
Color Hierarchy: The "Base" Colors
Red (High Priority): The ground layer is massive. It consumes approximately 40% of the sand. You must prioritize Red cups immediately whenever they appear. Blue and Cyan (Medium Priority): The sky and mountains take up another 40%. These are abundant in the tray, so you can be somewhat aggressive in clearing them to make space on your belt, but don't ignore the ground.
Color Hierarchy: The "Detail" Colors
Orange (Late Game Critical): The cabin walls are the centerpiece. This color is scarce and buried at the bottom of the tray. Do not waste Orange sand on small pixels; save it for the main walls. White (Finishing Touch): The snow on the roof and chimney smoke requires White sand. This is the most dangerous color because the target areas are small. If you pour White too early or too fast, you will overfill and fail.
The "Safety Net" Strategy
Use the Red ground as your dumping ground. If you have a Mystery Cup that turns into a color you don't need right now (like Blue when the sky is full), pour it into the Red ground if it can accept it, or prioritize clearing other cups to change the board state. The Red zone is your "safety net" because it is large and forgiving compared to the tiny roof details.
Step-by-Step Walkthrough: The Center Rush
Phase 1: The Initial Strike (Moves 1-5)
As the level begins, do not touch the sides (they are blocked by Ice Counters). Look directly at the top center row. You will see two Red cups. Tap these immediately. The Red ground is the largest area and needs to be filled early to establish a base score. Next, tap the Blue cups adjacent to them. The sky is vast and can accept Blue sand instantly. This "double tap" strategy clears the top crust and reveals the second layer.
Phase 2: The Mystery Cup Gauntlet
Clearing the top row exposes a row of Mystery Cups (grey with question marks). This is the most dangerous part of the level. Do not spam tap. Tap one Mystery Cup at a time. If you tap too many, they might transform into White or Orange, which you are not ready to use yet. This clogs your belt with useless resources. If a Mystery Cup turns into Red or Blue, pour it immediately. If it turns into Orange or White, try to keep it on the belt or in the tray until the house structure is ready.
Phase 3: Breaking the Ice Counters
Continue clearing the center column cups (mostly Red and Blue). Watch the Ice Counters in the corners. Every time you clear a cup, the counter drops. You need to clear roughly 8 cups to shatter the ice. Focus entirely on the center vertical channel. Once the ice shatters, the left and right columns (Columns 1 and 6) will open up, dropping new cups onto the board and giving you much-needed maneuvering room.
Phase 4: Managing the Roped Obstacles
With the sides open, you will encounter Roped Cups around the 4th row. These are bound horizontally. To clear a roped cup, you often need to clear the cup directly above it first, or match colors adjacent to it. Prioritize clearing the cups above the ropes. Once the ropes are cut, you gain access to the bottom row of the tray where the precious Orange and White cups are hiding.
Phase 5: The Cabin Construction
Once the Orange cups are accessible, the canvas should be ready. The Red ground and Blue sky should be roughly 80% full. Now, shift focus to the Orange cups. Pour them to build the cabin walls. Be careful not to overfill; the walls are rectangular, but the windows are small. Once the Orange is substantial, switch to White cups. These should be your very last action. Use them to cap the roof with snow and add the smoke from the chimney.
Common Mistakes and Stuck Solutions
Mistake: The "Spam Tap" on Mystery Cups
The most common error in Level 228 is treating Mystery Cups like regular slots. Players tap 3 or 4 in a row, hoping for luck. This often results in three White cups appearing while the canvas is still demanding Red. Since you cannot pour White yet, your 5-slot belt fills up, and you have no moves left. Solution: Tap one, assess, pour if possible, then tap the next.
Mistake: Ignoring the Conveyor Belt Limit
Your belt only holds 5 cups. A common mistake is filling the belt with 5 cups of the same color (e.g., 5 Reds) while waiting for the Blue sky to open up. Solution: Always keep 1 or 2 slots open on your belt as "buffer space." This allows you to catch falling cups from the top without causing a jam. If you are stuck, look for a cup you can pour immediately, even if it's not the perfect color, just to free up a slot.
Mistake: Overfilling the Small Details
The chimney smoke and roof snow are very small pixel areas (often 2-4 pixels total). If you pour a large White cup into a nearly full smoke stack, it will overflow and waste the rest of the cup. Solution: When dealing with small details, look for the "pixel perfect" moment. Wait until the area is 90% full, then use a smaller cup or a partial pour if the game allows precise timing. Do not use White cups until the very end.
Solution: Deadlocked Board
If you are completely stuck—no moves possible, belt full, and board blocked—you likely have a mismatch between your belt inventory and the canvas needs. Fix: You may need to make a "sacrifice pour." Look for a larger area (like the Red ground) that can accept a "wrong" color just to clear a slot. While this might dirty the color slightly, it frees up a slot to let you clear the cup you actually need.
Solution: Running Out of Orange
Orange is buried deep. If you reach the end and run out of Orange sand for the walls, it means you used Orange cups earlier in the level, possibly by accident from Mystery Cups. Fix: There is no fix late-game. You must restart and be stricter with Mystery Cup RNG. If you get Orange early, try to pour it into a corner of the Red ground (if compatible) or simply hold it on the belt until the house appears.
Speed Run Tips and Advanced Tricks
The "Center Load" Optimization
For speed runners, the key is minimizing hand movement. Since the Ice Counters block the sides for the first 8 moves, position your thumb/cursor over the center column. Tap the Red and Blue cups in a rhythmic "down-down" pattern. Do not look at the score animation; watch for the next cup to become tappable. Anticipating the shatter of the ice blocks saves valuable seconds.
Mystery Cup Prediction
Experienced players learn to predict Mystery Cup outcomes based on the remaining tray composition. If the tray is showing mostly Blue at the bottom, the Mystery Cup is statistically likely to turn into Blue or Cyan. Use this probability to your advantage. If the tray is heavy on Red, tap Mystery Cups aggressively, as they are likely to turn into the Red you need for the ground.
Belt Management Macro
Advanced players use the "Hold 2" rule. Never let your belt fill past 3 cups if possible. Keeping 2 slots open allows you to instantly clear any falling debris from the top rows without pausing to reorganize. This fluidity prevents the "stutter-step" that ruins speed runs. It is better to pour a slightly imperfect color than to wait 10 seconds for the perfect one.
Pre-Placement for Detail Work
Before you break the ropes to release the White cups, ensure your Orange structure is 100% complete. The transition from Orange to White needs to be instantaneous. As soon as the White cups drop, tap them. Pre-positioning your cursor near the roof area while clearing the last Orange cup can shave off 0.5 seconds per detail section.
Visual Cues for Completion
Don't rely on the percentage counter alone. Look for the visual "shine" or "sparkle" effect that indicates a section is full. For the Red ground, if it looks matte, it needs more. For the chimney smoke, if it moves or pulses, it is full. Recognizing these visual cues faster than the numerical counter allows you to move to the next color sooner.