
Level 237
EXPERTHow to solve Sand Loop level 237? Get instant solution for Sand Loop 237 with our step by step solution & video walkthrough. Sand Loop 237 tips and guide.
Play Sand Loop Now
Experience the puzzle challenge firsthand
Game Screenshots
Sand Loop Level Guides
Level Overview: Understanding the Canvas and Constraints
Visual Breakdown of the Hot Air Balloon
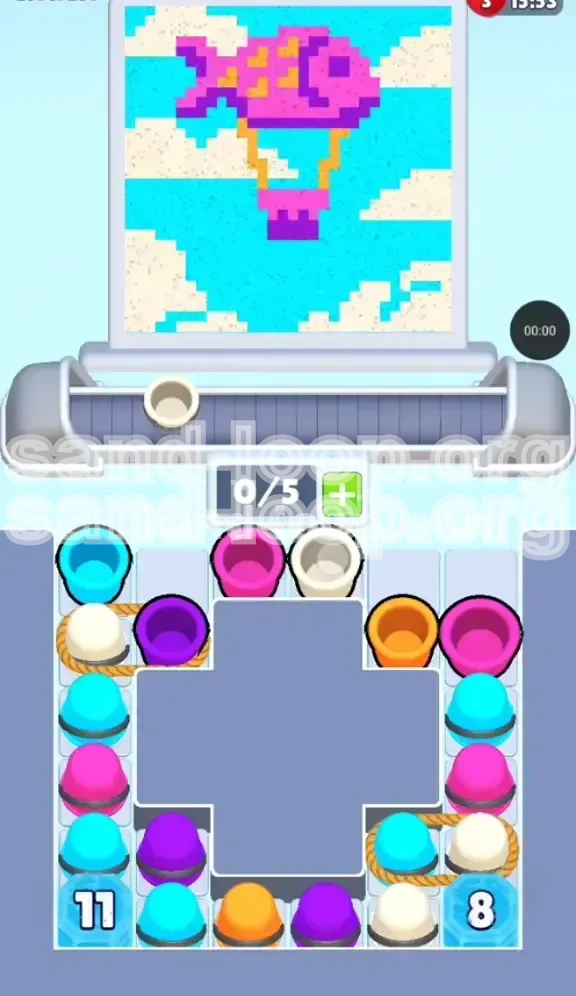
Sand Loop Level 237 presents a visually striking scene that is deceptively complex. The central object is a large hot air balloon set against a vast, bright cyan sky. The balloon is not a single-color object; it features a segmented design requiring deep purple for the main envelope, vibrant magenta for lower accents, and golden yellow mixed with orange for the basket and detailing. The challenge lies in the sheer scale of the cyan background compared to the intricate, smaller sections of the balloon.
The Supply Tray Puzzle
Your success depends entirely on how you manage the initial supply tray setup. You are facing a classic "buried treasure" scenario. The left stack consists of 11 cups, with the critical purple cups trapped beneath layers of cyan and white. The right stack, totaling 8 cups, buries the magenta and yellow cups under similar debris. You cannot simply pick the colors you want; you must unlock them by processing the unwanted top layers first.
Conveyor Capacity Analysis
Operating with a 0/5 base conveyor capacity means you have 5 slots to work with. While this might seem generous, it fills up rapidly during the unblocking phase. Because you need to cycle out top-layer colors to reach the buried ones, your slots will temporarily be occupied by cups you cannot immediately use. Efficient slot rotation is the only way to prevent a deadlock.
The "Cyan Trap" Danger
The most significant visual feature is the cyan sky, which covers approximately 60% of the canvas. This creates a psychological trap: because cyan is abundant in the stacks, players tend to pour it early to clear space. However, doing so fills the background before you have established the balloon's boundaries, making it incredibly difficult to pour the smaller color sections later without causing overflow and color contamination.
Win Condition Requirements
To achieve a three-star rating and complete the level, you must fill the balloon completely with zero contamination, followed by the background. The "purity" of the color blocks is the primary scoring factor. If magenta bleeds into the purple section, or yellow spills into the sky, your score potential drops significantly. The game requires a clean finish, meaning every pour must be deliberate.
Step-by-Step Walkthrough: The Unblocking Strategy
Phase 1: The Initial Clear (Left Stack Focus)
Do not start by pouring cyan. Instead, focus entirely on the left stack. Load the top two cups (likely Cyan or White) onto your conveyor. If they are White, pour them immediately onto the cloud areas to clear them from your belt. If they are Cyan, do not pour them onto the sky yet. Instead, carry them on the belt or place them in a temporary slot if available. Your goal is to dig down 4 layers to reach the first Purple cup.
Phase 2: Exposing the Purple Core
Once you have removed the top 3-4 cups from the left stack, the Purple cup will be accessible. Load this Purple cup immediately. Do not pour it yet. Place it in the first slot of your conveyor. Now, look at the right stack. You need to start clearing the top layers there to find the Magenta. Load 1-2 cups from the right stack to begin this process, keeping your belt moving.
Phase 3: Executing the Purple Body
With a Purple cup loaded and ready, wait for the balloon to align with your pour spout. Use short, controlled taps to fill the deep purple main body of the balloon. Do not use a continuous stream; the balloon shape is curved, and the paint will slide off if applied too heavily. You want to achieve about 90% coverage here. Once the main body is purple, do not overfill. Stop immediately, even if you have leftover paint in the cup.
Phase 4: Unblocking and Pouring Magenta
Return to the right stack. Continue cycling cups until you expose the Magenta. This might require loading a "dummy" cup (a color you don't need) onto the belt to push the stack down. Once Magenta is loaded, target the lower accent sections of the balloon. These areas are adjacent to the purple, so be extremely careful not to overlap. A slight pause between taps is crucial here to prevent bleeding.
Phase 5: Golden Basket Details
By now, you should have exposed the Yellow or Orange cups from the deeper layers of the stack. Load the Yellow cup. The basket is the smallest area on the canvas. This requires the most precision of the entire level. Use "micro-bursts"—tapping the pour button for less than half a second—to fill the basket. Overfilling the basket is the most common cause of failure in the late game.
Color Order and Processing Logic
The Priority Hierarchy
Strict adherence to the following order is non-negotiable for this level: Purple > Magenta > Yellow/Orange > Cyan > White. Processing colors out of this order will result in failure. For example, if you do White (clouds) before Purple, you risk splashing white onto the balloon envelope. If you do Cyan (sky) before the balloon, you lose your reference points for the balloon's shape.
Why Purple Must Be First
Purple defines the largest volume of the foreground object. It serves as the anchor for the rest of the image. Furthermore, the purple cups are buried deepest in the left stack (usually at layer 5 or 6). You must prioritize digging them out first because if you wait until the end, you might not have enough moves or belt space to clear the debris covering them.
Managing the Transition to Magenta
The shift from Purple to Magenta is the highest risk moment in the level. These colors are adjacent on the canvas. When you switch cups on your conveyor, visually confirm the cursor has moved. Do not rush. A 1-second pause between finishing the Purple pour and starting the Magenta pour can save you from a "contamination" fail.
The Sky (Cyan) Fallback Strategy
Leave Cyan for last. While it is the largest area, it is also the most forgiving. Because it touches the edges of the screen, overfilling is less risky. Once the balloon is fully colored (Purple, Magenta, Yellow), you can aggressively pour Cyan to fill the remaining 50-60% of the level rapidly.
Final Touches with White
White is used sparingly for the fluffy clouds. Use White to clean up any rough edges between the balloon and the sky, or to fill the specific cloud zones. White should only be poured after the Cyan sky is 80% full, to ensure you don't accidentally paint the sky white.
Key Tips for Precision and Control
The "Tap-and-Stop" Technique
Never hold down the pour button for the balloon sections. The physics engine in Sand Loop applies paint with momentum. A continuous stream will cause the liquid to overflow the balloon's boundaries and run into the sky area. Instead, use a rhythmic tapping motion: Tap-Wait-Tap. This gives the previous drop time to settle before the next one lands.
Conveyor Belt Rhythm Management
Keep the belt moving. Even when you are aiming, ensure the belt is in motion. If the belt stops, you lose momentum and risk running out of time if there is a clock (or simply lose flow efficiency). However, align your cup so that it arrives at the pouring zone exactly when you are ready to strike.
Slot Management Strategy
Try to keep 1 slot empty at all times during the "Digging" phase (first 30 seconds). This empty slot allows you to pick up a blocker cup from the stack to expose the colors underneath. If all 5 slots are full, you cannot dig, and you will be stuck waiting for cups to process, which wastes valuable time.
Utilizing the "Dry Pour" Trick
If you pick up a cup you don't need (like an extra Cyan early on), you can choose to pour it into a "waste" area if the game allows, or simply let it ride the belt until it falls off the end (if the game mechanics permit dropping cups). In Sand Loop, usually you must process it. If forced to process unwanted Cyan, pour it onto the sky but only in small amounts to avoid "locking" the sky percentage too early.
Common Mistakes and How to Avoid Them
Mistake #1: The Sky Overload
Players often panic seeing the large empty sky and fill it with Cyan first. This is a fatal error. Once the sky is 100% full, you cannot spill any excess paint from the balloon without failing the level. Always leave the sky at 0% until the balloon is 100% done.
Mistake #2: Ignoring the Stack Depth
Looking at the surface cups and only picking those is a slow route to failure. You must actively calculate: "If I take this Cyan, I get a Purple." Always play 3 moves ahead. If you don't plan your digs, you will end up with a belt full of White and Cyan while the timer runs out and your balloon remains unpainted.
Mistake #3: Bleeding Colors on the Basket
The basket is small and sandwiched between the balloon body and the sky. Using a heavy stream here will almost always result in the basket color bleeding into the sky or the balloon body. Use the minimum amount of pressure needed to dispense the paint.
Mistake #4: Deadlocking the Conveyor
This happens when you load 5 cups that you cannot use (e.g., 5 Cyan cups) because you haven't dug deep enough to find the Purple. The belt stops moving, or you have no room to maneuver. To avoid this, never load a cup unless you know exactly when you are going to pour it.
Stuck Solutions and Speed Run Tips
What to Do If You Are Color Locked
If you find yourself with a full conveyor of useless colors and the balloon still unpainted, you have no choice but to "waste" pours. Pour the unwanted colors onto the sky (Cyan) or clouds (White) purely to get them off the belt. Yes, this partially fills the level early, but it frees up your slots to dig for the Purple you desperately need. It is a recovery tactic.
Recovering from a Bad Pour
If you accidentally splash Magenta onto the Purple section, stop immediately. Do not try to fix it by pouring Purple over it, as this often creates a muddy brown mix. Depending on the game's strictness, you might need to restart immediately. If the splash is small, you might be able to hide it by filling the rest of the Magenta section perfectly, but large splashes usually mandate a restart.
Speed Run Strategy: The Rush Method
For experienced players looking to maximize time: Ignore the clouds (White) entirely. The clouds are decorative. Focus 100% on the balloon. Load the first Purple cup you find, pour it. While that is settling, load the Magenta. You can effectively ignore the Cyan and White cups on the belt until the very last second. The speed run relies on completing the "hard" constraints first and treating the background as an afterthought.
Optimized Path for 3 Stars
To secure 3 stars, accuracy > speed. A slow run with zero color contamination scores higher than a fast run with messy edges. Take your time with the Yellow basket. If you can nail the Yellow basket perfectly, you usually secure the score threshold needed for the top rating, regardless of how fast you filled the sky.