
Level 275
HARDHow to solve Sand Loop level 275? Get instant solution for Sand Loop 275 with our step by step solution & video walkthrough. Sand Loop 275 tips and guide.
Play Sand Loop Now
Experience the puzzle challenge firsthand
Game Screenshots
Sand Loop Level Guides
Level Overview: The Blueberry Branch Challenge
Visual and Mechanical Theme
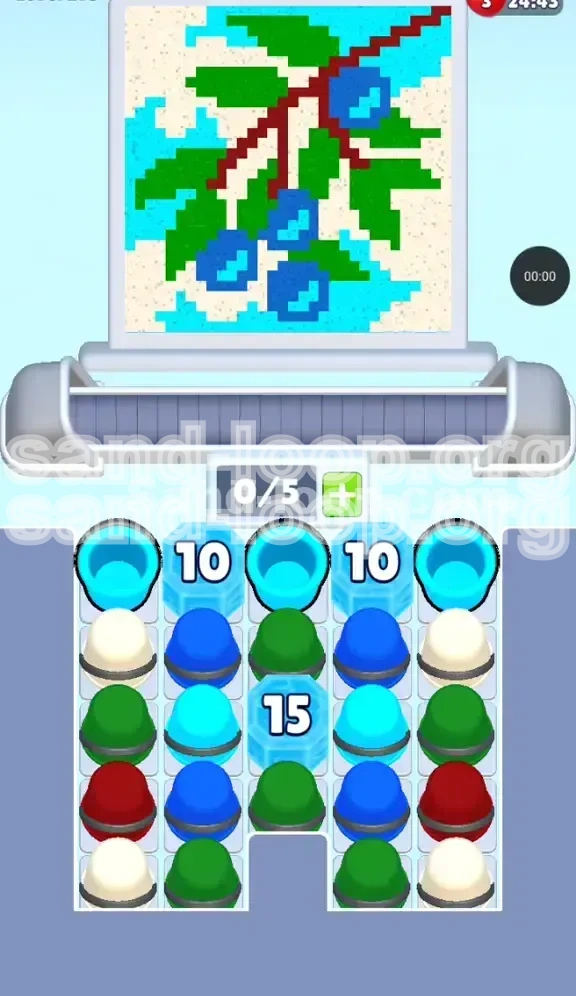
Level 275, titled "Blueberry Branch," presents a deceptive visual challenge. While the screen displays a serene pixel art image featuring dark blue berries, stark green leaves, and a winding brown branch, the underlying gameplay mechanics are far from relaxing. This level is a resource management puzzle disguised as an art game. The primary aesthetic focuses on contrast—the deep blues of the fruit against the cyan sky—while the gameplay focuses on breaking through high-durability obstacles to access those very colors.
The Core "Ice Blockade" Mechanic
Unlike previous levels where color matching is the primary difficulty, Level 275 introduces a "Ice Blockade" mechanic. You face three distinct Ice Blocks with HP values of 10, 10, and 15 positioned strategically in the center columns. These blocks act as gatekeepers, preventing easy access to the essential Green and Dark Blue cups located in the lower rows of the tray. Your success depends entirely on your ability to generate "crash" damage to shatter these blocks without clogging your supply line.
Layout Analysis: The Bottleneck
The tray layout is designed to induce panic. With a Slot Capacity of 5, space is incredibly tight. The top row offers immediate access to Cyan cups (sky), but the useful Dark Blue and Green cups are buried behind the Ice Blocks. The layout forces a specific dependency chain: you cannot effectively paint the foreground elements until you have cleared the path to their respective paints. This bottleneck is the leading cause of failure for unprepared players.
Difficulty and Frustration Points
This level is rated as high-difficulty primarily due to the "15 HP" Center Ice Block. This specific block requires sustained combo chains to break, which is difficult when you are low on available moves. Furthermore, the pixel art requires precision; the "Dark Red" branch is a mere 2-pixel wide line in many places, meaning that sending a cup slightly too early or late results in a "miss," wasting precious moves.
Why This Level Matters
Mastering Level 275 is crucial for progressing to later stages. It teaches the concept of "Endurance Matching"—the ability to maintain a rhythm of matches not just to paint, but to deal physical damage to the board environment. The skills learned here regarding cup rotation and slot management are applicable to the final tier of Sand Loop puzzles.
Clear Objectives: Your Mission Goals
Primary Goal: Shatter the Ice Triangle
Your first and most critical objective is to destroy the three Ice Blocks located in the top-center of the tray. This is not optional. You must treat the first 15-20 moves of the level as a "battle phase" rather than a "painting phase." Focus your energy on making matches adjacent to these blocks. The 10-HP blocks will fall first, but the central 15-HP block requires a dedicated strategy to crack.
Secondary Goal: Unlock the Supply Line
Once the ice is shattered, your objective shifts to retrieval. You must clear the top row Cyan cups efficiently to allow the bottom row cups (Dark Red and Green) to cycle up into the active play area. If you fail to clear the backlog of Cyan cups, the heavier cups at the bottom will remain trapped, making it impossible to finish the picture.
Tertiary Goal: Precision Painting
After the supply line is open, the objective becomes accuracy. You must achieve 100% coverage on the berries and leaves without over-painting. The berries require specific Dark Blue placement, avoiding the Cyan highlights. The leaves require Green, but you must avoid painting over the branch.
Efficiency Goal: Minimize Slot Clogging
You must aim to keep your slot usage between 2/5 and 4/5 at all times. Allowing the slots to fill to 5/5 creates a deadlock where no new cups can enter, and no cups can be cycled to damage the ice. Your objective is to maintain a "fluid belt," ensuring that cups are constantly entering and exiting the active tray.
Completion Goal: The Perfect Branch
The final objective is the execution of the Dark Red branch. This is usually the last step. You must save at least 2-3 Dark Red cups for the very end of the level to connect the berries. Because the branch is thin and winding, it requires an empty or near-empty tray to execute correctly without mistakes.
Step-by-Step Walkthrough: The Action Plan
Phase 1: The "Sky" Opening (Moves 1-10)
Immediate Action: Do not start by matching the berries. Start with the Cyan cups in the top row. Look for the Left and Right Cyan cups. Tap them to send them to the sky. This causes the cups below them (White/Dark Blue) to slide upwards. This sliding action is what generates the first 3-4 points of damage against the side 10-HP Ice Blocks.
Middle Management: Avoid tapping the Center Cyan cup immediately if it is blocked by the 15-HP Ice. You want to focus on breaking the outer 10-HP blocks first to open up the sides of the board.
Phase 2: The Ice Breaker Protocol (Moves 11-25)
The Rhythm: Once the outer ice cracks, you will see Green and Dark Blue cups sliding into the middle rows. Now, switch to a 1:1 rhythm. Send one Dark Blue cup (for a berry), then immediately send one Green cup (for a leaf). Do not send two Blues in a row unless necessary.
Why the 1:1 Rhythm? Alternating colors prevents the tray from getting clogged with a single type. It ensures that as you clear one color, the other slides up to take its place, keeping the physical momentum going against the central 15-HP Ice Block.
The Breakthrough: You will notice the central block shaking. Keep up the pressure. The moment it shatters, a flood of new cups will arrive.
Phase 3: The Great Flood (Moves 26-40)
Managing the Deluge: When the center block breaks, you will likely have 4 or 5 cups on the belt instantly. Pause for a second. Look at the bottom row. You likely have Dark Red cups waiting.
The Decision: Do NOT send the Dark Red yet. Your tray is too full. Focus on clearing the remaining Cyan (Sky) and Dark Blue (Berry) cups to reduce your slot count to 2/5. You need "maneuvering room" for the final detail work.
Phase 4: The Foreground Focus (Moves 41-55)
Leafing Out: Now that the ice is gone, focus heavily on the Green leaves. They cover large areas and are easy to hit. Clearing the Green cups will help cycle the tray faster, bringing the Dark Red cups closer to the dispenser.
Berry Detailing: Use any spare Dark Blue cups to fix the edges of the berries. Ensure you haven't accidentally painted the "highlight" pixels (the lighter blue/white dots inside the berries). If you have, use a White cup (if available) to correct it, or leave it if the percentage is still high enough to pass.
Phase 5: The Final Branch (Moves 56+)
Clearing the Deck: This is the most dangerous part. Wait until your tray is nearly empty (0/5 or 1/5). You want zero distractions.
Steady Hand: Tap the Dark Red cups now. Paint the thin branch connecting the berries. Since the branch is diagonal, aim for the center of the berries to "bridge" the gap. With a clear tray, you can afford to wait for the perfect visual alignment of the cup to the target pixels.
Color Order Strategy: Processing the Palette
Priority 1: Cyan (The Sky)
Why First? Cyan is your "trash" color and your "key." It is mostly background, but the cups clogging the top row are Cyan. You must process Cyan first to clear the physical space in the tray. Furthermore, painting the sky early gives you a safe "dump" zone for excess cups if you make a mistake later.
Priority 2: Dark Blue & Green (The Symbiotic Pair)
Why Second? These two must be processed together. The berries (Blue) and leaves (Green) are interwoven. Focusing on one without the other leads to tray jams. Statistically, you will likely use 45% Green and 35% Dark Blue. Treat them as your "workhorse" colors. They are also the weapons you use to break the ice.
Priority 3: White/Cream (The Highlights)
Why Third? These are usually low-volume. Use them to fix the berry highlights or fill negative space. They are often "filler" cups that appear when the game is running low on main colors. Process them only when you have a spare slot and no critical Green/Blue moves available.
Priority 4: Dark Red (The Finale)
Why Last? The Dark Red branch is the highest risk element. It covers the least amount of surface area (approximately 10-15% of the image) but has the highest difficulty due to narrow hitboxes. Saving it for last ensures you have the maximum amount of screen visibility and tray control to execute the fine lines.
Key Tips and Strategic Advice
The "Match-Adjacent" Damage Rule
Remember that you don't need to match the ice block itself (you can't). You damage the ice by matching the cups *next* to it. Always look for the cups touching the ice blocks. If a cup is touching a block, it is a priority target, regardless of its color. This is the fastest way to generate the 35 total hits needed to clear all the ice.
The Slot Capacity "Safety Buffer"
Never let your slots hit 5/5 unless you have a guaranteed "Clear All" or massive combo ready. A 5/5 tray means you have zero flexibility. If you get a surprise "Bad Cup" (a color you don't need), you are stuck with it. Try to keep a buffer of 1 empty slot to absorb random drops.
Visualizing the Diagonal
The branch runs diagonally. The game's tray logic is horizontal. This creates a disconnect. To bridge this, don't trace the branch with your eyes. Instead, look at the berries as "anchors." Paint the berry, then immediately drag/paint towards the next berry. The branch fills in the space between.
Handling the "Cyan Lock"
Sometimes, you will have three Cyan cups and no ice to break. This is a "Cyan Lock." Do not panic. Send them to the sky immediately, even if the sky is 100% finished. Over-painting the sky by 5-10% is better than jamming your tray and losing the level. You need the flow of movement.
Timing the "Release"
Don't tap wildly. Watch the cups move. If you tap a cup the exact moment it slides into position, you maintain a higher "combo multiplier" (indicated by the music and visual effects). Keeping this combo high maximizes the damage dealt to the ice blocks per hit, reducing the total number of moves needed.
Common Mistakes to Avoid
Mistake 1: The "Berry Rush"
Many players see the berries and instinctively try to fill them first. This is a trap. The berries are surrounded by ice and leaves. If you focus only on berries, you will neglect the Green cups needed to break the ice. Result: You run out of moves with the ice still intact.
Mistake 2: Ignoring the "Danger Zones"
The "Danger Zones" are the thin areas where the branch touches the leaves. Players often rush and paint the leaf (Green) over the branch (Red), or paint the branch over the leaf. Once a pixel is painted the wrong color, it is very hard to fix without a specific "Eraser" or "Bomb" powerup. Always zoom in (mentally) on the branch tips before tapping.
Mistake 3: Hoarding the "Breakers"
Sometimes players hold onto Cyan cups waiting for the perfect moment. Don't hoard. If a cup is in a slot, it is taking up space. If you aren't going to use it in the next 2 seconds, send it away. An empty slot is infinitely more valuable than a cup you "might" use later.
Mistake 4: Late-Game Tray Clogging
In the last 10 moves, players often get careless because the end is in sight. They let the tray fill up, and then a single misplaced Dark Red cup blocks the final Berry cup needed to win. Maintain discipline until the "Victory" screen actually appears.
Mistake 5: Misjudging the 15-HP Block
The central block breaks faster than you think if you keep the rhythm. Many players waste powerful moves (like Large Cups) on it when it only has 1 HP left. Watch the crack density. If it looks heavily fractured, switch targets to the next block to maximize efficiency.
Solutions for When You Are Stuck
Solution: The "Soft Reset" Tactic
If your tray is a complete mess (5/5 full, no moves possible), you need a soft reset. Stop tapping colors. Look for a cup that, if sent, will clear *nothing* but clear a slot. Send it. You lose a small amount of progress (over-painting), but you buy yourself 1 slot of breathing room to reorganize your strategy.
Solution: Focus on the "Bottom Feeders"
If you are stuck because the top of the tray is useless colors, stop looking at the top. Look at the very bottom of the tray (the "After" row). Identify which color is next. If it's a Green, start clearing non-Green cups now to prepare for its arrival. Playing one step ahead of the tray is the key to unjamming a stuck level.
Solution: Using the "Highlight" Trick
Stuck on the berries? Look at the highlight (the light reflection on the berry). That pixel is usually White or Light Blue. If you have a cup of that color, aim specifically for the highlight. Hitting the small target clears the cup and often triggers a "Precision Bonus" which can clear surrounding fog or give you extra moves.
Solution: The "Ice Focus" Emergency
If you are stuck with 5 moves left and full ice, abandon all painting. Stop trying to make the picture look good. Tap *only* the cups touching the ice. You will fail the artistic score, but you might break the ice enough to let the final colors flow, giving you a last-second chance to snatch a victory from the jaws of defeat.
Speed Run Tips: For the Fast and Furious
Shortcut 1: The "Double Tap" Start
At the very start of the level (Move 1), don't analyze. The layout is preset. Immediately double-tap the Left and Right Cyan cups. This input lag bypass allows you to shatter the side 10-HP blocks 2 seconds faster than a cautious player. This head start is vital for speed runs.
Shortcut 2: Predictive Sliding
Don't wait for the cups to stop sliding. As the ice breaks and the cups are shifting, predict where the Green cup will stop. Tap that column *while* the cup is still moving. If you time it right, the cup registers as "available" the millisecond it lands, shaving 0.5 seconds off every move.
Shortcut 3: The "Bulk Paint" Strategy
Ignore the branch entirely until the end. Speed runners often paint 90% of the berries and leaves in one go, leaving the screen looking like a mess of disconnected fruit, then use a "Clear Tray" powerup (if available/charged) to instantly reset the belt for the final branch drawing in one continuous motion.
Shortcut 4: Ignoring the 100% Perfection
For a speed run, 90% completion is often enough to get 3 stars. Do not waste time fixing the tiny pixel highlights on the berries if the main shape is down. Every second spent fixing a 2-pixel error is a second lost on the clock. Focus on broad strokes and major color blocks.