
Level 290
HARDHow to solve Sand Loop level 290? Get instant solution for Sand Loop 290 with our step by step solution & video walkthrough. Sand Loop 290 tips and guide.
Play Sand Loop Now
Experience the puzzle challenge firsthand
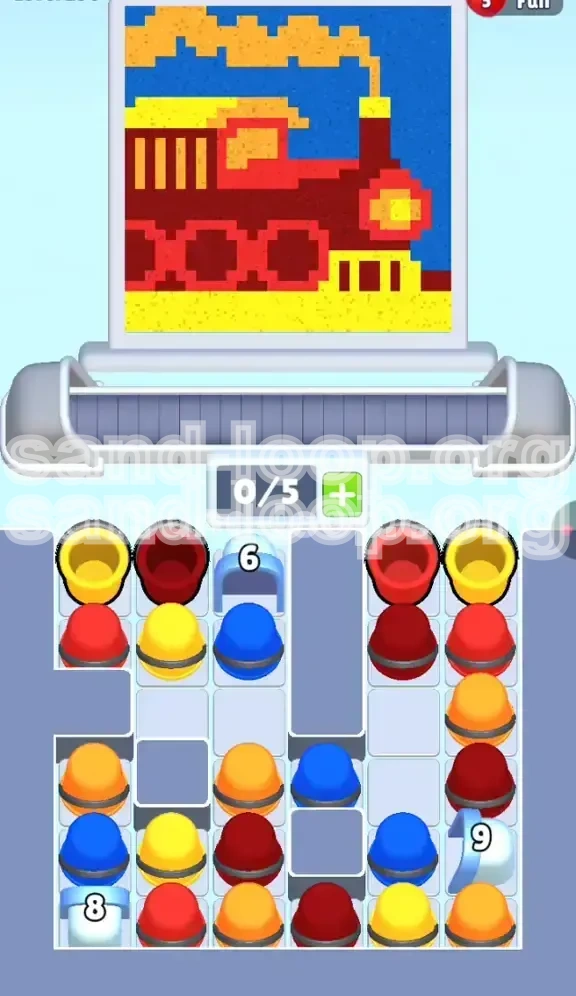
Game Screenshots
Sand Loop Level Guides
Level 290 Overview: The Retro Steam Locomotive
Welcome to Level 290, commonly known as "The Retro Steam Locomotive." This stage is a significant shift in difficulty, testing your ability to manage a tightly packed board under strict inventory constraints. Unlike previous levels where you could afford to be loose with your collecting strategy, Level 290 requires a "sniper" approach. The level is themed around a pixel-art steam train featuring a complex color palette and a "U-shaped" map layout that funnels you into specific bottlenecks.
The primary challenge here is space management. You are dealing with a dense board structure where essential colors are buried deep under stacks of non-essential ones. If you collect cups indiscriminately, your 5-slot tray will fill up with the wrong colors, forcing you to waste moves dumping them or, worse, causing a game-over stalemate. The level introduces a deceptive color theory challenge, requiring you to distinguish between similar shades of red to paint the engine body versus the cabin.
Key Level Features
- The "U-Shaped" Board: The cups are arranged in a specific formation where the sides (left and right) are tall towers, and the center is blocked by ice. This forces a specific digging order: sides first, center later.
- Dense Color Volume: The Maroon (Dark Red) color required for the train body accounts for approximately 45% of the total sand volume. You must prioritize this immediately or risk getting bottled up.
- The Sky Trap: Blue cups, which make up the background, are strategically placed to clog your tray. Collecting them too early is the most common cause of failure.
Winning Condition
- Completion Goal: You must fully paint the train, the tracks, and the sky without overfilling your tray.
- Accuracy Requirement: The train's wheels and windows require high precision. Missing these details often results in a "Level Failed" screen even if the main body looks finished.
The Three Ice Buckets
- Ice Block #6: Located top-center. It sits directly on top of the main reserve of Blue cups.
- Ice Block #8: Located bottom-left. It guards the lower supplies, usually hiding critical connector pieces.
- Ice Block #9: Located bottom-right. This is the final lock, typically holding the remaining White or Maroon cups needed for finishing touches.
Why This Level is Hard
- Inventory Choke: With only 5 slots, picking up 2 Blue, 2 Yellow, and 1 Red cup when you need Dark Red can soft-lock your run.
- Visual Similarity: The "Maroon" (Body) and "Bright Red" (Cabin) look very similar on the board. Using them interchangeably will result in color bleeding and artistic failure.
Step-by-Step Instructions: The Opening Phase
The beginning of the level is purely a race against your own inventory. Your goal in this phase is to establish a flow of Dark Red and Yellow while ignoring the tempting Blue cups in the background.
Step 1: Assess the Canvas
- Visual Scan: Look at the top screen. Identify the three main zones: the Ground (Yellow), the Train (Dark Red), and the Sky (Blue).
- Trace the Path: Notice that the nozzle starts on the left. It will sweep across the ground, move up to the train, and then hit the sky last. This movement dictates your collection order.
- Check the Blocks: Verify the position of the "6" block. It is your gateway to the endgame, but it is frozen for now.
Step 2: Prioritize Ground Colors (Yellow)
- First Tap: Locate the Yellow cups in the top-left sector of the board. Tap one immediately.
- Why Yellow? The nozzle starts at the bottom. If you don't have Yellow ready the moment the level starts, you will miss the ground layer and have to wait for a full loop to fix it.
- Inventory Target: Keep 2 slots open for Dark Red. Do not fill your tray with more than 2 Yellow cups at once.
Step 3: Mining the Dark Red (The Engine)
- Locate the Supply: The Maroon/Dark Red cups are primarily stacked on the right side.
- Aggressive Collection: Once the Yellow ground is started, switch your focus entirely to the right side. Clear the top-right cups to access the deeper Dark Red stack.
- Tray Management: Ideally, your tray should look like this during Phase 1: [Dark Red, Dark Red, Yellow, Empty, Empty].
Step 4: The "No-Go" Zone (Blue)
- Resist the Urge: You will see Blue cups exposed in the middle or top rows. Do not tap them.
- The Logic: The nozzle does not reach the sky until the train body is roughly 60% complete. Picking up Blue now means those cups will sit in your tray taking up space for 30-40 seconds.
- Consequence: If you pick up Blue early, you will be forced to dump it or waste it later, reducing your overall efficiency percentage.
Step 5: Triggering the First Block
- Mechanic: The "6" Block breaks when you clear a specific number of cups (usually 6) from the immediate vicinity or top layers.
- Strategy: Don't aim for the block. Just focus on clearing the Dark Red and Yellow cups on the periphery. The block will shatter naturally as you dig.
- Preparation: Once the "6" breaks, mentally prepare to switch strategies. A flood of Blue is about to be exposed.
Processing Colors: The Palette Strategy
Success in Level 290 relies on understanding the hierarchy of the color palette. Not all colors are created equal, and treating them as such leads to tray overflow.
1. Maroon (Dark Red) - The Volume King
- Usage: 40-45% of the canvas.
- Target: The main boiler, the wheels, and the chassis.
- Strategy: This is your "bread and butter." You need a constant stream of this color. Never drop below 1 Maroon cup in your tray during the first half of the level.
2. Bright Red - The Accent
- Usage: 10-15% of the canvas.
- Target: The cabin roof (rear) and the cowcatcher (front).
- Strategy: This is a low-volume color. Only pick it up when the nozzle is physically approaching the rear or front of the train. Do not stockpile it.
3. Yellow - The Foundation
- Usage: 20% of the canvas.
- Target: The ground, window trim, and smoke outlines.
- Strategy: Critical at the very start (ground) and the very middle (smoke). Keep a small supply (1 cup) handy for touch-ups.
4. Orange - The Smoke Core
- Usage: 5% of the canvas.
- Target: The center of the smoke puffs and the headlight.
- Strategy: This is a "burst" color. You only need it for specific seconds when the nozzle passes the smoke stack. Do not let it sit idle in your tray.
5. Blue - The Background
- Usage: 25% of the canvas.
- Target: The sky.
- Strategy: This is the "Endgame" color. Even though it is exposed early, you should treat it as if it is locked until the train is mostly done. Collect it last.
Mid-Game Tactics: Breaking the Bottlenecks
The middle phase of Level 290 is defined by the "Smoke Trap" and the breaking of the main ice blocks. This is where most players get stuck.
Navigating the Smoke Stack
- The Trap: The smoke is not a solid block. It is a pixel-art pattern that requires alternating colors.
- The Yellow-Orange Rhythm: The game expects you to paint a Yellow outline, then fill the center with Orange, then return to Yellow.
- Technical Tip: If you have a full stack of Orange, you will over-paint the yellow edges. When you see the nozzle approaching the smoke, ensure your tray is ready to cycle back to Yellow quickly.
Unblocking the "8" and "9" Guards
- The Grind: Blocks 8 and 9 are located at the bottom of the side towers. To reach them, you must clear the columns above them.
- Don't Force It: If you can't reach the block yet, it means there are still valid cups above it. Look for the "active" cup (the one you can actually pick up) and clear it.
- The Reward: Breaking these usually releases the remaining "cleaner" cups (white/light grey) or the final batches of Maroon needed to patch the wheels.
Dealing with Wheel Spokes
- The Precision Test: The train wheels have holes in them. If you pour sand continuously, you will fill the holes with the wrong color (the wheel color instead of the background).
- Technique: You must "tap" the pour button instead of holding it down when the nozzle is over the wheels. Pause the flow when the nozzle is over the hole, and resume when it is over the spoke.
Inventory Crisis Management
- Symptom: Your tray is full of Blue and Yellow, but you need Dark Red immediately.
- Solution: You have two choices: 1) Find a spot on the canvas to dump the excess color (even if it's not 100% perfect), or 2) Wait for a color swap and dump it into the "void" if the nozzle is in a safe zone. Choice 1 is usually faster.
Speed Run Tips & Common Mistakes
To achieve a high score or a fast time (under 60 seconds), you must optimize your movements and avoid the pitfalls that plague casual players.
Speed Run Strategy
- The "Pre-Load" Method: While the nozzle is painting the left side of the screen, you should already be digging for the cups needed for the right side. Always look 2 steps ahead.
- Combo Digging: Try to dig cups in batches. If you need 3 Dark Reds, tap-tap-tap them in quick succession rather than waiting for the conveyor to move between each tap.
- Skip the Perfection: In a speed run, 100% coverage isn't always necessary if the level auto-finishes at 95%. Don't spend 10 seconds fixing one pixel on the window frame.
Common Mistake #1: The Blue Jam
- The Error: Collecting the center Blue cups as soon as the "6" block breaks.
- The Result: Your tray becomes [Blue, Blue, Blue, Yellow, Red]. When the nozzle hits the train body, you have no Dark Red. You have to dump the Blue, wasting 15 seconds.
- The Fix: Ignore the Blue until the train body is visually 75% complete.
Common Mistake #2: Color Bleeding
- The Error: Confusing Maroon and Bright Red.
- The Result: The engine cabin looks "washed out" or the main body looks too bright. The game might detect this as a texture error.
- The Fix: Zoom in (if possible) or focus on the pixel pattern. Maroon is darker and flatter. Bright Red is vibrant and usually used for smaller geometric shapes.
Common Mistake #3: The Smoke Block
- The Error: Painting the smoke with a solid stream of Orange.
- The Result: You lose the definition of the clouds. The smoke looks like a solid orange blob, and the "outline" requirement for the level fails.
- The Fix: Remember: Yellow is the outline, Orange is the fill. You must alternate.
Stuck? What to Do
- Analyze the Tray: If you can't pick up a cup you need, look at your tray. Is it full of garbage? Dump it.
- Analyze the Nozzle: If the nozzle is over a Blue zone but you are holding Red, you are in a "wait" cycle. Use this time to dig for the next color you need (likely more Blue or White), not Red.
- Reset: If you mess up the wheels (the holes are filled with the wrong color), it is often faster to restart the level than to try to fix it pixel by pixel.