
Level 305
HARDHow to solve Sand Loop level 305? Get instant solution for Sand Loop 305 with our step by step solution & video walkthrough. Sand Loop 305 tips and guide.
Play Sand Loop Now
Experience the puzzle challenge firsthand
Game Screenshots
Sand Loop Level Guides
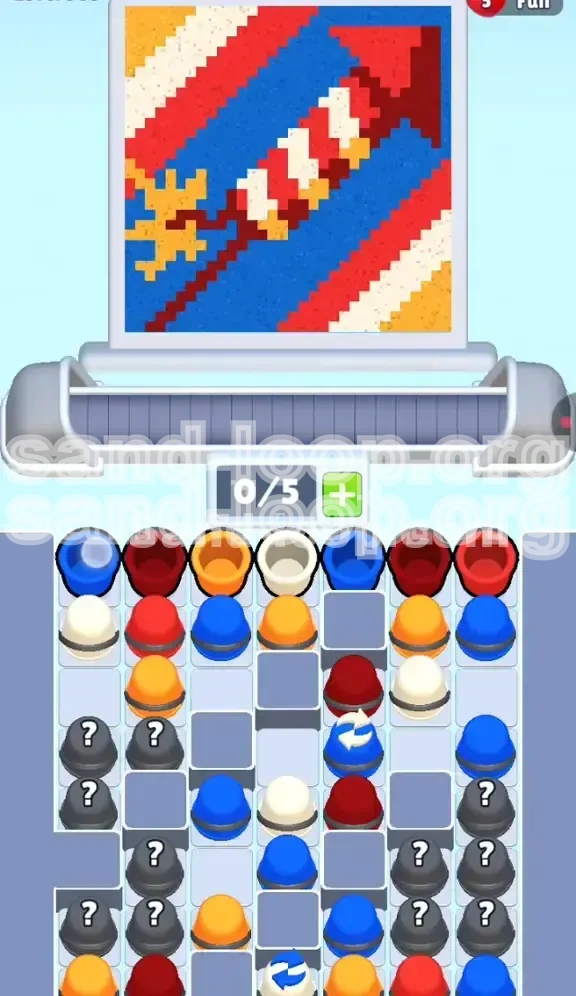
Sand Loop Level 305 Complete Walkthrough: The Firework Rocket
Welcome to the ultimate strategy guide for Sand Loop Level 305. This level is a significant hurdle for many players, shifting the focus from raw speed to precise resource management and prediction. In this stage, you are tasked with painting a pixel-art Firework Rocket launching diagonally across a blue sky. While the image seems simple, the level is complicated by a "Mystery Cup" mechanic that hides critical resources, forcing you to play a game of memory and probability rather than just reaction.
Level Overview and Core Mechanics
Level 305 is a fixed-puzzle level, not a speedrun challenge. Your conveyor belt has a limited capacity of 5 slots. The supply tray is divided into two sections: a top layer of visible colored cups and a bottom layer dominated by "Mystery Cups" (marked with a question mark). The challenge lies in the "Blind Dependency"—you often cannot see the color you need next until you clear the cups blocking it.
The Pixel Art Structure
The target image is a Firework Rocket moving diagonally from the bottom-left to the top-right.
- Background (Solid Blue): Occupies approximately 40% of the canvas, primarily in the top-left and bottom-right corners. This is your "dumping ground" for excess blue paint.
- Rocket Body (Red & White): This is the hardest part. It features a striped pattern requiring rapid alternation between Red and White. It accounts for about 30% of the image but requires 80% of your attention.
- Details (Yellow/Gold): The sparks and fuse. Yellow is the rarest resource in this level (roughly 10% of the cup supply), making it the most valuable commodity.
Primary Objectives
To achieve a 3-star rating on this level, you must meet specific completion criteria without running out of moves or clogging your belt.
- Accuracy Target: Maintain a pixel accuracy rate above 95%. Over-painting the Red stripes with Blue will lower your score significantly.
- Efficiency Goal: Complete the rocket body (Red/White) before fully clearing the background. This frees up mental bandwidth to manage the mystery cups.
- Resource Management: Do not let the conveyor belt reach 5/5 capacity with "useless" colors (e.g., holding Blue cups while the nozzle is over the Red rocket body).
Why This Level Is Hard
Many players fail because they treat this like a standard painting level. They pull cups randomly to clear space, leading to a deadlock where the conveyor belt is full of Blue cups, but the nozzle is sitting on a White stripe that needs to be filled. The "Mystery" element adds a layer of RNG (Random Number Generation) that can soft-lock your game if you don't plan 3 steps ahead.
Strategic Color Breakdown and Priority
Success in Level 305 depends on knowing which colors are "Critical" and which are "Filler." You cannot treat all colors equally.
Priority Tier 1: The Rare Yellows
Yellow is the bottleneck of this level. There are very few Yellow cups in the supply tray compared to Blue and Red.
- Strategy: Count the Yellow sparks on the canvas (usually 4-5 distinct pixels). Only pull a Yellow cup when the nozzle is within 1-2 seconds of reaching a spark zone.
- Risk: Using a Yellow cup on the background is an automatic fail. You will not have enough Yellow left for the sparks later.
- Timing: The sparks are located at the tail of the rocket (bottom-left). Wait for the nozzle to swing back to the start of the line before deploying Yellow.
Priority Tier 2: The Rocket Body (Red/White)
This requires the most micro-management. The diagonal orientation means the nozzle crosses these pixels quickly.
- The Alternation Rule: You should never have more than 1 Red and 1 White cup on the belt at the same time. A stack of "Red-Red-White" is dangerous; if the nozzle hits a white pixel while two Reds are queued, you might paint it red by mistake.
- Placement: Ideally, queue them as "Red-White-Red-White" to match the stripe frequency.
Priority Tier 3: The Background (Blue)
Blue is abundant and safe, making up about 50% of the visible cup supply.
- Buffer Zone: Use Blue cups to fill the conveyor belt slots (up to 3/5) only when you are sure the nozzle is passing over a blue area.
- Trap: Do not fill the belt with 5 Blue cups early on. If you do, you have no room to pull the Red or White cups you need for the rocket, and the belt will just spin uselessly.
The Mystery Cup "RNG" Factor
The grey cups with "?" are wildcards. They can be any color.
- Calculation: Statistically, Mystery Cups in this level have a 40% chance of being Blue, 30% Red, 20% White, and 10% Yellow.
- Gambit: If you are desperate for a Red cup and the visible tray only has Blue, look for a Mystery Cup blocking a column. It might be worth the gamble to pull the block, hoping the revealed cup underneath is Red.
Step-by-Step Walkthrough: The Opening Phase
The first 20 seconds of Level 305 are critical. You must establish the rhythm of the rocket body before you get buried in Mystery Cups.
Step 1: The Initial Diagonal Pass
As the level starts, the nozzle will begin its automated movement, usually starting from the center or bottom-left.
- Action: Do not touch the Blue cups yet. Scan the tray immediately for one Red and one White cup.
- Execution: Pull one Red cup. Wait for the nozzle to enter the first Red stripe zone. Pull one White cup immediately after.
- Goal: You want to establish the first 3 stripes of the rocket body. If you miss the timing on the first diagonal pass, you will spend the rest of the level trying to fix "leaked" colors.
Step 2: Managing the Conveyor Belt "Slots"
Your belt has 5 slots. Think of them as currency.
- Slot 1 & 2: Keep these open for immediate reaction (Red/White).
- Slot 3, 4, & 5: Use these for "storage" only if you are 100% sure the nozzle will pass over that color soon.
- Pro Tip: If you have a full belt of Blue cups and the nozzle is approaching a Red stripe, you are in trouble. You must wait for the nozzle to pass over a Blue background pixel to dump those Blues, even if it means wasting a second or two of the rocket painting. It is better to miss a pixel slightly than to paint it the wrong color.
Step 3: The "First Row" Clear
The top row of the supply tray contains the most accessible colors.
- Action: Clear the top row of the tray systematically. Prioritize removing cups that are blocking the columns below.
- Warning: Do not clear a column just because it has a Blue cup on top if clearing it reveals a Mystery Cup that you don't need right now. Only clear columns that give you access to the colors you need for the current section of the rocket.
Step 4: Dealing with the First Yellow Spark
The first Yellow spark usually appears early in the nozzle's path.
- Preparation: Locate the single Yellow cup in the initial tray.
- Tactical Pause: If the Yellow cup is buried under a Red cup, you must clear the Red cup first (use it on a stripe), then immediately pull the Yellow.
- Execution: Deploy the Yellow cup slightly *before* the nozzle reaches the spark pixel. The pour stream has a travel time; starting early ensures the paint hits the exact pixel as the nozzle arrives.
Mid-Game Strategy: The Mystery Grid
Once the top layer is cleared, you will face a wall of grey Mystery Cups. This is where the game is won or lost.
Navigating the "Blind Dependency"
You can no longer see what you need; you can only see what is blocking you.
- The "Safe" Pull: Only pull a Mystery Cup if you have at least 2 empty slots on your conveyor belt. This gives you buffer room if the revealed cup is a color you don't need right now.
- The Worst Case: You pull a cup, hoping for Red, and it reveals a Blue. Now you have a Blue cup you didn't want, taking up space. If you have 4/5 slots full, this Blue cup might block you from picking up a White cup that is passing by.
Using the Switch Cups
Scattered in the grid are Switch Cups (marked with arrows).
- Function: These cups change the color of the liquid inside them to the *exact* color you need next, or they shuffle the board. In Level 305, they usually act as a "Wildcard" or "Refresh" for the immediate area.
- When to Use: Save these for emergencies. If you have a belt full of Blue/Red, but the nozzle is hitting a White stripe and there are no White cups available, use a Switch Cup immediately to convert one of your unwanted cups into White.
- Efficiency: Do not use Switch cups just to clear space. They are too valuable. Use them only to fix a color mismatch crisis.
Handling the Yellow Shortage
By the mid-game, you will likely have run out of visible Yellow cups. They are hiding in the Mystery stack.
- Hunting Strategy: Look at the bottom of the screen. Are there unpainted Yellow pixels? Yes. That means there *must* be Yellow cups in the Mystery stack.
- Desperation Move: If you are missing 1 Yellow pixel and have no Yellow cups, you must start digging Mystery Cups even if it clogs your belt. Pull a Mystery cup. If it's not Yellow, use it on the background (if Blue) or hold it (if Red/White) until you can cycle it off the belt. Keep digging until Yellow appears.
The Belt "Deadlock" and How to Fix It
A deadlock happens when your 5 slots are full, and the nozzle is passing over a color that is not on the belt.
- Symptom: You have Blue-Red-Red-White-Blue on the belt. The nozzle is on a Yellow spark. You are stuck.
- Solution: You must "burn" a move. Look at the belt. Is there a cup you can dump? No. You must wait for the nozzle to pass over a color matching *one* of your cups. Pour that cup to empty the slot, then quickly pull from the tray to find the color you actually needed.
- Prevention: Never let the belt get full unless you are 100% sure of the upcoming color sequence.
End Game and Speed Run Optimization
The final phase involves cleaning up the background and ensuring all small pixels are filled.
The Final Blue Flood
Once the rocket, stripes, and sparks are perfectly painted, the level becomes a race to fill the blue void.
- Aggressive Loading: Now you can fill your conveyor belt to 5/5 with Blue cups. There are no more complex patterns to worry about.
- The "Fill" Trigger: Once the blue percentage hits 98%, the game often triggers a "Fast Fill" animation or auto-completes minor pixels, provided your accuracy is high enough.
Speed Run Tips for Sub-30 Seconds
For players aiming for the leaderboard, efficiency is key.
- Pre-loading: As the final "Level Complete" animation plays for the previous level, don't relax. Focus immediately on the center of the tray for 305.
- Input Buffering: You can queue up cup pulls while the nozzle is moving. You don't have to wait for the nozzle to arrive at the pixel to pull the cup. Pull the Red cup while the nozzle is still on the Blue background, so it's ready to pour the instant it hits the stripe.
- Mystery Bypass: If you get lucky with Mystery Cup RNG (e.g., first pull is Yellow), pivot immediately. Don't stick to a rigid plan if the RNG gives you a fast path.
Common Mistakes to Avoid
Review these errors to ensure a clean run.
- Mistake 1: Over-prioritizing the Background. Players see the large blue areas and instinctively fill them first. This is wrong. If you fill the blue first, you will have no room on the belt for the Red/White cups needed for the rocket later. Always prioritize the complex, narrow shapes (the rocket) first.
- Mistake 2: Ignoring the Nozzle Path. The nozzle moves in a predictable loop (often a spiral or zigzag). Don't focus on the screen center; watch the nozzle. If the nozzle is moving away from the rocket, stop pulling cups and wait for it to come back.
- Mistake 3: Panic-Pulling Mystery Cups. When you can't find a color, don't just start tapping grey cups randomly. That is how you get 4 Blue cups in a row. Analyze which columns are likely to yield results based on what you've already pulled.
Troubleshooting: What To Do If You Get Stuck
Sometimes, despite best efforts, the level goes wrong.
- Scenario: "I'm out of Yellow and the level won't end." Check the pixel-perfect zoom. Did you miss a spark? Or is there a single pixel gap in a stripe? Use a Switch Cup to turn a random cup into Yellow and touch up that specific spot.
- Scenario: "My belt is stuck with useless colors." You have to sacrifice accuracy for speed. Pour the wrong color on a safe area (like the corner of the blue sky) just to empty a slot, then quickly pull the correct color. It's better to have 90% accuracy and finish than 100% accuracy and fail due to time.