
Level 309
HARDHow to solve Sand Loop level 309? Get instant solution for Sand Loop 309 with our step by step solution & video walkthrough. Sand Loop 309 tips and guide.
Play Sand Loop Now
Experience the puzzle challenge firsthand
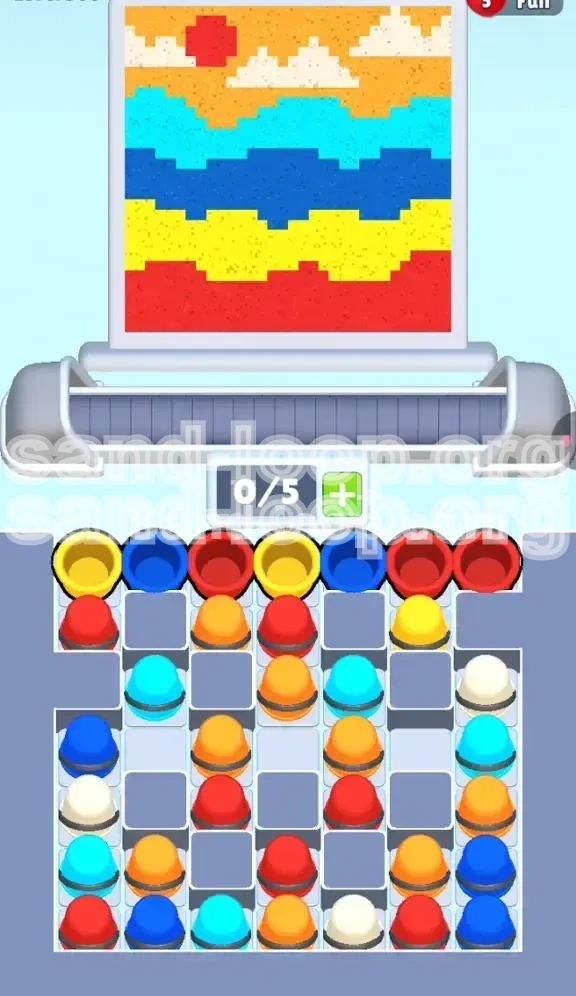
Game Screenshots
Sand Loop Level Guides
Level 309 Comprehensive Walkthrough: Mastering the Sunset Logic
Welcome to the ultimate guide for Sand Loop Level 309, "The Sunset Landscape." This level is a deceptive puzzle that tests your ability to manage resources under strict constraints. While the image of a sunset, clouds, and ocean seems peaceful, the reality is a frantic race against conveyor belt physics. This guide breaks down every pixel of the stage, ensuring you can breeze through the "5-slot bottleneck" and achieve a three-star rating without breaking a sweat.
Understanding the Challenge
Level 309 is defined by one critical mechanic: the Conveyor Bottleneck. Unlike previous levels where you could hoard cups, here you are limited to a maximum of 5 active slots (0/5 to 5/5) on your processing belt. The level features a high density of colors—Red, White, Orange, Cyan, Dark Blue, and Yellow—all jammed into a tight tray.
The primary difficulty stems from the "Tray Lock." Essential colors for the sky (White, Cyan) are buried at the bottom of the supply grid, inaccessible until you clear the top layers. This forces a specific play order: you must paint the ground before the sky. If you mismanage your slots by loading the wrong colors early, you will face a deadlock where no new cups can spawn, and active cups cannot be dispensed.
Canvas Analysis: The Six Color Layers
Before tapping a single cup, you must visualize the target image as distinct horizontal bands. Gravity is your friend, but only if you guide it correctly.
- Top Layer (Sky Background): Orange. This acts as the filler for the upper 30% of the canvas.
- Feature Layer (Clouds & Sun): White and Red. The clouds (White) are floating islands, while the Sun (Red) sits in the top-left corner.
- Mid-High Layer (Upper Wave): Cyan (Light Blue). A distinct wave pattern rolling below the sky.
- Mid-Low Layer (Lower Wave): Dark Blue. A deeper wave, heavier and thicker than the cyan one.
- Strip Layer (Land): Yellow. A thin, solid band separating the water from the earth.
- Base Layer (Foundation): Red. A thick, solid block of red earth anchoring the bottom of the painting.
The Strategic Bottleneck
Why is this level hard? It’s a math problem. You have 6 colors but only 5 slots. If you fill your belt with 5 cups of the wrong color (e.g., all Blues), and the next required color is White, you are stuck waiting. You cannot pick up the White cup because you have no slots, and you can't clear the Blue cups because the dispenser head is in the wrong position.
The Golden Rule: Always keep at least 1 slot open (4/5 occupancy) unless you are executing a confirmed combo. This flexibility allows you to grab emergency cups or correct a misalignment without pausing the flow.
Why "Bottom-Up" is Mandatory
Physics dictates that sand falls from top to bottom. However, game logic dictates you must often unlock from bottom to top. The supply tray is arranged in a checkerboard "lock" pattern. The Red and Yellow cups needed for the bottom are physically blocking the White and Cyan cups needed for the top. Attempting to clear the top first is impossible; you literally cannot reach those cups. Therefore, your strategy is pre-determined: clear the tray from top to bottom, which corresponds to painting the canvas from bottom to top.
Clear Objectives: Your Mission Checklist
To secure the win, you need to hit specific milestones within a tight timeframe. Don't just tap randomly; follow these checkpoints.
Objective 1: The Tray Unlock
Your immediate goal is not painting, but resource management. You must clear the first 12-15 cups from the top two rows of the supply tray.
- Target: Clear all visible Red and Yellow cups.
- Success Metric: The first row of the tray is empty, revealing the Cyan and White cups beneath.
- Failing this: If you leave Yellow cups sitting on the tray while the belt is full of Blue, you create a "Log Jam" that costs you precious seconds.
Objective 2: The Foundation Fill
Before you can build the house, you need the ground. You must complete the bottom two bands of the image: the Red base and the Yellow strip.
- Red Zone: Fill the bottom 20% of the screen completely. This creates a "floor" that catches any accidental spills from above.
- Yellow Zone: Create a sharp, straight line above the red. Any jagged pixels here will ruin the wave definition later.
Objective 3: The Dual Wave Precision
The middle of the screen is defined by two water layers. This is the most timing-intensive section.
- Dark Blue Wave: Must be 100% filled before touching the next color. Gaps here look like errors in the final image.
- Cyan Wave: Must sit perfectly atop the dark blue. Since the dispenser moves horizontally, you need to time your taps to hit the "crests" of the waves.
Objective 4: The Sky Islands
This is the final hurdle. The clouds (White) are small targets surrounded by empty space (Orange).
- Accuracy Requirement: 95%. You cannot afford to miss a cloud pixel and leave a hole in the orange sky later.
- The Sun: A singular burst of Red in the top-left. If you miss this window, you have to wait for the dispenser to cycle all the way back around.
Step-by-Step Instructions: The Execution Phase
Follow this exact sequence to navigate the level. We assume a standard conveyor speed; if your level is timed faster, tap quicker.
Phase 1: Establishing the Base (Red & Yellow)
The level starts with a supply tray row of: [Red] [Yellow] [Dark Blue] [Yellow] [Red].
- Tap the Red Cups: Locate the two Red cups at the ends of the top row. Tap them immediately. Send them to the dispenser.
- Monitor the Dispenser: The nozzle will move to the bottom. Let the Red sand flow. It will create the solid earth layer.
- Tap the Yellow Cups: Once the Reds are cleared, tap the two Yellow cups in the middle of the row.
- The "Sandwich" Technique: Do not tap the Dark Blue yet! If you introduce Blue now, it will mix with the Yellow on the belt, potentially causing a color switch delay. Let the Red and Yellow clear the belt first. You want the Yellow layer to settle above the Red.
- Verify: You should now see a solid Red block at the bottom and a Yellow strip forming above it. The top row of the tray should now be empty.
Phase 2: The Deep Water (Dark Blue)
With the top row gone, the second row is revealed, containing [Dark Blue] [Dark Blue] [Cyan]....
- Load Dark Blue: Tap 2-3 Dark Blue cups in rapid succession. This is safe because the Yellow layer is done, and the dispenser needs to cover the middle wave.
- Watch for Overfill: The Dark Blue wave is thick. If you send too many cups, the sand will pile up and spill into the Cyan zone above. Stop tapping Dark Blue the moment the wave looks "solid" and the jagged edges are smooth.
- Belt Management: As the last Dark Blue cup is dispensing, you have a 3-second window. Do not let the belt sit empty. Look ahead to the next color.
Phase 3: The Shallows (Cyan)
This is where the conveyor positioning gets tricky.
- Reveal the Tray: You should now see Cyan cups exposed.
- Sync the Tap: Watch the dispenser nozzle. If it is on the far right, wait. Tap the Cyan cup when the nozzle is roughly in the middle or left-center of the screen. This ensures the sand hits the "upper wave" target immediately.
- Controlled Burst: Tap Cyan 2 times. Let the wave form. If there are gaps, tap 1 more cup.
- Stop Condition: Once the Cyan wave connects with the Dark Blue wave below, stop immediately. You do not want to fill the sky area with Blue water.
Phase 4: The Sky Engineering (White & Orange)
The final phase requires precision. You are now dealing with the bottom rows of the tray: [White] [Orange] [White] [Red].
- Priority: White Clouds: Locate the White cups. These are rare and buried.
- The Single-Tap Method: Do not spam White. Tap one White cup. Watch the dispenser. You need the white sand to land exactly on the cloud pixels.
- The Sun Insert: You will notice a Red cup in the mix (for the sun). Wait until the dispenser is in the Top-Left Corner. Then tap the Red cup. This paints the sun instantly.
- The Orange Flood: Now that Clouds (White) and Sun (Red) are placed, the sky is full of holes. Tap all remaining Orange cups. Orange is the "filler" color. It will patch up the empty sky background behind the clouds and sun.
- Final Polish: Keep tapping Orange until the percentage counter hits 100%.
Color Order: The Processing Sequence
The "Sand Loop" logic is unforgiving. Processing colors in the wrong order is the number one reason players fail. Here is the definitive hierarchy for Level 309.
1. Primary Foundation: Red (Earth)
Priority: Highest.
- Reasoning: This is the bottom layer. It is also the key to unlocking the tray.
- Tip: Always process the initial Red cups before anything else. Even if the dispenser is slightly out of position, the Red pile is large enough to catch its own sand.
2. Secondary Strip: Yellow (Land)
Priority: High.
- Reasoning: Sits directly on top of Red.
- Tip: Yellow is a "bridging" color. It separates the earth from the water. If you do Yellow after Blue, you risk blue sand bleeding under the yellow strip, creating a muddy green outline.
3. The Heavy Wave: Dark Blue
Priority: Medium-High.
- Reasoning: The middle of the canvas needs mass.
- Tip: Since this is a darker color, mistakes (overspill) are harder to see against the lighter Cyan above, but easier to see against the Yellow below. Keep it tight.
4. The Light Wave: Cyan
Priority: Medium.
- Reasoning: Defines the water surface.
- Tip: This color contrasts highly with the Orange sky. Keep the line straight.
5. The Sky Background: Orange
Priority: Low (Save for last).
- Reasoning: It covers the largest area but has the lowest detail. It acts as the "background" for the clouds and sun.
- Tip: If you do Orange first, you will cover up the "anchor points" for the clouds, making it impossible to place White accurately later.
6. The Details: White (Clouds)
Priority: Variable (Contextual).
- Reasoning: Small target size.
- Tip: Process White immediately after Cyan, before the final Orange flood. The dispenser head needs to be precise for White. If the belt is full of Orange, the switch to White might cause a timing error.
Key Tips & Strategic Advice
To elevate your game from "passing" to "mastering," apply these advanced strategies.
Tip 1: The "3-Cup Safety Rule"
Never let your conveyor belt fill up to 5/5 unless you are 100% certain of the next 3 moves. The supply tray in Level 309 is a "Checkerboard." You need access to the next color immediately after the current one dispenses. If your belt is full of 5 Red cups, but the next pixel needed is Yellow, you are stuck waiting for 5 Reds to process, wasting 10+ seconds. Keep 2 slots open (3/5 full) to maintain flexibility.
Tip 2: Tray "Peeling" Logic
Visualize the supply tray not as a grid, but as an onion. You cannot reach the center (White/Cyan) without peeling the outer layers (Red/Yellow). Do not fight the layout. If the tray offers you Red, take the Red. Do not wait for Cyan to become available; it won't until you clear the Reds blocking it.
Tip 3: Dispenser Anticipation
The dispenser nozzle moves on a loop (Left -> Right -> Left). Use this travel time to your advantage. If you need to paint the top-left corner (Sun) but the nozzle is on the right, wait. Do not tap the Red cup yet. Tap it when the nozzle is 1 second away from the corner. This minimizes the "travel time" where sand is wasted in mid-air.
Tip 4: The "Patch-Up" Strategy
Don't aim for 100% accuracy on the first pass for the broad strokes (Orange, Red). It is faster to do a "rough pass" at 80% coverage, let the belt clear, and then do a "precision pass" to fill the remaining holes. Trying to hit every single pixel on the first go often leads to overfilling and spills.
Tip 5: Audio Cues
Listen to the sound of the sand hitting the canvas. A "solid" sound means the pixel is filling up correctly. A "hollow" or continuous flow sound means you are overfilling a hole or spilling over the edge. Use audio to know when to stop tapping a specific color.
Common Mistakes to Avoid
Even experienced players make these errors in Level 309. Learn what not to do.
Mistake 1: The "Checkerboard Lock"
The Error: Attempting to pick up a Cyan cup from the 2nd row while a Red cup from the 1st row is still blocking it.
The Consequence: The game won't let you pick up the Cyan. You stare at the cup, tap furiously, and nothing happens. Meanwhile, your belt stops moving.
The Fix: Always clear the top-most available cup first. If Red is available, you must take Red.
Mistake 2: Pre-loading the Belt
The Error: Filling the belt with 5 cups of Blue because "they are there," only to realize you need Yellow immediately after.
The Consequence: You have to wait for 5 Blues to cycle through the dispenser (taking ~15 seconds) before you can even start on the Yellow layer. This usually results in a "Time Out" fail.
The Fix: Only pick up what you need for the current layer and the next layer. Never hoard.
Mistake 3: Painting the Sky Too Early
The Error: Seeing Orange cups and tapping them immediately because they look like the sky.
The Consequence: You fill the sky with Orange, but now you have to place White clouds and a Red Sun on top. Placing Red on top of Orange is fine, but placing White on top of Orange requires pixel-perfect accuracy. If you miss, you get a messy Orange blob with White spots.
The Fix: Remember: Clouds (White) before Sky (Orange). Paint the objects first, then paint the background around them.
Mistake 4: Ignoring the Sun
The Error: Focusing so much on the waves and clouds that you forget the Red Sun in the top left.
The Consequence: You finish the level with 99% completion. You have one lone pixel of Red missing, and the only Red cups are gone or buried. You have to replay the whole level.
The Fix: During the "Sky Engineering" phase, consciously look for the Sun icon on the canvas. Ensure you dedicate one specific Red cup to that spot.
Solutions for When You Are Stuck
Feeling trapped? The sand isn't flowing? Here is how to reset the flow.
Scenario 1: The Belt is Full and Nothing is Moving
Symptom: You have 5 cups on the belt, the dispenser is stuck, and the tray is blocked.
Solution: Panic Button. You need to clear space immediately. Look at the cup currently in the dispenser. Is it the right color? If yes, wait for it to finish. If no, look at the belt. Can you discard a cup (if the game allows) or just speed-tap to drain it? Usually, you just have to wait out the bad cups. Next time, keep 1 slot empty!
Scenario 2: Can't Find the White Cups
Symptom: You need to do clouds, but see no White.
Solution: You haven't cleared enough of the top tray. Look at the top row of the tray. Is it full? If yes, those cups are blocking the view of the White cups below. Clear the top row (usually Dark Blue or Yellow) to reveal the Whites hiding underneath.
Scenario 3: Pixels Won't Fill (The "Ghost" Pixel)
Symptom: You are pouring sand on a spot, but it won't turn color.
Solution: Gravity check. Is there a "hole" underneath that pixel? If there is a gap in the layer below, the sand falls through. You cannot build the second floor if the first floor has a hole. Backtrack and fill the lower layer first.
Speed Run Tips & Shortcuts
Want to finish in under 60 seconds? Use these pro techniques.
Shortcut 1: The "Double Tap" Launch
At the very start of the level, don't wait for the first cup to reach the dispenser. Tap the first two Red cups immediately (Double Tap). By the time the first cup hits the bottom, the second will be halfway down the belt. This maintains momentum from second 1.
Shortcut 2: Pre-Positioning the Nozzle
While the Red layer is finishing (auto-filling), don't stare at it. Look at the supply tray. Find the Yellow cups. Locate the one closest to the left. As soon as Red finishes, tap that Yellow cup instantly. Don't wait for the nozzle to return to center. Tap it en route.
Shortcut 3: The "Sky Combo" (White + Red)
For advanced players: You can combine the Cloud and Sun steps. If you have a White cup and a Red cup ready on the belt, wait for the nozzle to pass the Cloud zone, then immediately tap the Red cup as it swings past the Sun zone (Top Left). If your timing is perfect, you paint the cloud and the sun in one single nozzle swing, saving a full 2-3 seconds of travel time.
Shortcut 4: Ignoring Minor Gaps
Perfection is slow. If the Dark Blue wave has 98% coverage but one tiny pixel is missing, leave it. The Orange sky filler will eventually cover that background spot, or the slight imperfection won't be noticeable. Don't waste 5 seconds fixing 1 pixel. Focus on the big layers first.