
Level 316
EXPERTHow to solve Sand Loop level 316? Get instant solution for Sand Loop 316 with our step by step solution & video walkthrough. Sand Loop 316 tips and guide.
Play Sand Loop Now
Experience the puzzle challenge firsthand
Game Screenshots
Sand Loop Level Guides
Level 316: The Brick Fireplace Challenge - Overview
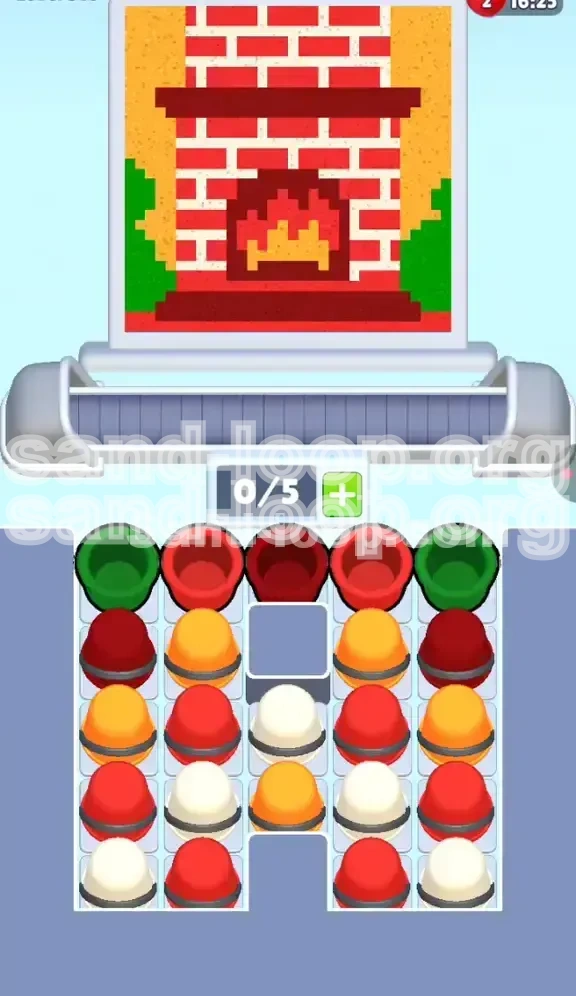
Welcome to the Brick Fireplace challenge in Sand Loop Level 316. This stage presents a unique blend of visual aesthetics and logistical puzzle-solving. Unlike previous levels that might have relied on quick reflexes, this is a pure logic and inventory management test. The goal is to paint a pixelated brick fireplace, complete with a roaring fire, bushes, and a mantel. The difficulty arises not from the complexity of the image, but from the rigid, U-shaped structure of the cup dispensing tray.
This level is defined by its "top-heavy" distribution. The colors you need most frequently (Red and White) are buried at the bottom, while secondary colors (Green and Orange) sit perched on top or trapped in the middle. You are armed with a standard 5-slot conveyor belt, which provides ample room for error if used correctly, but can lead to a deadlock if mismanaged. The primary threat here is a "soft lock," where your nozzle is hovering over the fire area needing Orange, but your belt is clogged with Red, preventing you from digging down to the required color.
The Core Mechanics of Level 316
Understanding the underlying mechanics is crucial for success. This level operates on two distinct systems: the Layering System of the tray and the Spatial Distribution of the canvas.
- The U-Shaped Trap: The tray is shaped like a "U". The sides are deep (5 rows), and the center is shallow but blocked by a "cork" of Dark Red.
- The Checkerboard Cadence: The canvas requires a strict alternating rhythm. Paint large swaths of Red, then immediately switch to White for mortar lines.
- The Inner Fire: The fire is located in the geometric center of the image. You must time your color switch to Orange exactly when the nozzle passes this coordinate.
- The Green Anchors: The bushes are the first and last pixels painted. They act as anchors for your run.
Visual Breakdown of the Canvas
Before tapping a single cup, analyze the art. The fireplace is divided into three distinct horizontal zones, and your strategy must shift as you move between them.
- Zone 1: The Green Perimeter. Two small bushes on the extreme left and right edges. These are low-priority but easily accessible.
- Zone 2: The Mantle & Hearth. A deep Maroon (Dark Red) color forming the top shelf and bottom base. These require a heavy volume of specific cups.
- Zone 3: The Brick Facade. The main body is a checkerboard of Brick Red and Mortar White. This is where 60% of your time will be spent.
- Zone 4: The Fire Core. A cluster of Orange pixels buried in the dead center, surrounded by bricks.
Strategic Importance of the 5-Slot Belt
Your 5-slot conveyor belt is your most valuable asset. In this level, it functions as a buffer zone. Because the tray is densely packed, you cannot simply pick cups as you need them; you must pick them before you need them to ensure the lower layers are accessible.
- Buffering: Use empty slots to hold colors that will be needed in the future (e.g., picking up Orange early while the nozzle is still on the roof).
- Sequencing: Arrange the order of colors in your belt to match the painting path. Left-to-right reading order applies here.
- Capacity Management: Never fill the belt to 5/5 unless you have a clear plan for all 5 colors. A full belt is a rigid belt; flexibility is key.
Level 316: Clear Objectives and Goals
To secure a 3-star rating and a smooth completion of Level 316, you must move beyond simple "painting" and think like an engineer. Your objectives are ordered by priority and timing.
Primary Objective: Uncork the Center
The single most important objective of the first 30 seconds is to remove the initial Dark Red cup blocking the center column.
- The Blocker: Identify the top-center cup. It is Dark Red. It sits directly on top of the White and Orange cups you need later.
- The Move: You must clear this blocker early. If you leave it until the nozzle is already painting the fire, you will run out of ink and crash.
- The Timing: Ideally, this happens within the first 10-15 taps, before the nozzle finishes the Mantle section.
Secondary Objective: Establish Color Rhythm
You must avoid "mono-color batching." Do not load your belt with all Reds, then all Whites. The nozzle paints line-by-line.
- The Checkerboard Strategy: Your belt should ideally look like [Red, White, Red, White, Empty] or similar variations.
- Prevention of Stalling: If you have 5 Reds queued, but the very next pixel required is White, the nozzle stalls, wasting precious seconds.
- Mixing: Actively mix Red and White pickups in the mid-game to ensure a seamless flow of brickwork.
Tertiary Objective: The Fire Core Synchronization
The fire is the trickiest part because it is surrounded by bricks. You must have Orange ink loaded exactly when the nozzle hits the center coordinates.
- Early Acquisition: Do not wait for the nozzle to reach the center to look for Orange. By then, the cups are buried under bricks you haven't cleared yet.
- Pre-loading: You need to "pre-load" Orange into your belt while the nozzle is still painting the upper Mantle or lower sides.
- Placement: Ensure Orange is in the [Slot 1] or [Slot 2] position of your belt as the nozzle approaches the middle rows.
Efficiency Goal: Minimize Tray Churning
Excessive tapping on the tray without a clear pickup goal wastes time.
- Surgical Taps: Only tap the specific cups you need. Avoid chain-reaction taps that might accidentally load a color you don't want yet.
- Visibility: Keep the tray clear enough so you can always see the "Next Row" of colors. If the tray is a chaotic mess of shifting stacks, you will miss critical Orange cups.
Level 316: The Optimal Color Processing Order
The sequence in which you process colors is the difference between a smooth run and a restart. Do not follow the visual order of the tray; follow the logical order of the printer head.
Phase 1: The Green Introduction (0% - 10% Completion)
Start your run by clearing the Green cups. This is the only way to expose the inner layers of the tray without clogging your belt.
- Action: Tap the two Green cups on the far left and far right edges of the top row.
- Result: The nozzle will paint the top-left and top-right bushes.
- Benefit: Removing these "ears" from the tray exposes the Dark Red cups in the second row, which are your next target.
Phase 2: The Dark Red Structure (10% - 25% Completion)
Immediately after Green, shift focus to the Dark Red (Maroon). This builds the frame of the fireplace.
- The Targets: There are three key Dark Red cups: one in the top-center (the "Cork") and two on the sides of the second row.
- The Order: Pick the Top-Center Dark Red first. This is critical. Once it's gone, the center column opens up.
- The Belt: Load 2-3 Dark Reds at a time. The Mantle (top) requires a solid block of this color, so batching is safe here.
Phase 3: The Orange Interlude (25% - 40% Completion)
This is the most unique phase of Level 316. You must pause your structural building to prepare for the fire.
- The Hunt: With the center uncorked, look at the new top row. You should see Orange cups exposed in the middle.
- The Strategy: Even though the nozzle might not be at the fire yet, pick these Orange cups now.
- The Reasoning: If you wait, the Red and White cups from the upper sides will fall down and bury the Orange again. You must "rescue" the Orange while it is exposed.
Phase 4: The Red/White Weave (40% - 90% Completion)
The bulk of the level is this phase. It is a slow, rhythmic alternating process.
- The Pattern: Observe the canvas. If the next line starts with Red, ensure Red is ready in your belt. If it starts with White, prioritize White.
- The Rule: Never let more than 2 of the same color stack up in your belt during this phase. Keep the mix balanced.
- The Sink: The Hearth (bottom) requires the same checkerboard logic as the main body. Do not switch back to Dark Red yet; finish the bricks first.
Phase 5: The Final Dark Red Base (90% - 100% Completion)
The final pixels are the Dark Red base of the hearth.
- The Cleanup: By now, the tray is mostly empty. The remaining Dark Red cups are easy to access.
- Action: Load all remaining Dark Reds and finish the image.
Level 316: Step-by-Step Walkthrough Guide
Follow this actionable, linear guide to navigate the tray layout pixel-by-pixel. This assumes a standard play speed.
Step 1: The Green Removal
As soon as the level loads, locate the top-left and top-right corners of the tray.
- Tap Target: The Green cup at Position 1 (Top-Left).
- Tap Target: The Green cup at Position 5 (Top-Right).
- Status Check: Your belt now has [Green, Green]. The nozzle is painting the bushes. The tray has shifted, revealing the second row.
Step 2: Decorking the Center Column
With the greens gone, look at the very top of the center stack.
- Identification: You will see a Dark Red cup sitting at the summit of the center hill.
- Action: Tap this Top-Center Dark Red cup immediately.
- Outcome: This cup moves to your belt. Crucially, the stack beneath it drops, revealing a White cup (and likely an Orange cup nearby). The path to the fire is now physically open.
Step 3: Flanking the Mantle
While the center Dark Red is processing, look at the cups that were just exposed on the left and right sides of the second row.
- Tap Target: The Dark Red cup on the Left-Flank (Row 2).
- Tap Target: The Dark Red cup on the Right-Flank (Row 2).
- Belt State: You now have 3-4 Dark Reds in your queue. This is safe. The nozzle will paint the top Mantel and the upper hearth frame.
Step 4: Rescuing the Orange (The Critical Move)
Pause and look at the tray again. The "Cork" is gone. The center has shifted.
- Search: Look for the Bright Orange cup. It is usually in the center or slightly off-center in the new top layer.
- Action: Tap the Orange cup.
- Note: Do not worry if the nozzle isn't at the fire yet. Place it in your belt. Let it sit in Slot 3 or 4. It is safer in your belt than buried in the tray.
- Secondary Check: Is there a second Orange? If yes, tap it. If no, proceed to Red/White.
Step 5: Executing the Brickwork Weave
Now we enter the main loop. The nozzle is moving down the brick body.
- Analyze the Canvas: Look at the very next pixel the nozzle needs to paint.
- Scenario A (Needs Red): Look at the tray. Find a Red cup. Tap it.
- Scenario B (Needs White): Look at the tray. Find a White cup. Tap it.
- The Trap: If you need White but only see Red, do not tap the Red just to "clear the tray." Wait for the nozzle to move slightly or tap a different area to shift the tray mechanics.
- The Rhythm: Tap Red, Tap White, Tap Red, Tap White. Keep this beat.
Step 6: The Hearth and Base Cleanup
As the nozzle nears the bottom, the brickwork gives way to the solid Dark Red base.
- Transition: Finish the last of the White mortar lines.
- Final Sweep: Your belt should now be emptying of Red/White. The tray should only have Dark Reds left.
- Action: Rapid-fire tap the remaining Dark Reds to finish the base and the level.
Level 316: Pro Tips and Strategic Notes
Master the nuances of Level 316 with these advanced observations. This is the difference between a lucky clear and a consistent win.
Understanding the "Checkerboard" Penalty
The game engine in Sand Loop often penalizes "mono-color" queues on complex patterns.
- The Concept: If your belt holds [Red, Red, Red, Red, Red], and the canvas requires a single pixel of White, the machine has to flush the Red ink to purge the line for White. This takes time.
- The Fix: By alternating colors (Red, White, Red, White), the machine keeps both fluids "primed." Switching costs are minimized.
- Application: Actively use your belt to "store" a White cup behind a Red cup to facilitate this transition naturally.
The "Fall-Through" Visual Glitch
Sometimes, tall stacks can obscure what is happening in the row immediately behind them.
- The Issue: You tap a Green cup, but you can't see if the cup behind it is Red or Dark Red because of the angle.
- The Tip: Watch the animation carefully. As the cup flies to the belt, look at the color of the cup rising to take its place.
- Advanced Technique: If you can't see the middle row clearly, tap the side cups first to lower the overall height of the stack, improving visibility of the center.
Nozzle Positioning vs. Tray State
Always know where your nozzle is.
- Top of Screen (Mantle): Safe to load Dark Reds and Greens. Do not worry about Orange yet.
- Middle of Screen (Bricks): Danger Zone. Must have Red and White active. Orange is not needed yet but should be secured.
- Center of Screen (Fire): Critical Zone. If the nozzle is here and you have no Orange in the belt, you are in trouble. You must have picked it up 5 seconds ago.
Managing the 5th Slot
That 5th slot is valuable real estate.
- Beginner Mistake: Filling it with "extra" Red just to clear the tray visually.
- Pro Move: Keep it empty or fill it with a "buffer" color you will need in 10 seconds. An empty slot gives you the flexibility to grab a sudden color requirement (like a stray White mortar line) without clogging the flow.
Level 316: Common Mistakes to Avoid
Learn from the errors that cause most players to fail or restart Level 316. Avoiding these pitfalls is half the battle.
Mistake #1: Ignoring the "Cork"
This is the most common cause of failure.
- The Error: Players see the easy Greens on the side and the side Dark Reds, and they tap those first, ignoring the top-center Dark Red.
- The Consequence: The nozzle moves down. The fire needs to be painted. You reach for the center of the tray to get the Orange, but it's still buried under that initial Dark Red "Cork" you didn't clear.
- The Fix: Make the Top-Center Dark Red your #2 or #3 priority, immediately after the Greens.
Mistake #2: The Orange "Out-of-Sight" Trap
Orange cups are often scarce in this level (usually only 2 or 3 exist).
- The Error: You see an Orange cup exposed, but decide to finish the side Reds first because they are "easier."
- The Consequence: After clearing the side Reds, the stack shifts. The Orange cup falls down a row or gets covered by a White cup from above. It effectively disappears from your accessible "tap zone" right when you need it most.
- The Fix: If you see Orange, take it. Immediately. Prioritize it over Red or White even if you don't need it for another 5 seconds.
Mistake #3: Mono-Color Loading the Belt
Getting lazy with the color mixing.
- The Error: Loading [Red, Red, Red, Red, Red] because the tray is full of them.
- The Consequence: The nozzle hits a white mortar line. The machine dumps all 5 Reds, paints one White, then you have to reload 5 Reds. It triples the time spent on the brick section.
- The Fix: Force yourself to alternate taps. Left Red, Right White. Keep the belt diverse.
Mistake #4: Clearing the Wrong Side First
Symmetry can be deceptive.
- The Error: Systematically clearing the entire left side of the tray before touching the right side.
- The Consequence: You might clear the left side, revealing the bottom layer, but the nozzle is painting the right side of the canvas. You have loaded the wrong colors for the immediate future.
- The Fix: Follow the nozzle. If the nozzle is on the left, clear the left (or load what you need for the left). If the nozzle moves right, shift your focus to the right side of the tray.
Level 316: Speed Run and Shortcuts
For players looking to achieve the fastest time or maximize their score efficiency, these shortcuts bypass the standard "safe" methods.
The "Center-Punch" Shortcut
This is a high-risk, high-reward opening move.
- The Move: Instead of tapping Greens first, tap the Top-Center Dark Red (The Cork) as your very first move.
- The Logic: This immediately drops the stack in the middle. The Greens are still accessible on the sides, but now you have visual access to the Orange/White core much earlier.
- Why it works: It front-loads the difficult part of the level (managing the center column) while your belt is completely empty and flexible.
The "Double Tap" Tray Shift
Manipulating the physics engine to expose cups faster.
- The Move: If you need a cup from the 3rd or 4th row and it's not accessible, tap a top-row cup on the opposite side to cause a global shift in the tray stack.
- The Application: You need the White cup in the middle-back. It's blocked by a side Red. Tap the far side Green. The tilt mechanics might slide the middle stack just enough to make the White clickable.
Pre-loading for the Hearth
Don't let the belt run dry at the end.
- The Strategy: As you are finishing the last 20% of the brickwork (Red/White phase), check the tray.
- The Shortcut: If you see the last of the White cups, load them. Immediately after, start loading the final Dark Reds into your last slot while the nozzle is still finishing the bricks.
- The Benefit: When the nozzle hits the hearth (Dark Red), you don't have to tap the tray at all. You just burn through the queue. It saves 3-5 seconds of digging time.
Visual Skipping
Trusting the pattern over your eyes.
- The Concept: The brick pattern is repetitive (Red-White-Red-White).
- The Speed Run: Once the rhythm is established, you can stop looking at the specific pixel the nozzle is on and just listen to the sound or watch the flow.
- Action: Tap Red, White, Red, White in a constant beat without checking the canvas for every single pixel. Trust the algorithm. This significantly increases your Actions Per Minute (APM).