
Level 319
HARDHow to solve Sand Loop level 319? Get instant solution for Sand Loop 319 with our step by step solution & video walkthrough. Sand Loop 319 tips and guide.
Play Sand Loop Now
Experience the puzzle challenge firsthand
Game Screenshots

Sand Loop Level Guides
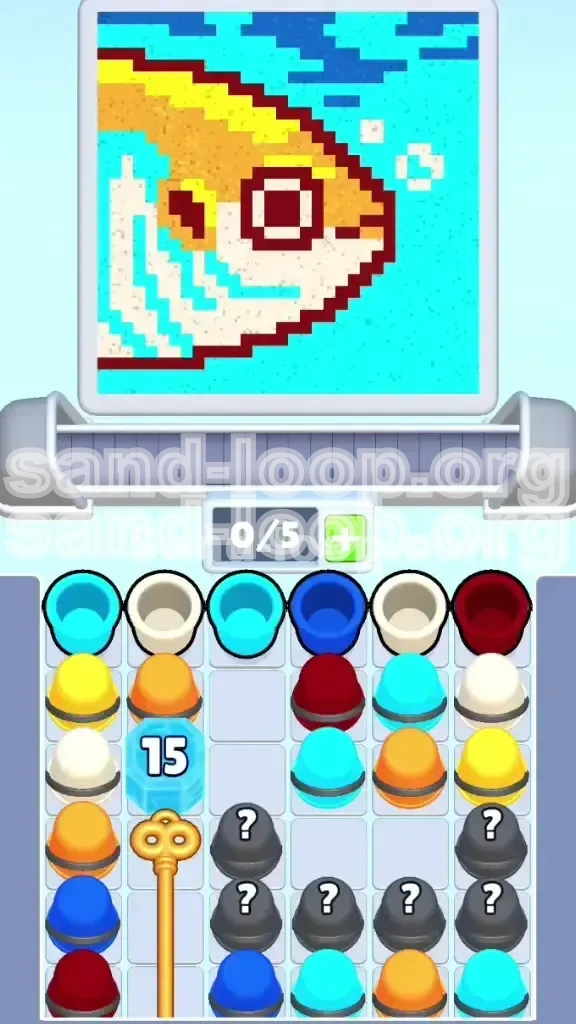
Level 319 Overview: The Tropical Fish Challenge
Welcome to Level 319 of Sand Loop, a stage that will test your ability to manage board space and color sequence simultaneously. While the subject—a vibrant Tropical Fish resembling a fancy Goldfish—seems innocent enough, the level is classified as a complex "Unlocking" stage. Your primary obstacle here is not a timer, but a restrictive board layout where over 60% of your playable area is initially frozen behind locked mechanics.
The challenge is deceptive. You are presented with a palette of six distinct colors: Cream, Bright Yellow, and Orange for the fish’s body; Dark Red for the fine outlines; and Cyan mixed with Dark Blue for the aquatic background. The difficulty spike comes from the "Ice Block 15" mechanic, which forces you to play aggressively with a limited number of slots before you can even access the majority of the level. Success in this level requires a shift in mindset from "precision painting" to "resource management" during the opening phase.
The Layout Restriction
Unlike standard levels where the entire board is open, Level 319 starts with a paralyzed bottom half. The tray is effectively split into two zones: an active upper zone and a locked lower zone. This means you cannot rely on having empty slots to maneuver cups around. You are forced to make difficult decisions about which colors to discard early, often sacrificing potential progress just to keep the conveyor belt moving.
The "Ice Block" Mechanic
The defining feature of this level is the large Ice Block located in the right-hand column, prominently labeled with the number "15." This acts as a move counter rather than a physical barrier you can break with a hammer. You must successfully clear 15 cups from your board and the conveyor combined to shatter this block. This creates a "turn limit" feel for the first phase of the level. If you are too slow, you will run out of viable moves before the board opens up.
Color Palette Complexity
The palette is deceptively tricky because it splits into three distinct groups that must not mix: the Warm tones (Yellow/Orange/Red) for the fish, and the Cool tones (Cyan/Dark Blue) for the water. The danger lies in the "bridge" colors like Cream, which can easily blend into the Yellow background or the White highlights if you aren't careful. Furthermore, the Dark Red required for the outline is extremely scarce; if you waste it on the wrong pixels, you will not finish the level.
The Golden Key Objective
Hidden beneath the Ice Block is a Golden Key. This item is essential for 100% completion as it unlocks the Mystery Blocks (labeled '?') on the far right. These mystery blocks contain the bulk of the sand required for the fish's body. If you fail to retrieve the key efficiently, you will run out of sand around the 70% mark, making the level impossible to finish. The key triggers a "flood" of new resources, turning a resource-scarce environment into a resource-management crisis instantly.
Why Players Fail Here
Most players fail Level 319 because they treat it like a normal puzzle level. They try to carefully paint the fish's eye or gills while the Ice Block counter is ticking down. This "slow play" leads to a clogged conveyor belt. When the board is clogged, you cannot process the 15 cups fast enough. The second most common failure point is immediately after getting the key; players panic at the sudden influx of new cups and pour Dark Red into the Cyan water, ruining the contrast of the final image.
Clear Objectives for Victory
To conquer Level 319, you need to break the mission down into three distinct phases. You cannot win by trying to do everything at once. Your mindset must shift from "Artist" to "Engineer" to "Artist" again throughout the course of the single level.
Phase 1: The Ice Breaker (First 20%)
Your sole objective in the first 30 moves is to reduce the "15" counter to zero. Accuracy does not matter here; speed does. You need to cycle cups from the conveyor to the board as fast as possible. Do not worry if you splash a little Orange into the Cream section, or if the edges look messy. Your only goal is to clear space and shatter the Ice Block to expose the Golden Key. If you finish this phase with 3 or more empty slots, you are in a good position.
Phase 2: The Key and Mystery (Middle 50%)
Once the Ice Block shatters, the Golden Key becomes accessible. Objective #2 is to retrieve this key without letting your board overflow. Retrieving the key triggers the Mystery Blocks to burst, adding 5-10 new cups to your conveyor instantly. You must manage this sudden influx. The objective here is to process the "Body Colors" (Orange, Yellow, Cream) while strictly avoiding the "Outline Color" (Dark Red) until the board is stabilized.
Phase 3: Precision Painting (Final 30%)
After the Mystery Blocks are cleared and the bulk of the fish is painted, you enter the final phase. Now, accuracy is paramount. The objective is to fill the isolated pixels—the eyes, the thin fins, and the background bubbles—without contaminating adjacent zones. You must hold onto Dark Blue cups until the very end to prevent them from settling in the body of the fish.
Understanding the Fill Order
Sand Loop physics dictate that sand fills from the bottom up, but "spills" from the center out. In Level 319, you must fill the Center Body (Cream) first. Then, you can handle the Gills (Cyan). Finally, you address the Background (Dark Blue). If you fill the Background first, the sand for the Body will float on top of it, creating muddy colors. Always prioritize the lowest, central elements of the fish before touching the water background.
Slot Management Goals
Maintain a "2/3" rule. Keep 2 slots full at all times to ensure you have resources if the right color appears, but keep 3 slots completely empty. This 60% free space buffer is crucial for when the Mystery Blocks pop. If you enter Phase 2 with 4 or 5 full slots, you will likely lose because you won't have room to sort the incoming flood of Mystery cups.
Step-by-Step Walkthrough Instructions
Follow this exact sequence to navigate the level. We have broken this down into actionable moves you can take in real-time.
Step 1: Initial Assessment and Setup
As soon as the level loads, do not tap anything immediately. Look at the top row of your conveyor. Identify if you have any "Body Colors" (Cream, Orange, Yellow). If the first cup is Dark Blue or Cyan, check if there is *any* matching pixel open. If yes, tap it. If no, you may need to discard it immediately to the trash can (if available/allowed by mechanics) or force it into a "sacrifice" slot to move the conveyor. We need to cycle through to the good colors.
Step 2: Aggressive Cup Cycling (The "Grind")
This is the most critical step. Start tapping cups rapidly. You are aiming to lower the Ice Block counter from 15 to 0.
- Prioritize Cream and Orange: These colors have the largest surface area on the fish. They are the easiest to dump quickly.
- Ignore the Details: Do not try to fill the fish's thin fins or the small bubbles yet. Only target the big, open chunks of color.
- Keep the Conveyor Moving: Every cup you clear reduces the counter. Speed is your friend.
Step 3: The Key Retrieval Moment
Watch the counter. When it hits "1" and you clear the last cup, the Ice Block will shatter.
- Pause for 1 Second: Don't tap instantly. Look at where the Golden Key falls.
- Clear the Path: If there is a cup directly above the key, prioritize clearing that cup.
- Match the Key: The key usually falls into a specific color slot (often Yellow or Orange). Match that color to collect it.
- Result: Collecting the key unlocks the '?' blocks on the right.
Step 4: Managing the Mystery Flood
The moment the key is collected, the '?' blocks transform into regular cups. This usually dumps 3-5 Red, Cream, and Cyan cups onto your belt.
- Scan for Red: Immediately locate if any Dark Red cups appeared. These are dangerous. If you see them, note their position but do not tap them yet unless the outline is perfectly empty and ready.
- Dump the Cream/Orange: Take the new body colors and pour them immediately. The fish body is a "sink" that can take almost infinite amounts of sand without issue.
Step 5: The "Red Zone" Execution
Once the body is mostly full (around 80% Cream/Orange), you must switch to precision.
- Tap Dark Red: Now you can pour the Dark Red. Because the body is full, the Red will stay in the outline channels.
- Use the Pause Trick: If the outline is very thin, tap the Red cup, then immediately tap elsewhere to stop the flow if it looks like it's about to bleed into the Cream. Better to underfill and add a second cup than to overfill and ruin the contrast.
Step 6: The Dark Blue Finale
You should be left with only the background water and maybe a few stray bubbles.
- Hold Dark Blue: If you have Dark Blue cups left, save them.
- Fill Cyan First: Ensure all Cyan areas are solid.
- Final Pour: Pour the Dark Blue. Since the fish and Cyan are already solid and "heavy" with sand, the Dark Blue will flow over them or settle in the remaining gaps without mixing poorly. This final layer should push you to 100% completion.
The Correct Color Order
Why does color order matter so much in this level? Because of the "sand stack" physics. If you pour a background color first, it acts as a floor. Then, when you pour the body color, the body sand spreads *over* the background sand, creating a thin, diluted layer that looks messy. To get the crisp, cartoon look shown in the preview, you must layer from "Foreground" to "Background."
1. Body Base: Cream
The Cream color is the foundation of the fish. It occupies the largest volume. You must fill this first. Why? Because it is the "floor" for the rest of the fish details. If you fill the Cyan water or Dark Blue background first, the Cream sand will try to spread across the entire board, making it impossible to keep the fish defined. Filling Cream first creates a "container" for the rest of the fish.
2. Accents: Bright Yellow and Orange
These go second. They blend well with Cream. If you accidentally splash some Orange into the Cream, or vice versa, the visual error is minimal because they are analogous colors (similar warm tones). Pour these while the Cream is still settling to help them merge naturally in the highlighted areas of the fish.
3. The Barrier: Cyan
The Cyan stripes are tricky. They separate the head from the body. If you do Cyan too early, the Cream will cover it up. If you do it too late, the Cyan won't stick because the Cream is already dry/packed. The best time to pour Cyan is when the Cream is about 70% full. The wet Cream will grab the Cyan sand, but there's enough structure to keep the stripe visible.
4. The Outline: Dark Red
Always save Dark Red for the late game. It is the highest contrast color. It needs to sit on top of everything else to look like an outline. If you pour Red early, the subsequent Cream or Orange cups will bury it, and your fish will lose its definition. The Red outline is essentially the "ink" of the drawing—it goes on last to make the colors pop.
5. The Background: Dark Blue
This is the absolute final step. The background water should fill all the negative space around the fish. If you pour Dark Blue before the fish is done, it will get trapped *under* the fish sand, creating ugly dark patches in the orange fins. By waiting until the fish is 100% complete, the Dark Blue simply flows around the solid fish, filling the top and bottom corners perfectly.
Summary of Sequence
Remember the mnemonic: "COB-R-B". Cream, Orange/Yellow (Body), Blue-Cyan (Water/Gills), Red (Outline), Blue-Dark (Background). Deviating from this order is the primary cause of "muddy" results in this level.
Key Tips and Strategies
Beyond the basic steps, these pro-tips will help you maintain control over the chaos of Level 319. These are refined strategies for handling the specific pressures of this stage.
The "Center-Out" Strategy
Always aim your sand pours at the center of the fish's body, even if you are trying to fill the tail. The physics engine in Sand Loop tends to push sand outward from the point of impact. If you aim for the edge, the sand might spill off the fish entirely. If you aim for the center, it will flow outward toward the edges of the fish naturally, ensuring full coverage without waste.
Sacrificial Slotting
During the "Ice Block" phase, you will inevitably get a color you don't need (e.g., Dark Blue when you only have body open). Do not let it clog your conveyor! If you have an empty slot and a useless color comes up, pick it up anyway. Why? Because getting it *off* the conveyor brings you closer to the next cup, which might be the color you need. Treat useless cups as "currency" to buy time and move the belt.
The "Red Ripple" Effect
When you finally pour the Dark Red for the outline, pour it in short bursts. Tap the cup to start the flow, watch the sand fill the line, and tap the cup again to stop it. If you just hold it down, the sand builds up in a "ripple" or pile that can spill over into the eye or the background. Short taps give you clean, sharp lines.
Pre-Filling the Tray
Before you shatter the Ice Block, try to ensure your board slots are as empty as possible. Ideally, you want 3 or 4 empty slots right before the block breaks. This gives you the maximum capacity to handle the sudden release of the Mystery Blocks. If you have 5 full cups when the block breaks, you might panic and make a mistake.
Identifying "Safe" Zones
Learn where the "Safe Zones" are on the fish. The area where the Orange meets the Yellow is a safe zone—mixing them creates a nice gradient. The area where the tail meets the body is a safe zone for Cream. The only "Unsafe Zones" are the Eye (must be Dark Red/Black) and the thin water lines separating the fins. Avoid pouring near the unsafe zones until you are in the final "Precision Phase."
Using the Trash Can Wisely
If the game mechanic allows for a trash can or refresh button, use it sparingly. In Level 319, only trash a cup if it is Dark Red and you are not ready for the outline, or if it is Dark Blue and you haven't finished the body. Trashing Body Colors (Cream/Orange) is usually a mistake because you can almost always find a place to dump them, even if it's not the perfect spot.
Common Mistakes to Avoid
Even experienced players stumble on Level 319. Here is a breakdown of the specific errors that lead to failure, so you can actively prevent them.
Mistake 1: Hoarding "Rare" Colors
Players see a Dark Red cup early on and think, "I need to save this for the outline later!" They hold onto it for 20 moves. This clogs a valuable slot that could have been used to cycle through 3 or 4 other cups to lower the Ice Block counter. Correction: If you can't use it immediately, dump it or trash it. An empty slot is worth more than a saved color in this level.
Mistake 2: Ignoring the "15" Counter
Some players get obsessed with painting the fish perfectly right away. They spend 10 moves trying to get the Cream exactly right. Meanwhile, they haven't cleared enough cups to break the Ice Block. They eventually run out of moves with the key still trapped. Correction: Keep one eye on the "15" number at all times. It is your heartbeat. If it stops decreasing, you are stalling and risking failure.
Mistake 3: The "Mystery Block" Panic
The moment the '?' blocks open, players get excited and start tapping everything rapidly. They often tap the Dark Red first, flooding the delicate fish body with outline ink. Correction: When the Mystery Blocks open, mentally categorize the new cups instantly. "Body Colors" = Fast Tap. "Outline Colors" = Wait. "Water Colors" = Wait.
Mistake 4: Pouring Background Too Early
It is very tempting to fill the blue water because it looks like a big, easy target. However, if you fill the water first, the fish body (Cream) will float on top of the water, creating a jagged, messy edge that looks like an oil spill. Correction: Be disciplined. Leave the background empty. It feels wrong to play with a blank background, but it guarantees a clean finish.
Mistake 5: Overfilling the Eye
The fish's eye is a tiny pixel cluster. It requires very little sand. Players often hold the Red cup down too long, causing the sand to pile up and spill out of the eye socket into the surrounding Cream or Cyan. Correction: Use "micro-taps" for the eye. One tap might be enough. Watch the pixel fill percentage—if it hits 90%, stop immediately. The surrounding sand will often creep in and finish the last 10% naturally.
Mistake 6: Misjudging the Sand Physics
Sand doesn't just fill up; it fills *out*. Players often aim for the bottom of the fish, expecting the sand to stay there. Instead, it rolls off the side and into the water. Correction: Aim high and central. Let gravity and the spread mechanics do the work of pushing the sand to the edges for you. This maximizes coverage and minimizes spillage.
Solutions When You Are Stuck
Feeling trapped with no moves? The conveyor belt isn't giving you what you need? Here are the emergency protocols for Level 319.
Stuck Scenario 1: The "Wrong Color" Lock
Situation: The Ice Block is still up (Counter > 5). You have 2 full slots of Dark Blue, but the only open pixels on the board are Cream (Body). The conveyor is showing Cyan.
Solution: You must break the deadlock. You cannot wait for Cream because the belt is clogged. Take the Cyan cup. Look for the absolute smallest patch of open water—maybe just a few pixels at the very top. Pour the Cyan there, even if it looks imperfect. This clears the cup, moves the belt, and hopefully brings a Cream cup into view. You must sacrifice the water purity to keep the game moving.
Stuck Scenario 2: The "Full Board" Flood
Situation: You just got the Key, the Mystery Blocks opened, and now you have 6 full slots. The conveyor is showing a color you need, but you have no room to pick it up.
Solution: Emergency Dumping. Pick a cup that is "least critical." Do you have a cup of Cream that is only 10% full? Dump it onto the biggest open patch of body, even if it's not the perfect match. Do you have a Blue cup? Pour it into the background water. Create an empty slot at all costs within 2-3 seconds, or the level timer/game-over mechanic will trigger.
Stuck Scenario 3: The "Isolated Pixel" Problem
Situation: You are at 95% completion. You have one single pixel of Dark Red left in the fish's fin, but the game keeps giving you Dark Blue.
Solution: This is a RNG (Random Number Generator) trap. You have two options. Option A: Keep cycling. Pick up the Dark Blue, pour it into a corner of the background (don't touch the fish), and discard it to move the belt. Repeat until Red appears. Option B: If the pixel is truly tiny and surrounded by other colors, sometimes an adjacent color cup (like a very dark Orange) can "bleed" into that pixel and the game might accept it as complete. Try using a neighboring color if available.
Stuck Scenario 4: Ice Block Won't Break
Situation: You have cleared cups, but the Ice Block counter says "1" and won't drop to "0".
Solution: The counter tracks cups *cleared from the board*, not just picked up. You likely have a cup in a slot that is partially full. You must pour that cup completely out to register the "clear." Even if the color isn't perfect, find a place to dump the rest of that sand to force the game to register the action and break the block.
Speed Run Tips and Shortcuts
For those looking to 3-star this level or achieve a personal best time, efficiency is everything. Here is how the pros beat Level 319 in under 60 seconds.
The "Pre-Load" Technique
Before the level even starts (during the "3-2-1" countdown), look at the far left of the conveyor. Identify the first cup you will need. If your finger is hovering over that cup the millisecond the level begins, you save precious seconds. In a level defined by an "Ice Block" counter, starting 1 second faster is equivalent to clearing 1 extra cup.
Chain Reaction Tapping
Don't tap one cup, wait for it to pour, and then tap the next. Queue your inputs. While one cup is pouring, look at the next slot. If you know you want to pour that next cup into the same area, tap it while the previous sand is still flowing. This "double tap" stacks the pouring animation and cuts your animation time in half.
Ignoring the 100% Perfection
Speed runners don't care if the fish's eye is perfectly centered or if the water ripple is perfectly symmetrical. They only care that the *percentage* hits 100%. If you are missing 1% of the fish's tail, but you have a Dark Blue cup in hand, don't wait for a Yellow cup. Pour the Blue in the background. Often, the "splash" from the background pour will accidentally fill that last 1% of the tail, or the game's leniency will let you pass with 99% visual accuracy. Finish the level, don't polish the art.
The "Slot Shuffle" Cheat
If you are waiting for a specific color (e.g., Red) and it's not coming, pick up and discard (pour into a safe dump zone) 2-3 cups rapidly. This forces the game to generate new cups from the "Next" queue faster than waiting for them to arrive naturally. It costs you a bit of sand, but it saves time searching for that one specific color you need to break the deadlock.
Memorizing the Spawn Pattern
Levels in Sand Loop often follow a loose algorithm. After playing this level 3-4 times, you will notice that the Mystery Blocks always spawn the same colors (e.g., 2 Red, 2 Orange, 1 Blue). If you know the Red is coming, you can proactively clear an empty slot and prepare the outline area *before* you even collect the Golden Key. This anticipation allows you to process the Mystery Block flood instantly instead of reacting to it.
Utilizing Gravity
Instead of filling the fish body layer by layer (bottom up), speed runners often dump the entire load of Body Colors (Cream/Orange) into the center of the fish in one go. The sand spreads out to the edges naturally. This is faster than trying to paint the tail, then the head, then the middle. One big pour in the middle is often faster and covers all zones due to the spread mechanics.