
Level 337
HARDHow to solve Sand Loop level 337? Get instant solution for Sand Loop 337 with our step by step solution & video walkthrough. Sand Loop 337 tips and guide.
Play Sand Loop Now
Experience the puzzle challenge firsthand
Game Screenshots
Sand Loop Level Guides
Level Overview: The Pink Bird Challenge
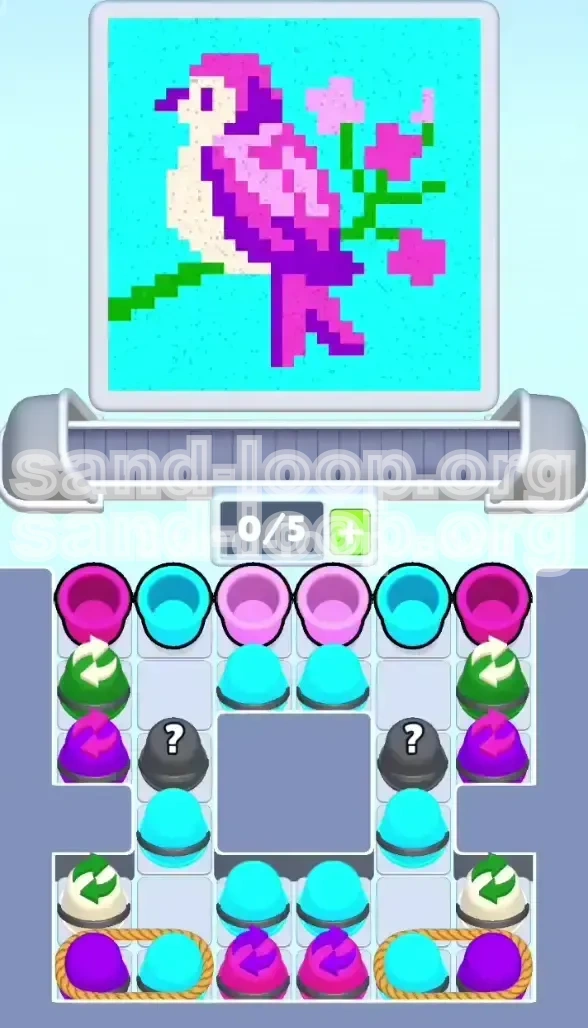
Welcome to the guide for Sand Loop Level 337, widely known by the community as the "Pink Bird" challenge. This stage represents a significant difficulty spike in the blockage puzzle genre. Unlike standard levels where you can simply pour colors in any order, Level 337 forces you to manage a highly congested tray with a very strict resource limit.
The level features a beautifully designed pixel-art bird perched on a branch, but don't let the artistic aesthetics fool you. The board layout is symmetrical and deceptive. Your primary adversary here is not time, but space. You are operating with a tight 5-slot conveyor belt capacity. If you allow the wrong colors to accumulate, you will face an immediate deadlock. The challenge is compounded by "Roped Pairs" in the lower corners and "Mystery Crates" blocking the center, which serve as physical barriers to your color management strategy.
The 5-Slot Capacity Constraint
The most critical mechanic in this level is the limited capacity of your conveyor belt. You only have 5 available slots to hold cups before they must be poured onto the bird.
- The Deadlock Risk: If your belt is full (5/5) and the tray is full, you cannot make any moves. Tapping a cup in the tray will have no effect because there is nowhere for it to go.
- Flow Control: You must constantly monitor the belt speed. Pouring cups too quickly can flood the belt, while pouring too slowly leaves you vulnerable to the "Recycle" mechanic, where returned cups clog your tray.
Symmetrical Layout and Blockages
The tray is mirrored perfectly, which means strategies for the left side apply to the right. However, this symmetry leads to congestion issues.
- Corner Traps: The bottom corners contain roped pairs that are difficult to dislodge until the center is cleared.
- Center Blockage: The Mystery Crates in the direct center prevent easy access to the Cyan reserves. You cannot rely on the background color early in the level.
The Recycle Mechanic
Specifically, the Green and Cream cups are marked with "Recycle" arrows (or loop icons).
- How it Works: After you pour a Green or Cream cup, it doesn't disappear. It cycles back to the tray after a short delay.
- Strategy Implication: You cannot "burn" these cups to get rid of them. You must pour them, wait for them to clear the belt, and then manage their return. If you pour two Green cups back-to-back, they will return to a full tray and cause a crash.
Mystery Crates Analysis
The black crates with question marks are not random; they are tactical blockers.
- Contents: In Level 337, these crates predominantly transform into Cream or Purple—colors essential for the bird's face and belly details.
- Triggering: They usually transform once the cups directly above them are moved. Do not waste moves tapping them early; wait until the path is clear.
Level Objectives and Color Strategy
To beat Level 337, you must adopt a "Foreground First" mentality. Many players fail because they try to clear the easiest colors first or work on the background too early. This level requires a strict processing order to prevent color bleeding (where a background color ruins a foreground detail).
Objective 1: Clear the Wings (Magenta & Light Pink)
The bird's wings and tail feathers are the largest foreground areas. They are your "safe zones."
- Target: Use Magenta (Dark Pink) for the main wing shape and Light Pink for the inner feather details.
- Priority: High. Clearing these cups opens up the vertical columns on the sides of the tray, allowing you to access the Green and Cream cups buried underneath.
Objective 2: Establish the Branch (Green)
The branch is a thin, continuous line that connects the left and right sides of the canvas.
- Target: Pour Green cups to fill the branch structure.
- Difficulty: The Green line is thin. It requires patience. If you pour Green while the branch is partially blocked by other colors, you risk wasting the cup.
- Strategic Value: Finishing the branch clears the physical space on the canvas, making it easier to pour the large volume of Cyan later without hitting "collisions" with unpainted pixels.
Objective 3: Define the Bird (Purple & Cream)
This is the most delicate phase. The bird's head, back, and belly are intricate shapes.
- The Danger: Purple and Cream are adjacent to the massive Cyan background. If you pour Cyan before these are done, the Cyan will "bleed" into the belly or face, forcing you to restart.
- The Face: The beak and eye require tiny, precise amounts of Cream. Do not flood the belt with Cream; use it sparingly.
Objective 4: The Background Flood (Cyan)
Cyan constitutes approximately 60% of the total canvas area. It is the "boss" color of this level.
- When to Start: Only after the Pink wings, Green branch, and Cream/Purple body are 100% complete.
- Execution: Once the foreground is "locked in," you can spam the remaining Cyan cups to fill the sky rapidly. This is the speed-run phase of the level.
Step-by-Step Walkthrough
Follow this exact sequence of operations to navigate the tray safely. This guide assumes a standard playthrough without power-ups.
Phase 1: The "Trash" Clear (Moves 1-5)
At the start, your tray is clogged with Pink cups blocking the essential columns. You must clear the top layer immediately.
- Action: Locate the Magenta and Light Pink cups at the very top of the tray (Top Left and Top Right).
- Move: Tap these Pink cups first. Send them to the belt.
- Pouring: Pour them onto the bird's wings. Do not save them. The wings are large enough to take the sand, and clearing these cups is the only way to reach the Green cups buried beneath them in the tray stack.
- Result: You should see the Green cups becoming accessible in the side columns.
Phase 2: Managing the Recyclers (Moves 6-12)
With the top Pinks gone, you now see the Green and Cream cups. Be very careful here.
- Green Focus: Tap the Green cups now. Send them to the belt.
- Pouring: Pour the Green onto the branch.
- The Wait: STOP. Do not tap the next Green immediately. Watch the belt. The Green cup will go to the bin and then recycle back into your tray. You must wait for it to land in the tray and clear the belt slot before tapping the next Green.
- Cream Warning: If you exposed Cream cups, leave them alone for a moment. Focus on getting the Green branch started so the cup recycles out of the way.
Phase 3: Cracking the Mystery Crates (Moves 13-18)
By now, the middle of your tray should have shifted. The Mystery Crates are your next target.
- Triggering: Usually, clearing the Pinks in Phase 1 allows the Mystery Crates to shift or become clickable.
- Action: Tap the Mystery Crates in the center row.
- Result: They will likely transform into Cream or Purple.
- Management: Send these transformed cups to the belt. If they are Purple, pour them onto the bird's head/back. If they are Cream, pour them onto the belly. Do not let them sit on the belt; you need the slots free.
Phase 4: Unlocking the Roped Corners (Moves 19-25)
The bottom corners hold the heavyweights: Roped Purple and Cyan pairs.
- Prerequisite: You need at least 2 empty slots in your tray to tap a roped pair. If your tray is full, you must pour whatever is on the belt first.
- Action: Tap the bottom-left or bottom-right roped pair.
- The Shift: Both the Purple and Cyan cup will move to the belt.
- Immediate Triage: The Purple is urgent (foreground). The Cyan is dangerous (background).
- Move: Pour the Purple immediately onto the bird. Leave the Cyan sitting on the belt for a moment (or move it to a safe tray slot if you have space, but usually, you just pour the Purple to free the slot).
Phase 5: The Final Cleanup (Moves 26+)
You are now in the endgame.
- Status Check: Ensure the bird's body (Pink, Purple, Cream) and the branch (Green) are fully colored. Even 1% missing can be ruined by the next step.
- The Cyan Release: Now, look at the center of the tray. You likely have a massive stack of Cyan cups that were blocked by the crates or ropes.
- Action: Rapidly tap all remaining Cyan cups. Send them to the belt.
- Spam: Pour them continuously. The background sky is huge, so it will drink up all this sand quickly. This is the satisfying payoff!
Key Tips and Notes
To achieve a high score and avoid frustration, keep these analytical insights in mind while playing.
The "Sandwich" Technique
When dealing with the Recycle cups (Green/Cream), use a sandwiching method.
- Technique: Tap Green -> Pour Green -> Wait for return -> Tap Cream -> Pour Cream -> Tap Green.
- Benefit: This prevents the belt from being clogged by two cups of the same recycling type returning simultaneously. By alternating, you ensure one is always on the belt while the other is in the tray.
Recognizing the "Locked" State
Level 337 has a specific visual cue when you are about to fail.
- The Symptom: If you tap a cup and it doesn't move, or you try to pour and the animation stutters.
- The Cause: Your tray is full (5/5) AND your belt is full (5/5).
- The Fix: You must immediately pour a cup from the belt onto the bird. Do not try to tap anything in the tray; there is physically no room for it to move.
Analyzing Color Ratios
Understanding the volume of sand required helps you plan.
- Cyan (60%): Requires the most cups. Do not panic when you see 8 Cyan cups stacked up; this is normal for the endgame.
- Green (10%): Low volume. You only need 2-3 successful pours to finish the branch.
- Cream/Purple (30%): Medium volume but high precision. These define the art.
Dealing with Mystery Crate RNG
Sometimes the crates behave differently based on the game's random number generation (RNG).
- Scenario A: The crate turns into a color you already have on the belt. This is bad. You must prioritize pouring the belt color to make space.
- Scenario B: The crate turns into a color you just finished (e.g., it turns Light Pink when the wing is done). This is a "dud." You must treat it as trash. Do not pour it onto the finished art (it won't fit). You must let it clog a slot until you can combo it or use a power-up.
Common Mistakes to Avoid
90% of losses in this level come from three specific errors. Learn them so you don't repeat them.
Mistake 1: The "Background First" Fallacy
It is tempting to clear the massive Cyan stack in the middle early because it frees up a lot of tray space.
- Why it fails: If you pour the Cyan background first, the bird's outline is not established. The Cyan sand will spill into the branch and belly slots.
- Consequence: When you eventually try to pour Green for the branch, it will hit a pixel already filled with Cyan, causing a collision/fail.
- Correction: Force yourself to work on the wings and branch first. Ignore the Cyan clutter in the center until the end.
Mistake 2: The Double-Recycle Crash
This happens when players get impatient with the Green or Cream cups.
- The Action: You tap Green, pour it. It's recycling. You immediately tap the *second* Green cup behind it.
- The Crash: The first Green returns to the tray. The second Green moves to the belt. The belt pours the second Green. Now the first Green is in the tray, and the second Green is returning. You have no empty slots. The game locks.
- Correction: Always wait for the recycle animation to complete and the cup to settle before tapping the next cup of that color.
Mistake 3: Ignoring the Roped Pairs
Sometimes players focus so much on the center crates that they forget the corners.
- The Issue: The Roped Pairs (Purple/Cyan) take up 2 slots on the belt simultaneously when activated.
- The Fail: If you have 4 cups on the belt and tap a roped pair, the game tries to add 2 cups to a belt that only has 1 slot left. The move fails, but you might not notice immediately, leading to confusion.
- Correction: Always count your belt slots. If you have 3 or more cups on the belt, do not tap a roped pair until you have poured some off.
Solutions for When You Are Stuck
Level 337 is unforgiving. If you reach a point where no moves seem possible, use these diagnostic checks to save your run.
Stuck Scenario: "Full Board, No Matches"
The tray is full, the belt is full, and nothing seems to match the bird's remaining needs.
- Diagnosis: You are likely holding a "useless" color (like Cyan) while needing a specific detail color (like Cream).
- Solution: Look for a "Mystery Crate" or a Roped Pair you haven't tapped. Tapping these forces a shift, which might dislodge a cup and create a chain reaction. If you have no crates/ropes left, you are likely in a deadlock state and may need to restart.
Stuck Scenario: "Recycle Loop"
You are stuck in a loop where Green cups keep returning, and you can't pour them because the branch is full, but you can't tap anything else because the Green takes up a slot.
- Diagnosis: You have over-saturated the branch (it's 100% done) but the cups keep coming.
- Solution: This is a trick. If the branch is full, stop pouring Green. You must let the Green cup sit in the tray. Use your other slots to clear other colors (Pink/Purple) to beat the level. You do *not* need to clear every cup from the tray to win; you just need to fill the bird 100%. If the Green is useless now, treat it as a block and work around it.
Stuck Scenario: "The Mystery Dud"
A Mystery Crate turned into a color you don't need (e.g., extra Magenta when the wing is done).
- Diagnosis: Bad RNG.
- Solution: This cup is now dead weight. You must keep it on the belt or tray as a placeholder. Do not pour it (it won't fit). Use your remaining 4 active slots to finish the level. It is frustrating, but manageable if you have 4 slots free.
Speed Run Tips
Once you have beaten the level and want to achieve a 3-star score or a personal best time, optimize your playstyle with these advanced techniques.
Pre-Clicking (Input Buffering)
Sand Loop allows you to "queue" your next tap while an animation is playing.
- Technique: As soon as you tap a cup to send it to the belt, immediately tap the next cup you want in the tray.
- Benefit: This saves milliseconds between every move. In a level with 50+ moves, this saves several seconds.
- Risk: Only do this when you are 100% sure of the color order. If the Mystery Crate RNG fails, your buffer might be wrong.
The "Cyan Rush" Optimization
The fastest way to finish the last 40% of the level.
- Strategy: As soon as the bird's beak (Cream) and eye (Purple) are filled, stop looking at the bird art.
- Action: Focus entirely on the tray. Tap every Cyan cup in rapid succession. Then, tap the belt to pour.
- Reasoning: Since the foreground is done, you can't make a mistake anymore. Mashing the tap button is faster than carefully aiming.
Memorizing the Spawn Order
The tray setup is identical every time you play.
- Tip: Memorize that "Top Left is always Magenta" and "Bottom Right is Roped Purple."
- Benefit: You don't have to scan the board to find colors. You can develop muscle memory, tapping specific corners automatically without looking, significantly increasing your APM (Actions Per Minute).