
Level 339
HARDHow to solve Sand Loop level 339? Get instant solution for Sand Loop 339 with our step by step solution & video walkthrough. Sand Loop 339 tips and guide.
Play Sand Loop Now
Experience the puzzle challenge firsthand
Game Screenshots
Sand Loop Level Guides
Sand Loop Level 339: Comprehensive Strategy Guide
Introduction: The Sun and Moon Mosaic
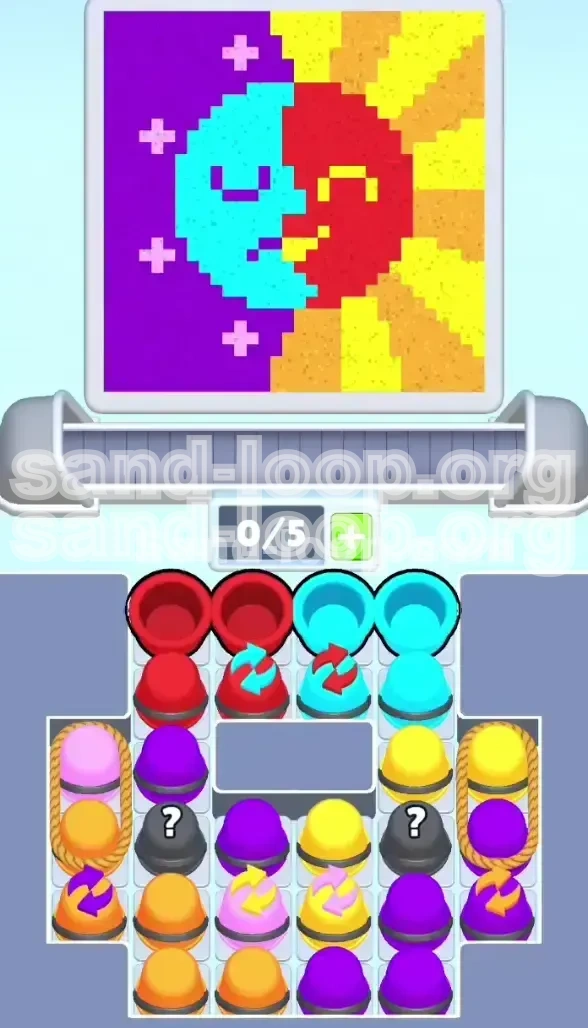
Welcome to Level 339, widely known in the community as the "Sun and Moon" challenge. This stage presents a visually striking pixel art mosaic split directly down the center. The left side of your canvas depicts a serene, cool-toned Moon face set against a deep purple background, accented by bright pink stars. The right side contrasts this with a warm, fiery Sun face resting on a yellow background, detailed with vibrant orange features. This is a Logic Puzzle stage, meaning raw speed is secondary to mental clarity. The primary difficulty lies in the supply tray layout, which is designed to force you into making difficult choices about resource management.
The Split-Screen Mechanic
The defining feature of this level is the strict bisected nature of the gameplay. Unlike previous levels where sand could flow freely across the entire canvas, here you must treat the left and right sides as two separate distinct entities. Colors meant for the Moon (Left) are often buried under colors meant for the Sun (Right) in the tray. If you simply tap cups randomly, you will cross-contaminate the canvas—pouring Purple sand onto the Sun’s Yellow face or Orange sand onto the Moon’s Cyan features. Your mindset must shift from "clearing the board" to "managing the flow."
Why Logic Beats Speed
Attempting to speed-run Level 339 without a plan will result in an immediate fail state. The level introduces specific "Roped" pairs and Converter cups that act as traps for the unwary. You are given exactly the amount of sand needed, perhaps with a margin of error of only 1-2 cups. This means efficiency is not just about time; it is about preservation of resources. You must prioritize clearing the central faces (Red and Cyan) before you can even think about touching the background colors (Purple and Yellow), or you will run out of space to stack incoming sand.
The Resource Imbalance
One of the hardest aspects of this stage is the asymmetrical distribution of materials. You might find yourself with an abundance of Cyan sand but a critical shortage of Purple for the background. Conversely, the Yellow cups are often locked behind Mystery Boxes that you cannot access until the middle of the game. Understanding this imbalance is the first step toward victory. Do not panic if one side of the canvas fills up faster than the other; this is intended by the level design.
The Failure Conditions
To succeed, you must avoid three specific failure scenarios: First, cross-contamination of colors (e.g., spilling Pink on the Sun). Second, running out of a specific color because you used a Converter cup prematurely. Third, getting the Roped Columns stuck in the supply tray because you failed to clear a path for them. We will address how to navigate all these pitfalls in the sections below.
Clear Objectives: How to Beat Level 339
Primary Goal: Complete the Dual Faces
Your immediate priority upon starting the level is the completion of the two large central faces: the Red Sun and the Cyan Moon. These occupy the largest surface area on the canvas and require the most volume of sand. You cannot achieve victory if you run out of Red or Cyan sand halfway through the pour. These colors are the foundation of the level; everything else is secondary. If you have to choose between pouring a background color or a face color, always choose the face color to ensure you don't get bottlenecked later.
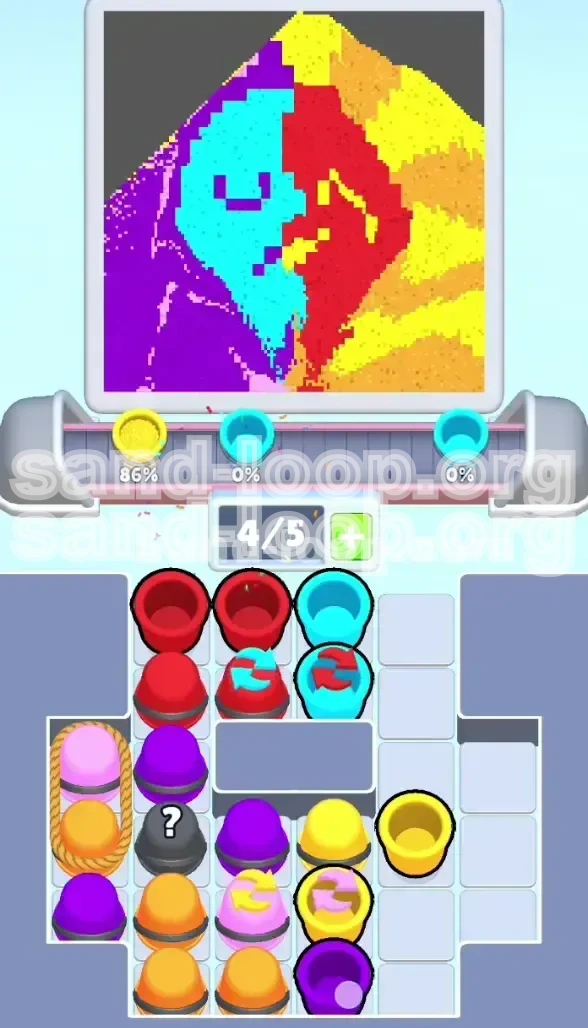
Secondary Goal: Fill the Backgrounds
Once the faces are roughly 80% complete, your focus shifts to the large empty fields on the left and right. The Left side requires a deep Purple fill, while the Right side requires a bright Yellow fill. These background pours are tricky because they require large volumes of sand, but the cups for them are often trapped at the bottom of the tray or tied up in ropes. You must clear the center column of the supply tray methodically to unlock these background colors without spilling them into the wrong areas.
Tertiary Goal: Execute Fine Details
The final 10% of the level involves the small, high-precision details. This includes the Pink stars on the Moon's side and the Orange facial features (like the Sun's mouth or cheek) on the right side. These details are often blocked by the "Converter" cups or located in the bottom rows of the tray. A common mistake is tapping these small detail cups too early when the conveyor belt is full of larger face cups. You must reserve specific slots in your mental queue for these details, ensuring you don't accidentally bury a critical Pink cup under a pile of useless Purple sand.
Managing the Conveyor Belt
Think of the conveyor belt at the bottom as your "hand." You only have 5-7 slots available at any given time. A major objective is to keep this belt fluid. You must avoid the "Traffic Jam" scenario where the belt is full of colors you can't use yet (like Purple when the Moon face isn't done). To beat this level, you must tap cups in an order that constantly rotates the belt, preventing blockages that stop you from accessing the colors you actually need.
The Zero-Waste Rule
In Level 339, every grain of sand counts. The "Zero-Waste Rule" means you should never pour a color into an area that is already 95% full. For example, if the Sun's face is completely Red except for one pixel, pouring a whole new Red cup is a waste of resources that could have been used elsewhere. You must wait until you have multiple small gaps to fill before utilizing a large cup, or use the remaining sand in the current cup to touch up small areas. Efficiency is the key to unlocking the victory screen.
Unlocking the Roped Columns
The side columns (Left and Right ropes) act as the final gatekeepers of the level. You cannot beat the stage until you successfully release and pour these columns. Your objective regarding these is to clear the "body" of the level (the faces and main backgrounds) enough so that when you release the ropes, the sand has a place to go. Releasing the ropes too early results in overflowing the current sand piles and spilling into the wrong color zones. Your goal is to create a "sandbox" environment where the final colors can land safely.
Step-by-Step Walkthrough: The Opening Phase
Step 1: Initial Assessment of the Tray
As soon as the level loads, pause for three seconds and look at the top three rows of the supply tray. You will see two pure Red cups and two pure Cyan cups in the very top row. These are your starting tools. Directly below them (Row 2) are the Converter Cups—Red-to-Blue and Blue-to-Red. Do not touch Row 2 yet. Your first action is dictated entirely by the top row. Identify which side (Red or Cyan) has more immediate volume required on the canvas and start there, but generally, you should alternate between them to keep the pile level on both sides.
Step 2: Executing the Primary Pours
Tap the two Red cups first. Pour them carefully into the Sun face on the right. Watch the sand pile up; aim for the center of the Sun to create a stable base. Once the Red cups are cleared and on the belt, immediately tap the two Cyan cups. Pour these into the Moon face on the left. By clearing the entire top row first, you open up the middle section of the tray. This is crucial because the middle section contains the "access" colors needed to reach the ropes on the side. If you leave one Red cup sitting in the top row while working on the bottom, you create a bottleneck that blocks the flow of the game.
Step 3: Handling the Converter Trap
With the top row empty, the Converter cups (Row 2) are now exposed. These are dangerous. A Red cup with Blue arrows turns Red sand into Cyan. A Blue cup with Red arrows turns Cyan into Red. Why is this a trap? Because if you accidentally pour a pure Cyan sand into the Blue-to-Red converter, you lose your Cyan supply. The strategy here is to check your canvas. If the Sun face is missing a tiny bit of Red but you have plenty of Cyan, use the Converter. However, the optimal strategy for 99% of players is to treat these Converter cups as "regular" cups only if you have a massive surplus of the input color. Ideally, try to match the input color to the output need. If you must use them, do it now while the belt is relatively empty, ensuring you don't mix the converted sand with pure sand.
Step 4: Digging for Mystery Boxes
Rows 3 and 4 typically contain the Mystery Boxes (Black cups with "?"). These are your keys to the background colors. Usually, tapping these reveals Yellow or Purple cups. The goal in this step is to clear the center column entirely. Tap the Mystery boxes to reveal their contents. Do not pour them immediately! Look at the belt. If the belt is full of Red/Cyan leftovers, you must pour those first to make space. Once you have space, pour the revealed Purple or Yellow cups into the *edges* of the canvas, avoiding the faces. The goal here is just to clear the supply tray, not necessarily to perfectly finish the art yet.
Step 5: Establishing the Base Piles
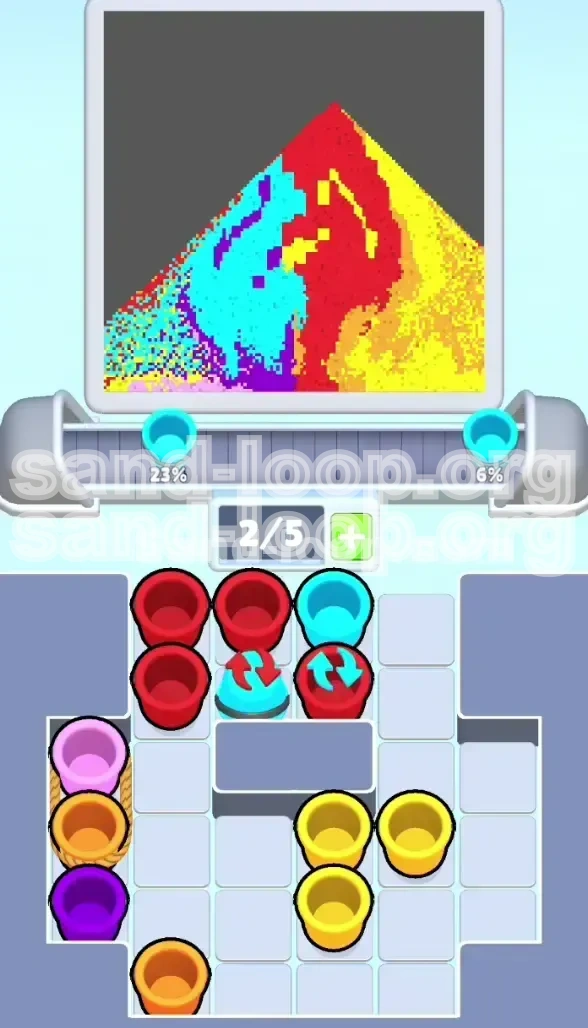
By now, you should have poured the primary colors and revealed the secondary colors. You should have two distinct piles of sand on the canvas: a Cyan/Purple mix on the left and a Red/Yellow mix on the right. The piles should be roughly equal in height. If one side is significantly higher than the other, you risk spilling sand over the "divide" line in the center. Use this step to balance the piles. Pour smaller amounts to build up the lower side. This balancing act is critical for the later stages when you have to pour large amounts of background colors all at once.
Step 6: Assessing the Rope Blockers
Look at the far left and right edges of the supply tray. You will see cups "holding" the ropes. Usually, these are standard color cups blocking the Roped Columns from dropping down. Your objective in the final steps of the Opening Phase is to clear these blockers. Identify exactly which cups are preventing the ropes from falling. It might be a stray Green or Blue cup that you don't really need for the main art. Prioritize tapping these blockers and pouring their sand into safe, overflow areas (like the deep corners of the background) just to get them off the tray. You need those ropes to drop to finish the level.
Color Order and Processing Strategy
The Priority Hierarchy
Not all colors are created equal in Level 339. To avoid getting stuck, you must follow a strict processing hierarchy: Face Colors > Background Colors > Detail Colors. Face Colors (Red/Cyan) must be processed first because they cover the largest area and define the success or failure of the level. Background Colors (Purple/Yellow) come second; they fill the voids but are useless if the faces aren't there to anchor them. Detail Colors (Pink/Orange) are processed last. If you process a Detail Color before a Face Color, you waste the Detail Color on an area that might just get covered by a Face Color later.
Left Side: Cyan -> Purple -> Pink
The Left Side of the canvas follows a cool-tone progression. Start with Cyan. This fills the Moon face. It is the dominant feature. Once the Moon face is roughly 90% full, switch to Purple. The Purple sand is heavier and darker; pour it around the Cyan to create the night sky background. Finally, once the Purple and Cyan have established the boundaries, use the Pink sand. Pink is for the stars. If you pour Pink too early, the subsequent Purple or Cyan pours will bury the stars, making them invisible. Wait until the very end to "dot" the landscape with Pink stars.
Right Side: Red -> Yellow -> Orange
The Right Side follows a warm-tone progression. Begin with Red for the Sun face. Similar to the left, get this to about 90% completion before moving on. Next, process the Yellow cups. Yellow acts as the sunlight aura. Pour it carefully around the Red Sun face. Be careful not to let Yellow spill onto the left side. Finally, use the Orange cups. Orange is used for the Sun's facial features—rays, cheeks, or mouth. These are small areas. If you pour Orange when the background is empty, it will spread too thin and disappear. Pour Orange only when the Yellow background is already present to contain it.
Handling the "Cross-Over" Risk
The most dangerous moment for color order is the transition from Faces to Backgrounds. When you switch from pouring Red (Face) to pouring Yellow (Background), you risk cross-contamination. The strategy here is to use the "Clean Pour" technique. Before pouring the Background color, ensure the cup is directly over the correct side of the divide. Do not start the pour while hovering over the center line. Move the cup all the way to the far right or far left before starting the flow. This minimizes the risk of sand drifting across the center divide.
Dealing with Converter Interference
Sometimes, the supply tray will force a Converter Cup into your flow (e.g., a Blue cup with Red arrows appearing when you need Cyan). If the converter aligns with your needs (Blue->Red when you need Red), use it. If it conflicts (Blue->Red when you need Cyan), do not panic. Do not tap the converter. Instead, look deeper into the tray. Is there a pure cup you can reach? If not, you may need to temporarily use the converter to "dump" the wrong color sand into an overflow area just to clear the cup from the tray. It is better to waste a little sand than to have a blocker jamming the machine.
The Final 10% Adjustment
The last 10% of the color order is about filling gaps. You might have a mostly full Red face with one missing pixel. You might have a stray Yellow cup left. The order here is "Fill the biggest hole first." If you have a large gap in the Purple background, don't use a tiny Pink cup to try and fill it. Use the big Purple cup. Save the tiny Pink or Orange cups for the final, tiny detail adjustments. This logic ensures you maximize the utility of every cup.
Advanced Tips and Common Mistakes
Common Mistake: The "Rope Release" Timing
The single most common mistake in Level 339 is releasing the side ropes too early. The Left Rope holds Pink/Orange, and the Right Rope holds Yellow/Purple. Players often see these and tap them immediately to clear the tray. Do not do this. If you release the ropes while the main faces are still filling, the new sand will hit the current piles and roll uncontrollably. It will roll right across the center line, contaminating the other side. Wait until the main faces are completely finished and the background is started. You need a "wall" of background sand to keep the rope sand contained.
Key Tip: The "Gap" Strategy for Mystery Boxes
Mystery Boxes are wildcards, but you can control them. Never tap a Mystery Box if your conveyor belt is full (6/7 slots). If you do, the revealed cup (e.g., a crucial Pink) might get pushed immediately onto the "Out" pile or buried behind a cup you don't need. Always create a 2-slot gap on the belt before tapping a "?". This gives you control over the revealed cup, allowing you to place it exactly where you want it in the pouring queue.
Common Mistake: Ignoring the Arrows on Converters
In the heat of the moment, it is easy to see a Blue cup and think "Oh, I need Blue/Cyan!" and tap it. But in Level 339, that Blue cup might have Red arrows. If you pour that, you turn your precious Cyan sand into Red sand. If you are working on the Moon side (Left), this is a disaster. You have just wasted a Cyan cup to create Red sand you don't need. Always double-check the arrows before tapping any cup in Row 2. Treat every cup with arrows as a potential hazard until you have verified its direction matches your current need.
Key Tip: Overflow Management
You will have overflow. Sand will pile up higher than you want. The key to managing this is "intentional spilling." If you have a small amount of wrong-color sand (e.g., leftover Red when the Sun is full), pour it into the deepest corner of the correct side's background. Do not pour it in the center. By pouring into the deep corners, you isolate the overflow from the main work area. This keeps the center "clean" for the detailed work required later in the level.
Common Mistake: Mixing Detail Colors
As you reach the end of the level, the canvas is a tapestry of colors. A common error is trying to finish the Pink stars on the Moon while you are still pouring Purple background. The Purple will inevitably cover the Pink. The rule is: Detail colors are never poured while Background colors are active. Finish all Background pouring first. Once the Background is 100% done, then, and only then, do you switch to Pink and Orange to do the final detailing.
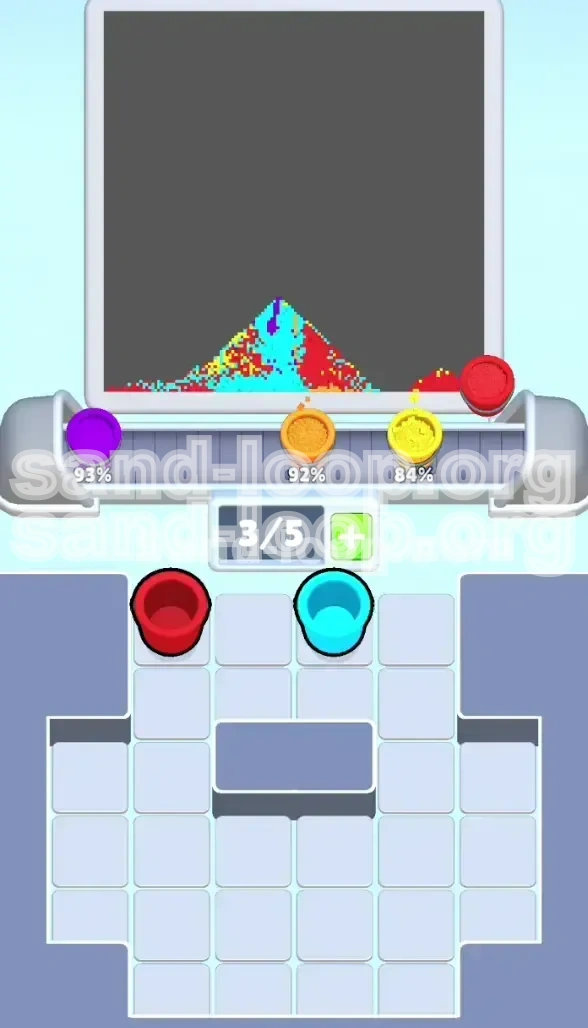
Key Tip: The "1% Check"
Before you tap that final cup to clear the tray, zoom in (pinch and drag) on the canvas. Check the 1% areas. Look for unfilled pixels in the corners of the Sun's mouth or the edge of the Moon's crater. It is heartbreaking to clear the supply tray only to realize one tiny pixel of Orange is missing, and you have no Orange cups left because you poured the last one into a general overflow pile. Always assume you have just enough sand, and verify the canvas is truly complete before celebrating.
Solutions for When You Are Stuck
Problem: Supply Tray Gridlock
Symptom: You cannot tap any new cups because the conveyor belt is full of colors you don't need right now (e.g., you have Purple and Yellow on the belt, but the faces need Red).
Solution: You must "waste" to gain space. Look at the full cups on your belt. Pick the one that is least useful (e.g., a Background color when the Faces aren't done). Pour that cup into a safe, deep corner overflow area just to get it off the belt. This frees up a slot, allowing a new cup (hopefully a Face color) to enter the tray. It is better to waste 10% of a Background cup than to be stuck completely.
Problem: Roped Columns Won't Drop
Symptom: The Left or Right rope columns are stuck in the air, and you can't tap them.
Solution: Look directly under the ropes in the supply tray. There is almost certainly a cup blocking them from falling. This blocker is usually a cup you have been ignoring because it's the wrong color. You must tap that blocker cup. Even if it's the wrong color, you have to deal with it to get to the rope. Tap the blocker, pour it into overflow (using the strategy above), and then the rope will drop into reach.
Problem: Cross-Contamination of the Canvas
Symptom: You accidentally poured Purple onto the Sun (Right side), or Red onto the Moon (Left side).
Solution: Do not restart immediately if it's a small amount. You can sometimes "fix" minor spills. If you spilled Purple on the Sun, pour Yellow on top of it. If the volume is small, the Yellow might hide the Purple. However, if the spill is massive (half a cup), the level is likely failed. In that case, hit Restart immediately to save time. Trying to dig out sand in this game is impossible; you can only cover it up.
Problem: Running Out of a Specific Color
Symptom: The Moon face is 95% full, but you have zero Cyan cups left in the tray or on the belt.
Solution: Check the Converter cups again. Is there a Blue cup with Red arrows? If so, and if you have some Red sand left (even if you don't need it), you can pour the Red sand into the Converter to make Cyan. This is the "Emergency Conversion" maneuver. It is resource-intensive, but it can save a run. Alternatively, check if you missed a Mystery Box or a Roped cup that might contain the color you need.
Problem: Sand Piling Too High in the Center
Symptom: The sand in the middle of the canvas is touching the dividing line, risking a spill-over to the other side.
Solution: Stop pouring in the center. Move your pouring point to the far left or far right edges of the current pile. By pouring on the *edges*, you encourage the pile to spread outwards rather than upwards. Use a "zig-zag" pouring motion to flatten the peak. If the pile is already too high, you may need to pause and wait for the sand to settle slightly (physics) before pouring more, or use a wider pouring motion to distribute the sand.
Problem: Mystery Box Gives Useless Color
Symptom: You tap a Mystery Box hoping for Purple, and it gives you Green (which isn't needed for this level).
Solution: This is a variance in level design. Treat the Green cup as a "Trash Blocker." Your immediate goal is just to get it off the tray. Pour the Green sand into the farthest corner of either side—it doesn't matter which one since it's not part of the palette. Once it's poured, it's gone. Do not let a useless cup sit on the belt; it is taking up valuable real estate for colors you actually need.
Speed Run and Shortcuts Guide
Efficiency Tapping: The Two-Finger Method
For experienced players looking to optimize time, the "Two-Finger Method" is essential. While pouring a cup with one hand (controlling the flow), use your other thumb to pre-tap the next cup in the tray. As soon as the current cup is empty and on the belt, the next cup is already in your hand. This eliminates the 0.5-1 second delay between pours. Over a 5-minute level, this saves significant time. However, only do this if you are 100% sure of the color order; a mistimed tap can be fatal.
The "Skip Converter" Strategy
Many players waste time trying to utilize the Converter cups in Row 2. If you are speed running, the fastest strategy is often to ignore the converters entirely if possible. Use only the pure cups from the top and bottom rows. If you have a surplus of pure Red and Cyan, you don't need the converters. Using a converter adds a step (mental check) and a risk (wrong color). If you can beat the level using only 80% of the available pure cups, let the converters expire or pass through the belt without using them. This is a high-risk, high-reward strategy for advanced players.
Batching Small Details
Instead of switching between pouring a tiny bit of Pink, then a tiny bit of Orange, then a tiny bit of Purple, try to "batch" your pours. Wait until you have 3-4 small detail cups ready on the belt. Then, do a "Detailing Pass." Pour all the small cups in quick succession, one after another, focusing on the tiny areas. This keeps your momentum flowing and prevents you from constantly changing your mental context between "Big Pour" and "Small Pour."
Optimizing Rope Release Timing
The speed run shortcut for the ropes is to release them exactly when the background colors hit the 50% mark. You don't need to wait for the background to be 100% full. As soon as you have a decent bed of Purple and Yellow sand (roughly halfway up the background area), release the ropes. The incoming sand from the ropes will top off the background and fill the details simultaneously. This shaves off minutes of gameplay compared to the cautious method of filling the background 100% first.
Pre-Planning the Pour Path
While a cup is filling up (the few seconds after you tap it but before it pours), scan the canvas. Decide exactly where that sand is going. Don't wait until the cup is in your hand to look. The moment the cup activates, move it to the target zone. This "pre-aiming" ensures that the sand starts flowing exactly where you want it immediately, minimizing the amount of "wandering sand" that spills into the wrong areas during the first second of the pour.
Using Gravity to Your Advantage
When pouring the large background fields (Yellow and Purple), don't just hold the cup in one spot. Use a "Tilting" motion. Start pouring at the top of the background area and slowly drag the cup down towards the bottom edge. Gravity will help pull the sand down the slope, filling the background faster and more evenly than a static pour. This technique also helps to flatten the pile, preventing the dangerous "high peak" scenario that leads to cross-contamination.