
Level 359
HARDHow to solve Sand Loop level 359? Get instant solution for Sand Loop 359 with our step by step solution & video walkthrough. Sand Loop 359 tips and guide.
Play Sand Loop Now
Experience the puzzle challenge firsthand
Game Screenshots
Sand Loop Level Guides
Sand Loop Level 359: The Sunset Pagoda Master Walkthrough
Introduction: A Logic Puzzle in Disguise
Welcome to Level 359, officially known as "The Sunset Pagoda Challenge." While the visual presentation suggests a relaxing, zen-like landscape featuring a pixelated sunset and serene mountains, do not be deceived. This level is a rigorous test of inventory management and logical layering. Unlike previous speed-based stages, Level 359 demands a "slow-and-steady" approach where precision trumps speed. The primary conflict in this level is the tension between the physical game board (which pushes certain colors forward via Ropes) and the logical painting order (which requires painting background layers before foreground details). Mastering this balance is the key to clearing the stage without getting stuck.
Visual Analysis and Board Layout
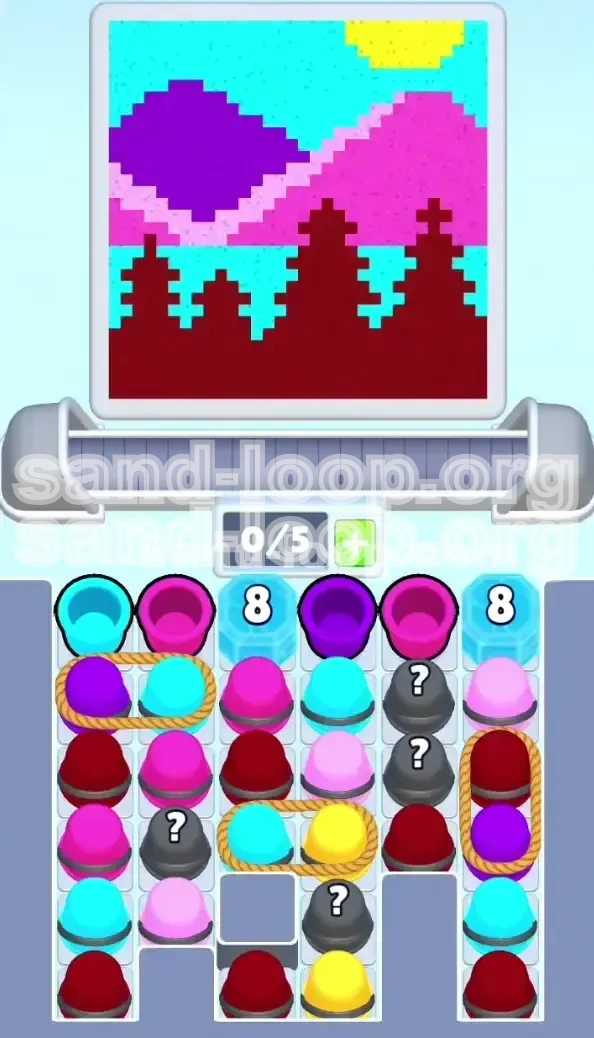
The canvas depicts a layered landscape that requires specific ordering. The background layer consists of a Cyan sky and a bright Yellow sun. The middle layer features rolling Purple and Magenta mountains. The foreground is dominated by sharp, jagged Dark Red pagoda trees. Because the Dark Red trees are visually "on top" of the mountains, the game engine prioritizes them, meaning if you pour Red too early, it will cover the mountains you haven't painted yet, forcing you to waste paint re-doing the background. You must complete the sky and mountains (60-70% of the board) before you even think about touching the Dark Red foreground.
The Inventory Constraint
Your biggest enemy here is not the timer, but your inventory limit. You have a 5-slot capacity on your conveyor belt. This level is choked with "Rope Pairs"—cups tied together that count as two items but take up one physical space on the board until clicked. If you pick up a rope pair when you only have 1 slot open, your belt instantly fills to 100%, creating a deadlock. You must maintain a strict policy of never picking up a rope pair unless you have at least 2 empty slots available.
Primary Objectives for Success
To achieve a three-star rating and clear this level, you must adhere to three main goals. First, Preserve Inventory Space: Always keep 2 slots free for rope pairs; never let your belt fill up completely. Second, Follow the Layering Logic: Complete the Sky (Cyan) and Sun (Yellow) first, followed by the Mountains (Purple/Pink), and finish with the Trees (Dark Red). Third, Mitigate RNG Risks: Manage the Grey Mystery Cups effectively to prevent them from clogging your belt with useless colors. If you can maintain this flow, the level will resolve itself naturally.
Step-by-Step Walkthrough: The Opening Phase
Step 1: The Initial Clear
As the level begins, do not frantically tap everything in sight. Analyze the top row. You will see a cluster of Ice Blocks in the upper corners and a mix of Magenta and Purple cups in the top center. Your very first move is to tap the loose Magenta and Purple cups located in the top-center row. Do not touch the ropes yet. By clearing these loose cups, you free up the columns beneath the Ice Blocks, allowing gravity to pull new cups down. This creates the initial "breathing room" necessary for the conveyor belt to function.
Step 2: Managing the First Rope Pair
After clearing the initial loose cups, you should have 2 empty slots on your belt. Look immediately to the left side of the board. You will see a Purple/Cyan Horizontal Rope Pair. This is your mandatory next move. Click this rope pair now. Why? Because you need Cyan for the sky, and Purple is needed for the left mountain. Since you strategically cleared space in Step 1, your belt can handle this 2-cup addition. Pour the Cyan into the sky and the Purple into the left mountain range. This dual-action fills two different zones efficiently.
Step 3: The Sky and Sun Foundation
With the first rope cleared, your immediate focus shifts to the center of the board. You need to secure the Yellow cups for the sun. However, they are often buried. Look for the Cyan/Yellow Rope Pair in the center columns. Before you grab it, ensure you have poured enough of the current cups to free up 2 slots. Once space is available, grab the Cyan/Yellow rope. Pour the Yellow immediately to finish the Sun (this is a small zone, so it completes quickly). Use the Cyan to continue expanding the sky. If the Sky zone is full, hold onto Cyan or use it to clear adjacent cups, but do not waste it.
Step 4: Ice Block Elimination Strategy
At this point, you will notice the 8 Ice Blocks in the top corners are stubborn. These blocks act as walls, preventing you from accessing cups trapped in the corners. Do not waste moves trying to match colors next to them aimlessly. Instead, focus on clearing the columns directly *underneath* the Ice Blocks. Every time you clear a cup from the bottom rows, the stack shifts down. By clearing the vertical columns beneath the ice, you force the Ice Blocks to shift into the "kill zone" where they can be matched or blasted naturally. Patience is required here; let gravity do the work.
Step 5: Mystery Cup Protocol
During the first 15 moves, you will encounter Grey Cups with Question Marks. In Level 359, these are high-risk traps. If you tap a Mystery Cup and it turns into a color you have already completed (like Cyan if your sky is done), it becomes "trash" that clogs your belt until the very end of the level. The rule for this phase is simple: Ignore Mystery Cups unless you have an open slot and no other valid moves. Prioritize known quantities (Magenta, Purple) over the unknown.
Strategic Color Order: The Layering Logic
Phase 1: The Background (Cyan and Yellow)
The first 40% of your gameplay should be dedicated almost exclusively to Cyan and Yellow. The Cyan Sky is the largest zone on the canvas, requiring the highest volume of paint. You must prioritize Cyan whenever it appears on the belt, even if it means temporarily holding other colors. The Yellow Sun is a medium-sized zone but is usually blocked by Ice. Treat Yellow as a secondary priority to Cyan, but always pour it before you start on the mountains. If you paint the mountains before the sky is finished, you will have to go back, wasting valuable time and moves.
Phase 2: The Midground (Purple and Magenta)
Once the Sky is roughly 80% full, shift your focus to the Purple and Magenta cups. These colors fill the rolling mountains. The strategy here is to alternate between Purple and Magenta to prevent your belt from becoming stagnant. Since these colors are often tied together in ropes or found in the same clusters, clearing one often reveals the other. Avoid the temptation to start on the Red trees at this stage, even if Red cups become available. If you pour Red now, it will layer over the empty mountain spaces, forcing you to repaint those mountains later.
Phase 3: The Foreground (Dark Red)
The Dark Red color is the "boss" of this level. It represents the foreground trees and covers the bottom of the screen. You should actively avoid picking up Dark Red cups until the Sky and Mountain meters are at 90% completion. This requires immense discipline. If a Red/Purple rope appears, cut the Purple side (if possible) or ignore the rope entirely until you are ready. Once you do start pouring Red, it usually fills rapidly because the tree shapes are intricate but cover a smaller surface area than the sky.
The "Rope Trap" Logic
Understanding the specific rope configuration in Level 359 is vital. There is a dangerous Vertical Red/Purple Rope on the right side. This is a trap. If you click this too early, you will have a Red cup clogging your belt while you are still trying to find Blue for the sky. You will be forced to either waste the Red (pour it where it doesn't belong) or lose the game. Wait until the Purple mountain on the right is finished, and the Sky is done, before you cut this specific rope. Treat it as a "finishing move" rather than an opening move.
Belt Management During Transitions
Transitioning between phases (Sky to Mountains to Trees) is where most players fail. As you switch from collecting Cyan to collecting Purple, you may have residual Cyan cups on your belt. You must clear these before filling your belt with the new color. A common strategy is the "Trash Slot" method: keep one slot on your belt completely empty (or filled with a color you are willing to waste) to act as a buffer for unexpected Rope drops or Mystery Cup results. This buffer prevents the soft-locks that occur when your belt is 100% full.
Key Tips and Notes for Victory
The 2-Slot Rule is Absolute
This is the single most important tip for Level 359. Repeat this like a mantra: Never grab a rope with less than 2 empty slots. The game generates cups constantly. If you have 4 items on a 5-slot belt and you grab a rope, you are at 6/5 capacity. This causes a traffic jam that stops new cups from entering the belt. Once a jam starts, it is very difficult to recover because you can't make matches to clear space. Always count your slots before clicking a tied pair.
Gravity is Your Best Tool
Do not fixate solely on the cups at the very front of the belt. Look at the entire board structure. If a column is stuck, look for the cup blocking the bottom of that column. Clearing the bottom cup causes everything above it to fall, often creating new match opportunities automatically. This is especially true for the corners where the Ice Blocks reside. Instead of trying to break the ice directly, clear the trash cups underneath it, and the ice will eventually fall into a position where it can be destroyed.
Mystery Cup Probability
While the outcome of Mystery Cups is technically RNG (Random Number Generator), they tend to skew towards colors you currently have the most of on your belt. If your belt is full of Cyan, the Mystery Cup will likely turn into Cyan. If you are desperate for a specific color (e.g., you need Yellow to finish the sun), a Mystery Cup is a bad gamble because the probability of it giving you the specific rare color you need is low. Only rely on Mystery Cups for "filler" when you are doing well, not as a rescue mechanism when you are stuck.
Don't Force the Foreground
It is psychologically tempting to work from the bottom up, but the game punishes you for it. If you start filling the Red trees at the bottom while the top of the canvas is blank, the game logic prioritizes the bottom layer. You will find yourself in a situation where you are pouring Cyan onto the canvas, but it's not registering progress because it's "behind" the Red trees. Always ensure the background is solid before moving to the foreground.
Prioritize "Loose" Cups Over "Roped" Cups
Whenever possible, clear single, loose cups before cutting ropes. A single cup only takes 1 slot and clears 1 slot (net 0). A rope takes 2 slots and clears 2 slots (net 0), but it requires more setup. By clearing loose cups first, you maintain a higher average of free slots on your belt, giving you more flexibility to react to new spawns. Only grab ropes when the board layout forces you to or when you have a perfect 2-slot opening.
Common Mistakes to Avoid
The Early Bird Error
The most common failure in Level 359 is clicking the Red/Purple rope on the right within the first 10 moves. Players see Purple, which they need, and click without checking the Red. This floods their belt with Red, a color they cannot use for another 50 moves. This single mistake effectively reduces your play capacity from 5 slots to 4, leaving you no room for error. Resist the urge to clear that right-side rope until the endgame.
The Sky-Hole Mistake
Players often finish 90% of the sky but leave a small hole or gap, thinking they will come back to it. They then switch to painting the foreground trees. Later, when they try to fix the sky gap, the paint logic malfunctions because the "layer" is now obstructed by the tree layer. Ensure your background (Cyan/Magenta/Yellow) is 100% visually contiguous before you apply the first drop of Dark Red. It is better to over-paint the background slightly than to leave gaps.
Inventory Hoarding
Some players try to "save" good colors for later. For example, they see a Yellow cup but don't pour it because they want to save it for a "combo." In Sand Loop, hoarding is fatal. If you hold a cup, you lose a slot. If you hold 3 cups waiting for a perfect moment, you only have 2 slots left to play with. Always pour immediately if the target zone is available. The only exception is holding a cup for 2-3 seconds to align with a match-3 opportunity, but never hoard indefinitely.
Ignoring the Ice Blocks
It is easy to focus on the center of the board and ignore the top corners where the Ice Blocks are. However, those Ice Blocks are often hiding crucial Purple or Magenta cups needed to complete the level. If you ignore the top corners until the very end, you may find yourself with no moves left except for a locked column. Make sure to chip away at the ice columns throughout the level, not just at the end.
Panic Tapping
When the board starts to fill up and the belts get tight, the instinct is to tap faster. This is the opposite of what you should do. Speed leads to accidental rope clicks and inventory overflow. If you feel stuck, stop tapping for 3 seconds. Look at the board. Identify the one cup that is blocking the flow (usually a cup right in front of the dispenser) and clear it. Reset your rhythm.
What to Do If You Get Stuck
The "Dead Belt" Scenario
If your belt is full (5/5 items) and the next cup in the dispenser is a Rope Pair (requiring 2 slots), you are in a "Dead Belt" scenario. You cannot click the dispenser. To get out, you must pour a cup immediately. Look for a color on your belt that matches a large zone (like Cyan or Magenta). Pour it to free up 1 slot. Now you are at 4/5 items. You still cannot click the rope. You must pour another cup. If no cups match perfectly, look for a partial match or a zone that is close to full. If absolutely necessary, pour a cup into a zone that is already finished to "trash" it and free up the slot.
Dealing with Unwanted Mystery Cups
If a Mystery Cup turns into a color you don't need (e.g., it gives you Red when you are working on the Sky), it becomes a permanent obstacle on your belt. You cannot get rid of it except by pouring it. If you are stuck with an unwanted Red cup, you have two choices: 1. Wait until the end (risky, as it clogs the belt). 2. Pour it into the Cyan Sky to "waste" it. Pouring Red into the Sky will paint over the blue, which is bad, but if you are stuck, it is better to waste a little bit of Sky paint (which you can easily fix later) than to be stuck with a full belt. Pour the unwanted color, fix the damage later, and keep the flow moving.
The Column Rescue
Sometimes a specific column becomes frozen because you can't make a match. The cups are just stacking up. To rescue a column, look at the cup at the very bottom of that stack. Identify its color. Find that same color elsewhere on the board where it is easier to clear. By clearing that color elsewhere, you might trigger a combo or a shift that drops the column. Alternatively, if you have a bomb or a special power-up (if available in your version), use it on the bottom cup of the stuck column.
Resetting the RNG
If you are truly stuck and there are no moves available, the game's algorithm might need a moment to catch up. Stop interacting with the board for 5-10 seconds. Watch the animations finish. Sometimes, the "next cup" preview is slow to update. Giving the game a moment to breathe can reveal a move that wasn't obvious a second ago. If no moves appear after a wait, you may be forced to use a reshuffle power-up (if you have one) or restart the level.
Utilizing the "Last Ditch" Effort
If you are near the end (80% clear) but stuck with a belt full of mismatched colors, ignore strategy and just pour. Pour colors into zones that are "close enough." Pour Purple into the Pink mountains if you have to. It's better to have a messy canvas that is 90% complete than to fail because you were waiting for the perfect Purple cup. The game is often forgiving with near-matches in the final 10%, allowing you to scrape by with a 1-star victory where you would otherwise get a Game Over.
Speed Run Tips and Shortcuts
The "Speed Clear" Path
For experienced players looking to optimize time, the standard advice of "save Red for last" can be bent slightly. You can carry a single Red cup on your belt for a long time if you are disciplined. If you have 3 open slots and see a loose Red cup, you can pick it up and sit on it. This saves you from having to hunt for Red later. However, do not pick up a Red Rope pair early. Only loose Red cups. This allows you to segue instantly from Mountains to Trees without waiting for the dispenser to cycle.
Pre-Loading Colors
Look at the "Next Cup" preview window. If you see a difficult Rope Pair coming up (like the Red/Purple one), start clearing your belt before it even arrives. If you know the dispenser is about to drop a 2-cup rope, ensure you pour enough current cups to have 2 empty slots ready the moment the rope appears. This "anticipatory clearing" saves seconds per move and significantly increases your overall speed.
Combo Utilization
While this is a logic level, match-4s and match-5s are still possible. Try to arrange cups on the belt to set up these combos. For example, if you have two Magentas on the belt and see two Magentas in the tray, try to align them. A match-5 creates a "Super Paint" blast that can instantly finish a zone or clear a problematic Ice Block. Focusing on these big matches early can save you from the slow grind of chipping away at the Ice Blocks in the late game.
The "Fast Finger" Technique
The game's animation for pouring takes about 1 second. You can cut this time short. As soon as you see the paint hitting the canvas and the percentage meter ticking up, you can tap the next cup on the belt. You do not need to wait for the character to fully return to the neutral position. Chaining your inputs in this "rapid-fire" manner can shave 15-20% off your total completion time. Be careful not to out-tap your logic, though!
Zone Skipping
Advanced players know that you don't need to fill a zone to 100% to be "safe." You can leave the Cyan Sky at 95% and move on to Purple if you see a massive opportunity to clear Purple cups. As long as the zone is visually "dominated" by the correct color, the game will usually accept the level completion. Leaving zones at 95% allows you to keep the belt moving faster, preventing the bottlenecks that occur when you are hunting for that last 1% of a specific color.