
Level 361
HARDHow to solve Sand Loop level 361? Get instant solution for Sand Loop 361 with our step by step solution & video walkthrough. Sand Loop 361 tips and guide.
Play Sand Loop Now
Experience the puzzle challenge firsthand
Game Screenshots
Sand Loop Level Guides
Level Overview: The Mount Fuji Challenge
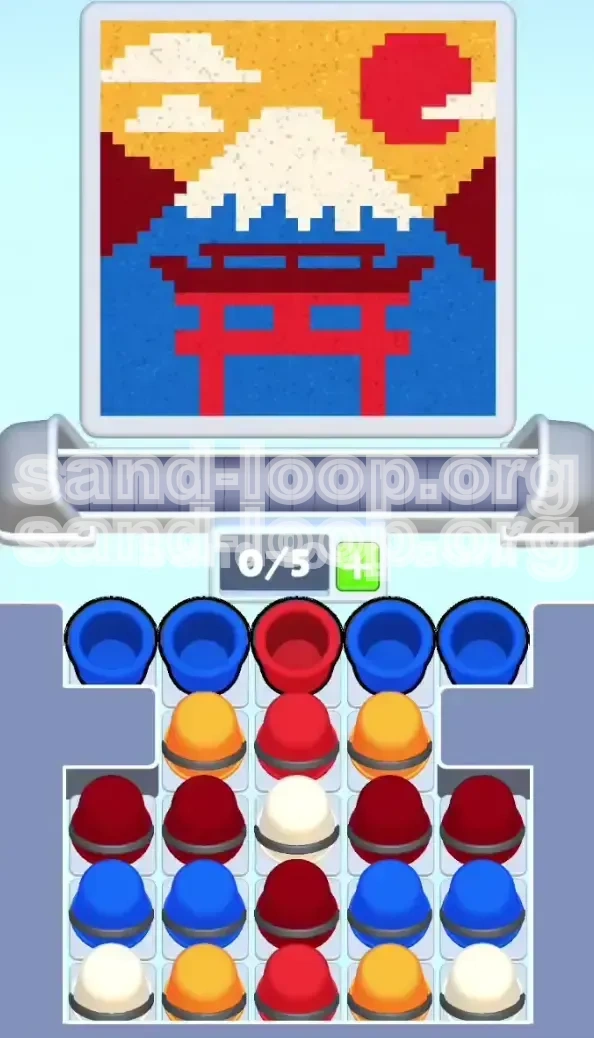
Welcome to Level 361, a stage that stands out as a pure test of logic and tray management rather than reflex. Unlike the frantic ice-smashing levels of Sand Loop, this stage presents you with a serene, pixel-art recreation of Mount Fuji. The visual composition is stunning, featuring a traditional Red Torii Gate in the immediate foreground, a massive snow-capped mountain, and a rising sun against a yellow sky.
However, do not let the scenery fool you. This is arguably one of the most complex digging challenges you will face in the game. The cups required to build the intricate center of the image—the Torii Gate and the mountain peak—are buried deep beneath a massive layer of common colors. You start with a tray that is 80% clogged with Blue water cups. Your primary challenge is not finding the colors, but stripping away these top layers without causing a logjam in your limited 5-slot processing tray.
The difficulty here lies in the "Central Column Lock." The most critical colors (Red and White) are stacked vertically in the center of the incoming queue. You cannot reach the White snow until you have completely exhausted the Red cups above it. This creates a strict dependency tree that dictates every move you make. One wrong tap—such as filling the sky Yellow too early—can block the Red flow, leaving you with an unfinished mountain peak and a broken run.
The "Tray Lock" Mechanic
The most defining feature of this level is the severe restriction on tray space. With only 5 slots available and an initial spawn rate heavily skewed toward Blue water, you will encounter a "Tray Lock" situation within the first 10 seconds if you are not decisive. The game spawns Blue cups in the outer slots (1 and 5) and the critical Red/White cups in the center slots (2, 3, and 4). If you prioritize the outer Blue cups without immediately planning for the center, the outer slots will refill, burying the center stack and making the Red cups inaccessible.
Visual Composition Analysis
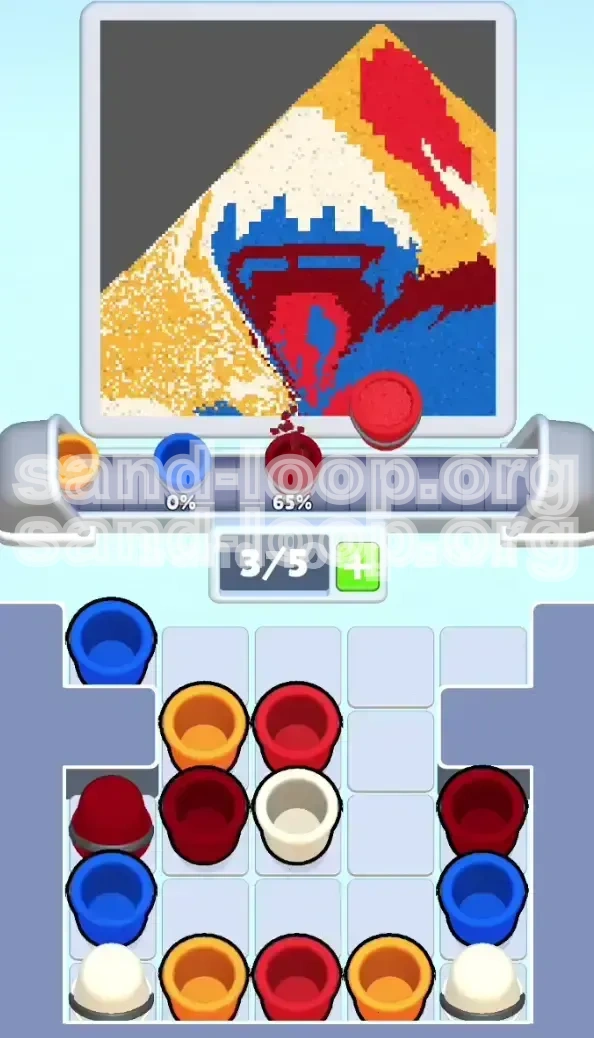
The target image is divided into three distinct horizontal zones, each requiring a specific color strategy. The bottom 20% is the Lake, requiring a solid block of Blue. The middle 50% is the Fuji and Gate scene, requiring a complex mix of Red, White, and Dark Red. The top 30% is the Sky, requiring Yellow. The challenge is that the game feeds you these colors in a chaotic order (mostly Blue first), forcing you to memorize the location of the center-stack colors to avoid running out of space.
The "Color Inversion" Risk
A unique failure state in this level is "Color Inversion." Because the mountain (Dark Red/White) sits in the middle of the canvas, and the sky (Yellow) sits behind it, pouring the Yellow sand before the mountain is fully formed creates a visual error. The Yellow pixels will fill the negative space where the mountain shadow should be. Once the mountain sand is poured on top, it blends with the Yellow, turning the pristine snow into a muddy greenish-brown. You must strictly follow the Bottom-Up pouring order to maintain color separation.
The "Single Point of Failure" White Cup
In many levels, if you miss one cup, you can recover. In Level 361, the single White cup located in Row 3 is a "Single Point of Failure." This cup is the sole source of sand for the snow cap. If this cup gets pushed off the screen because the tray was full, or if you accidentally tap it onto a full belt causing it to spill, the level becomes mathematically impossible to complete. Protecting this cup's path to the belt is your primary defensive objective.
Dynamic Queue Physics
Understanding the slide physics is crucial. When you tap a cup in slot 1 or 5 (the edges), the remaining cups do not slide immediately. However, tapping the center stack (slot 3) causes a rapid collapse of the row, pulling cups from slots 2 and 4 into the center. This means you can often "cheat" the system by tapping the center Red cup, which pulls a hidden White cup from Row 2 into the tap-able position faster than waiting for the natural row cycle. Mastering this "Center Pull" technique is the key to a sub-30-second clear time.
Clear Objectives for Completion
Objective 1: Drain the Blue Water Reservoir
Your first and most pressing goal is to clear the initial logjam of Blue cups. The water at the bottom of the canvas accounts for nearly 40% of the total image area. You must aggressively tap the Blue cups on the top row of the tray to get them onto the conveyor belt immediately. If you hesitate here, the tray will fill up, and new cups won't spawn, stalling your progress before you even reach the mountain.
Objective 2: Construct the Torii Gate Foundation
The Red Torii Gate sits directly on top of the water layer. This objective requires precision. You have a very limited number of Red cups available in the first two rows. You must use these specific cups to build the vertical pillars and the horizontal beams of the gate. Failing to prioritize these Red cups will result in a "broken gate" visual error, which usually means a level restart.
Objective 3: Unlock the Central White Core
Buried beneath the initial Red cups is the single most important resource for the mountain: the White cup. Your objective here is to "drill" down through the Red queue to expose this White cup. You cannot start filling the snow cap until this specific cup is tapped and sent to the belt. This is the bottleneck of the entire level.
Objective 4: Blend Dark Red Shadows with White Snow
Once the White is unlocked, you enter a dangerous phase where Dark Red (Burgundy) cups become available. The mountain requires a two-tone look. Your objective is to alternate between Dark Red and White cups. If you pour too much Dark Red, you lose the snowy aesthetic; if you pour White too late, the mountain looks flat. You must balance these inputs to create the 3D effect of the mountain face.
Objective 5: Fill the Atmospheric Sky
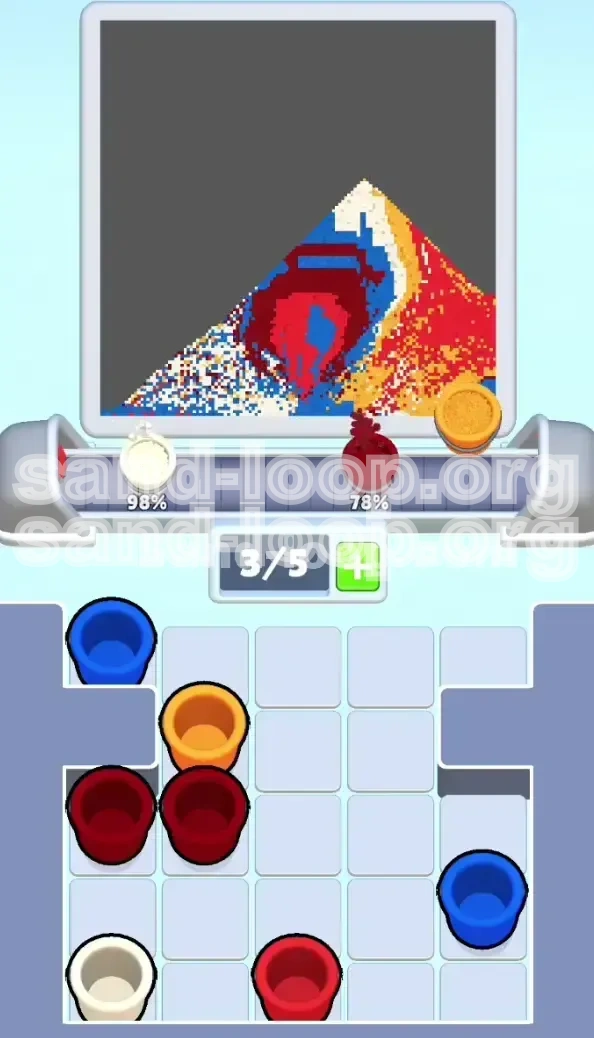
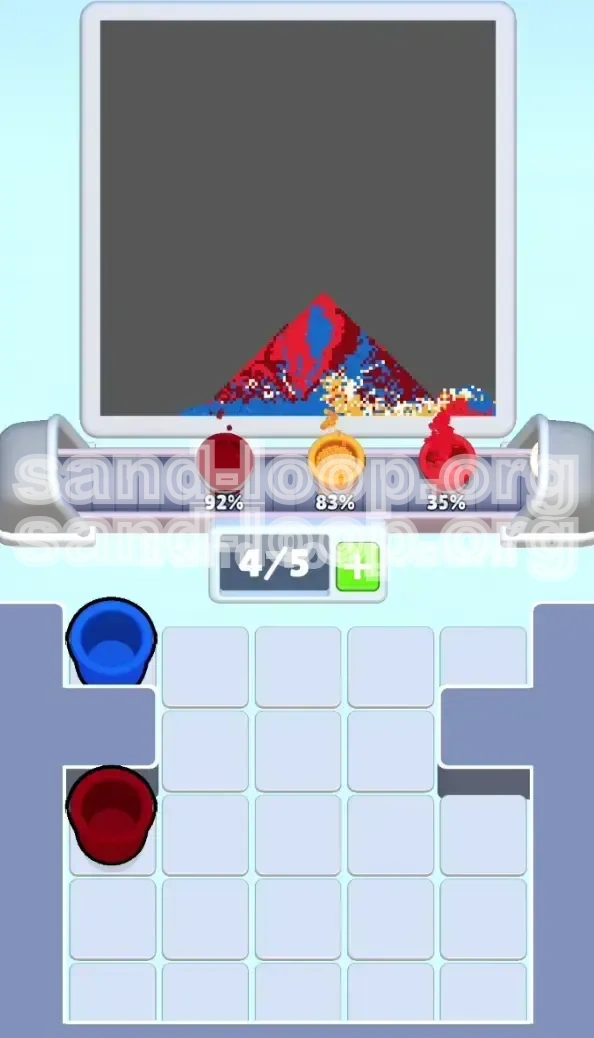
The Yellow sky and the rising Sun are your final tasks. These are "background" elements that should technically be filled last to avoid edge conflicts with the mountain. Your goal is to save enough Yellow cups to fill the upper 20% of the canvas without running out of space on your conveyor belt.
Color Order and Processing Logic
The Initial Blue Wall (Priority 1)
The level starts with a "Blue Wall." In the top row of your tray, you will see four Blue cups flanking a single Red cup. The Blue water is the foundation of the image. You must process the Blue cups first. Do not try to save them. The logic here is simple: the water is the bottom layer, so it must be poured first. Clearing these Blues also serves a mechanical purpose—it clears the tray width, allowing the next layer of cups to slide into position.
The Red Vertical Stack (Priority 2)
This is the most critical sequence in the level. The tray is designed so that Red cups are stacked in a vertical column (Row 1 Center, Row 2 Center). You must process these in order. Do not skip one to save for later. The game engine will not give you more Red cups until you clear these specific slots. Processing the Red stack first unlocks the "Next" row, which is where the complex mountain colors hide.
The Dark Red/White Alternation (Priority 3)
After the Red stack is cleared, you will see a mix of Dark Red and White cups. The correct order here is an alternating rhythm: Dark Red, White, Dark Red, White. Why? Because the mountain texture requires the sand to mix on the conveyor belt to create a gradient. If you pour all Dark Red first, it will settle on the belt, and the White will sit on top, potentially leading to a color inversion error when it hits the canvas. Alternation ensures the mountain paints correctly from the shadow up to the peak.
The Yellow Background Filler (Priority 4)
Yellow is the "safety color." It is abundant and easy to pour. However, it is Priority 4 for a reason. If you pour Yellow early, it creates a background layer behind the mountain. While this sounds correct, if the mountain isn't fully formed yet, the Yellow can bleed into the empty spaces, making it hard to see where you need to place the White snow. Always save Yellow for the final 20% of the level.
The "Shadow First" Rule
When dealing with the mountain colors (Priority 3), always prioritize the Dark Red shadow slightly before the White snow. The game's rendering engine paints from front to back. If you paint the snow (White) first, the shadow (Dark Red) will layer over it, darkening the snow. If you paint the shadow first, the snow layers on top, preserving its brightness. Therefore, in any 50/50 choice between Dark Red and White, tap the Dark Red first.
The Conveyor Belt Gradient
Your goal on the belt is to create a physical gradient of sand. You want the Blue at the front of the belt (hitting the canvas first), followed by the Red/Dark Red mix, with the Yellow sitting at the very back of the belt. If Yellow gets to the front of the belt, it hits the canvas first and ruins the background. You must manage your tapping speed so that the faster-poured Blues and Reds push the slower-poured Yellows backward on the belt.
Step-by-Step Walkthrough Instructions
Phase 1: Breaking the Dam (Steps 1-5)
As soon as the level loads, look at the top row of your tray. Ignore the center Red cup for a split second. Focus your eyes on the two Blue cups on the far left and the two Blue cups on the far right.
- Step 1: Rapidly tap the Far Left Blue cup. Send it to the belt.
- Step 2: Immediately tap the Far Right Blue cup.
- Step 3: Tap the remaining two Blue cups on the top edges.
- Step 4: Pause. Watch the water start to fill the bottom of the canvas.
- Step 5: Only now should you look at the Center Red Cup on the top row. Do not tap it yet. Let the water establish a base layer.
Phase 2: The Torii Gate Protocol (Steps 6-10)
With the Blue stream flowing, you now have space in the tray to handle the Red. The Torii gate is thin and intricate.
- Step 6: Tap the Center Red Cup (Row 1). This starts the gate posts.
- Step 7: As soon as it clears, a new row will slide in. Identify the Center Red Cup in the second row.
- Step 8: Tap this second Red cup immediately. Do not wait.
- Step 9: Watch the belt. The Red sand should be piling up, ready to build the gate details over the blue water.
- Step 10: AVOID the Yellow cups that appear on the flanks of the second row. Tapping them now is a death sentence for your tray management.
Phase 3: Unlocking the Mountain Core (Steps 11-15)
You have now burned through the top two rows. The tray shifts, revealing the third row. This is the "Lock Break" moment.
- Step 11: Identify the White Cup sitting in the exact center of the third row.
- Step 12: Notice the Dark Red (Burgundy) cups flanking it on either side.
- Step 13: Tap the Left Dark Red cup. This starts the mountain shadow.
- Step 14: Immediately tap the Center White cup. This is crucial—it begins the snow cap.
- Step 15: Tap the Right Dark Red cup. You are now sandwiching the White snow between shadow layers.
Phase 4: The Sky and Sunset (Steps 16-20)
The mountain is forming. The heavy lifting is done. Now you clean up the remaining colors.
- Step 16: Look for remaining White or Dark Red cups in the tray. Clear them.
- Step 17: Now, unleash the Yellow cups you have been ignoring. Tap them rapidly.
- Step 18: The Yellow sand will fill the sky, merging with the Red sun (which was auto-filled by the Red gate cups usually, or uses a specific Sun cup if present).
- Step 19: Monitor the conveyor belt. Ensure the colors are stacking correctly: Water at the bottom, Mountain in the middle, Sky on top.
- Step 20: Wait for the final pixels to settle. Level Complete.
Phase 5: Cleanup and Perfection (Steps 21-25)
Sometimes, despite following the steps, you might be left with 1-2% completion missing due to pixel gaps.
- Step 21: Check the corners of the canvas. Often, Blue water pools get stuck in the bottom corners.
- Step 22: If the tray has residual cups, tap them now to force a final pour.
- Step 23: If the tray is empty but the level isn't done, wait. The sand on the belt might still be processing.
- Step 24: Do not restart immediately if the bar is moving slowly. The physics engine takes a moment to settle fine details.
- Step 25: Celebrate your clear of the Mount Fuji stage!
Key Tips and Strategic Notes
Tray Management: The "Flow State"
In Level 361, your tray is your enemy. You only have 5 slots. If you fill all 5 with Blue and Yellow before you get to the Red, you lose. The key is to create a "Flow State" where you are tapping just as fast as the sand pours. Do not let the tray sit full. Always be tapping. The moment you see a color you need (Red/White), clear space for it immediately by dumping whatever is blocking it.
The "Rhythm Tap" Technique
This level requires rhythm, not just speed. When you are in Phase 3 (Mountain Core), you are alternating between Dark Red and White. If you tap randomly, you might dump two Dark Reds in a row. This clumps the shadow color on the belt. Instead, tap to a beat: Shadow, Snow, Shadow, Snow. This ensures the belt receives a layered mix that paints the mountain texture correctly.
Visualizing the "Hidden" Layers
Use your knowledge of the image to predict the cup order. You know the mountain has a shadow. Therefore, you know there must be Dark Red cups coming eventually. Don't panic when you don't see them immediately. They are buried under the "Red Gate" layer. Trust the queue. If you focus on the logic that "Gate Red" must come before "Mountain Red," you won't be surprised by the tray layout.
The 20% Rule
Keep the 20% Rule in mind: The bottom 20% (Water) and top 20% (Sky) are easy fills. The middle 60% (Gate, Mountain, Snow) is the hard part. Spend 80% of your mental energy focusing on the cups that affect the center of the canvas. Do not stress about spilling a little Blue water or getting a Yellow pixel in the wrong place early; the middle section is where runs go to die.
Handling the "Red Sun" Confusion
Sometimes players confuse the "Gate Red" with the "Sun Red." In this specific pixel art, the Torii Gate and the Sun often share the same color cup (Red). Don't look for a separate "Sun" cup. Usually, the Red you pour for the gate will also fill the Sun disc in the background, or the Sun is filled by the overflow of the Red layer. Focus on getting the Red out of the tray; the game's physics will sort out where it lands on the horizon.
Central Column Dominance
Train your eyes to ignore the edges. In this level, the edges (slots 1 and 5) are almost always filler (Blue or Yellow). The "gameplay" happens in slots 2, 3, and 4. By visually blurring the edges and focusing solely on the center column, you can react faster to the appearance of the critical White and Dark Red cups. This "Tunnel Vision" strategy prevents you from getting distracted by easy taps that don't help your progress.
Common Mistakes to Avoid
Mistake 1: The "Yellow Sky" Premature Pour
This is the #1 cause of failure. Players see the Yellow cups and think, "I'll clear the top of the tray to make room." Don't do it. If you fill the sky with Yellow before the mountain is formed, you run the risk of the mountain sand mixing with the sky sand, creating a muddy brown horizon line. Always force yourself to wait on Yellow until the mountain silhouette is distinctly visible on the canvas.
Mistake 2: Ignoring the Blue Flanks
Some players try to "save" the Blue cups on the far left and right, thinking they need to balance the tray. The tray physics in Sand Loop usually slide items to the center. Ignoring the flanks can cause the cups to stack up unevenly or prevent new rows from sliding in properly. Clear the flanks early to open the channel for the center column.
Mistake 3: Over-Filling the Conveyor Belt
The conveyor belt can only hold so much sand before it stops accepting new cups. If you tap Blue too fast, the belt fills up, and you can't tap the Red cup even if you want to. Watch the belt capacity! If it looks full (3/4), stop tapping for a split second to let the sand pour onto the canvas, then resume. This pause is better than a jammed tray.
Mistake 4: Breaking the Red Stack
There is a temptation to tap a flank color (like a Yellow that is easily accessible) while waiting for a Red cup to become "active" or aligned. This breaks your stack. In Sand Loop, maintaining a stack of a single color (like the double-Red in the center) is often more efficient than hopping around. Stick to the column. Clear the column. Then move on.
Mistake 5: Panic Tapping on White
When the White cup finally appears in Row 3, many players panic and tap it immediately, even if the belt is full of Blue. This results in the White sand mixing with the Blue water, turning it gray. Wait for the belt to clear the Blue water stream before introducing the White. Patience with the White cup is more important than speed.
Mistake 6: Misjudging the "Red" Amount
Players often stop tapping Red after the Torii Gate looks done. However, the Red is also needed for the sun and potentially the mountain shadow base. If you stop tapping Red too early, you might be left with a transparent sun. Keep tapping Red until the tray forces you to switch to Dark Red/White.
Stuck Solutions and Troubleshooting
Problem: The Mountain Peak Won't Fill
Symptom: You have poured everything, but the top of Mount Fuji remains empty (showing the background color).
Diagnosis: You likely missed the "Center White Cup" in Row 3. It got pushed to the side or buried.
Solution: Restart the level. This time, when you clear the first two Red cups, do not tap anything else. Look specifically at the center of the tray. That single White cup is your only ticket to the snow cap. Prioritize it above all else in Phase 3.
Problem: The Torii Gate is Missing Horizontal Bars
Symptom: The red pillars of the gate are there, but the horizontal beams are missing.
Diagnosis: This is a timing issue. You likely tapped the Red cups too slowly, causing the sand to pour in separate blobs rather than a continuous stream, or you tapped them too fast and skipped a cup.
Solution: The Torii Gate requires a continuous stream of Red. Ensure that the two Red cups in the first two rows are tapped in quick succession (1-2 tap). This creates a long "slug" of red sand on the belt, which ensures both the vertical and horizontal components of the gate are drawn.
Problem: Tray is Full of Useless Colors
Symptom: Your tray is full of Blue and Yellow, and the Red/Dark Red you need is buried behind them, inaccessible.
Diagnosis: You failed to manage the "Top Row Priority." You let the wrong colors stack up.
Solution: You have to restart. On the next run, adopt an aggressive "Top Row Clearing" mindset. Before a new row even slides in, the top row should be empty (or mostly empty). This prevents the "burying" effect where useful colors in Row 2 or 3 are blocked by useless colors in Row 1.
Problem: Colors are Mixing into Mud
Symptom: The image looks dirty, with brown or gray patches where there should be clean lines.
Diagnosis: You are pouring colors in the wrong order (e.g., Yellow before Mountain colors).
Solution: Strict adherence to the order: Blue (Base) -> Red (Structure) -> Dark Red/White (Detail) -> Yellow (Background). If you pour Yellow (Background) before Red (Structure), the Red lands on top of the Yellow, creating an orange mess.
Problem: The Sun is Not Round
Symptom: The sun appears oblong or distorted.
Diagnosis: You poured the Red Sun cups while the belt was moving, or mixed them with the Gate Red stream.
Solution: Pause briefly before tapping the final Red cups to let the belt stabilize. This allows the sand to pile up in a mound rather than a streak, creating a perfect circle.
Problem: Stuck at 98% Completion
Symptom: The image looks perfect, but the completion meter is stuck at 98%.
Diagnosis: You are missing the "Deep Blue" pockets at the very bottom edge of the canvas.
Solution: This is a common physics glitch in water levels. Sometimes you need to tilt your device or tap the canvas slightly to encourage the last few pixels to settle into the bottom corners. If that fails, ensure you didn't miss a single Blue cup in the very first row.
Speed Run and Efficiency Tips
Pre-Loading the Tap
If you are on a touch device, you can "pre-load" your tap. As the animation for the previous cup is finishing (falling into the slot), have your finger hovering over the next target. For the Blue wall, you can tap four times in rapid succession almost instantly. Shaving 0.5 seconds off your initial Blue clear can save you 2-3 seconds on the total run.
The "Skip" Strategy
Is it possible to skip the Yellow cups entirely? In some configurations, if you fill the image with Blue, Red, and White perfectly, the remaining negative space might be small enough that you don't need to clear every single Yellow cup. However, this is risky. Generally, you should clear the Yellows to ensure the 100% completion flag triggers, but don't obsess over getting every single Yellow pixel if the "Complete" bar is already full.
Memorization over Reaction
Speed running this level is 90% memorization and 10% reaction speed. You need to memorize the layout: Blue-Blue-Red-Blue-Blue. If you have to read the color of every cup, you are too slow. Know that the flanks are Blue and the center is the "Key." Drill the center blindly while using your peripheral vision to check the flanks. This "Blind Center" technique is how pros get sub-20 second times.
Optimized Belt Usage
Don't let the belt run dry. A dry belt means you are waiting for sand to travel to the canvas. A speed runner keeps the belt fully saturated. You want a constant stream of sand falling from the hopper onto the canvas. This means your tapping rhythm should match the consumption rate of the canvas exactly. If you tap faster than the canvas paints, you jam. If you tap slower, you lose time. Find the "Goldilocks" zone of continuous flow.
The "Double Tap" Start
The absolute fastest start involves a double-tap motion on the very first frame. As the level fades in, tap the leftmost Blue and rightmost Blue simultaneously. The game engine allows for two input registers at once. This clears the width of the tray instantly, allowing the center Red column to slide into view 0.5 seconds faster than a sequential tap.
Belt Segmentation Strategy
Advanced players utilize "Belt Segmentation." Instead of mixing the Red and Dark Red, they try to create distinct "blocks" of color on the belt. They tap all Red first (creating a Red block), then all Dark Red/White. This minimizes the mixing zone on the belt and creates a sharper contrast between the Gate and the Mountain on the canvas. However, this requires a perfectly empty tray to pull off without jamming.