
Level 393
HARDHow to solve Sand Loop level 393? Get instant solution for Sand Loop 393 with our step by step solution & video walkthrough. Sand Loop 393 tips and guide.
Play Sand Loop Now
Experience the puzzle challenge firsthand
Game Screenshots
Sand Loop Level Guides
Sand Loop Level 393 Master Walkthrough: The Pink Tulip Strategy
Sand Loop Level 393, often referred to as "The Pink Tulip," represents a significant spike in difficulty for players transitioning from basic logic puzzles to advanced grid management. This stage is not about reflexes; it is a pure test of resource management and queue optimization. You are tasked with painting a vibrant tulip field scene, which requires layering four distinct colors (Purple, Green, Pink, and Yellow) in a specific sequence to avoid irreversible gridlocks.
The primary bottleneck in this level is the restrictive conveyor capacity. With only five active slots available on your belt, mismanaging the influx of cups—especially the tied pairs—will instantly halt your progress. Furthermore, the board is heavily fortified with high-count Ice Blocks (ranging from 20 to 37 hits) and wooden crates that must be systematically cleared before you can even access the necessary color cups. This guide provides a step-by-step roadmap to navigating these obstacles, ensuring you complete the painting without running out of moves or queue space.
Level Mechanics Overview
Understanding the underlying mechanics of Level 393 is crucial for formulating a winning strategy. Unlike previous levels where you could tap freely, this stage demands a rhythmic approach to tapping and waiting.
- The Conveyor Belt Limit (5/5): Your most critical constraint. Once the belt holds 5 cups, you cannot add more. You must wait for cups to pour and disappear. Tying two cups together instantly takes up 40% of your total capacity.
- Ice Blocks: These barriers absorb cup "hits" to break. A 37-count Ice Block requires 37 units of sand impact. They do not block movement but must be destroyed to access underlying color cups.
- Wooden Boxes (9-Count): These are fragile but annoying. They sit in the middle rows, blocking the path for tied cups to drop into optimal positions.
- Color Shifting Traps: Two specific cups feature circular arrows, indicating they shift colors (Yellow/Pink and Purple/Green). Using these incorrectly is the fastest way to fail, as they can dump the wrong color into a completed section.
Visual Breakdown of the Canvas
To succeed, you must visualize the final image. The canvas is divided into four distinct color zones that must be filled in a specific order to prevent "bleeding" colors where they don't belong.
- Purple Zone (The Foundation): A solid strip at the very bottom representing the soil. This is your starting ground and must be cleared first.
- Green Zone (The Infrastructure): A thick stem and two broad leaves. These act as the border between the ground and the flower.
- Pink Zone (The Focal Point): The large tulip head in the upper center. This is the most complex shape and requires precision.
- Yellow Zone (The Background): The vast sky surrounding the flower. This is the "filler" color that should be applied last to avoid clogging your queue with background sand when you need detail colors.
Why This Level is Difficult
Level 393 is rated as hard due to the "Deadlock Risk." If you tap a tied pair (2 cups) when you have 4 cups on the belt, the game jams. Because Ice Blocks take so long to clear, your belt often stays full, leaving little room for maneuvering. The challenge lies in timing your taps to coincide exactly when a cup pours, freeing up a slot instantly.
Primary Objectives and Success Criteria
Before you start tapping, define your clear win conditions. Your goal is not just to fill the canvas, but to fill it efficiently without letting your queue overflow.
Establishing the Ground Layer (Purple)
Your immediate short-term goal is to clear the bottom 10% of the canvas. Do not focus on the flower head yet. You need to secure the Purple cups early. If you ignore the ground and start with the stem, you will find yourself blocked by the grid layout. Prioritize any Purple cup that drops from the initial Ice Block breakage.
Unlocking the Stem and Leaves (Green)
Once the purple base is laid (about 20% completion), shift focus to the Green cups. The stem acts as a divider. Completing the green section early prevents you from accidentally dumping pink sand into the stem later. Aim to have the stem fully green before you process more than 50% of your Pink cups.
Isolating the Flower Head (Pink)
This is the mid-game boss. You must flood the Pink Tulip head while actively avoiding the Green stem and Yellow background. This requires saving your Pink cups and avoiding the color-shifting traps until the stem is 100% done.
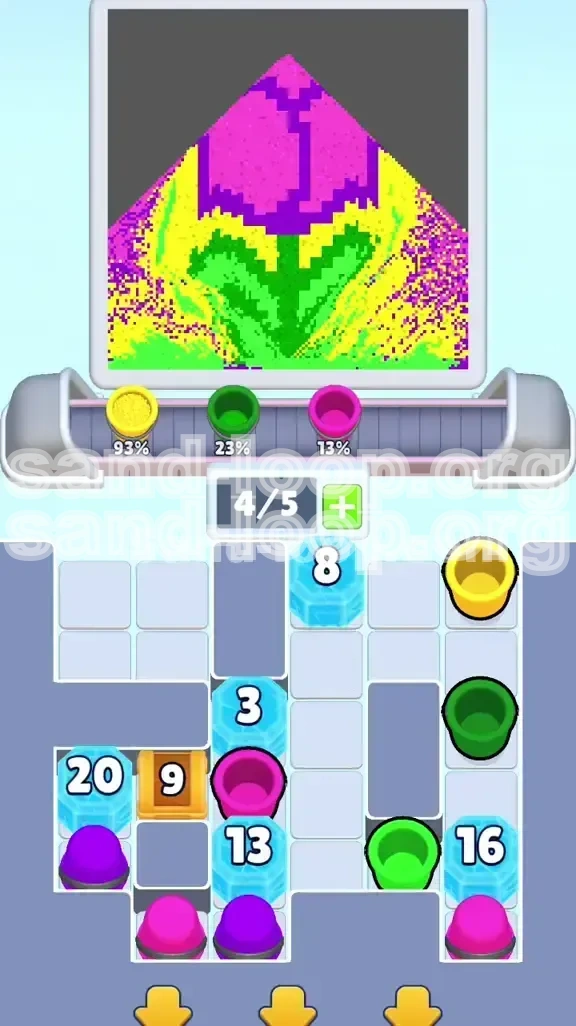
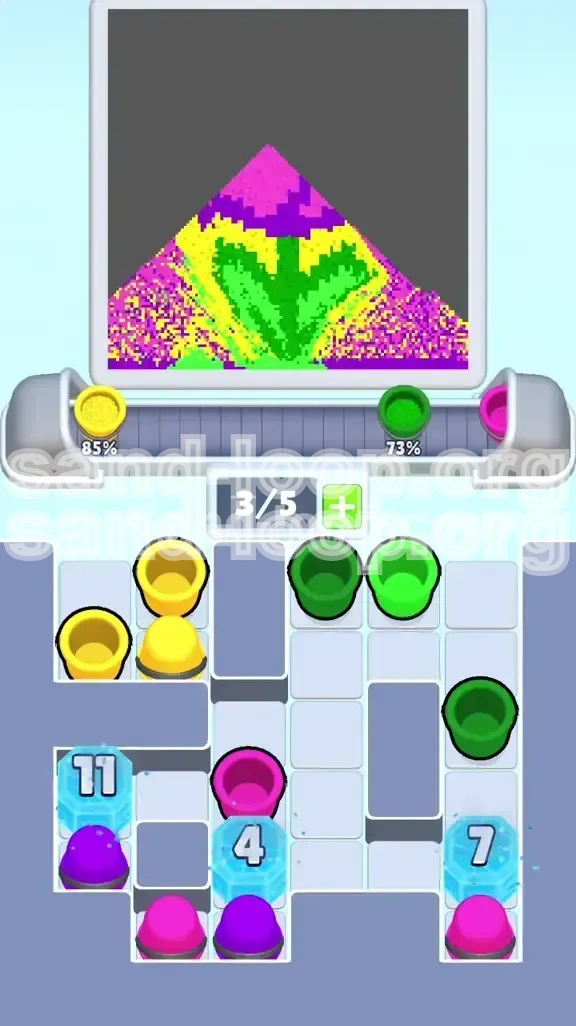
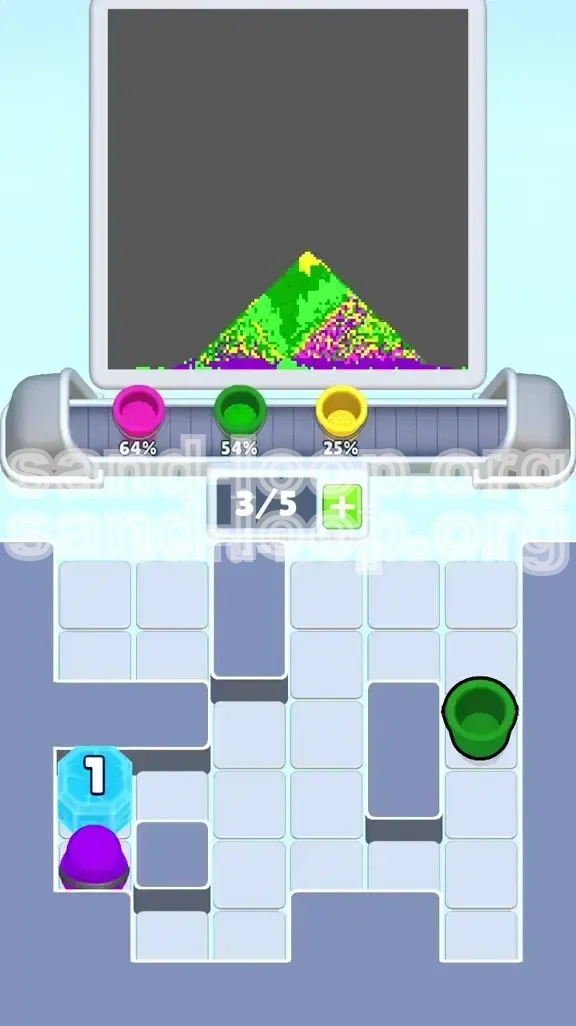
The Final Flood (Yellow)
The endgame is a speed run. Once Pink and Green are solid, you no longer need to be careful. The objective shifts to "Queue Management." You want to stuff the belt with as much Yellow as possible to finish the level quickly. Saving the Yellow background for last prevents the 5-slot bottleneck from ruining your detailed work on the flower.
Step-by-Step Walkthrough: The Opening Moves
The start of the level is the most dangerous phase. One wrong tap here can lock your board within the first 30 seconds. Follow these instructions precisely.
Phase 1: The Ice Breaking Strategy
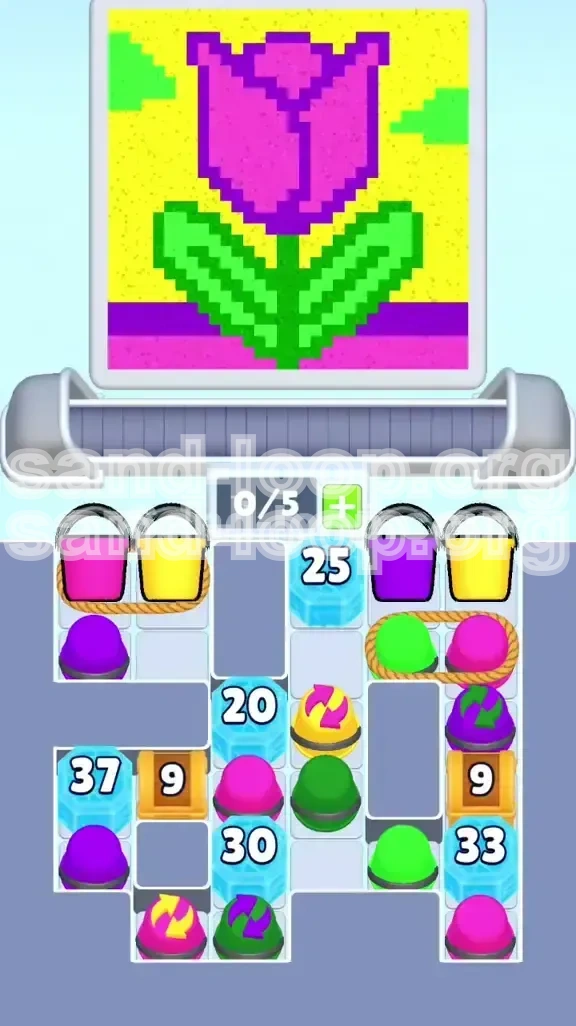
At the start, the board is dominated by a massive 25-count Ice Block in the center-left and a 20-count block in the top-center. Do not touch the tied ropes yet.
- Identify Single Cups: Look for the single, untied cups at the top of the board. These are your "safe" taps.
- Top-Right Purple: Tap the free-floating Purple cup at the top right. It flies to the belt.
- Top-Right Yellow: Tap the free Yellow cup next to it.
- Wait and Watch: Do not tap anything else. Watch the belt (0/5 -> 2/5). Wait for these cups to pour. As they pour, they chip away at the Ice Blocks above them.
- Repeat Singles: As soon as a slot opens, tap the next single cup. Avoid the pairs (tied ropes) until the 25-count block is reduced to below 15.
Phase 2: Clearing the 9-Count Wooden Boxes
Once the initial ice cracks, the board will drop, revealing 9-count wooden boxes in the middle rows. These block the columns for the big tied pairs.
- Target the Boxes: Use the single cups you are processing to hit these boxes. You need to clear the center column to allow the Green/Pink pair to drop down.
- Queue Management: Keep your belt at 3/5 or 4/5 capacity. Never let it sit empty, but never let it hit full unless you are waiting for a pour.
- The Box Break Moment: When the 9-boxes shatter, the board will shift again. This is the danger moment where new cups become available. Pause tapping for 2 seconds to see the new layout.
Phase 3: Managing the First Rope Trap
With the boxes gone, you now have access to the Green/Pink tied pair on the top right.
- Check Queue Space: Ensure you have only 2 or 3 cups on the belt.
- Tap the Pair: Tap the Green/Pink rope. Two cups fly up instantly.
- Immediate Follow-up: Immediately tap a single Purple or Yellow cup to fill the gap behind them. You want to keep the pressure on the ice blocks.
- Result: The Green cup should pour into the leaf outline. The Pink cup will start the flower head.
Advanced Strategy: Color Order and Queue Logic
This section covers the logic behind the "Sand Loop" methodology. You are not just filling colors; you are cycling your queue to prevent bottlenecks.
The Logic of Layering
Why do we save Yellow for last? In Sand Loop, the background color usually has the most cups and the largest area. If you fill the yellow background first, the sand pouring mechanics will obscure the edges of the stem and petals, making it hard to see where to place your Green and Pink sand. Furthermore, Yellow cups are abundant. If you process them early, your 5-slot belt will be clogged with Yellow, preventing you from accessing the rarer Green and Pink cups needed for the details. Always do: Base > Details > Background.
Dealing with the Shifting Cups
The Purple/Green shifter is a wildcard.
- Analyze the State: Before tapping a shifter, look at the canvas. If the Green leaves are 90% done, you can risk the shifter. If it shifts to Purple, it will go to the ground. If it shifts to Green, it finishes the leaf.
- The Risk: If the ground is already full of Purple, a shifted Purple cup is wasted (overflow). If the leaf is full of Green, a shifted Green cup is wasted.
- Strategy: Treat shifters as "Wildcards." Only tap them when BOTH the target color zones (Ground and Stem) are partially empty. This ensures that whichever color it lands on, it contributes progress.
Optimizing the 5-Slot Conveyor
The "Loop" in Sand Loop refers to the rhythm of your tapping.
- The "Batch" Method: Don't tap one by one. Tap 3 cups rapidly, then wait for 2 to process, then tap 2 more.
- The Emergency Gap: Always try to keep 1 slot open on the belt. If you keep it at 5/5 constantly, you have zero flexibility to use a "Single" cup if a "Tied Pair" drops unexpectedly.
Prioritizing the 37 and 33 Ice Blocks
These are the anchors on the bottom left and right.
- Ignore them initially: You cannot break them quickly. They are too big.
- Passive Damage: They will break slowly as you process the cups above them.
- Mid-Game Focus: Only when the center of the board is clear should you worry about the corners. By the time you are ready for the Yellow background, these corner blocks will have shattered naturally, unlocking the bulk Yellow cups needed for the final phase.
Common Mistakes to Avoid
Players fail Level 393 for three specific reasons. Learn these so you don't repeat them.
The Premature Rope Pull
This is the number one killer. Tapping a tied pair (2 cups) when your belt has 3 or more cups.
- The Mistake: You see a pair you want, you tap it. The belt goes to 5/5 and jams.
- The Consequence: You cannot process the ice blocks. The board locks. You have to wait potentially minutes for the belt to clear, wasting precious time.
- The Fix: Count before you tap. If you have 3 cups, you can add a pair (total 5). If you have 4 cups, you cannot.
Color Bleeding (The Sky is Green)
Using Green or Purple cups after the Yellow background has started.
- The Mistake: You start the Yellow flood too early. You still have Green stems to paint. You tap a Green cup.
- The Consequence: The Green sand pours, but since the yellow is wet/high, it might land in the "sky" area, creating a dirty green-yellow mix that looks like mud.
- The Fix: Finish Green and Pink 100% before touching the bulk Yellow cups.
Ignoring the "Wait" State
Trying to play fast and furious like a Match-3 game.
- The Mistake: Constantly tapping the screen hoping things speed up.
- The Consequence: You misread the queue. You overfill the belt.
- The Fix: Embrace the pause. Sand Loop is a rhythm game. Tap... wait... Tap... wait.
Solutions When You Are Stuck
So you are midway through, the belt is stuck, and the canvas is a mess. Here is how to recover.
The "Full Belt" Recovery Protocol
Your belt is 5/5 and nothing is moving because the next cup needed is trapped behind 5 others.
- Step 1: Stop tapping completely.
- Step 2: Look at the cup at the very front of the line (the one about to pour). Is it the right color for the area it is aiming at?
- Step 3: If yes, wait. If no, you might be in trouble. However, usually, the game auto-targets. Just wait for 2 cups to pour. This frees up 2 slots.
- Step 4: Once 2 slots are free, assess the board. Do not refill the belt immediately. Let it drain to 0/5 or 1/5 to reset the rhythm.
Ice Block Gridlock
The Ice Blocks aren't breaking because you aren't hitting them, but you can't hit them because the cups are tied up.
- The Solution: You must prioritize the "Single" cups that align with the ice blocks. Even if you don't need the color (e.g., a Yellow cup when you want Pink), tap it anyway. You need the "hit" on the ice block to clear the board structure. The color spill-over is a worthy sacrifice to unlock the grid.
Wrong Color in the Shifter
You tapped the shifter and it turned into the color you didn't want (e.g., Purple when you needed Green).
- The Mitigation: Check if the alternative zone (the ground) needs sand. If yes, let it pour. If the ground is full, you have to wait for the shifter to cycle again or use a different cup. Never force a wrong color into a finished section; it creates overflow that wastes future sand.
Speed Run and Efficiency Tips
Once you understand the logic, you can optimize for a faster clear time (under 3 minutes).
The "Tap-Wait-Tap" Rhythm
Don't watch the sand pour; watch the queue counter.
- Technique: When the belt is at 3/5, scan the board for the specific colors you need next. Pre-select them in your mind.
- Execution: As soon as a cup pours (belt goes 3/5 -> 2/5), instantly tap the cup you pre-selected. This reduces downtime to zero.
Bulk Processing the Background
The final 20% of the level (Yellow Sky) can be finished in seconds.
- The Setup: Ensure the Pink Tulip and Green Stem are visually solid.
- The Action: Tap the Top-Left Tied Pair (Pink/Yellow). Since the Pink part is irrelevant (flower done) or useful (finishing edges), and the Yellow is huge, this is safe.
- The Flood: Simultaneously tap all remaining Yellow cups in the bottom rows. Fill the belt to 5/5. Let the machine run. Since there are no more complex shapes to draw, just filling the yellow sky, you can overload the queue without fear of strategic errors.
Pre-Game Visualization
Before the level even starts, visualize the "Tulip" shape. Knowing where the stem connects to the head helps you predict which cups are the "connectors" that need to be saved. If you know the stem goes up the center, you save the central Green cups and prioritize the side Pinks. Mental preparation saves seconds of hesitation.