
Level 395
EXPERTHow to solve Sand Loop level 395? Get instant solution for Sand Loop 395 with our step by step solution & video walkthrough. Sand Loop 395 tips and guide.
Play Sand Loop Now
Experience the puzzle challenge firsthand
Game Screenshots

Sand Loop Level Guides
Sand Loop Level 395: The "Butterfly Challenge" Walkthrough
Level Overview: A Test of Logistics Over Speed
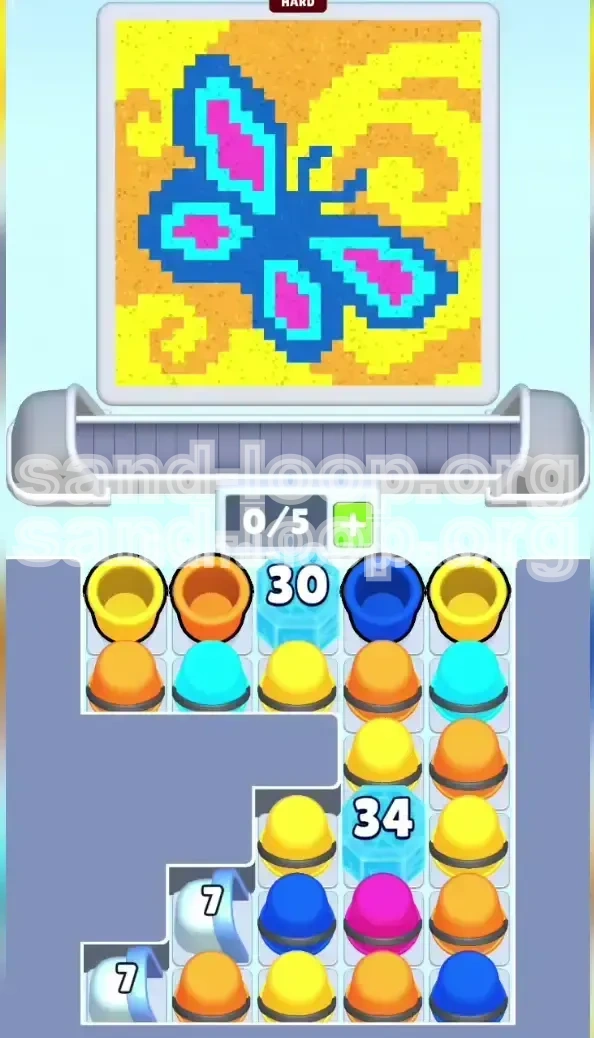
Level 395 is infamously known within the community as the "Butterfly Challenge." Unlike previous levels that reward rapid tapping and chain reactions, this stage is a strict exercise in structural integrity and logistical management. The visual target is a vibrant butterfly set against a swirling, warm-toned background. The challenge arises from the severe imbalance of resources: background colors (Yellow and Orange) are abundant, while detail colors (Blue, Magenta, Cyan) are scarce and trapped behind barriers.
Core Mechanics: The Ice Block Dams
The defining feature of this level is the presence of two massive Ice Blocks that fundamentally alter the board's physics. The Top Center Ice Block (30 HP) and the Bottom Right Ice Block (34 HP) act as physical dams. They do not just obstruct view; they prevent specific color cups from entering the conveyor belt. You cannot access the critical Magenta or Cyan cups needed for the wings until these structures are completely destroyed.
The Constraint: The 5-Slot Conveyor Belt
Your conveyor belt has a strict limit of 5 slots. In Level 395, new cups are generated constantly. If your belt reaches capacity (5/5) and a new cup attempts to enter, the game ends immediately. This forces a "Flow Control" playstyle where every tap must be calculated to clear space rather than just create matches.
Win Conditions: Structural Isolation
To achieve 100% completion, you must fill the canvas without color contamination. The physics engine treats sand as a fluid. If you pour background colors (Yellow/Orange) before the butterfly's "container" (the Dark Blue outline) is built, the sand will bleed into the wing zones, ruining the purity of the image. The win condition is the complete isolation of the butterfly outline before flooding the background.
Why Players Fail: The "Yellow Trap"
The most common failure point is attacking the background first. Players see the abundance of Yellow cups and clear them to free up grid space. This releases "background sand" too early. Without the Dark Blue outline acting as a dam, this sand spreads uncontrollably into the zones meant for Magenta and Cyan. You must fight your instincts and prioritize cool tones over warm tones.
Level Statistics & Requirements
- Level ID: 395
- Canvas Subject: Butterfly (Complex)
- Ice Block HP: Top Block (30 HP), Bottom Block (34 HP)
- Conveyor Capacity: 5 Cups (Strict Limit)
- Difficulty Spike: High (Precision required)
Color Theory & Processing Order
Priority 1: Dark Blue (The Skeleton)
Dark Blue is the most critical resource in this level. It forms the thick, structural outline of the butterfly's wings and body. Think of this color as the concrete foundation of a house. If the foundation has holes or is incomplete, everything you pour inside will leak out. You must prioritize matching and pouring Dark Blue until the outline is visually continuous and closed off.
Priority 2: Magenta & Cyan (The Interiors)
Once the outline is established, your focus shifts to the interior fills. Magenta fills the lower wings, while Cyan accents the upper wings. These colors are trapped deep inside the butterfly shape. They must be processed after the outline is ready to ensure they are contained within their specific boundaries.
Priority 3: Yellow & Orange (The Flood)
These warm tones occupy roughly 60% of the total canvas area but are the lowest priority for action. They represent the "world" around the butterfly. Processing these too early is the primary cause of failure. You must wait until the butterfly is fully sealed before releasing this flood of sand.
The "Containment" Principle
Visualize the level as a series of containers. The Dark Blue outline is the main vessel. The Magenta and Cyan are liquids trapped inside that vessel. The Yellow and Orange are a flood waiting to happen. If the vessel isn't sealed (by completing the blue outline), the flood will destroy the interior. Level 395 is physically impossible to complete if you process Yellow before Blue.
Understanding "Numbered Cups"
On the bottom left of the grid, you will notice gray stepped structures containing "Numbered Cups." These look standard but have a small number on them. These require exactly 7 adjacent matches to "crack" and release their contents. These usually contain the heavy payload needed for the final background fill and should be ignored until the very end.
Analyzing Ice Block Adjacency
Not all cups damage the Ice Blocks equally. The physics engine only registers damage from cups that are orthogonally adjacent (touching Top, Bottom, Left, or Right). Diagonal touches do not count. When planning your moves to break the ice, focus strictly on cups that are directly above, below, or to the side of the blocks.
Step-by-Step Walkthrough Guide
Phase 1: Breaching the Top Ice Block (0% - 15% Progress)
The start of the game is a war of attrition against the Top Ice Block. Your immediate goal is to reduce its 30 HP to zero to free up the grid space.
- First Move: Scan the top row. Identify the Top-Left Yellow Cup and the Top-Right Yellow Cup. Tap both. This clears a pair and registers 2 direct hits on the ice block.
- Second Move: Look for the Top-Left Orange Cup and the Middle Orange Cup positioned directly underneath the ice block. Tapping these chips the block further and opens the left side of the grid, allowing gravity to shift cups into better positions.
- Strategy: Ignore isolated cups. Specifically, leave the isolated Dark Blue Cup on the top right alone for now. It is not blocking anything, and removing it might bring down a problematic cup that jams your belt.
Phase 2: The Bottom Ice Block Siege (15% - 30% Progress)
Once the top block is cracked, the board settles. Now you must focus entirely on the bottom right. This block has 34 HP and guards the Magenta.
- Targeting: Look for pairs of cups that are orthogonally adjacent (touching top, bottom, left, or right) to the Bottom Ice Block. Diagonal touches do not count in Sand Loop.
- The Grind: You will likely need to cycle through 15-20 matches to break this wall. Use Yellow and Orange cups primarily for this phase. Save your Blue and Magenta cups for the belt.
- Belt Management: While grinding this block, ensure you never have 5 cups on the belt. If you see a "Numbered Cup" (with a small number on it), do not tap it yet. It is a trap for later.
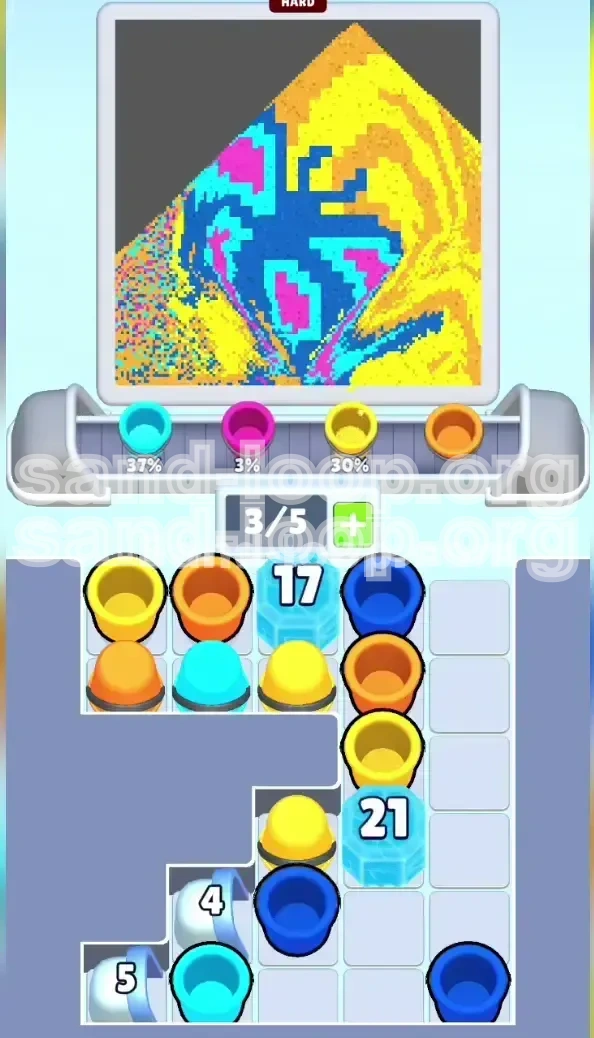
Phase 3: Releasing the Magenta Payload (30% - 50% Progress)
The moment the Bottom Ice Block shatters, a stack of Magenta Cups will be released. This is a critical turning point.
- Hold Position: Do not immediately tap the Magenta cups on the grid. Instead, wait for them to slide down onto your conveyor belt.
- Preparation: Clear 2 slots on your belt manually to make room for the incoming Magentas.
- The Pour: Once the Magenta cups are on the belt, tap them to pour. This will fill the "Lower Wings" of the butterfly. If you haven't finished the Dark Blue outline, the sand might spill—this is why you focused on Blue first. If the outline is 100% ready, the Magenta will settle perfectly into the wing cavities.
Phase 4: Constructing the Blue Skeleton (50% - 75% Progress)
With the ice gone and the Magenta settling, you must aggressively deploy the Dark Blue Cups.
- Belt Prioritization: If a Dark Blue cup enters your belt, make it your number one priority to match and pour. The Dark Blue is your structural wall.
- Monitoring: Watch the canvas percentage. You want the Dark Blue coverage to hit 78% before you touch the heavy background colors. The outline must be thick and unbroken.
- Cyan Integration: Once the Blue outline is solid, look for the Cyan Cups that were trapped under the first ice block. Pour these to fill the upper wing details. The Blue wall will keep them separated from the Magenta.
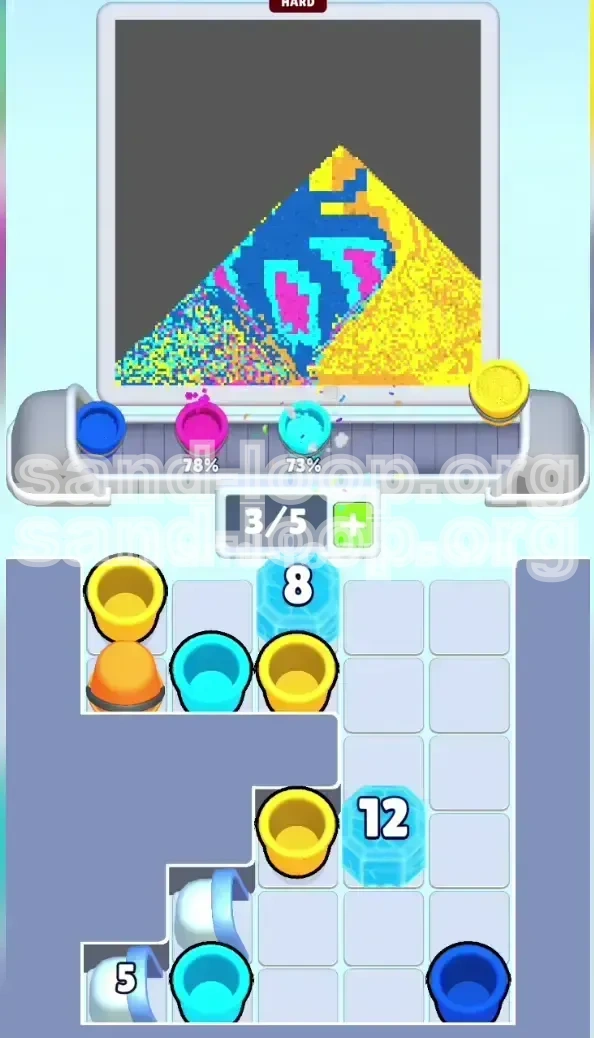
Phase 5: The Great Background Flood (75% - 100% Progress)
This is the final sprint. The butterfly is now a sealed, colorful entity floating in a white void. Now you paint the world around it.
- The Alcoves: Return to the bottom left gray stepped structure. You can now safely break the Numbered Cups (7 matches required). These release the final reservoirs of Yellow and Orange sand.
- Flooding: Flood the belt with Yellow and Orange. Since the Blue outline is complete, this sand will flow around the butterfly, filling the negative space without contaminating the wings.
- Final Touches: The background is a "Swirl" pattern. This means the sand needs to settle. If you are at 99%, stop tapping. Let the physics engine settle the grains. Often, the last 1% is just waiting for sand to slide into the tiny cracks along the edge of the screen.
Phase 6: The Final Verification
Before celebrating, pause and look at the image.
- Check Edges: Ensure no Yellow has bled into the Cyan tips of the wings.
- Check Percentage: Is the counter at 100%?
- Result: If the counter is stuck at 99% despite no sand left on the belt, look for a tiny "bubble" of white space usually hidden behind the butterfly's antennae or in the tight swirls of the background. You may need to tilt your device or wait 10 seconds for the auto-settle to trigger the win.
Common Mistakes to Avoid
Mistake #1: The "Yellow First" Instinct
This is the killer. Players see a board full of Yellow cups and start clearing them to relieve the pressure on the ice blocks. Do not do this. Clearing Yellow releases Yellow sand. If that sand hits the canvas before the Blue outline is built, it flows *into* the butterfly. You will then have to overwrite that Yellow with Blue, wasting massive amounts of ink and potentially running out of Blue cups before the outline is closed. Always prioritize Dark Blue over Yellow.
Mistake #2: Ignoring the Conveyor Capacity
The "0/5" limit is strict. A common error is tapping a cup that doesn't result in a match, just to move it. If you tap a non-matching cup, it stays on the belt, and a new one enters. If you do this with a full belt, the game ends. Rule of thumb: Never tap a cup unless you are 100% sure it has a match on the board or on the belt.
Mistake #3: Diagonal Ice Hits
The game physics for Ice Blocks are specific. Only orthogonal (Up/Down/Left/Right) matches count as damage. If you see a Red cup diagonally touching the Ice Block and tap it, nothing happens to the block. You have wasted a move. Ensure your matches are physically touching the side of the block.
Mistake #4: Breaking Numbered Cups Early
The cups in the bottom left that require 7 matches are "Power Ups." Don't break them until you are ready for the final flood. Breaking them too early releases a massive amount of sand that you can't control. Treat them as a "Finisher" move.
Mistake #5: Panic Tapping
When the board settles after an ice block breaks, it can look chaotic. Do not tap randomly. Random tapping is the fastest way to jam your belt with useless colors. Take a deep breath, identify the color you need (likely Magenta or Blue), and only tap those specific cups.
Mistake #6: Forgetting the "Settle" Phase
Sand physics are not instant. Sometimes, you pour the correct color, but it takes a few seconds for the grains to slide into their final resting spot. If you panic and pour more sand because you don't see immediate results, you risk overfilling an area and bleeding into another zone. Patience is key.
Pro Tips & Speed Run Strategies
Tip: The "Tap and Pause" Technique
When the board is volatile (e.g., right after an Ice Block breaks), use the "Tap and Pause" method. Tap one cup, then wait 2 seconds to see how the board shifts. This prevents chain reactions that might accidentally dump the wrong color into the wrong zone. Patience is your greatest tool in Level 395.
Tip: Isolate the "Locked" Colors
Sometimes, you need to clear a specific color but it's buried under a pile of useless cups. Use the "Refill" mechanic to your advantage. If you are stuck and can't make a match, sometimes it's better to intentionally create a jammed state (if you have a life to spare) to force a board shuffle, though in Sand Loop, simply planning 3 moves ahead is safer.
Speed Run Strategy: The "Ice Breaker" Focus
If you are aiming for a high score or speed run, your efficiency at the start is everything. Do not wait for cups to fall naturally. Aggressively tap the top-left and top-right zones immediately upon spawn. Memorize the exact position of the Yellow/Orange pairs near the Top Ice Block. You should be able to clear the first 10 HP of the ice block within 5 seconds of starting the level.
Advanced Technique: The "Belt Cycle"
Advanced players manage the belt like a queue. If you need a Magenta cup but the belt brings a Blue one, tap the Blue one immediately onto the canvas (even if you don't "need" it right now) to cycle the belt faster to the Magenta. This keeps the flow moving and prevents the 5-slot jam.
Dealing with "Stuck" Sand
Sometimes, a single grain of sand gets stuck on the edge of a "Gray Step" (the immovable terrain). In a speed run, you can't wait. To fix this, pour a large amount of a different color behind it. The pressure from the new sand will usually push the stuck grain into its correct hole.
Shortcuts: Skipping the Background
While not recommended for first-time players, speed runners often skip filling the *entire* background. You only need 100% coverage. If the butterfly is complete and the background is 90% filled, sometimes the remaining sand will trickle in on its own. Focus on getting the Dark Blue and Magenta 100% perfect first. If you run out of Yellow/Orange cups but the percentage is climbing, stop and let the physics settle.