
Level 401
HARDHow to solve Sand Loop level 401? Get instant solution for Sand Loop 401 with our step by step solution & video walkthrough. Sand Loop 401 tips and guide.
Play Sand Loop Now
Experience the puzzle challenge firsthand
Game Screenshots
Sand Loop Level Guides
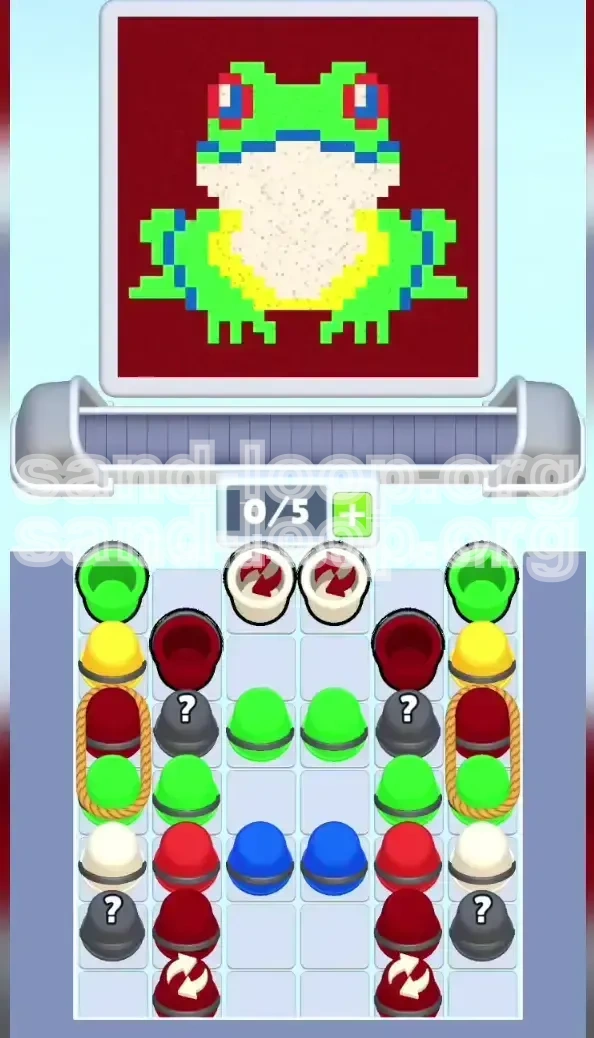
Sand Loop Level 401: The Tree Frog Master Strategy
Welcome to the definitive guide for Sand Loop Level 401. This stage is a deceptive puzzle that masquerades as a simple color-filling game. Featuring a complex Tree Frog illustration against a deep Maroon backdrop, this level is notorious for causing belt jams and deadlocks. The difficulty stems from the limited 5-slot conveyor belt capacity and the specific order of operations required to unlock the supply tray. This walkthrough will provide a structured path to 100% completion, focusing on belt management, precise color execution, and resource optimization.
Level Overview: The 5-Slot Inventory Challenge
Level 401 is a test of inventory logic rather than reflexes. The primary constraint is your conveyor belt, which only holds five items. With six distinct colors in play (Green, Cream, Yellow, Red, Blue, and Dark Red), mismanaging this space is the fastest way to fail. The level features "Rope" mechanics that hide essential colors behind others, and "Mystery Cups" that act as RNG wildcards. Success depends on treating your belt slots like a limited inventory and prioritizing colors that unlock gameplay flow.
The Rope Mechanic
The supply tray is segmented by Ropes, specifically in the 2nd and 5th columns. You cannot access the vital Green and Cream cups at the bottom until you clear the obstructing Red and Yellow cups at the top. Failing to clear these ropes early creates a bottleneck where you run out of usable colors while the belt is clogged with useless ones.
Mystery Cup RNG
Mystery Cups (marked "?") are high-risk, high-reward elements. They are the primary source for the rare Blue sand required for the frog's eyes. However, they can also yield common Dark Red background sand. Tapping these without an empty belt slot is a guaranteed restart.
The Frog's Anatomy
Understanding the target areas is crucial. The Green body and Cream belly occupy about 60% of the canvas and serve as your "dumping grounds" for excess sand. The Red and Blue eyes are high-precision zones (less than 5% of the canvas each) where mistakes are fatal to your percentage score.
The Background Trap
The Dark Red background is pervasive but dangerous. It covers the negative space around the frog. Pouring this early is a critical error because it contaminates the edges of the frog's body and legs. It must be treated as a final-step filler, not a starting color.
The Recycle Bin
You have access to Recycle Cups, but they are not unlimited. Using a Recycle Cup consumes a turn and belt space. Strategic use involves converting unwanted Dark Red or surplus colors into the specific color you currently lack, usually Green or Blue.
Winning Conditions
To achieve 100% completion, you must fill the frog accurately without "overspray"—the spillover of one color into another's zone. The game tracks your precision percentage; hitting 100% requires leaving the background until the end and executing pixel-perfect pours on the eyes and stripes.
Primary Objectives: Managing Your Queue
Your goal is not just to pour sand, but to manage the flow of materials. You must treat the conveyor belt like a queue that must never reach maximum capacity. The primary objectives focus on preventing a deadlock where you have usable cups on the belt but no space to pour them.
Maintain the "4+1" Rule
Never let your belt reach 5/5 capacity if the available cup in the tray is a color you need. Always keep at least one slot open (ideally two) to maneuver cups. If you are at 4/5, you must pour a cup immediately before tapping anything new in the tray. This flexibility allows you to react to RNG from Mystery Cups.
Unlock the Supply Columns
Your immediate priority is to clear the top rows of the Rope-bound columns. Accessing the lower-tier Green and Cream cups provides a steady stream of "safe" colors that you can pour almost anywhere on the frog. Do not focus on the eyes or background until these columns are free.
Isolate High-Value Colors
Red and Blue are your bottleneck colors. You must only pull these when you are physically ready to pour them into their specific small zones. Allowing a Red or Blue cup to sit on your belt while you work on the body wastes a valuable slot that could be used for Green.
Efficient Recycle Timing
Use the Recycle Cup only when necessary. The best time to use it is when you are forced to pick a Dark Red cup early or when you have a surplus of a color (like Green) but the zone is already full. Do not use Recycle on "just-in-case" scenarios; save it for emergency belt clearing.
Visualizing the Pour Path
Before you tap a cup, look at the canvas. Is the target zone (e.g., the Cream belly) currently under the pour spout? If not, wait. Tapping a cup and then waiting for the canvas to align wastes time and clutters the belt. Sync your taps with the movement of the frog illustration.
Step-by-Step Walkthrough: Execution Phase
This guide breaks the level into six distinct phases. Follow this sequence rigidly. Deviating from the order—especially by pouring the background early—is the most common cause of failure.
Phase 1: The Green Body Foundation
Start by tapping all accessible Green cups. Do not engage with the Rope columns yet. Pour the Green sand into the frog's body and legs. This is the safest phase. Your goal is to reduce the Green cup count in the tray and establish a rhythm. Do not fill the Green areas 100%; leave them at about 90% to allow for minor adjustments later if you get desperate for a pour zone.
Phase 2: The Rope Breaker (Red & Yellow)
Identify the Rope-bound columns. Tap the top Red cup. Wait until the frog's eye aligns with the pour spout, then pour carefully. Immediately clear the top Yellow cup. Pour Yellow onto the frog's thigh/leg accents. Clearing these top cups is critical: it shifts the bottom cups (Green and Cream) up, unlocking your mid-game supply.
Phase 3: The Cream Belly Buffer
With the ropes cleared, tap the newly available Cream cups. The Cream belly is large and forgiving. Pour Cream until the belly is solid. This phase acts as your buffer; if you make a slight mistake with Green and splash into the belly area, it's less critical than splashing into the eyes. Keep your belt flowing during this phase.
Phase 4: The Mystery Cup Gamble
Now that your belt is managed, tap a Mystery Cup. There are two outcomes:
1. **It is Blue:** Perfect. Wait for the eye alignment and pour.
2. **It is Dark Red:** This is the danger scenario. Immediately drag this cup to the Recycle Bin. Do not let Dark Red sit on your belt. If you don't have a Recycle Cup available, you must pour it into the background (carefully) and restart the level, as your percentage will likely suffer.
Phase 5: Precision Blue and Red
Use any remaining Blue or Red cups. The Blue eyes are small targets. Wait for the exact center alignment. Pour for 1 second and stop. Check the fill. Pour again if needed. It is better to underfill and retry than to overfill and ruin the level. The Red eyes/stripes require the same precision. Do not rush these pours.
Phase 6: The Dark Red Background
The frog should be fully colored now (Green body, Cream belly, colored eyes). Only the background should remain. Now, you can aggressively tap all remaining Dark Red cups. Since there are no complex shapes left, you can pour rapidly to fill the negative space. Watch your percentage counter climb from 90% to 100%.
Color Priority: The Processing Logic
Knowing what to do is half the battle; knowing *when* to do it is the other half. This hierarchy dictates which colors you should allow onto your conveyor belt and when.
Tier 1: Green (The Bulk Filler)
Priority: High / Scarcity: Low.
Process Green immediately and constantly. It is your primary workhorse. You want Green cups on the belt because they correspond to the largest areas. Clearing Green early frees up tray space for the more difficult colors later.
Tier 2: Cream (The Safety Zone)
Priority: Medium / Scarcity: Medium.
Cream is your "panic button." If you have a cup you can't use and need to clear a slot, you can usually dump a little bit of Cream into the belly if there's room. Process Cream in the mid-game to bridge the gap between the Body phase and the Detail phase.
Tier 3: Yellow (The Utility Color)
Priority: Low / Scarcity: Low.
Yellow is only used for small accents. It is not urgent. Process Yellow only when the specific leg/thigh zones are aligned. Do not hold Yellow cups on the belt longer than necessary.
Tier 4: Red (The High-Stakes Color)
Priority: Critical / Scarcity: Medium.
Red is used for the eyes and specific leg stripes. It is dangerous because it is often located in Rope columns. Process Red only when you have a clear shot at the eye. Pouring Red elsewhere is a waste.
Tier 5: Blue (The Bottleneck)
Priority: Critical / Scarcity: Rare.
Blue is almost exclusively found in Mystery Cups. It is the rarest color. If you see a Blue cup, you must take it, provided you have belt space. Do not "skip" a Blue cup thinking you will get another; you might not.
Tier 6: Dark Red (The Deadlast Color)
Priority: None (until end) / Scarcity: High.
Dark Red is the most abundant but least useful color until the very end. Treat Dark Red cups as obstacles. Avoid tapping them until the frog is 95% complete. If you accidentally tap one, recycle it immediately.
Key Tips and Mistakes to Avoid
Even with a plan, the physics of the game can betray you. These tips focus on the mechanical aspects of Sand Loop that are often overlooked.
The "Full Belt" Deadlock
The most common way to lose is having a belt full of colors (e.g., Red, Blue, Yellow) that you can't use because the target zones aren't aligned, while the tray offers a color you do need (e.g., Green) but you can't pick it up.
Tip: Always keep one slot open. If you are at 4/5, pour a "safe" color like Green or Cream into a semi-filled area just to free up a slot, even if that area isn't 100% done yet.
Overfilling the Eyes
The eyes are the hardest part of the level. The hitboxes are small. It is very easy to pour Blue and have it spill into the surrounding Green face.
Tip: Use short, tapping pours rather than holding the screen down. Pulse the pour to control the flow. If you see the Blue pixel creeping out of the eye socket, stop immediately.
Mystery Cup Mismanagement
Tapping a Mystery Cup when your belt is full (4/5 or 5/5) is gambling with your life. If it turns into Dark Red, you have no move.
Tip: Only tap Mystery Cups when you have 3/5 slots or fewer. This gives you the flexibility to recycle the result if it's bad.
Ignoring the Recycle Cup
Players often try to "save" Recycle Cups for a dire emergency, then end up never using them.
Tip: The Recycle Cup is a tool for flow control. Use it proactively to convert a Dark Red cup (useless now) into a Green cup (useful now). Don't hoard it.
Poor Zone Alignment
Sand physics in this game are consistent; sand falls straight down. If you pour when the canvas is moving left, the sand will drag left.
Tip: Always pour when the target zone is stationary in the center of the screen. Pouring while the canvas is in motion leads to inaccurate, diagonal streams that miss the target.
Speed Run and Stuck Solutions
For those looking to optimize their time or dig themselves out of a hole, these advanced strategies offer a way to control the game's RNG and pacing.
Recovering from a Soft Lock
If you are stuck with a belt of useless colors (e.g., Dark Red and Yellow) but need Green:
1. Look for the Recycle Cup. Use it on the Dark Red.
2. If no Recycle is available, look for the "least full" zone on the frog. Can you dump the Yellow into a Green leg area to clear the slot? It will cost you percentage points, but it keeps the game moving. A 90% completion is better than a restart.
The "Batching" Technique for Speed
To minimize downtime, group your actions. Instead of: Tap Green -> Wait -> Pour -> Tap Red -> Wait, try this:
Tap Green (1) -> Tap Green (2). As Green (1) is pouring, align Green (2). This creates a continuous flow of sand. This requires keeping 2 slots open constantly but drastically reduces completion time.
Late-Game Blue Shortage
If you reach the end and the eyes are empty but you have no Blue cups left:
1. Check the tray for Mystery Cups you skipped.
2. Check if any Blue is hidden under a Rope in a column you neglected.
3. If you are 100% sure no Blue exists, you may have to restart. To prevent this, prioritize tapping Mystery Cups in the mid-game even if you don't need Blue yet, just to "clear" the RNG.
Speed Run: The Background Skip
Speed runners often ignore the Dark Red background until the very last second. Since the background has no borders, you don't need to be precise. You can pour the remaining 5-6 Dark Red cups in a frenzy at the end. This prevents you from accidentally clogging your belt with Dark Red during the complex logic phases of the early game.
Optimized Tap Timing
Every tap has an animation. To speed up, tap the next cup in the tray the *millisecond* the previous cup finishes pouring and leaves the belt. This "animation canceling" saves a fraction of a second per cup, which adds up over a 50-cup level.