
Level 406
HARDHow to solve Sand Loop level 406? Get instant solution for Sand Loop 406 with our step by step solution & video walkthrough. Sand Loop 406 tips and guide.
Play Sand Loop Now
Experience the puzzle challenge firsthand
Game Screenshots
Sand Loop Level Guides
Level Overview: The Playground Slide Challenge
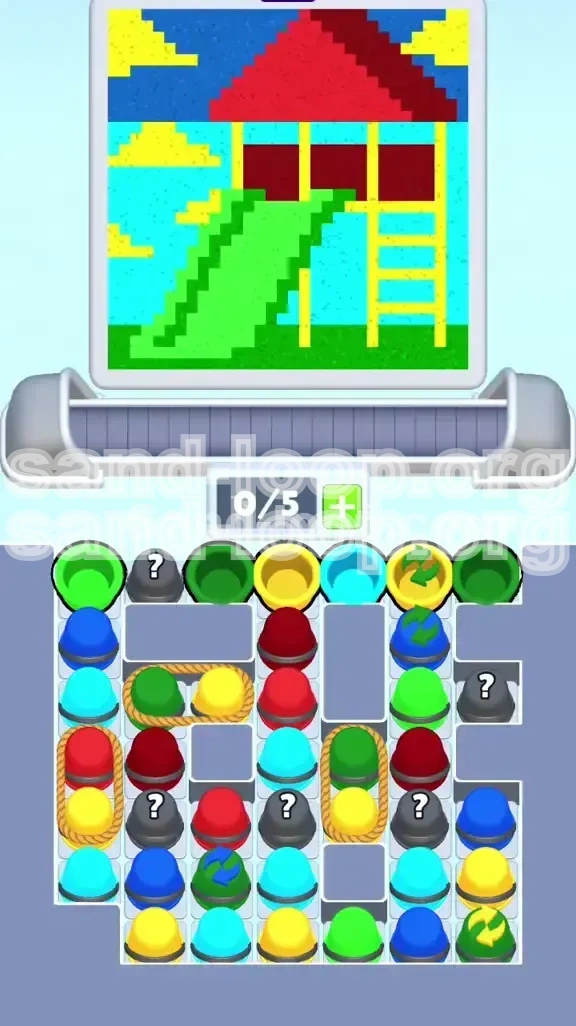
Welcome to the definitive guide for Sand Loop Level 406. This stage is a deceptive puzzle that hides a rigorous logic test behind a nostalgic pixel art scene: a playground complete with a fort, ladder, and a winding slide.
Unlike standard levels where you can tap rapidly to clear ice, Stage 406 is defined by its restrictive routing and unforgiving slot management. You are operating with a maximum capacity of 5 slots on your conveyor belt. This limitation turns the game into a high-stakes strategy session. One wrong move—specifically, tapping a roped pair when your belt is too full—will result in an immediate deadlock.
The visual design features distinct color zones that dictate your strategy. You must navigate around immovable grey gap blocks that fragment the grid, creating isolated vertical columns. Success in this level is not about speed; it is about precision, foresight, and managing the "traffic jam" of cups on your conveyor belt.
Structural Layout and Grid Analysis
The grid in Level 406 is heavily fractured by static grey blocks. These obstacles serve a critical gameplay function: they prevent you from easily clearing buried cups by crushing adjacent rows.
Because of these walls, you cannot rely on chain reactions to clear the board. You must methodically expose cups from the top down. The layout forces you to deal with specific colors in specific orders, or you risk blocking the pour windows for critical areas like the sky or the roof.
The Slot Capacity Crisis
The central mechanic of this level is the 5-slot limit on your conveyor belt. This is the primary constraint that will cause most players to fail.
Every time you tap a cup, it takes a seat on the belt. If that cup cannot pour its sand immediately because the target pixel isn't ready, it sits there, clogging the line. You must constantly monitor your slot count (e.g., 3/5 or 4/5) to ensure you never exceed the limit, especially when dealing with Roped Pairs.
Color Palette Breakdown
Understanding the volume requirements for each color is essential for planning your queue.
- Cyan (Sky): This is your highest volume color. The background is massive and will consume a huge amount of sand.
- Bright Green (Grass/Slide): Another high-volume color. The slide is a large, continuous structure that needs constant attention.
- Yellow (Sun/Ladder): Medium volume, but tricky. The ladder rungs are small and fragmented, making them easy to clog.
- Dark Red (Roof): Low volume, but high risk. The roof pixels are limited and appear late in the game logic.
- Dark Blue (Accents): Lowest volume. These are the finishing touches for windows and supports.
Choke Points and Danger Zones
There are two specific areas on the canvas that act as choke points: the Dark Red roof and the Dark Blue structural accents.
These colors are dangerous early in the game. If you release Dark Red or Dark Blue cups too early, the canvas won't be ready to accept them. The sand will sit on the belt, taking up valuable space until the correct pixels are revealed. This "dead time" is where your run will likely die. You must suppress the urge to clear these colors until the very end.
Objective and Winning Condition
To complete Level 406, you must fill the Playground Slide image to 100% completion. This involves prioritizing the large background areas (Cyan and Green) to open up the grid, while meticulously managing your belt capacity to accommodate the Roped Pairs that appear in the mid-game.
The win condition is reached not just by filling the art, but by successfully clearing the final "straggler" cups (Dark Red and Dark Blue) without triggering a belt overflow.
Step-by-Step Walkthrough Guide
This section provides a precise, move-by-move strategy to navigate the board from start to finish. Follow these steps in order to maintain the necessary flow of cups.
Phase 1: The Opening Sequence (Top Row)
At the start of the level, your goal is to clear the immediate ceiling and expose the Mystery Cups underneath without clogging your belt.
Start by identifying the exposed cups on the top row. You want to prioritize the Bright Green and Yellow cups. Tap the top-left Green cup first. Follow up immediately with the top-middle Yellow cup. If the top-right cup is Green, tap it as well.
Actionable Tip: Leave the Cyan cups alone for a moment. You need to clear space on the belt first. This initial sequence should leave you with a manageable queue, allowing you to see the first row of Mystery Cups.
Phase 2: Handling the Mystery Layer
Once the top layer is gone, you will face a row of black Mystery Cups marked with "?".
Your strategy here is "reveal and assess." Tap the leftmost Mystery cup. You need to know what color it is immediately.
- If it is Green or Cyan: Great. These colors have open pour windows (Grass and Sky). Let them ride the belt.
- If it is Dark Red or Dark Blue: Stop. Do not tap it yet. You cannot afford to have these clogging your 5-slot belt this early.
Keep your slot capacity at a maximum of 3/5 during this phase. This ensures you have buffer room for the inevitable arrival of the Roped Pairs.
Phase 3: The Roped Pairs Transition
This is the most critical phase of the level. As you clear the Mystery cups, you will expose Roped Pairs in the middle-left and lower-middle sections of the board. These are two cups tied together with a brown rope.
The Mechanics: When you tap a roped pair, both cups launch to the belt simultaneously. This consumes two slots instantly.
The Strategy: Look at your slot counter. If you are at 3/5 capacity, you cannot tap a roped pair safely. You must wait until your capacity drops to 2/5 or lower. Once you have space, tap the Green/Yellow roped pair. Watch them fly to the belt (bringing you to 4/5). Immediately stop tapping. Let the sand pour into the slide and sun. Wait for the cups to dissolve and your capacity to drop before even thinking about the next move.
Phase 4: The Mid-Game Clean Up
After dismantling the first set of Roped Pairs, the board will settle into a rhythm of Green and Cyan processing.
Focus entirely on feeding the Green slide and the Cyan sky. These are your "bread and butter" colors. By now, the canvas should be accepting these colors rapidly. You can tap multiple Green and Cyan cups in quick succession to boost your score into the 70-80% range.
Ignore the Dark Blue: You will see Dark Blue cups sitting in the outer columns. Do not tap them. The structural accents (windows/supports) they fill are not yet open. Tapping them now is a waste of a slot.
Phase 5: The Endgame Logic
Once the Green and Cyan sections are mostly filled (90%+), the board layout changes. The remaining cups will be predominantly Dark Red and Dark Blue.
This is the time to clear the stragglers. The Dark Red roof pixels are now open. Queue the Dark Red cups you ignored earlier. Follow them with the Dark Blue cups. The canvas will swallow this sand quickly now that the main structures are complete.
Finish the level by tapping the final few Yellow ladder rung cups to reach 100%.
Color Order and Strategy
Winning Level 406 requires a strict adherence to a specific color processing order. Deviating from this hierarchy is the primary cause of failure.
Priority Tier 1: Cyan and Green
These are your "infinite" colors. The Sky and the Grass/Slide cover the majority of the canvas area.
You should process these colors constantly throughout the early and mid-game. They are your "safe" colors. If your belt is empty and you don't know what to do, look for Cyan or Green. They will almost always have an open pour window available. Prioritizing these early also helps clear the physical space on the grid to reveal the deeper, harder-to-reach cups.
Priority Tier 2: Yellow
Yellow is a "bridge" color. It has medium volume but is fragmented into small pixels (sun, clouds, ladder rungs).
You should process Yellow when you need to bridge a gap in your queue or when the Green/Cyan flow is momentarily blocked. Be careful with ladder rungs—they are small. If you dump too much Yellow sand at once, you might clog the specific pixel slot, causing the cup to linger on the belt. Tap Yellow cups one at a time to ensure smooth flow.
Priority Tier 3: Dark Red (The Trap)
Dark Red is the most dangerous color in the level. It represents the roof of the fort.
The roof is a small, triangular area. It requires very little sand relative to the sky. If you release Dark Red cups before the roof is fully revealed and ready, the cups will sit on the belt until the end of time.
Rule: Do not tap Dark Red until you see the roof structure on the canvas is mostly cleared of other colors. Save Dark Red for the final cleanup phase. Treat it as a "finisher" move.
Priority Tier 4: Dark Blue
Dark Blue is the "cherry on top." It is used for tiny accents like windows and support beams.
Like Dark Red, this should be saved for the very end. The volume required is negligible. There is no benefit to clearing these cups early, and the risk of them blocking a slot for a high-volume Green or Cyan cup is immense. Leave them in the grid until you have nothing else left to do.
The Slot Management Hierarchy
When deciding which cup to tap next, ask yourself: "Which color is the canvas asking for right now?"
The canvas is "asking" for a color if that color's pixel zone is open and empty. If the Sky is empty, it's asking for Cyan. If the Slide is empty, it's asking for Green. If the Roof is covered by other blocks, it is not asking for Dark Red. By aligning your taps with the canvas's current demand, you prevent belt clogging.
Visualizing the Pour Window
Imagine a "pour window" for each color—a specific timeframe in which the canvas accepts that sand.
For Cyan and Green, the pour window is "Always Open" for 90% of the level. For Dark Red and Dark Blue, the pour window is "Locked" until the very end. Visualizing these windows helps you understand why you must delay certain taps. You cannot force a pour through a closed window.
Common Mistakes to Avoid
Even experienced players fall into these traps. Recognizing these mistakes beforehand is the best way to prevent them.
The "Full Tap" Error
This is the number one cause of Game Over screens in Level 406.
The mistake happens when a player sees a cluster of cups and taps them all rapidly without watching the belt capacity. They tap 3 cups when they only have 2 slots open. The belt fills up, the next cup gets stuck, and no more sand can pour. The game freezes, and you lose.
How to Avoid: Always look at the slot counter (e.g., the number in the corner or the visual spaces on the belt) before you tap. If you are at 4/5, never tap a Roped Pair.
The Premature "Trap" Color Release
Many players get nervous seeing Dark Red or Dark Blue cups sitting on the board and tap them early to "get them out of the way."
This backfires because these colors have nowhere to go. They enter the belt, take up a slot, and then refuse to pour because the pixels aren't ready. They effectively turn your 5-slot belt into a 4-slot or 3-slot belt, making it impossible to manage the Roped Pairs later.
How to Avoid: Trust the strategy. Leave the dark colors alone. They are not blocking anything essential in the early game. They are just decoration until the end.
Ignoring the Roped Pair Mechanics
Some players treat Roped Pairs (two cups on a rope) as single units.
They forget that tapping the rope releases two cups into the queue. If you calculate for one cup but have to feed two, you will overflow your belt. This mechanical misunderstanding can instantly end a promising run.
How to Avoid: Always do the math: "Current Slots (2) + Roped Pair (2) = 4." Is 4 less than or equal to your limit? If yes, tap. If no, wait.
Misreading the Cycle Cups
The level features Cycle Cups (marked with green/blue recycling arrows). These cups change color or type after every use.
A common mistake is assuming a Cycle Cup will always provide the color you need right now. If you rely on a Cycle Cup to give you Green, but it cycles to Dark Red, you've just added a trap color to your belt.
How to Avoid: Use Cycle Cups only when you have the buffer space to handle a "worst-case scenario" color. If your belt is empty, a Cycle Cup is a great opportunity. If your belt is full, it's a gamble you shouldn't take.
Fragmenting the Yellow Ladder
Players often tap Yellow cups sporadically, leading to a half-finished ladder.
The ladder rungs are small. If you pour a little bit of yellow, then stop, then pour more, you might leave a single pixel unfilled. This single pixel can block your completion percentage from reaching 100%, forcing you to hunt for that last sliver of sand.
How to Avoid: Try to focus on Yellow in a dedicated burst. Once you start working on the ladder, clear all the available Yellow cups to ensure the structure is finished in one go.
Stuck Solutions and Speed Run Tips
If you find yourself stuck or just want to optimize your time, these advanced strategies will help you master the level.
How to Recover from a Near-Deadlock
So, you messed up. Your belt is at 5/5, and nothing is pouring. The cups are just sitting there. Is it over? Not necessarily.
Stop tapping immediately. Watch the active pouring cup. If it is halfway done, wait for it to finish. As soon as it disappears, a slot opens up (4/5). If the next cup in line matches an open pixel, it will start pouring immediately.
If it doesn't, you are in a "soft lock." The only solution is to wait and see if the current pours clear enough space to change the canvas state. If not, you may need to restart. But often, patience is the key to unlocking a jammed belt.
The "Reset and Recall" Method
If you are consistently failing at the same spot (usually the first Roped Pair), use the Reset button intentionally.
Don't just mash buttons. Play the level up to that point, then hit Reset. Do this 5 or 6 times. This "muscle memory" training helps you memorize the exact sequence of colors needed to survive the transition. By the time you play "for real," your hands will know exactly what to do without you needing to think about the math.
Speed Run Strategies
To complete Level 406 quickly, you must eliminate "thinking time." You need to know your color order instinctively.
The best speed run strategy is "Macro Management." Instead of looking at individual cups, look at color zones. Clear the entire "Green Zone" on the board first. Then clear the "Cyan Zone." By grouping your tasks by color and board region, you minimize the time spent searching for the next tap. You aren't hunting for cups; you are systematically clearing zones.
Using the "Empty Belt" Window
There will be a brief moment in the mid-game where your belt is completely empty. This is your "Power Hour."
During this window, you can tap much faster than usual. You can safely tap 2 or 3 cups in a row without worrying about the 5-slot limit because the sand is pouring instantly. Look for this opportunity—it usually happens right after you finish the first big Green slide push. Use this speed burst to clear the Mystery cups and set up the Roped Pairs.
Visual Cues for the Endgame
Don't rely on the percentage counter alone to tell you when you are done.
Look at the art. Is the roof solid Dark Red? Are the windows solid Dark Blue? If you see a single pixel of Cyan in the Red roof, you need to fix that. Sometimes the percentage says 99% but you can't see the issue. Look for "bleed" colors—colors that have spilled into the wrong zone. Fixing these visual errors is often faster than trying to guess which cup you missed.
Optimizing the Final 5%
The last 5% of this level is often the slowest. You are hunting for the last few pixels.
To speed this up, stop looking at the cups. Look at the canvas. Find the empty spot on the canvas. Then, locate the cup that matches that color. This "reverse lookup" method is much faster than scanning the board for cups and hoping they are the right color. Let the art tell you what you need, then go find it.