
Level 414
HARDHow to solve Sand Loop level 414? Get instant solution for Sand Loop 414 with our step by step solution & video walkthrough. Sand Loop 414 tips and guide.
Play Sand Loop Now
Experience the puzzle challenge firsthand
Game Screenshots
Sand Loop Level Guides
Sand Loop Level 414 Master Guide: The Frozen Fox Strategy
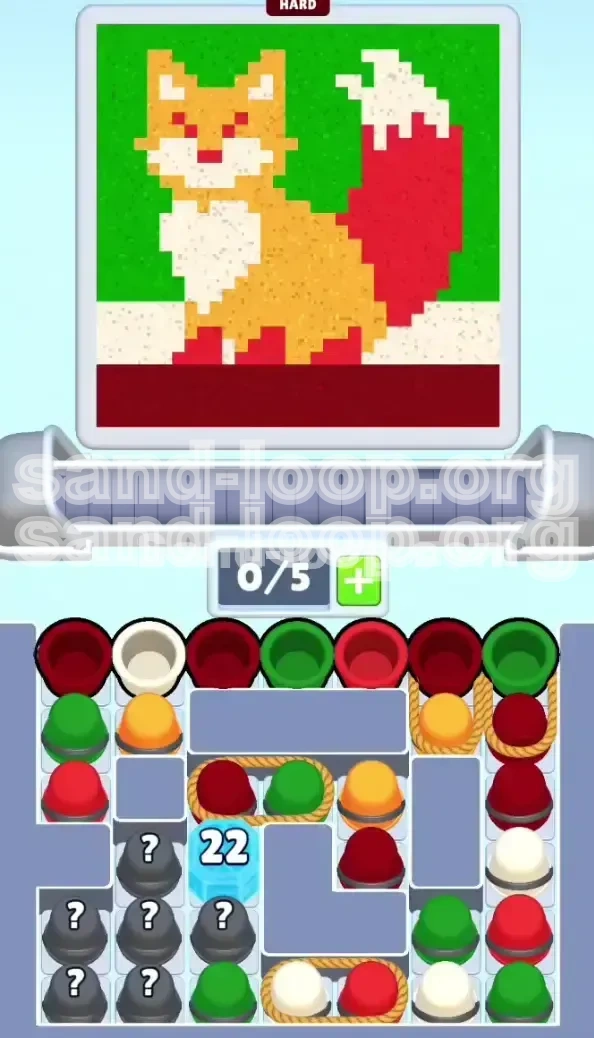
Welcome to the comprehensive walkthrough for Level 414, known as "The Fox in the Snow." This stage is a significant difficulty spike in Sand Loop, testing your ability to manage logic puzzles under pressure. Unlike previous levels where speed might be an option, Level 414 is a strict exercise in patience and precision. The level features a high-density pixel art design of a fox surrounded by snow, constrained by a massive ice blockage that controls the flow of the game. If you fail to plan your moves, you will find yourself with a full conveyor belt and a locked board.
Level Mechanics and Layout
The board layout in Level 414 is deceptive. At first glance, it looks like a standard pixel art challenge, but the supply tray is split into two distinct zones. The left side contains the critical ice block, while the right side is cluttered with roped cup pairs. The canvas itself requires five distinct colors: Orange, Red, White, Green, and Dark Red. The challenge is not just pouring the sand; it is unlocking the ability to pour the sand by breaking the ice block without causing a conveyor belt jam.
The Color Palette Breakdown
Success depends on understanding the volume requirements for each color. Orange is your primary resource, making up approximately 50% of the canvas for the fox's body. White is secondary, used for the snow and chest details. Red is a low-volume but high-precision color needed for facial features and paws. Green and Dark Red are background colors that must be saved for last to avoid bleeding over the fox's delicate edges.
Core Difficulty Factors
The difficulty rating here is high due to the "22-Hit Ice Block." This mechanic functions as a countdown timer. Every cup you process reduces the counter by one. However, the board is designed to make hitting that number 22 difficult. You are given a limited number of accessible single cups early on, forcing you to engage with the dangerous roped cups much sooner than you would like. Managing your slot capacity (max 5) while dealing with these roped pairs is the primary logistical hurdle.
Victory Conditions
To achieve 100% completion, you must fully paint the fox without contaminating the background colors. The level ends when the final dark red cup is poured, grounding the image. You cannot leave the ice block intact; breaking it is mandatory to access the mystery cups hidden beneath. Failure occurs if the conveyor belt becomes full (5/5 slots) with no moves available to process them.
Strategic Phase 1: Breaking the Ice Block
The opening phase of Level 414 is a math problem. You have a large number to reach (22), and limited moves to get there. The goal here is not to paint the picture perfectly yet, but to mechanically clear the path to the rest of the board. This phase requires you to ignore the aesthetic result temporarily and focus purely on supply tray management.
Understanding the Roped Cup Danger
Roped cups are the main enemy in this phase. These are pairs of cups tied together; tapping one pulls both onto the belt instantly, consuming two slots. If your belt has 4 slots occupied, tapping a roped pair will instantly fill the belt to 6/5 (an overflow), causing a deadlock. You must never tap a roped pair unless you have 3 open slots or fewer. Ideally, you want the belt to be completely empty (0/5 or 1/5) before engaging any ropes.
The "Safe Cup" Opening Sequence
Start the level by identifying all single, unattached cups. Typically, these are located on the periphery of the tray. Tap the single dark red cup on the top left, followed by the single green and dark red cups on the top right. This begins chipping away at the ice block counter safely. Your aim here is to reduce the counter from 22 down to roughly 18 without risking a jam.
Calculated Conveyor Management
Watch the slots meter like a hawk. As you tap cups, they travel to the dispensing area. There is a travel time delay. A common mistake is tapping a new cup the moment a slot opens up, forgetting that another cup is already en route. Always wait for the cup to physically dispense the sand and clear the slot before tapping the next one. Patience is your weapon.
Triggering the First Rope Pair
Once the obvious single cups are depleted, you must face the ropes. Look for the roped pair on the mid-right edge, usually consisting of Orange and Dark Red. Ensure your conveyor belt is totally empty. Tap this pair. They will fly onto the belt. Let them process completely. Do not tap anything else until they have cleared. This reduces the ice block count by 2 valuable points.
Stalling for Mystery Cups
As you get closer to breaking the ice (around 5-10 hits remaining), you might run out of easily accessible cups. This is by design. You may need to tap single orange or white cups that you intended to save for the fox's details just to keep the counter moving. Do not hoard cups for the "perfect paint job" yet. Breaking the ice takes priority over color placement in this phase. Use any available single cup to tick the counter down.
The Final Break
The last few hits to break the ice will likely require tapping the bottom-center roped pairs (White and Red). This is the most dangerous moment. Ensure the belt is empty. Tap the pair. As the ice shatters, the grey Mystery Cups will be revealed. Do not immediately tap them. Take a breath. The hardest mechanical part of the level is over.
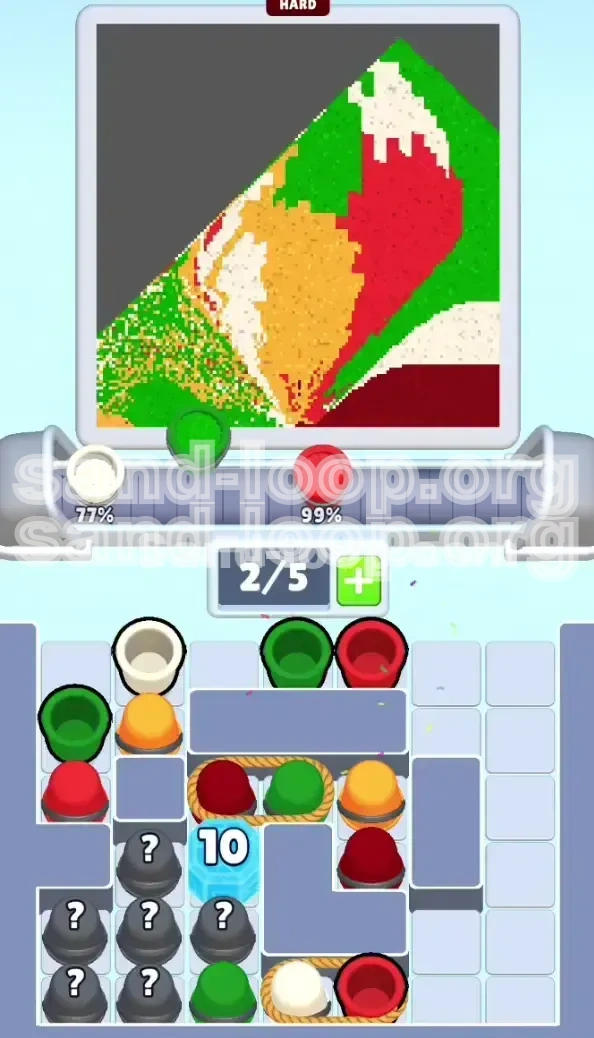
Strategic Phase 2: Color Execution and Layering
With the ice block shattered and the Mystery Cups revealed, the game shifts from a logistics puzzle to a coloring book challenge. The L-shaped cluster of Mystery Cups usually flips into the background colors (Green and Dark Red), but some may become body colors. Now you must execute the pour order with precision.
The Body-First Protocol
You must always pour the main body colors before the background colors. The Orange and Red cups create the core of the image. If you pour the Green sky or the Dark Red floor first, the subsequent body colors will layer on top, making the fox look like it is floating or buried. Start by processing all available Orange and Red cups to solidify the fox's shape.
The Isolation Technique for Details
The fox's eyes and paws are tiny red pixels surrounded by white and orange. To hit these, you need a "clean" cup. Avoid pouring a large Red cup immediately after a White cup, or the sand might bleed. Use the smaller, single red cups you saved earlier to tap these specific pixels. If you run out of small red cups, you may have to retry the level, as large cups are too unwieldy for fine details.
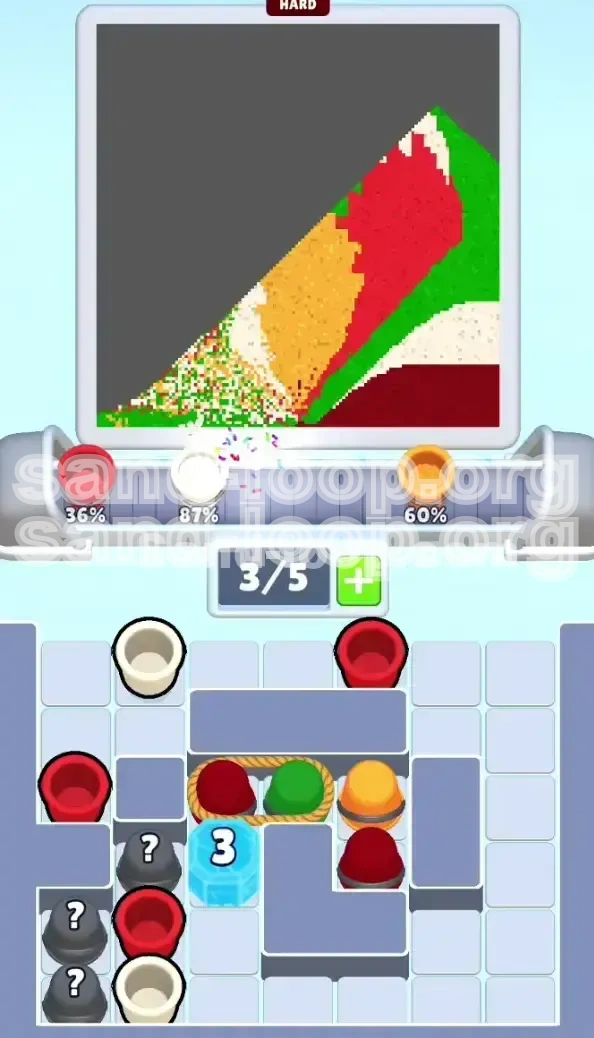
Processing the Mystery Cups
Tap the Mystery Cups one by one. Watch the color preview in the cup before it pours. Most will be Green or Dark Red. As these pour, they will fill in the top and bottom of the canvas. This is satisfying but requires you to have already finished the fox's head and ears. If the ears aren't done, the green sky will spill over them.
Snow and Chest Placement
The White cups are versatile. They are used for the snow under the fox and the chest fur. Ensure you have enough White volume left after breaking the ice. If you used all your white cups to break the ice block in Phase 1, you will not be able to finish the snow layer. This is why managing the "Safe Cup" resources in Phase 1 is critical.
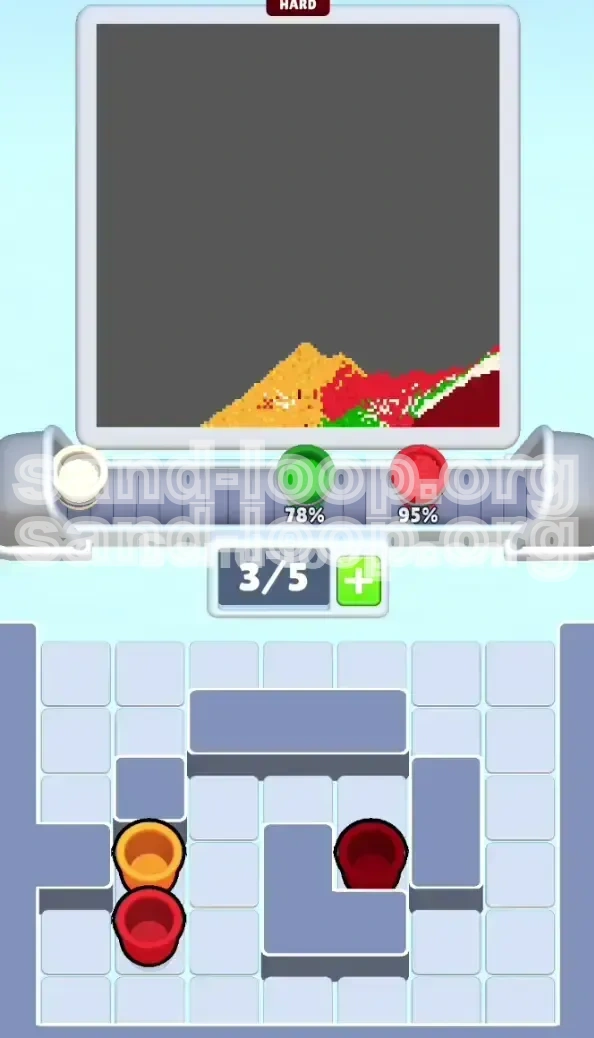
The Final Dark Red Lock
The Dark Red floor is the finishing touch. It grounds the image and covers the bottom pixel row. Save your Dark Red cups for the very end. Pouring them too early creates a muddy baseline that interacts poorly with the white snow paws. Wait until the fox is 100% complete, then flood the bottom with the dark red cups.
Color Order and Logic Analysis
This section details the specific logic behind the color hierarchy. Level 414 is unforgiving with layering. The game engine renders sand in the order cups are processed. Understanding this sequence is the difference between a coherent picture and a mess.
Priority 1: Orange (The Foundation)
Orange is the base. It has the largest surface area and defines the silhouette of the fox. If you mess up the orange, the fox is unrecognizable. This color must be processed first to establish the boundaries for everything else. It occupies the central mass of the canvas.
Priority 2: White (The Contrast)
White sits in the middle of the layer stack. It goes on top of orange (chest fur) but next to red (paws). It serves as a bridge between the warm fox tones and the cold background. Since it is a lighter color, it can be covered by dark colors, but ideally, you want it sitting cleanly on top of the orange base.
Priority 3: Red (The Details)
Red is for accents. It is the most dangerous color because it is dark and high-saturation. If you pour red over a light green background, it creates a dirty brown mess. Red must be confined to the tail, paws, and face. It should never touch the green sky area.
Priority 4: Green (The Background)
Green is a "flood" color. It washes over the top 30% of the canvas. It must be poured after the fox's ears and head are complete. If you pour green first, the orange ears will sit on top of the green sky, looking like strange growths rather than ears against the horizon.
Priority 5: Dark Red (The Ground)
Dark Red is the anchor. It fills the bottom row. It is the final pour because it interacts with the white snow paws. You want the dark red to sit perfectly *under* the paws (or rather, the paws sit on top of it visually). Pouring it last ensures a clean horizon line.
Advanced Troubleshooting and Common Mistakes
Even with a plan, things can go wrong. This section addresses the specific failure points of Level 414 and how to recover from them, or how to restart quickly if recovery is impossible.
Mistake: The Conveyor Belt Deadlock
The Symptom: You have 5 full slots, and the cups on the belt are not processing. You have roped pairs left on the tray but no room to tap them.
The Solution: You are stuck. You cannot recover from a 5/5 deadlock if the remaining cups are roped pairs. The only option is to restart the level. To prevent this, never let the slots exceed 4/5 when dealing with ropes.
Mistake: Premature Background Pouring
The Symptom: You poured the Green background, but the fox's ears are still orange-on-white. The green sand has spilled over the ear tips, turning them murky.
The Solution: Unfortunately, sand does not un-pour itself. You must restart. Always double-check that the top section of the fox (ears/head) is fully colored Orange/Red/White before touching any Green cups.
Mistake: Running Out of Ice-Breakers
The Symptom: The ice block is at "1" hit remaining, but there are no single cups left. Only roped pairs remain, and your belt is full.
The Solution: This is a planning failure from Phase 1. You likely tapped too many single cups early on that you didn't need. In your next run, try to preserve 2-3 single cups specifically for the end of the ice-breaking phase to avoid the rope trap.
Mistake: Color Bleeding on the Tail
The Symptom: The fox's tail, which should be bold red, looks pink or washed out.
The Solution: You likely poured the white snow cups *after* the red tail cups. The white sand has layered over the red tail. The fix is to reverse the order: Red Tail -> White Chest/Snow. Always pour the "inside out" — body details before surrounding background elements.
Issue: Mystery Cup RNG
The Symptom: The mystery cups turned into colors you didn't need (e.g., giving you Red when you needed Green).
The Solution: Mystery cups in this level are pseudo-random but weighted. If you get a bad roll, you may be short on background colors. In this case, focus on finishing the fox body as perfectly as possible. If you run out of Green for the sky, the level may not register 100% completion. Restart and hope for a better distribution, or adjust your strategy to use the mystery cups as soon as they appear to see what color they are.
Speed Run and Pro Tips
Once you have mastered the logic, you might want to improve your time or efficiency. These tips are for players who are comfortable with the mechanics and want to optimize their playstyle.
The "Tap and Wait" Rhythm
Speed running this level is counter-intuitive. The fastest way to complete it is to wait. Establish a rhythm: Tap a cup -> Watch the belt -> Wait for the slot to open -> Tap the next cup. Breaking this rhythm to tap frantically will result in the 5/5 deadlock, which forces a full restart, costing you minutes. A steady, rhythmic pace is faster than a fast pace with a crash.
Pre-Visualization
Before the level even starts (or while the loading animation is playing), visualize the color order: Orange -> Red -> White -> Green -> Dark Red. If you have this order memorized, you won't waste time scanning the canvas trying to decide what to do next. Your hands will know where to go.
Batch Processing Single Cups
In Phase 1, group your single cup taps. If you see three single cups available, tap them all in quick succession (provided you have the slot space). This gets the small, incremental damage to the ice block out of the way quickly, leaving you with a clearer board to manage the complex roped pairs.
The Slot Buffer Strategy
Always keep one slot open as a "buffer" for conveyor travel time. Visually, treat a 4/5 slot belt as "Full." If you operate on this rule, you will never be caught off guard by a cup that takes a split second longer to move from the tray to the dispenser. This buffer is your safety net against accidental overflows.
Optimizing Rope Placement
When you are forced to tap roped pairs, try to time them so that the last cup from the *previous* batch is dispensing just as the roped cups enter the belt. This minimizes downtime. You want the belt to be constantly moving, but never overflowing. It is a balancing act between throughput and capacity.