
Level 47
HARDHow to solve Sand Loop level 47? Get instant solution for Sand Loop 47 with our step by step solution & video walkthrough. Sand Loop 47 tips and guide.
Play Sand Loop Now
Experience the puzzle challenge firsthand
Game Screenshots
Sand Loop Level Guides
Level Overview: The Orange Blob Monster
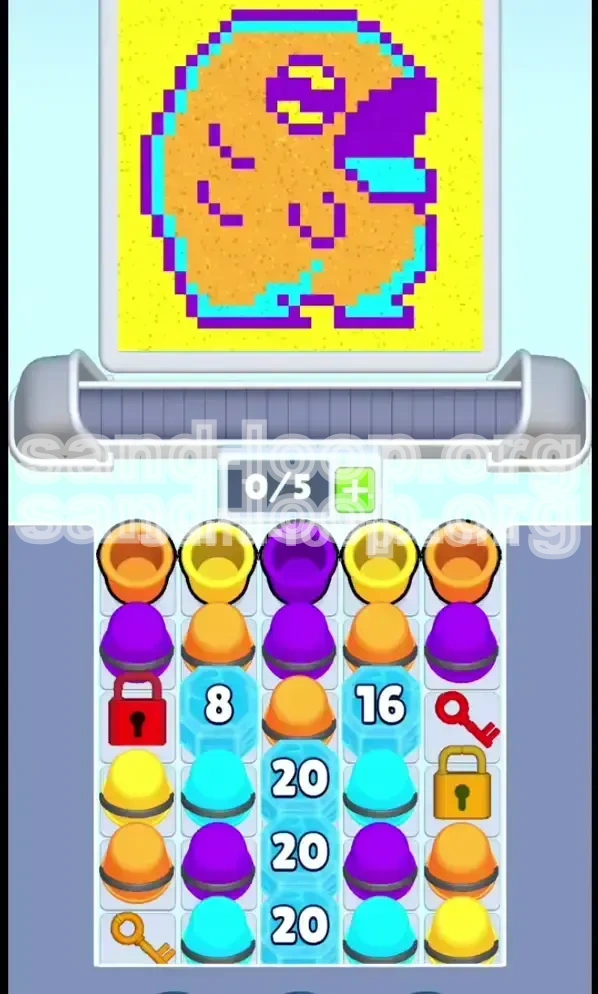
Sand Loop Level 47 introduces a significant spike in difficulty, combining resource management with a strict logic puzzle. Unlike previous stages where you could rely on fast reflexes, this level—dubbed the "Orange Blob Monster"—requires a deliberate, calculated approach. The visual target is a deceptively simple pixel-art character featuring a large Orange body, Purple facial features, a Cyan outline, and a Yellow background.
The primary challenge lies not in the painting itself, but in the physical layout of your tray. You are immediately confronted with a daunting "Ice Spine"—a vertical column of high-value Ice Blocks (20, 20, 20) sitting directly in the center of your workspace. This spine acts as a barrier, splitting your tray into two distinct hemispheres and preventing access to crucial resources located at the bottom.
Success in this stage depends on your ability to manage your limited 5-slot inventory while simultaneously clearing the top-layer ice to trigger the cascades needed for the keys. If you panic and fill your slots too early, you will create a deadlock that forces a restart. This guide will provide the exact strategy to dismantle the blockade layer by layer.
The "Ice Spine" Obstacle
The central column is the defining feature of this level. You will see a stack of three massive Ice Blocks, each requiring 20 matches to break. Trying to chip these away directly is inefficient. Your strategy must focus on clearing the outer columns to destabilize the center.
Resource Scarcity
Notice that Cyan cups, required for the monster's outline, are locked behind the Gold mechanism on the right. You cannot access them until the late game. Attempting to start the outline early is impossible; you must focus on the Orange body first.
The Inventory Management Puzzle
With only 5 slots available, you must keep at least 2 slots empty at all times. Filling your tray blocks new cups from entering, which stops the cascade needed to drop keys into position. Discipline is more important than speed here.
Visual Complexity
The target image has sharp, high-contrast borders. A single misplaced color (like dropping Cyan into the Purple mouth) can ruin your accuracy percentage. You must wait for the nozzle to align perfectly with the specific color zones.
Key Dependency
The level is gated by two locks: a Red Lock on the left and a Gold Lock on the right. The Red Key is trapped in the upper-middle section, while the Gold Key is buried deep. You cannot clear the level without following the specific order to free these keys.
Background Management
The Yellow background consumes a large volume of sand. Since Yellow is abundant on the left side, it is tempting to spam it. However, doing so too early will clog your slots with Yellow, leaving no room for the critical Purple and Orange cups needed for the monster's details.
Step-by-Step Instructions
This walkthrough is divided into phases. Do not rush ahead to future phases; ensure each step is complete before moving to the next.
Phase 1: Assessment and Initial Clearing
Start the level and pause. Look at the "Ice Spine." Do not touch the center column. Identify the smaller Ice Blocks on the far left (Value: 8) and far right (Value: 16). These are your entry points.
Phase 2: Breaching the Left Side (The Red Key)
Begin sending cups onto the conveyor. Prioritize Orange and Yellow cups. Your immediate goal is to break the top-left Ice Block (Value 8). As you match Orange and Yellow cups in the first two columns, the pressure will break this block quickly.
Phase 3: Retrieving the Red Key
Once the left Ice Block breaks, the board will shift. Watch the Red Key closely. It is likely hovering in the middle rows. You need to clear the cups *directly underneath* the Red Key to make it fall onto the conveyor belt. Use your slot space to manipulate the columns: if a cup is blocking the key's path, pull it into your tray.
Phase 4: Unlocking the Left Bank
Once the Red Key is on the belt, send it to the mixer to break the Red Lock. This unlocks a massive reservoir of Yellow and Orange cups at the bottom left. This is your fuel tank for the main body of the monster.
Phase 5: The Right Side and the Gold Key
Shift your focus to the right side. You now have a steady flow of Yellow/Orange. Use these to start chipping away at the right-side Ice Block (Value 16). As this block breaks, it will destabilize the lower rows, freeing the Gold Key (which usually starts trapped in the bottom-left corner but gets shifted during the left-side clear).
Phase 6: Unlocking Cyan (The Outline)
Process the Gold Key to open the Gold Lock. This releases the Cyan cups. Warning: Do not flood the tray with Cyan yet. The Cyan cups are only effective when the nozzle is scanning the edges of the painting.
Color Order and Processing Strategy
The order in which you fill the canvas is critical to avoiding "crosstalk" between colors. The nozzle moves automatically, so you must have the correct color ready *before* the nozzle arrives.
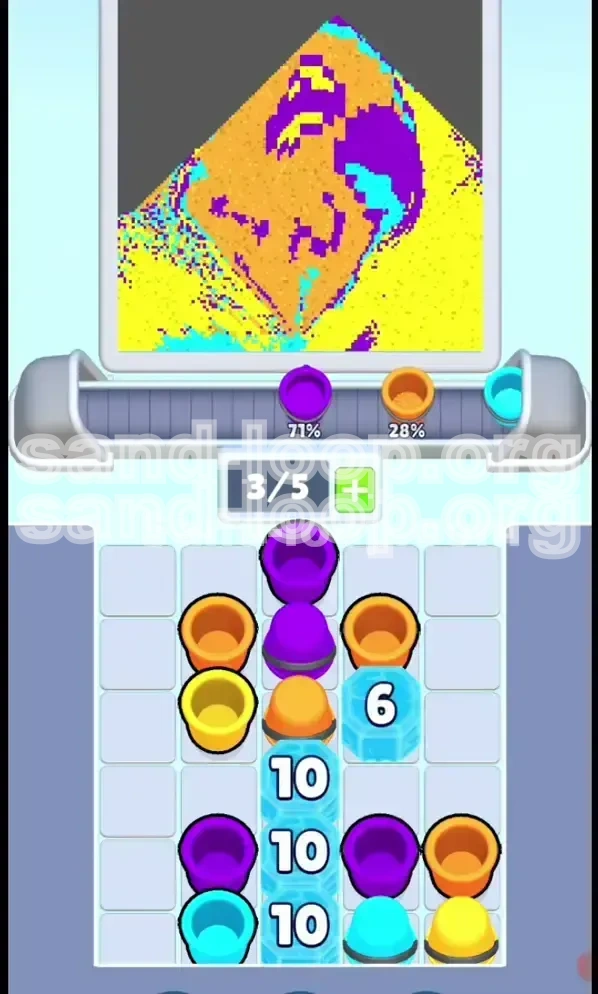
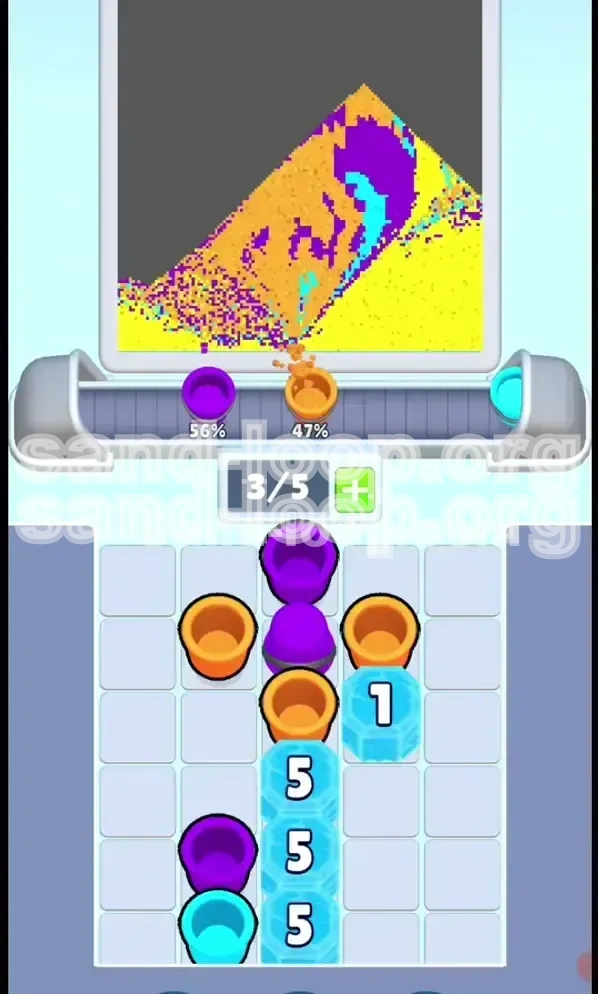
1. Primary Fill: Orange Body (40% of Canvas)
The Orange Blob is the largest area. Start filling this immediately after unlocking the Red Lock. The nozzle will likely start in the center-top. Since you have plenty of Orange cups from the left bank, this is the safest time to load your tray with 3-4 Orange cups and let them flow.
2. Secondary Fill: Yellow Background (35% of Canvas)
Yellow is the background. You should process Yellow cups only when the nozzle moves to the periphery or if you have excess slot space. A good rule of thumb is to keep a 1:2 ratio of Orange to Yellow in your tray during the mid-game.
3. Detail Work: Purple Features (15% of Canvas)
The monster's eyes and mouth are small. Wait until the nozzle is directly over the face before loading Purple cups. If you load Purple too early, the nozzle might drift to the background and waste your precious Purple supply on areas that require Yellow.
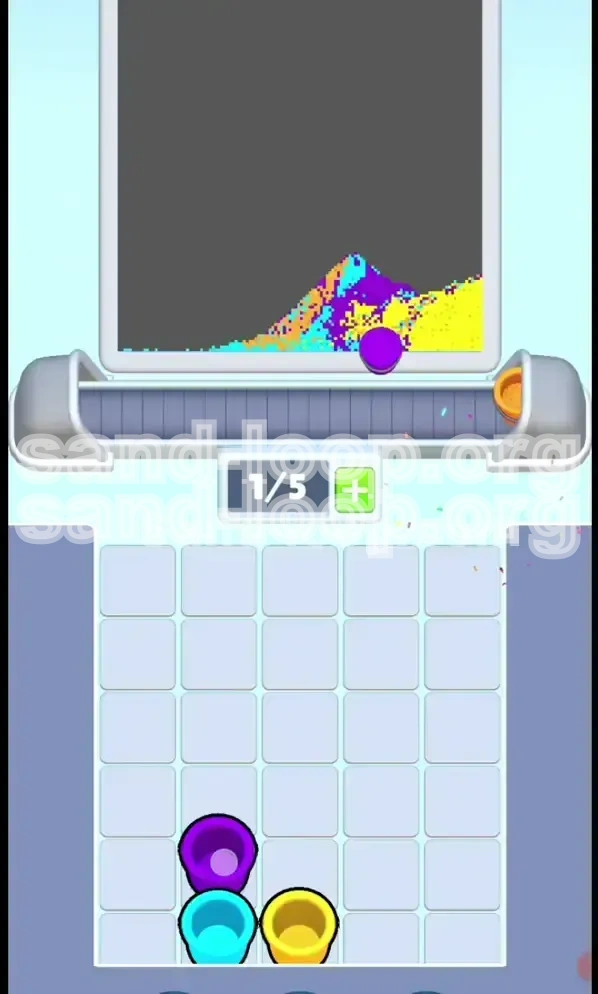
4. Final Touch: Cyan Outline (10% of Canvas)
The Cyan outline is the most dangerous phase. It is a thin line. If you have a stack of Cyan cups in your tray while the nozzle is over the Orange body, you will ruin the Orange fill with Cyan dots. Only activate the Cyan cups after the main body is 80% complete.
Key Tips for Success
Mastering Level 47 requires understanding the hidden mechanics of the game. These tips will help you optimize your playthrough.
The "Slot Reserve" Rule
Never fill all 5 slots unless you are 100% sure the next 5 cups on the belt are the exact color you need. Keeping 1 or 2 slots empty gives you the flexibility to grab a Key or a specific color cup that suddenly appears without disrupting your flow.
Cascading Matches
Use gravity to your advantage. Sometimes, instead of matching a cup immediately, you can wait for a column to clear. The falling cups will often create automatic matches, saving you time and slot space. This is essential for clearing the cups trapped underneath the high-value Ice Blocks.
Nozzle Tracking
Keep your eyes on the nozzle, not just the tray. Anticipate where it will go next. If it's moving from the face (Purple) to the background (Yellow), immediately stop feeding Purple cups, even if you have them in your tray.
Key Priority
If a Key is on the conveyor belt, it takes priority over everything else. Even if you are in the middle of a perfect Orange fill, if the Red Key appears, you must grab it to prevent it from falling off the end of the line (though in this game loop, keys usually stay, but grabbing them frees up the belt).
Ice Block Math
Don't waste matches on the "20" blocks. Every cup you match against a "20" block is a cup not used for clearing the "8" or "16" blocks. Focus your fire where the numbers are lowest to trigger the board shifts fastest.
Utilize the "Gold Lock" Delay
The fact that Cyan is locked is actually a blessing. It prevents you from accidentally using it too early. Treat the Gold Lock as a timer—you have until the lock opens to perfect your Orange and Yellow fills.
Common Mistakes to Avoid
Players often fail Level 47 because of bad habits formed in easier levels. Avoid these pitfalls to ensure a smooth clear.
Mistake 1: Premature Cyan Spam
The most common error is unlocking the Gold Lock and immediately dumping all the Cyan cups into the tray. Because the outline is so thin, the nozzle will inevitably drift over the Orange body, turning it a muddy blue-green. Correction: Feed Cyan cups one by one, only when the nozzle is on the edge.
Mistake 2: Ignoring the "8" Block
Some players try to clear the right side first because it looks bigger. This leaves the "8" block on the left intact, blocking the Red Key. Correction: Always clear the smallest ice numbers first (Left side > Right side > Center).
Mistake 3: Clogging the Conveyor
If you fill your tray with 5 Orange cups and the belt brings a Purple cup needed for the eyes, you have no room to take it. You are forced to use an Orange cup, wasting time and accuracy. Correction: Maintain "buffer slots" for incoming color changes.
Mistake 4: Over-filling the Background
Since Yellow is abundant, it's easy to overfill the background while the nozzle is still trying to fill the monster's body. This results in the monster having jagged yellow edges. Correction: Wait for the nozzle to pass over the monster before heavy background filling.
Mistake 5: Panic Matching
When the board is full of ice, players often start randomly matching cups anywhere they can. This usually clears the wrong columns. Correction: Be surgical. Only match cups that contribute to lowering the specific Ice Blocks you are targeting.
Mistake 6: Forgetting the Keys
In the heat of painting, players often leave the Red or Gold Key sitting on the conveyor for too long. While they don't disappear, having them on the belt reduces the efficiency of new cup generation. Correction: Process keys the moment they are accessible.
Solutions for When You Are Stuck
Sometimes, despite best efforts, the board locks up. Here is how to recover from specific deadlock scenarios.
Scenario: "The Frozen Spine"
You have cleared the sides, but the middle "20" blocks just won't break, and the board isn't moving.
Solution: Stop trying to break the middle. Look for the *smallest* remaining Ice Block anywhere on the screen and focus entirely on that. Usually, breaking a peripheral block will cause a shift that drops a heavy stack of cups onto the center spine, cracking it automatically.
Scenario: "No Purple Cups Available"
You are painting the face, but no Purple cups are spawning, and you have a tray full of Yellow.
Solution: You need to force a refresh. Use or discard your Yellow cups quickly (even if it means slightly overfilling a yellow area) to cycle through the conveyor faster. Purple cups are likely stuck behind a stack of Yellow cups in the queue. Clearing space speeds up the queue.
Scenario: "Key Trapped Under Ice"
You can see the Gold Key, but it's sitting on top of an Ice Block you can't reach.
p>Solution: You need to clear the column *adjacent* to the key. Don't try to clear the block directly under it (if it's a high value). Clear the neighbor column to shift the board sideways, which will slide the Key off the ice block and onto a breakable cup.Scenario: "Accuracy is Too Low"
You finished the painting, but your percentage is only 80%.
Solution: This is usually due to the Cyan Outline or the Purple Eyes. If the eyes are "leaking" color, it means you filled them while the nozzle was moving. The fix is to pause just as the nozzle hits the eye, drop a single Purple cup, and wait. For the outline, you may need to trace it manually by feeding Cyan cups slowly rather than in a batch.
Scenario: "Full Inventory, No Matches Possible"
Your tray is full, the conveyor is blocked, and you can't make a match.
p>Solution: You have to make a "sacrifice match." Look at your tray. Is there a color you have the most of? Find a spot on the canvas where that color *mostly* fits and dump it there, even if it's slightly inaccurate. This frees up a slot and gets the conveyor moving again.Speed Run Tips
Once you have mastered the logic, you can aim for a faster completion time. These shortcuts are for advanced players.
The "Left-Heavy" Start
Don't distribute attention evenly. Slam the left side immediately with Orange/Yellow. The faster you break the "8" block, the faster the Red Key drops. You can ignore the right side entirely until the Red Lock is open.
Pre-Loading for the Cascade
As soon as you see the "8" block about to break (visual cracks appear), fill your tray with the color of the cups *behind* the Red Key. When the block breaks and the key falls, you will have the correct cups ready to clear the path for the key immediately.
Bulk Processing Cyan
Instead of feeding Cyan one by one, wait until the nozzle is in the top-left corner. Unleash 3 Cyan cups in quick succession while the nozzle traverses the top edge. Pause, then repeat for the right edge. This minimizes the time the nozzle spends drifting over the body.
Ignoring the 20s
Truly, do not touch the center "20" blocks until the very end. In a speed run, every second spent on them is wasted. They will shatter naturally from the shockwaves of the side columns clearing. Trust the physics engine.
Pattern Recognition
The "Orange Blob" is roughly circular. You can predict the nozzle's path (usually a spiral or zig-zag). Anticipate the path to have the next color ready before the nozzle arrives. If you know the nozzle goes center -> edge, load Orange, then immediately load Yellow.
The "Reset" Early Exit
If your very first few moves don't break the left "8" block within 10 seconds, reset the level immediately. In a speed run, a bad start cannot be recovered from because the resource generation will be too slow.