
Level 424
HARDHow to solve Sand Loop level 424? Get instant solution for Sand Loop 424 with our step by step solution & video walkthrough. Sand Loop 424 tips and guide.
Play Sand Loop Now
Experience the puzzle challenge firsthand
Game Screenshots
Sand Loop Level Guides
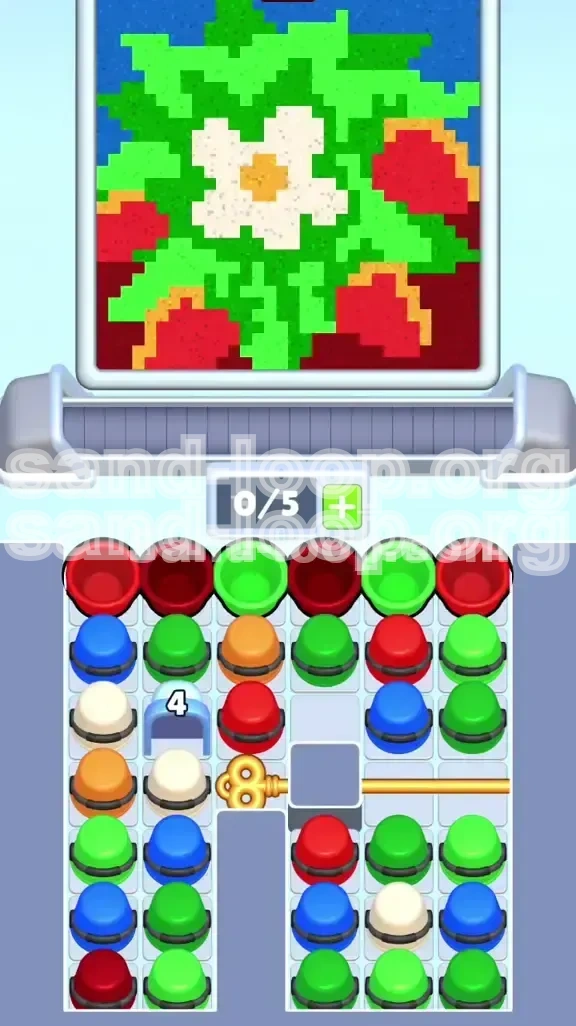
Level Overview: The "Strawberry Flower" Strategic Layout
Level 424, often referred to by the community as the "Slot Economy Test," presents a deceptive visual challenge. The image depicts a serene Strawberry Flower floating against a dark blue night sky, but the gameplay mechanics are anything but calm. This level is specifically designed to punish players who rely on brute-force tapping or rapid queueing.
The fundamental difficulty of Level 424 stems from a severe restriction on your inventory slots combined with a board layout that splits critical resources behind physical barriers. You are not just painting; you are managing a logistics crisis. The Golden Key mechanism in the bottom-right and the Ice Block in the middle-left effectively act as valves that control your flow of materials. If you open these valves prematurely—before your slot capacity is free—you will flood your board with unusable colors and face an inevitable deadlock.
The "Slot Starvation" Mechanic
Unlike standard levels where you can queue 3 or 4 cups in advance, Level 424 forces you to operate with a "Just-In-Time" inventory. You begin with limited functional slots. If you fill your queue while the Ice Block is still closed, you will not have space to accept the new Green cups released when the ice shatters. This leads to a cascading failure where you are forced to dump valuable paint into the background just to free up space.
Barrier Analysis: Ice and Gold
The board is governed by two distinct locks. The Ice Block (Middle-Left) requires 4 hits to break and safeguards your primary supply of Green pigment for the leaves. The Golden Key (Center-Left) controls the lower-right quadrant, locking away approximately 40% of the level's total volume, including the bulk of the White and Red cups required for the finishing touches.
Color Proximity Risks
The spatial arrangement of the art is the primary cause of failure. The White flower petals are sandwiched directly between the vibrant Red strawberries and the Green leaves. There is zero margin for error here. If a single drop of Red sand bleeds into the White petal zone, or if Green splashes onto the White center, the purity of the image is compromised, often requiring a full restart to achieve a high score.
The Resource Volume Disparity
Not all colors are created equal in this level. Red and Blue are "High Volume" colors, meaning they require dozens of cups to complete. Green is "Medium Volume," while Yellow is "Micro Volume." The challenge is balancing the demand for High Volume paints with the slow trickle of supply provided by the conveyor belt. Mismanaging the timing of the Red phase will leave you with a painted board but no remaining moves to finish the background.
Why "Slot Hygiene" Determines Victory
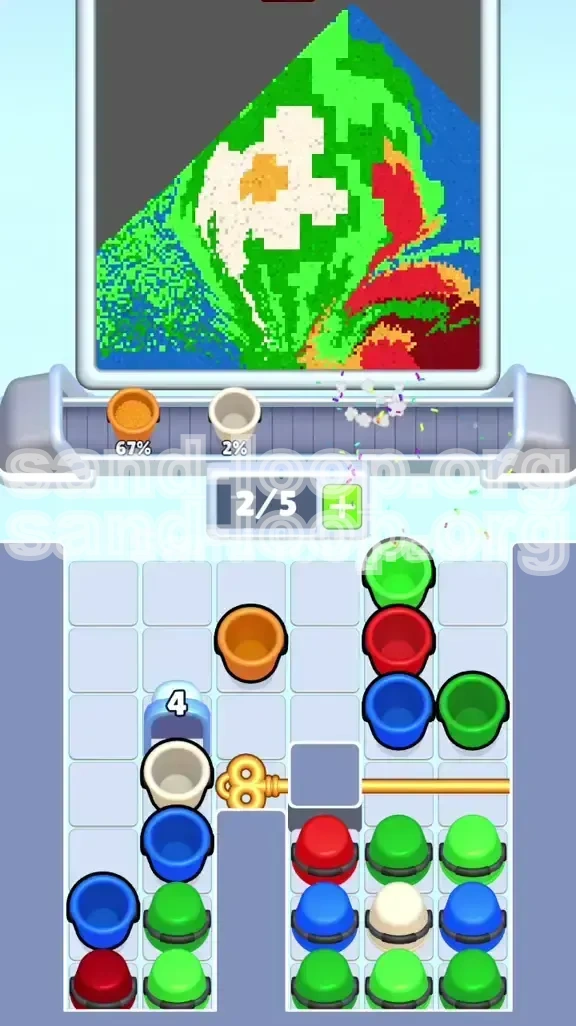
The difference between a win and a loss in Level 424 is usually determined by how empty you keep your slots. We recommend maintaining a strict "2/5 Occupancy" rule for the first 50% of the level. Keeping 3 slots open allows you to instantly absorb new cups from the conveyor belt without triggering a "Game Over" due to a full queue. It requires patience to watch a cup travel slowly to the dispenser, but it is the only way to survive the mid-game bottleneck.
Clear Objectives: The Three-Phase Protocol
To navigate Level 424 successfully, you must abandon the instinct to "paint what you see first." Instead, you must follow a rigid operational protocol that prioritizes unlocking resources over aesthetic progress. Your workflow is divided into three distinct phases: Access, Execution, and Finalization.
Objective 1: The "Green" Access Phase (Turns 1-10)
Your immediate priority is not to complete the picture, but to break the Ice Block. The Green cups needed for the leaves are physically trapped under the ice. Your sole objective in the opening moves is to reduce the Ice Block counter to zero without clogging your inventory. Do not touch Red or Blue cups unless they are blocking your access to the column above the Ice Block.
Objective 2: The "Key" Trigger Phase (Turns 11-25)
Once the Ice is broken and your initial Green layer is down, you must shift focus to the Golden Key. The lock is usually located adjacent to a cluster of difficult-to-reach cups (often Orange or White). You must clear the specific cups adjacent to the key to trigger the board shift. Do not start painting the bottom-right section yet; simply focus on unlocking the real estate.
Objective 3: The "Red & Green" Foundation Phase
Before you can touch the delicate White petals, you must complete the "aggressive" colors: Red and Green. These colors form the base layer of the image. Because the sand physics engine can sometimes "splash," pouring the heavy Red sand *after* the White petals are filled is a recipe for disaster. You must achieve at least 90% completion on Red and Green before unlocking the White paint from the bottom-right quadrant.
Objective 4: The "Precision" White Phase
White is the most volatile color on this board. It sits in the center and is surrounded by contrast. Your objective here is not speed, but isolation. You must ensure that the Red and Green dispensers are completely empty before queueing White cups. Any residual paint in the machine will contaminate the White petals. Treat this phase as a surgical operation rather than a painting task.
Objective 5: The "Void" Filling Phase
The Dark Blue background should be treated as "trash" for the majority of the level. It is the dump zone for colors you don't need. Your final objective is to sweep the board. By leaving Blue for last, you ensure that any minor spills or mis-taps that occurred during the level are swallowed up by the darkness of the background, rendering them invisible and securing your 100% rating.
Step-by-Step Walkthrough Guide
Follow this exact sequence of actions to navigate the board safely. This walkthrough is designed to minimize the risk of color bleeding and slot jams.
Step 1: Surgical Ice Breaking (Opening Moves)
Do not spam taps at the start. Identify the single column directly feeding into the Ice Block located in the middle-left section.
- Action: Tap only the cups in the column above the Ice Block.
- Logic: These cups (often Red or Blue) are the only ones that lower the counter.
- Slot Management: Send these tapped cups immediately. Do not let them sit in your tray.
- Goal: Shatter the ice to release the Green cups trapped underneath.
- Warning: Ignore the Golden Key area completely until the Ice is gone.
Step 2: Establishing the Green Base
With the Ice Block destroyed, the conveyor belt will immediately feed you a fresh stack of Green cups.
- Action: Pull the new Green cups immediately.
- Target: Apply Green to the stems and the base of the strawberry leaves.
- Strategy: Do not aim for 100% Green completion. Aim for about 50% coverage.
- Reasoning: You need to establish a border so that when you pour the heavy Red sand, it doesn't bleed into the background areas.
Step 3: The Red Heavy Lift
Switch your focus entirely to the Red cups. These are usually abundant in the top-left quadrant.
- Action: Tap all accessible Red cups to fill your queue.
- Target: The three large strawberry clusters.
- Execution: Pour aggressively. The strawberries are large pixel-dense areas.
- Tip: If a Blue cup is blocking a Red stack, tap the Blue to move it to the tray, but send it to the dispenser immediately (letting it pour into the background) to clear the slot for more Red.
Step 4: The Golden Key Maneuver
Look at the center-left area. You will see the Golden Key lock icon.
- Action: Identify the cups touching the lock mechanism. They are usually Orange or stray White cups.
- Move: Clear these specific cups to trigger the unlock animation.
- CRITICAL PAUSE: As soon as the key turns, STOP TAPPING.
- Why: The board will shift. If you tap a new cup while the board is shifting, you might accidentally pull a color you can't use yet.
Step 5: The Isolated White Protocol
The bottom-right quadrant is now open, revealing a stash of White cups.
- Pre-check: Ensure your Red dispenser is empty.
- Action: Tap White cups one at a time.
- Target: The flower petals.
- Micro-Management: Watch the dispenser closely. If the dispenser switches to White but there is still Red residue, you may contaminate the petals. If this happens, pause and let the residue drain, or restart if the spill is large.
Step 6: The Yellow Dot and Blue Sweep
The endgame is in sight. You have a tiny Yellow center dot and a massive Blue background.
- Action: Tap one Yellow cup. Wait for it to pour. Do not queue more than one.
- Target: The flower center.
- Final Action: Unleash the Blue. Tap every remaining Blue cup on the screen.
- Strategy: Since Blue is the background, you can speed up your tapping here. It is impossible to "mess up" the blue background with blue sand.
Color Processing Order: The Logical Hierarchy
Processing colors in the wrong order is the primary cause of failure in Level 424. The spatial relationship between the colors dictates the order of operations to prevent "bleeding."
Phase 1: Green (The Foundation)
Green must be processed first. Not only is it locked behind the Ice Block, but it also serves as the "buffer" zone between the Red strawberries and the Blue background. If you paint the background Blue before the Green leaves, any stray Green sand will be visible against the dark sky. Establish Green first to create clean boundaries.
Phase 2: Red (The Dominant Layer)
Red is the "heaviest" color in the level, requiring the most physical sand. It must be done before White. Red sand is viscous and takes a long time to pour. Attempting to micro-manage White petals while a Red cup is still processing in the machine is risky. Furthermore, Red acts as the outer border for the flower. You must finish the exterior before moving to the interior.
Phase 3: White (The Sensitive Core)
White is the "Critical Path" item. It has the lowest tolerance for error. Because White sits directly next to Red, you must ensure the Red phase is 100% complete before switching. Any leftover Red in the dispenser will inevitably turn your White petals pink. Treat this color as a separate, distinct phase that requires your full attention.
Phase 4: Yellow (The Accent)
Yellow is the "Micro" phase. It represents less than 1% of the total board area. Because it is so small, it is highly susceptible to overflow. If you process Yellow too early, the dispenser will continue pouring Yellow sand long after the center dot is full, spilling into the White petals. Process Yellow only when you are ready for the final touches.
Phase 5: Blue (The Eraser)
Blue is the "Cleanup" phase. By definition, the background is the negative space. It is impossible to overfill the background because there is nothing adjacent to it that can be ruined. Saving Blue for last allows you to use any "leftover" moves or mis-tapped cups to fill the void without consequence.
Common Mistakes to Avoid
Level 424 is a minefield of potential errors. Most restarts are caused by impatience and poor slot management.
The "Queue Clotting" Error
The most frequent mistake is treating your slot tray like a storage locker. Players often tap 5 cups in a row to "get ready" for the next color. In Level 424, this creates a clot. If the conveyor belt shifts or a new color is unlocked, you have no room to accept the new cup. Rule of thumb: Never have more than 2 cups in your queue unless you are 100% sure of the next 5 moves.
The "Color Bleed" Catastrophe
This occurs when you switch from Red to White without purging the machine. The sand nozzle retains a small amount of the previous color. If you switch to White immediately after a massive Red pour, the first few seconds of White paint will come out pink. Fix: Always wait for the dispenser to fully finish animating the previous color before tapping the next one.
Ignoring the "Key" Timer
The Golden Key does not unlock instantly. It requires the game logic to process the clearing of adjacent tiles. Tapping the bottom-right area frantically before the key animation finishes is a waste of moves. You cannot interact with the locked cups until the padlock icon physically disappears from the screen.
The "Tiny Yellow" Spill
Because the Yellow center is so small, players often underestimate the amount of sand a single cup holds. A standard cup contains enough sand to fill the center dot 3 times over. Consequence: The excess sand spills over into the White petals. Tip: If you see the Yellow progress bar hit 100% while the cup is still pouring, immediately send that cup to the dispenser (trash) or click away to stop the flow if the game allows.
Wasting "Ice" Moves
Some players panic when they see the Ice Block and start tapping random cups hoping for a "critical hit." Only cups in the specific column above the Ice Block affect its counter. Tapping cups on the far right of the screen does nothing to the ice but fills your valuable slots. Strategy: Focus 100% of your attention on the column directly above the block until it shatters.
Solutions for When You Are Stuck
Even with perfect planning, the RNG (Random Number Generator) can put you in a difficult position. Here is how to recover from specific deadlock scenarios.
Scenario A: The "Full Queue" Deadlock
Situation: Your 5 slots are full, the Ice Block is still active (needing 2 hits), and the only cup available to break the ice is buried under other cups in your queue.
- Immediate Action: Send the "safest" cup to the dispenser immediately.
- Selection: Choose a color that is already full (like Blue) or a color that is blocked (like a Red you can't reach yet).
- Goal: Create 1 empty slot. This allows you to pull the specific cup needed to break the ice.
- Prevention: Never let your queue fill up while a lock is still active.
Scenario B: The 99% Glitch
Situation: The picture looks complete, but the level won't end. You are stuck at 98% or 99%.
- The Invisible Pixel: In Level 424, this is almost always a gap between the Red Strawberry and the Green Leaf.
- Fix: Don't just look at the colors; look at the edges. Zoom in (if possible) or look for "shimmering" pixels that haven't updated color.
- Common Hideout: Check the corners of the screen behind the UI elements, or the tiny gaps between flower petals.
Scenario C: Conveyor Belt Lag
Situation: You tap a cup, but it doesn't move. You tap again, and suddenly three cups move at once, clogging the dispenser.
- Cause: The game engine is struggling to process the physics of the sand pouring.
- Solution: The "Hard Stop." Put the device down for 5 seconds. Let the current cup finish pouring entirely.
- Result: The logic will catch up, the belt will unjam, and you can resume tapping one by one.
Scenario D: No Greens Available
Situation: You haven't broken the Ice Block yet, and you are completely out of Green paint.
- Diagnosis: You have run out of resources because you were painting other areas.
- Fix: You must sacrifice moves. Look at the column above the Ice Block. Even if the cup is Blue (useless), you must tap it to lower the counter.
- Logic: Breaking the ice is the only way to get more Greens. You cannot paint leaves without it.
Speed Run Tips and Optimization
Once you have mastered the logic of the level, you can optimize your playstyle to achieve faster completion times (sub-60 seconds).
Parallel Processing (Mental Queueing)
While the sand is pouring from the current cup, do not stare at the screen. Use that downtime to scan the board for the next color you need. Identify exactly which cup you need to tap next (e.g., "The Red cup on the top left, second from the top"). As soon as the current pour finishes, tap that pre-located cup immediately. This eliminates the "searching" time between pours.
The "Buffer Slot" Strategy
Advanced players keep a "trash" cup in Slot 5. This is usually a Blue cup that you have no intention of using yet. By keeping a useless cup in your queue, you prevent the game from auto-filling that slot with a critical color (like White) before you are ready for it. When you need to pull a specific cup, you pull it. If the game forces you to take a cup from the conveyor, it takes the "Buffer" Blue cup instead of a vital Red.
Pre-Positioning for the Key
As you are painting the Green leaves, try to clear the cups adjacent to the Golden Key if they are in your path. Don't make a special trip, but if you see a stray Orange cup blocking the key, clear it early. This means that when you eventually decide to trigger the key, it will unlock instantly, giving you a faster transition to the bottom-right section.
Risk Management for Speed
In a speed run, you can accept a small amount of color bleeding (1-2%) if it saves you 10 seconds of micro-management. For example, if the Yellow center is 90% full, you don't need to wait for it to hit 100% precisely. You can switch to Blue (Background) immediately. The Blue sand will cover the tiny Yellow overflow, making the error invisible. This "Good Enough" principle is key to fast times.