
Level 438
HARDHow to solve Sand Loop level 438? Get instant solution for Sand Loop 438 with our step by step solution & video walkthrough. Sand Loop 438 tips and guide.
Play Sand Loop Now
Experience the puzzle challenge firsthand
Game Screenshots

Sand Loop Level Guides
Level Overview: The Rocket Launch Logic Puzzle
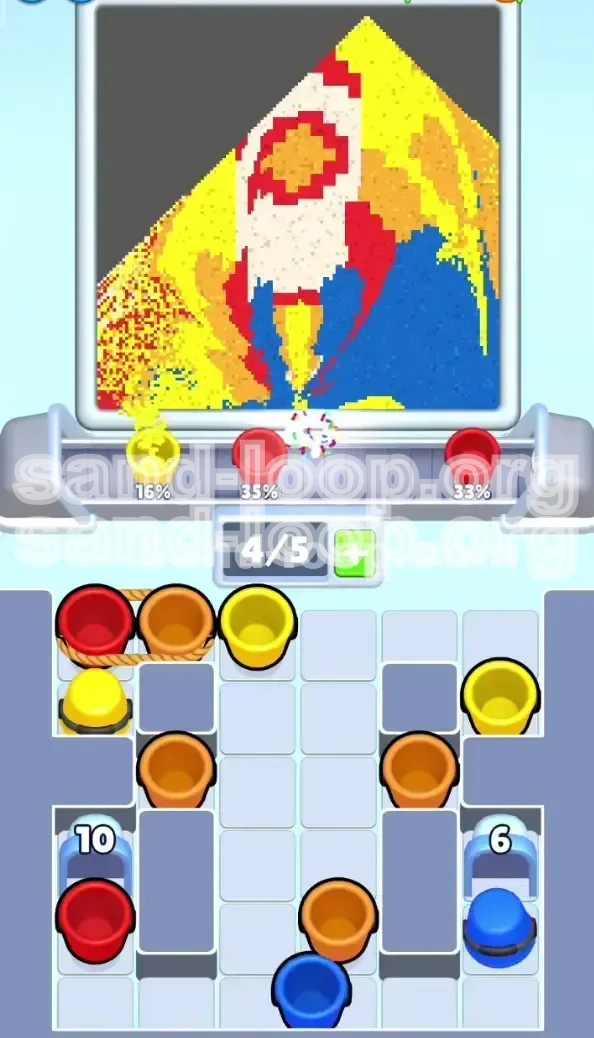
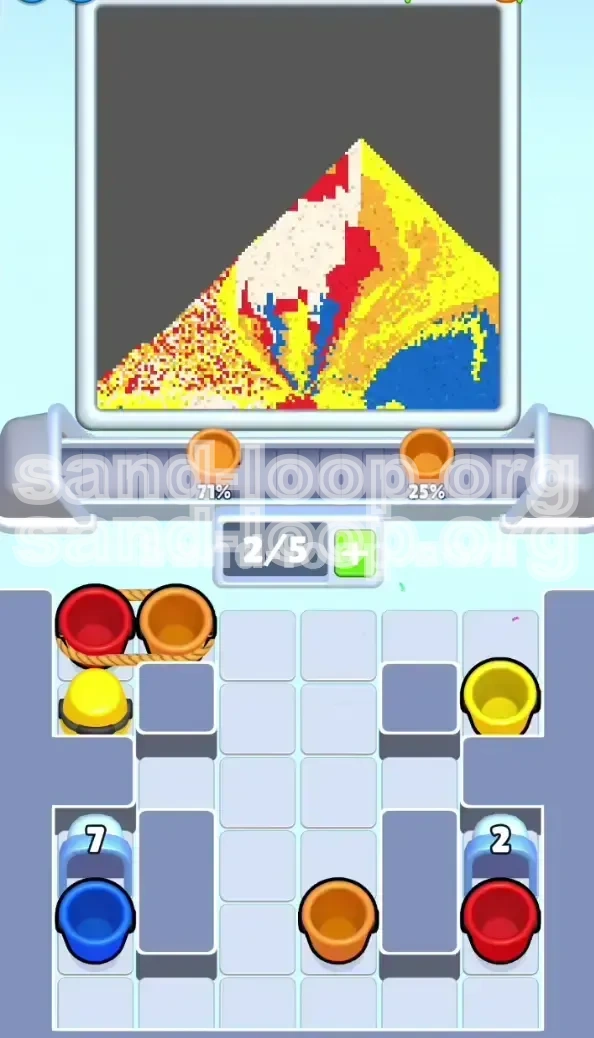
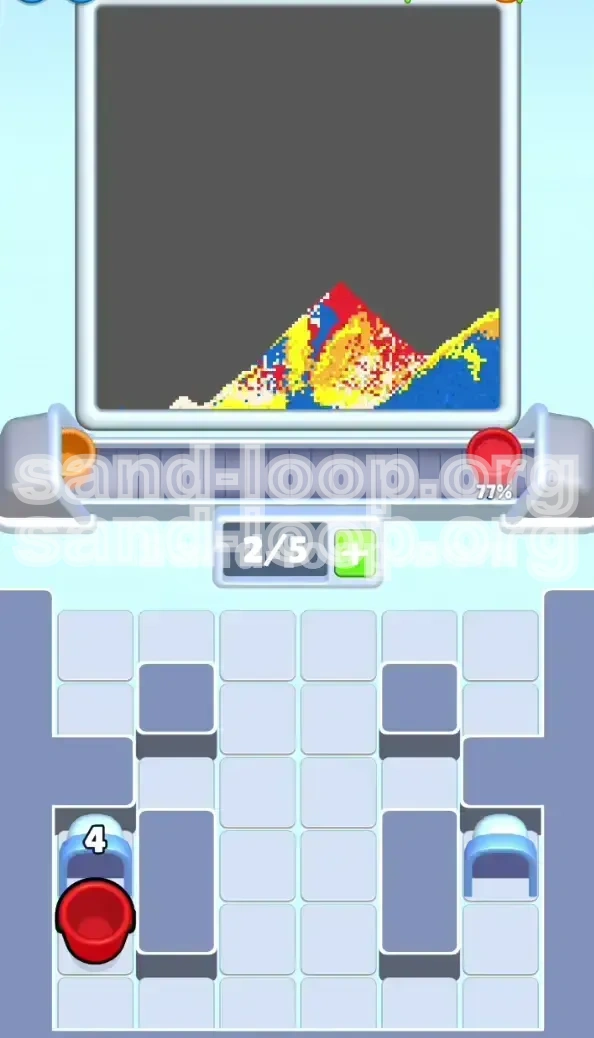
Sand Loop Level 438 is a deceptive challenge that masquerades as a simple coloring game but functions strictly as a resource management puzzle. The objective is to fill a retro-style Rocket Ship and its lunar background using falling colored sand. However, this level is not about artistic flair; it is a rigid test of logic and queue management. The board is visually cluttered with a dense array of ropes connecting paint buckets, creating a complex dependency chain. The defining feature of this level is the presence of two high-health Ice Blocks (10 HP each) located in the bottom corners of the supply tray. These blocks lock away essential Blue sand required for the background. If you trigger the wrong sequence of ropes early, you will clog your limited queue capacity, leading to an immediate deadlock and forcing a restart.
The "Ice Block" Gatekeepers
The most significant obstacles in Level 438 are the two Ice Blocks guarding the bottom corners of the tray. Each possesses 10 HP, meaning they require a total of 20 combined "hits" from sand buckets to shatter. These blocks are not just physical barriers; they are time bombs. While they are intact, they absorb the impact of your sand buckets, preventing you from accessing the valuable Blue and Red roped pairs trapped behind them. Many players make the mistake of ignoring these blocks until the end, only to find themselves with a full queue of unusable paint and no way to break the ice.
The Queue Capacity Crisis
Your conveyor belt has a hard limit of 5 slots. This is your most critical constraint. In this level, you will frequently encounter "Roped Pairs"—two buckets tied together that count as a single tap but occupy two slots in your queue. The math is unforgiving: if you have a queue with 3/5 slots filled and you tap a roped pair, you move to 5/5. If you accidentally tap another roped pair while at 5/5, the game enters a deadlock state where the conveyor jams, and no new buckets can enter. This "Queue Full" state is the primary cause of failure. You must constantly calculate if you have the buffer for a +2 item.
Fluid Sand Physics
Level 438 introduces advanced physics where different colors behave differently. The "Wet" Blue sand acts like a fluid, seeking the lowest point and flowing around obstacles. The "Dry" White and Yellow sands stack more solidly. This distinction is crucial for your strategy. If you pour the fluid Blue background sand before you have built the solid White Rocket walls, the Blue will bleed into the Rocket shape, ruining the crisp lines required for completion. You must visualize the invisible walls you need to build before flooding the zone with liquid sand.
Visual Clutter and Distraction
The tray is designed to confuse you. Ropes connect buckets that shouldn't be connected, and essential colors are often buried behind non-essential ones. The screen is busy, with the Rocket Ship, Moon, and Space background all competing for attention. A common error is tapping the "nearest" bucket rather than the "necessary" one. You must train your eyes to filter out the noise and focus solely on the specific colors required for the current phase of the level. Dismissing the visual chaos is the first step to mastering the board.
Winning Conditions
To achieve 100% completion, you must satisfy three distinct conditions. First, the Rocket Hull must be filled 100% with White sand without "bleeding" other colors into its frame. Second, the Moon must be filled with Yellow, keeping the Orange craters distinct. Third, the background must be filled with Blue. The Blue sand is the most abundant resource, but it is also the most dangerous because of its fluid physics. Success requires a strict layering order: Solid objects first, fluid background last.
Clear Objectives and Strategic Goals
Before you tap a single bucket, you need a clear roadmap. The goal is not just to drop sand, but to control the flow of resources from the tray to the canvas. This level is a marathon divided into three distinct phases. Your primary objective is to clear the board without ever hitting a "Queue Full" deadlock state for more than a few seconds.
Phase 1: The Anchor (White Hull)
Your immediate goal is to secure the White paint for the Rocket Ship. The White hull sits in the dead center of the screen. It is your anchor. If you delay getting White sand onto the canvas, the subsequent Blue background sand will flood the center zone, making it impossible to define the Rocket shape later. You must prioritize the roped White buckets located in the middle row of the tray. This phase also involves "unlocking" the top row, which blocks access to the middle items.
Phase 2: The Details (Moon & Fins)
Once the White center is established, your objective shifts to the Yellow Moon and Red Fins. The Yellow sand needs to cover the top portion of the canvas without spilling into the Rocket's window. The Red sand is needed for the side boosters. This phase is the most dangerous for your queue management because you will be processing a mix of roped pairs and single buckets. The objective here is to reduce the Ice Block health to zero while painting the top section, creating a seamless transition into the final phase.
Phase 3: The Flood (Blue Background)
The final objective is the background fill. This only happens after the Ice Blocks are destroyed and the bottom corners are accessible. At this stage, the Rocket, Moon, and Fins should be solidified on the canvas. The Blue sand acts as water that fills the remaining space. Your goal here is efficiency—dumping the remaining Blue buckets as fast as the conveyor allows to finish the level.
Queue Management Metrics
Throughout all phases, you must maintain a "Queue Occupancy" of roughly 60-80%. Never let it hit 100% (deadlock). If you see the queue at 4/5, stop tapping new buckets immediately. Wait for the conveyor to move and pour the existing sand. A good rhythm is: Tap, Wait 2 Seconds, Tap, Wait 2 Seconds. Rushing the tapping speed is the number one cause of failure in Level 438.
Ice Block Health Management
You cannot ignore the Ice Blocks. Your secondary objective during Phases 1 and 2 is to whittle down the 20 HP of the Ice Blocks. Every bucket you tap deals 1 damage to a block. You need to ensure that by the time you are ready for Phase 3, the blocks are gone. Do not leave them until the very end, or you will find yourself with a full queue of Blue paint and no way to pour it because the blocks are still blocking the mechanism.
Step-by-Step Walkthrough Instructions
This section provides the exact sequence of moves required to beat Level 438. Follow these steps in order. Do not skip ahead, as the tray setup changes dynamically as you clear ropes.
Step 1: The Top-Row Unlock
Start by looking at the very top of the supply tray. You will see roped pairs blocking the items below. Your first move is to tap the Yellow-Yellow roped pair located at the top-center. This adds 2 items to your queue. Immediately follow up by tapping the Orange-Red roped pair on the top-right. Your queue is now at 4/5 capacity. Stop tapping. Let the conveyor process these four cups. As they pour, they will deal 4 points of damage to the Ice Blocks.
Step 2: Clearing the Top Left
Once the queue drops down to 1/5 or 0/5 (empty), look at the top-left corner. You will see the remaining Red-Orange roped pair. Tap this now. This clears the entire top row of the tray. By this point, the Ice Blocks (bottom corners) should have taken approximately 6-8 points of combined damage. They are not broken yet, but they are getting weaker. The middle section of the tray is now exposed.
Step 3: Securing the White Hull
With the top gone, focus on the center. You should see a Roped White-White pair in the middle of the tray. Tap this immediately. You may need to clear a loose Yellow or Red bucket first if it's blocking the path, but prioritize the White. Getting White sand onto the canvas is critical to define the Rocket's shape. While this White pair is pouring, keep an eye on the Ice Blocks. They should be very close to breaking.
Step 4: The Ice Block Finale
At this stage, your queue is low, and the middle is clearing. You will notice loose Blue and Orange buckets in the center-lower area. Start tapping these one by one. Do not pull any more roped pairs. Just single taps. Every single tap sends a cup to the conveyor, dealing 1 damage to the Ice Blocks. Tap single Blue cups until the Ice Blocks shatter. Crucial: Do not let the queue fill up while doing this. Keep a rhythm of Tap... Pour... Tap... Pour.
Step 5: The Bottom Corner Release
Once the Ice Blocks shatter (you will hear a distinct break sound and see the cage graphic disappear), the bottom corners of the tray are free. These corners hold the final Roped Blue-Red and Roped Blue-Blue pairs. These are your heavy lifters for the final stretch. Since you have managed your queue well, you should have 3-5 empty slots available.
Step 6: The Blue Flood
Now that the Rocket (White), Fins (Red), and Moon (Yellow/Orange) are established, unleash the Blue. Tap the newly freed roped pairs from the bottom corners. You can be more aggressive now. Tap the Blue pairs rapidly. The Blue sand will flow around the established colors, filling the "Space" background perfectly. Finish the level by pouring the remaining cups. The level will complete automatically once the canvas coverage reaches 100%.
The Correct Color Processing Order
Why does order matter? In Sand Loop, sand stacks from the bottom up. If you paint the background first, you cannot place the foreground object on top without the colors mixing into brown/gray mush. Level 438 requires a "Back to Front" approach regarding layering, but a "Front to Back" approach regarding queue priority.
1. Priority Color: White (The Hull)
White is your highest priority color because it defines the largest central object. It is also the "driest" sand in this level's physics engine, meaning it stacks vertically and creates strong walls. We process White first (Step 3 of the walkthrough) to ensure that when the fluid Blue sand arrives later, it has a barrier to stop it from flowing into the Rocket's body.
2. Secondary Priority: Red and Orange (Fins & Craters)
Red and Orange act as your detail colors. They are slightly "wetter" than White but not as fluid as Blue. We process the Red Fins next to build the side walls of the rocket. This further compartmentalizes the canvas. By filling the fins, we create pockets that prevent the Yellow Moon sand from spilling into the sides, and vice versa. Orange is used sparingly for the Moon's craters; we process this alongside the Yellow to ensure color blending.
3. Bulk Fill: Yellow (The Moon)
Yellow is abundant. We process Yellow mid-game to fill the upper canvas. The Moon is a large surface area. Doing this early ensures we don't get stuck with unused Yellow cups clogging the queue late in the game when we need Blue slots. Yellow stacks reasonably well, so it serves as a good "plug" for the upper section.
4. Final Fill: Blue (The Space Background)
Blue is the "Water" of this level. It has low friction and flows into every nook and cranny. This is why it is last. If you pour Blue first, it will run under the White, Yellow, and Red zones, contaminating the pixel art. By saving Blue for the end (Phase 3), we treat it as a filler that simply takes up whatever empty space remains. We rely on the previously placed White/Red/Yellow blocks to act as a dam, keeping the Blue sand contained in the "Space" areas.
Understanding the "Dam" Logic
Think of the White and Red paints as concrete barriers. You are building a dam to hold back the Blue river. If your dam has leaks (gaps in the White/Red layers), the Blue river will burst through and flood the engine room (the Rocket's interior). This is why precise application of the early colors is more important than speed.
Key Tips for Success
Mastering Level 438 requires more than just following the steps; it requires understanding the nuances of the game engine. These tips are designed to help you optimize your playstyle and avoid common pitfalls that even experienced players encounter.
Tip 1: The "One-Tap" Rhythm
Develop a habit of tapping the bucket, then removing your finger from the screen. Watch the cup move to the conveyor belt. Count "one Mississippi" before tapping the next one. This rhythm ensures you never accidentally overflow your 5-slot queue. It is better to play slowly and finish than to play fast and restart.
Tip 2: Visualizing the Queue
Always keep an eye on the queue bar at the bottom. If you see it reaching 4/5 full, immediately stop tapping. Look at the canvas—is a cup pouring right now? If yes, wait for it to finish. If no, do you have a single cup you can tap to bridge the gap? Awareness of your queue status is the single most important skill in this level.
Tip 3: Ice Block Damage Awareness
You don't need to count every hit, but you should glance at the Ice Blocks occasionally. If one block has 1 HP left and the other has 5 HP, focus on pulling single cups that will target the specific block if possible (though in this level, damage is usually distributed). The moment they break, pause the game mentally—your strategy shifts from "Chip Damage" to "Flood Mode."
Tip 4: Rope Management
Ropes are a double-edged sword. They give you two cups for one tap (efficient for ice damage) but take up two slots (bad for queue management). The strategy in this guide uses a "Rope Sandwich" approach: Start with a Rope, manage singles in the middle, and finish with Ropes. This prevents the "Rope Clump" deadlock where 3 pairs are waiting to be pulled.
Tip 5: Utilizing the "Pause" Feature
If the conveyor belt gets chaotic, take your finger off the screen. The game does not penalize you for waiting. In fact, waiting is often the correct strategic move. Let the queue clear out completely (0/5 slots) before tapping the next big roped pair. This "reset" moment gives you full control over the board state.
Common Mistakes to Avoid
90% of failed attempts on Level 438 happen because of one of these three errors. Understanding what not to do is just as important as knowing the correct steps.
Mistake 1: The "Three-Pair" Trigger
This is the most common way players die. You have a queue with 1/5 slots. You see a roped pair. You tap it. Queue is 3/5. You see another roped pair. You tap it. Queue is 5/5. You see a third roped pair. You tap it out of habit. Deadlock. The third pair has nowhere to go. It blocks the dispenser. The conveyor stops. You lose. Fix: Never tap a roped pair unless you have 3 or more empty slots visible.
Mistake 2: Premature Blue Spillage
Some players try to break the Ice Blocks too early. They spam cups to get to the Blue sand at the bottom. However, once the Blue is free, if they haven't painted the Rocket Body (White) yet, the Blue sand flows right into the center of the screen. The result is a blue-tinted rocket that looks messy and often fails the "precise fill" requirements if the game judges color purity. Fix: Ensure the White Hull is visibly solid on the canvas before you destroy the Ice Blocks completely.
Mistake 3: Ignoring the Supply Tray Layout
The supply tray changes as you clear items. A loose Yellow cup might be blocking a roped White pair. If you just tap the White pair, the game might register the Yellow first, or the Yellow might get stuck. You must clear the "path" to the good items. Fix: Always tap the items closest to the front of the tray first to clear a path for the items behind them.
Stuck? Troubleshooting and Solutions
Did you follow the guide but still find yourself stuck? Here are solutions to specific "stuck" scenarios that might occur due to bad RNG (Random Number Generation) or slight variations in board physics.
Scenario: "The Queue is Full and Nothing is Moving"
You have 5 cups on the conveyor, but they aren't pouring sand, or they are pouring very slowly (e.g., thick sand). New buckets are blocked. Solution: This is the "Slow Pour" deadlock. You have to wait. Do not tap anything. Watch the existing cups. If you have a "Color Bomb" or "Blow" power-up (if your version allows it), use it to clear the canvas instantly. If not, you might have to restart the level, as this is usually a unrecoverable state in Sand Loop unless the sand finishes pouring within 10 seconds.
Scenario: "The Ice Blocks Won't Break"
You have tapped every cup you can see, but the Ice Blocks still have 1 HP left. Solution: You likely missed a "hidden" single cup tucked behind a rope in the middle row, or you are miscounting. Sometimes, a cup gets stuck on the edge of the tray. Zoom in (if on mobile) or look closely at the silhouette of the remaining buckets. Is there a narrow single cup you overlooked? Tap it to finish the job.
Scenario: "My Rocket Looks Ugly/Colors Mixed"
You finished the level, but the Rocket looks muddy. Solution: This is usually a result of "Sand Bleeding." Did you fill the Yellow Moon *before* the White Rocket was fully dry? Or did you flood Blue before the Red fins were set? While this doesn't always cause a "Game Over," it ruins the satisfaction. To fix this for the next run, focus on "Drying" one layer completely before adding the next color on top or adjacent to it.