
Level 475
HARDHow to solve Sand Loop level 475? Get instant solution for Sand Loop 475 with our step by step solution & video walkthrough. Sand Loop 475 tips and guide.
Play Sand Loop Now
Experience the puzzle challenge firsthand
Game Screenshots


Sand Loop Level Guides
Sand Loop Level 475: The "Pink Roses" Strategy Guide
Introduction: The Logic of the Beach
Welcome to the definitive walkthrough for Sand Loop Level 475. If you have been struggling with the "Pink Roses" stage, you are not alone. This level is notorious for turning a relaxing beach aesthetic into a frustrating logistical puzzle. Unlike earlier levels where speed is rewarded, Level 475 punishes impulsiveness. You are presented with a beautiful, complex scene of floral arrangements on a sandy shore, but your path to victory is narrow.
The core difficulty lies in the "Slot Limit" mechanic. You start with a restrictive capacity that limits how many cups you can queue on the conveyor belt. Combined with heavily layered blockers and "blind" mystery cups, this stage requires you to think three moves ahead. This guide is designed to take you step-by-step through the logic required to clear the board without jamming your machinery.
Level Overview and Core Objectives
Analyzing the Canvas Layout
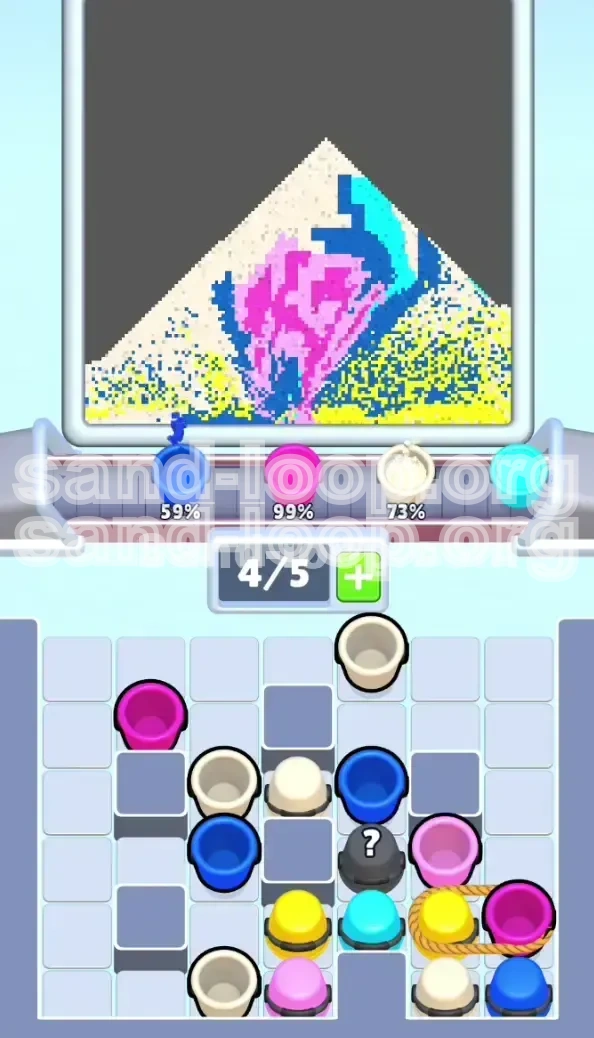
Your first task is to visually deconstruct the target image. The canvas is divided into distinct horizontal zones. The top 40% of the screen is the "Sky Zone," composed of large, contiguous blocks of Yellow. The middle section is the "Sand Zone," dominated by Off-White. The bottom third is the "Floral Zone," a dense mix of Cyan leaves, Light Pink outer petals, and Magenta inner swirls. Understanding this geography is critical because it dictates the order in which you must dispense your sand.
The Blocking Obstacles
This level introduces two major physical impediments: the 7-Hit Ice Block and the 6-Hit Cardboard Box. The Ice Block is located in the upper right quadrant and traps essential columns of sand underneath it. The Cardboard Box sits lower, blocking access to the Yellow cups required for the sky. You cannot ignore these; they must be systematically degraded by clearing adjacent cups.
The "Slot Limit" Challenge
Level 475 operates on a strict 0/5 Slot limit (sometimes fluctuating based on combo streaks, but effectively very low). This means you can only have a maximum of five cups waiting to be poured. If you tap cups in the supply tray randomly, you will fill these slots with colors you don't need yet (like Dark Blue), causing a bottleneck where the machine stops working. Your objective is to keep the belt moving.
Understanding Mystery Cups
Scattered throughout the supply tray are black cups marked with a question mark. These function as wildcards but carry a high risk. Tapping them reveals their color only after they occupy a slot on your conveyor belt. In a level with a strict slot limit, drawing a "useless" color (like a Dark Blue stem when you need Yellow sky) effectively reduces your capacity by 20% and can stall your entire run.
Optimized Color Processing Order
Priority 1: Backgrounds (Yellow and Off-White)
You must begin with the background colors. The Yellow sky and the Off-White sand cover the largest surface area of the canvas. These colors require the highest volume of sand. By clearing these first, you free up massive amounts of space on your conveyor belt. Additionally, the cups for these colors are often trapped behind the early blockers, so clearing them helps you chip away at the Ice Block and Cardboard Box.
Priority 2: The Foliage (Cyan)
Once the sky and sand are established, move immediately to Cyan. These represent the leaves and seaweed elements. Cyan is a medium-density color. It doesn't require as much precision as the flowers but more volume than the stems. Processing Cyan before the deeper floral colors ensures that the "greenery" sets the boundary for your roses.
Priority 3: The Floral Layers (Light Pink and Magenta)
With the background set, focus on the roses. Start with Light Pink (the outer petals) and finish with Magenta (the inner swirls). These are detailed pours. If you attempt these while the background is incomplete, you risk misalignment or running out of slot space for the necessary background colors later.
Priority 4: The Finishing Touches (Dark Blue)
The Dark Blue stems are the "Kill Code" of this level. They are thin, jagged lines that require very little sand but high precision. If you pour Dark Blue too early, the thin streams will clog your dispensers or get buried under subsequent layers of sand. You must save Dark Blue for the very last step.
Step-by-Step Walkthrough
Phase 1: The Ice Breaker Start
Do not touch the Dark Blue cup in the center column yet. Your immediate focus is the top right. Look for the 7-Hit Ice Block. Identify the Light Pink cup directly to its left and the Off-White cup below the ice. Tap the Light Pink cup first, then the Off-White cup.
This specific sequence knocks two "health" points off the Ice Block immediately. Now, shift your gaze to the top-left column. You need Yellow for the sky. Tap the top-most Yellow cup in that column. Your conveyor belt should now hold: Light Pink, Off-White, and Yellow. This is a safe, manageable load.
Phase 2: Managing the Mystery Cups
As you clear the initial rows, you will encounter the black "?" cups. Rule of thumb: Do not tap a mystery cup unless you have at least two empty slots on your conveyor belt.
Why? Because if you tap it and it reveals a Dark Blue cup (which is useless right now), it will sit on the belt and block you from sending up a Yellow cup that you desperately need. By keeping two slots empty, you create a buffer. If the mystery cup is a bad color, you still have room to maneuver the good colors onto the belt.
Phase 3: Breaking the Roped Duo
In the bottom right corner, you will notice a Yellow cup and a Magenta cup tied together with a rope. You cannot move these yet. The rope acts as a lock. To cut it, you must clear the Off-White and Light Pink cups sitting directly on top of the rope trap.
Focus your tapping on the column above the rope. Once the top layers are cleared, the rope will snap automatically. Critical Warning: When the rope snaps, do not immediately tap the freed Magenta cup. Check your canvas fill percentage first. If your Magenta roses are already at 95%, sending more Magenta will cause a jam. Tap the Yellow cup instead to finish the sky.
Phase 4: The Mid-Game Stagger
By now, the 6-Hit Cardboard Box should be gone, giving you full access to the lower tray. The strategy here is "Staggered Pouring." Do not send all Off-White cups at once. Instead, send two Off-White cups, wait for the pour to start, then send two Cyan cups.
This alternating rhythm prevents the sand dispensers from overheating or stuttering. The Off-White sand is heavy and takes time to settle. Alternating it with the lighter Cyan keeps the flow smooth and ensures you don't run out of slot space for the other colors.
Phase 5: The Final Floral Push
With the sky and sand at 100%, the board should look much clearer. Now, aggressively target the Light Pink and Magenta cups. Since the background is done, you don't need to worry about saving slots for Yellow or Off-White anymore. You can fill your belt with floral colors.
Work on the roses until they are completely filled. Only when the flowers are perfect should you even look at the Dark Blue stems.
Phase 6: The Stem Execution
This is the final phase. Tap the remaining Dark Blue cups. Since they are thin lines, they pour quickly. Draw the stems to complete the image. Because everything else is already filled, the Dark Blue sand has nowhere else to go but into the correct stem patterns.
Common Mistakes to Avoid
Mistake 1: The "Dark Blue" Trap
The most common way to fail this level is by tapping Dark Blue cups in the first 30 seconds of the round. Players see them in the supply tray and tap them out of habit. This clogs your belt with a color you cannot use until the very end. Always check your canvas. If the flowers aren't done, the stems can wait.
Mistake 2: Ignoring the Slot Count
Spamming taps is fatal here. If you have 4/5 slots filled, do not tap a new cup unless you are 100% sure it is the next color you need. Overfilling the belt stops the machine, breaking your combo and causing the sand to settle incorrectly, leading to "overflow" errors.
Mistake 3: Mystery Cup Roulette
Tapping a mystery cup when you have a full belt is a gamble you will usually lose. If it turns into a color you already have queued up, you have wasted a slot and created a duplicate pile that will stall your progress. Always leave buffer space.
Speed Run and Advanced Tips
Pre-Loading the Next Color
While a cup is pouring, you can (and should) tap the next cup in the supply tray. This queues it up immediately. Use the pouring animation time to scan the board and plan your next two moves. Advanced players never wait for the sand to finish falling before tapping the next supply cup.
The "Combo" Multiplier
Maintaining a unbroken combo chain is essential for hitting the high score thresholds on this level. A combo breaks if you let the conveyor belt stop completely. By alternating your pours (as described in Phase 4), you keep the machine running constantly, which keeps your score multiplier climbing even if you aren't tapping furiously.
Visualizing the "Cuts"
Imagine the image is a cake. You cut the biggest slices first (Sky/Sand). The stems are the icing. If you try to ice the cake before you bake it, you'll make a mess. Stick to the volume hierarchy: Background > Leaves > Petals > Stems.