
Level 481
HARDHow to solve Sand Loop level 481? Get instant solution for Sand Loop 481 with our step by step solution & video walkthrough. Sand Loop 481 tips and guide.
Play Sand Loop Now
Experience the puzzle challenge firsthand
Game Screenshots
Sand Loop Level Guides
Level Overview: The Bonsai Basin Challenge
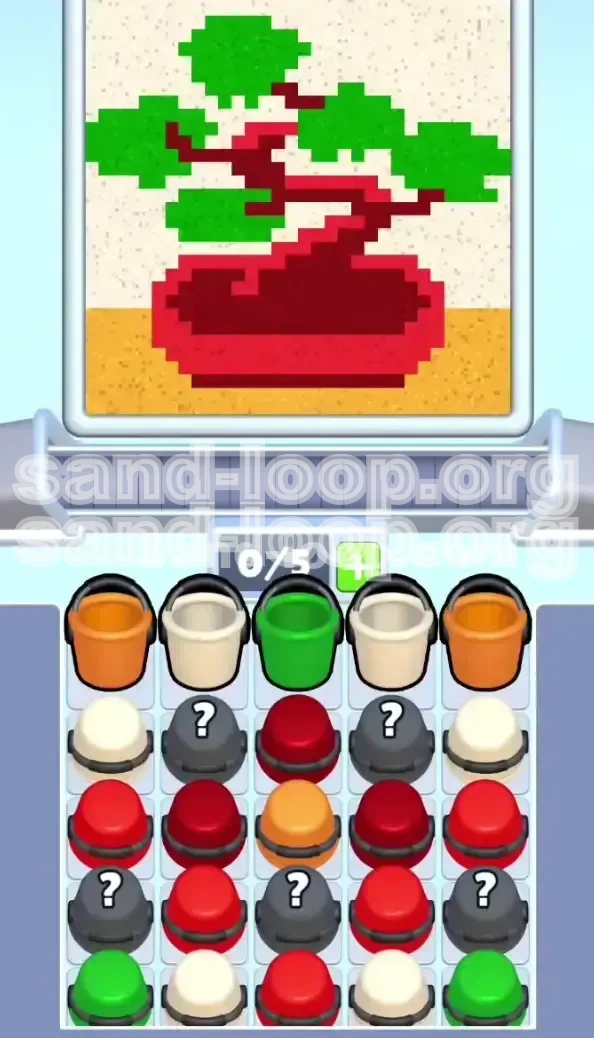
Sand Loop Level 481 introduces a high-difficulty artistic puzzle known as the "Bonsai Basin." Unlike standard levels where you can rely on luck, this stage is a strict test of logical sequencing and resource management. The visual appeal of the Bonsai Tree masks a ruthless gridlock mechanic designed to trap players who tap buckets randomly.
This level is characterized by a "False Bottom" grid layout. The essential colors required to build the base of the tree (Red and Maroon) are buried under layers of non-essential colors (White and Green) and obstructed by a wall of "Mystery Cups." You are not playing against a timer; you are playing against a 5-slot capacity limit. One wrong move fills your belt with unusable colors, causing a deadlock that forces a restart.
The 5-Layer Construction Logic
The Bonsai Tree is not a flat drawing; it is a 3D structure built from the ground up. To succeed, you must visualize the painting process in reverse. You are effectively building the object in this specific order to ensure gravity settles the sand correctly:
- Layer 1 (The Base): Sandy Orange. This forms the table and must be laid first to establish a floor.
- Layer 2 (The Container): Bright Red. This forms the pot walls. It must be poured before the soil/wood, or it will bury the trunk.
- Layer 3 (The Core): Dark Maroon. This is the trunk and main branches. It is the most critical component.
- Layer 4 (The Foliage): Emerald Green. This must be poured last to sit "on top" of the branches without mixing.
- Layer 5 (The Void): Off-White. This fills the negative space and must be done last to avoid blocking the other colors.
Grid Geography and Blockers
The level board is divided into a 5x5 grid plus deeper rows. The strategic challenge lies in the vertical distribution of the buckets.
- Top Row (Row 1): Contains your starting Orange and Green buckets, but also White traps.
- The Core (Rows 2-3): Heavily fortified with Mystery Cups (Gray/Question Mark).
- The Foundation (Row 4+): Where the vital Red and Maroon buckets are hidden, trapped by the blocks above.
The Mystery Cup Mechanic
The gray cups with question marks are the primary enemy in Level 481. There are 5 Mystery Cups clustered in the center columns (Columns 2, 3, and 4). They function as "slot blockers."
- Hidden Identity: They do not reveal their color until they are tapped and occupy a slot on your conveyor belt.
- The Risk: If you tap a Mystery Cup hoping for Red, and it reveals as White, it becomes "dead weight" on your belt.
- Capacity Crunch: You have a 5-slot limit. If you accumulate 3 useless White cups early, your active capacity drops to 2, making it impossible to queue the necessary Red/Maroon sequence.
Victory Conditions
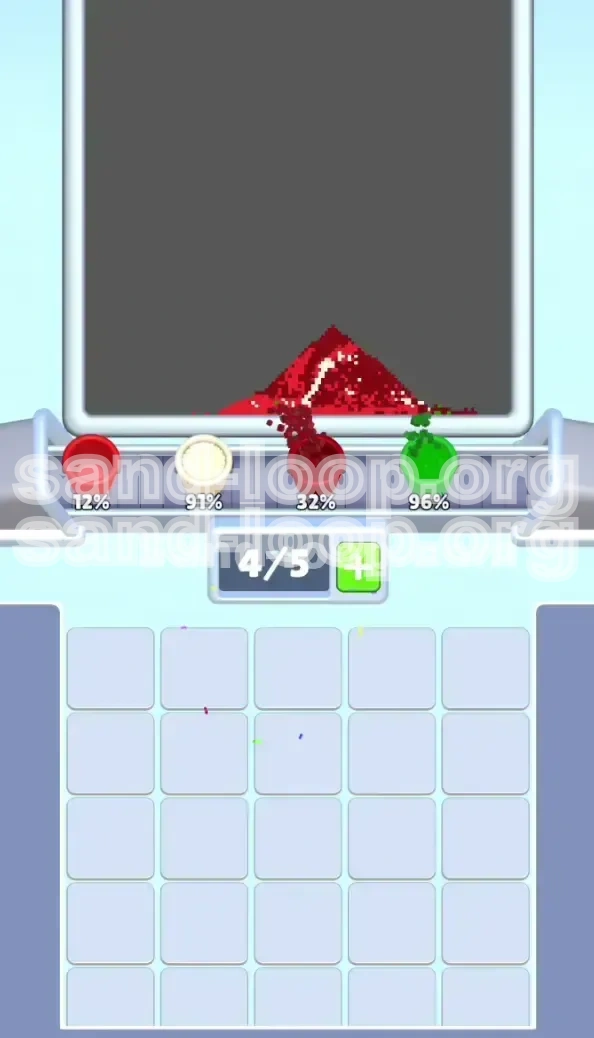
To achieve 100% completion and clear the level, you must meet specific criteria without overflow:
- 100% fill rate for the Orange Table base.
- Complete containment of the Red Pot without bleeding into the background.
- Full definition of the Dark Maroon trunk structure (no gaps).
- Zero cross-contamination between Green leaves and White background.
Difficulty Spike Analysis
This level is rated as "Hard" due to the probability factor. Even with perfect strategy, there is a 30% chance that Mystery Cups will reveal colors in an inconvenient order (e.g., giving you White before Red). This guide teaches you how to mitigate bad RNG (Random Number Generation) through slot management.
Clear Objectives: Your Mission Checklist
Before you tap a single bucket, understand your strategic goals. Do not focus on "clearing the board"; focus on "unlocking the supply line."
Objective 1: Clear the "Safe" Outer Columns
Your immediate goal is to reduce the board's vertical height in the safe zones. Columns 1 and 5 (the far left and far right) generally contain the structural elements that are not blocked by Mystery Cups. Clearing these first gives you immediate visual feedback and frees up space on the board for gravity to shift remaining buckets.
Objective 2: Surgical Removal of Mystery Cups
You cannot bypass the Mystery Cups; they form a ceiling over the Red and Maroon supplies. Your objective is to trigger them one by one, not in a batch. You must treat every tap as a gamble where you are betting on a color that matches your current construction phase (Red or Maroon).
Objective 3: Maintain 3-Slot Fluidity
At all times, you must keep at least 3 empty slots on your conveyor belt. This "buffer zone" is critical. If you have 4 occupied slots, you are in the "danger zone." If you hit 5 occupied slots with no pouring matches, you are gridlocked. Your objective is to pour colors as soon as they hit the belt to keep the flow moving.
Objective 4: The Bottom-Up Construction
You must prioritize colors based on the y-axis of the painting. The bottom of the screen (the table) is lowest priority visually but highest priority logically. You must secure the Orange and Red buckets before you ever touch a Green bucket.
Objective 5: Background Management
The Off-White color is the most abundant resource but also the biggest hazard. Your objective is to quarantine all White buckets until the very end. Tapping them early is the fastest way to fail Level 481.
Step-by-Step Instructions: The Phase Walkthrough
Follow this exact sequence to maximize your chances of success. Do not deviate from the order unless the board state forces a specific adaptation.
Phase 1: The Foundation Setup (Moves 1-5)
The board starts with a specific arrangement. Look for the Orange buckets. They are typically located on the top edges of the board (Top Left or Top Right corners).
- Action: Tap the two Orange buckets immediately.
- Reasoning: Orange is the table. It is the bottom layer. It cannot be messed up by other colors falling later.
- Next Step: Scan the top row for Green buckets. Are they blocking anything? If yes, tap them. If no, leave them.
- Warning: Do NOT tap any White buckets in the top row yet. They are useless until the end.
Phase 2: Breaching the Mystery Wall (Moves 6-15)
Once the top edge is cleared, you will see the "Gray Wall"—a row of Mystery Cups protecting the center.
- Action: Identify the Mystery Cups in Row 2.
- The Tap Protocol: Tap one Mystery Cup.
- Analysis:
- If it turns Red: Perfect. Let it fill the belt. Pour if you have a match on the canvas (which you might not yet, so keep it queued).
- If it turns White: This is a block. Do not tap more. You must deal with this blockage.
- If it turns Maroon: Excellent. Queue it.
- Strategy: If you get a White cup, your capacity is effectively reduced. You must pour other colors immediately to free up that slot. Do not tap a second Mystery Cup until the first one is resolved (poured or cleared).
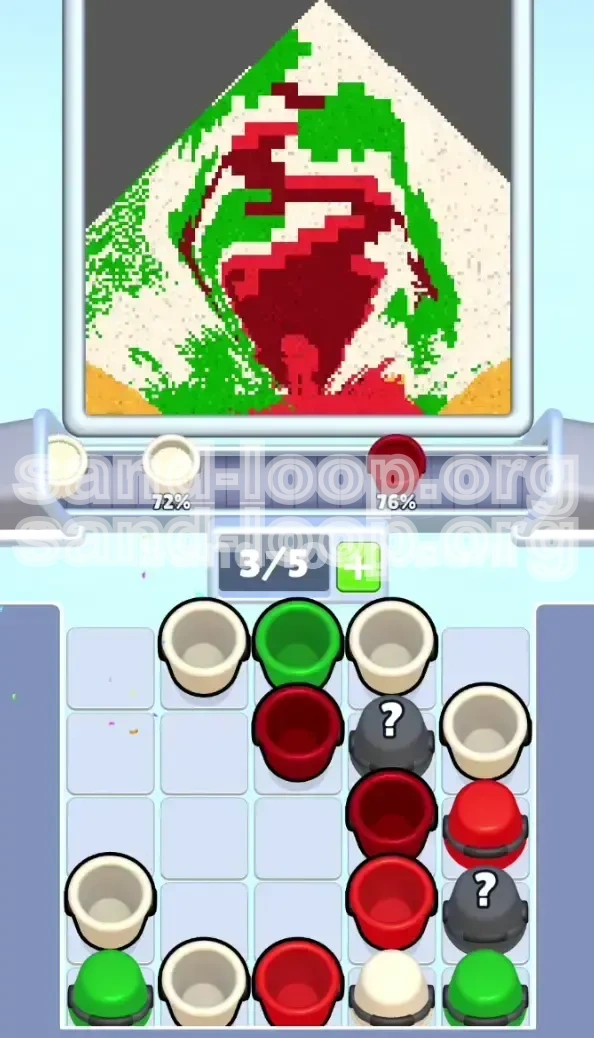
Phase 3: The Pot and Trunk Assembly (Moves 16-30)
As you clear the Mystery Cups, you will expose the Red and Dark Maroon buckets in the middle rows (Rows 3 and 4).
- Action: Aggressively tap all Red buckets that become accessible.
- Pouring: Pour Red sand to form the base of the pot.
- Action: Immediately follow up with Dark Maroon buckets.
- The Flow: You want Red and Maroon to be mixing on your belt. Pour the Red first to build the "walls" of the pot, then pour the Maroon so it stacks inside the pot and grows upward.
- Check: Ensure the trunk is rising from the center of the red pot. If the green is already poured (from Phase 1), it might complicate this, but usually, Green sits above Maroon.
Phase 4: The Foliage Layer (Moves 31-45)
Only after the trunk (Maroon) is established should you worry about the leaves.
- Action: Locate the remaining Green buckets. They are often trapped in the corners or below cleared Mystery Cups.
- Execution: Tap and pour Green. This will blanket the top of the trunk and the branches.
- Visual Check: The Green sand should sit cleanly on top of the Maroon. If you see Maroon bleeding over the Green, you poured the Maroon too late (or the Green too early). However, in this level's physics, Green usually flows *over* thin branches, so timing is flexible but safer to do after the trunk is "set."
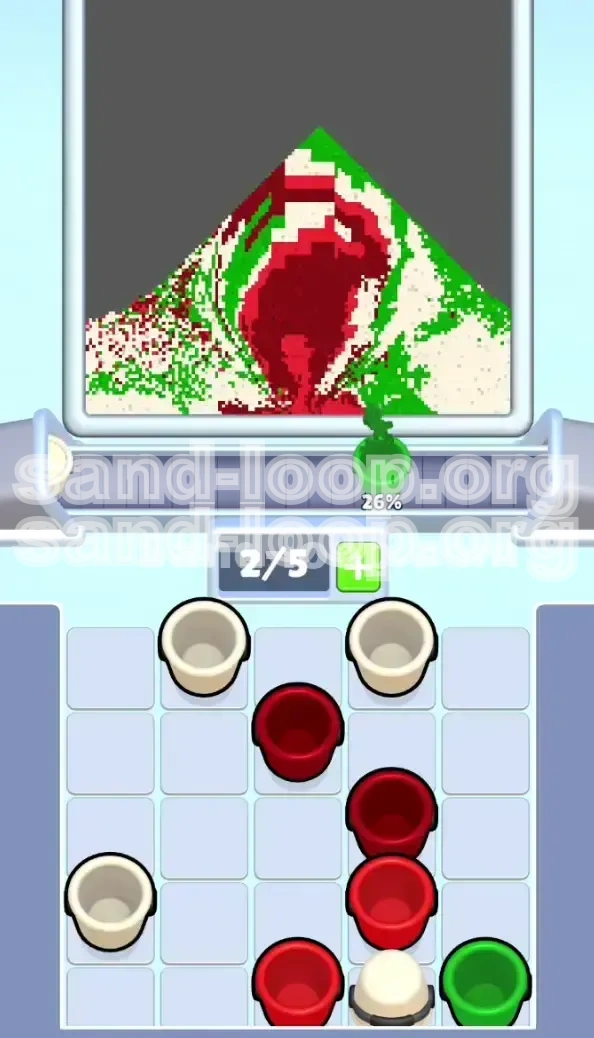
Phase 5: The White Out (Final Moves)
The board is now likely a mess of empty slots and the remaining White buckets.
- Action: Tap every remaining White bucket on the board.
- The Flood: Since the Tree (Orange/Red/Maroon/Green) is already solidified on the canvas, the White sand will simply flow around it, filling the background texture.
- Result: The level completes as the White sand fills the remaining negative space.
Color Order and Mechanics
Understanding the physics of Sand Loop is crucial. The colors don't just stack; they interact based on viscosity and pour order.
The Pouring Hierarchy
Think of the colors as having different "weights" or priorities in the game engine:
- Priority 1: Background (White) - Fluid, fills gaps. Lowest density.
- Priority 2: Table (Orange) - Foundation. Needs to be flat.
- Priority 3: Pot (Red) - Container. Needs to hold the next layer.
- Priority 4: Structure (Maroon) - Solid. Defines the shape.
- Priority 5: Canopy (Green) - Top coat. The most visible layer.
Processing the Mystery Cups
The Mystery Cups are not random; they are seeded from the remaining colors on the board.
- If the board has mostly Red and Maroon left to clear, the Mystery Cups have a high probability (approx. 60-70%) of yielding Red or Maroon.
- If the board is mostly clear except for White corners, the Mystery Cups will likely yield White.
- Tip: Tap Mystery Cups when the board is "rich" in the color you need (Red/Maroon), not when the board is empty.
Managing the "Slot Economy"
Your 5-slot belt is your inventory. Treat it like currency.
- Scenario A (Good): Belt has [Red, Maroon, Empty, Empty, Empty]. You are flexible.
- Scenario B (Bad): Belt has [White, White, Empty, Empty, Empty]. You are crippled.
- Rule: Never let 2 White buckets sit on the belt simultaneously. Pour them immediately, even if you don't "need" the sand yet, just to free the slot. In Level 481, pouring White early isn't fatal if the structure isn't built, but having a full belt of White is a game over.
Dependency Chains
The colors are linked. You cannot complete Green without finishing Maroon. You cannot finish Maroon without finishing Red. You cannot finish Red without finishing Orange.
- Orange unlocks Red.
- Red unlocks Maroon.
- Maroon unlocks Green.
- Everything unlocks White.
Key Tips for Success
Master these nuances to turn a frustrating loss into an easy win.
The "Tap-Wait-Pour" Rhythm
Do not spam taps. In Level 481, speed is your enemy.
- Tap: Select a bucket.
- Wait: 0.5 seconds. Look at the belt. Did it change color? Is it full?
- Pour: Only if the belt aligns with your current goal.
- Breaking this rhythm is how you accidentally queue 3 White cups and lose.
Corner Management Strategy
The corners of the board (Top Left/Right, Bottom Left/Right) are "safety zones" or "trap zones."
- Top Corners: Usually contain the starting Orange or Green. Always clear these first.
- Bottom Corners: Often contain the White traps. Ignore these until the end. If a Mystery Cup is blocking a bottom corner, leave it alone until you have cleared the center.
Visualizing the "Invisible Pot"
When pouring Red sand, don't just look at the bucket. Look at the canvas. Imagine the red sand forming a "U" shape or a bowl. You are building a container. If you pour the Red too fast, it might spill over the "lines" of the Bonsai image. Pour slowly to let the physics engine settle the sand into the pot shape.
Using Green as a Cap
The Green canopy is heavy. If you pour it too early, it smashes the thin Maroon branches. Think of the Green sand as a heavy blanket. Only place it on the tree once the "skeleton" (Maroon) is hard-set. If you see the Green sliding down the branches and mixing with the Red pot, you poured too early.
Mystery Cup Probability Play
If you have 3 Mystery Cups in a column, you don't have to tap them in order from top to bottom. Sometimes, tapping the lowest one first shifts the grid in a way that reveals a Red bucket above it. Experiment with the tap order if the standard top-down approach feels stuck.
Common Mistakes to Avoid
90% of failures in Level 481 come from these specific errors. Learn them so you don't repeat them.
Mistake 1: The "Whiteout" Deadlock
This is the most common loss state. A player taps the top row, revealing 2 White buckets. Then they tap the Mystery Cups, and 2 more turn White. The belt is now [White, White, White, White, Empty]. The player is stuck. They cannot tap anything else because the belt is full, and they cannot pour because pouring White background now would bury the yet-unbuilt tree.
- Fix: If you get 2 White cups early, you must aggressively tap Red/Maroon to get them on the belt. If no Red/Maroon is available, you must restart the level.
Mistake 2: Ignoring the Orange Base
Some players go straight for the Green leaves because they are visually prominent. This is a fatal error. Green sand poured first will slide down the canvas and mix with the Red and Maroon later, creating a muddy, brown sludge that fails the level's purity check.
- Fix: Always pour Orange first. It creates the "floor" that catches everything else.
Mistake 3: Panic-Tapping Mystery Cups
When the center is blocked, players get impatient and tap all 5 Mystery Cups at once.
- Result: Chaos. The belt fills with random colors. You lose control of the pouring order.
- Fix: Patience. Tap one. Wait. Clear it. Tap the next.
Mistake 4: Pouring Out of Order
You have a Red bucket and a Maroon bucket on the belt. The canvas needs a Red Pot base first. You accidentally pour Maroon first.
- Result: The Maroon (trunk) sits on the ground. Then you pour Red (pot) over it. You now have a tree trunk growing out of the floor, buried under a pot. The level fails because the trunk isn't in the pot.
- Fix: Watch your belt queue carefully. Pour the color that corresponds to the lowest unpainted layer on the canvas.
Mistake 5: Forgetting the "Spill" Effect
Sand doesn't just stop; it piles up. If you overfill the Red Pot, the sand spills over the rim. If you then pour the Green leaves, they will sit on top of the "spilled" Red sand, making the tree look like it's growing out of a red puddle instead of a pot.
- Fix: Stop pouring the Red as soon as the pot shape is filled. Do not overfill.
Stuck Solutions & Speed Run Tips
What to do when the game throws you a curveball, and how to finish fast if you are chasing a high score.
Stuck Solution: The "Full Belt" Scenario
Your belt is full [White, White, Red, Maroon, Green]. You cannot tap anything else. You cannot pour White.
- The Fix: Look at the canvas. Is there any part of the background that is currently empty but won't be touched by the tree? Maybe a tiny corner?
- Desperation Move: Pour the White sand into that tiny corner. It won't solve the level, but it frees up one slot. Now you can tap a Red bucket, get it on the belt, and pour it to start the actual structure. You basically waste the White sand to buy space.
Stuck Solution: Bad RNG on Mystery Cups
You tap the Mystery Cups and get [White, White, White]. No Red or Maroon appears.
- The Fix: There is no fix for bad luck in this specific instance other than restart. However, check the very bottom of the board (Row 5 or 6). Sometimes Red buckets are hidden underneath the Mystery Cup rows, not just inside them. If you can't find Red anywhere, it's a restart.
Speed Run Tip: The "Orange First" Rule
For a speed run, do not analyze the board. As soon as the level loads, tap the two Orange corners.
- Why: This is the universal opener for 481. It guarantees a safe start and immediately reduces the board complexity.
- Macro: Learn the rhythm: Tap Orange (2s) -> Tap Green Center (2s) -> Tap Mystery (1s) -> Pause. This micro-opening saves 5-10 seconds immediately.
Speed Run Tip: Pre-loading the Belt
Don't wait for the belt to be empty to tap the next color.
- Technique: If you have [Red, Red, Empty] and you know there is a Maroon bucket available, tap the Maroon while the Reds are pouring.
- Benefit: This queues the Maroon instantly. As soon as the Reds finish, the Maroon starts automatically. This "chains" your pouring and eliminates the downtime of looking for the next bucket.
Speed Run Tip: Ignoring Small Spills
Perfectionism kills speed. If a single grain of Green sand touches the Red pot, don't restart immediately.
- Risk Assessment: The game physics engine is forgiving. If the spill is less than 5% of the total area, it usually still counts as a "Pass."
- Action: Keep pouring. Focus on the large color blocks. Only restart if you have a catastrophic failure (like pouring White first).