
Level 480
HARDHow to solve Sand Loop level 480? Get instant solution for Sand Loop 480 with our step by step solution & video walkthrough. Sand Loop 480 tips and guide.
Play Sand Loop Now
Experience the puzzle challenge firsthand
Game Screenshots
Sand Loop Level Guides
Level Overview: The Festive Logic Challenge
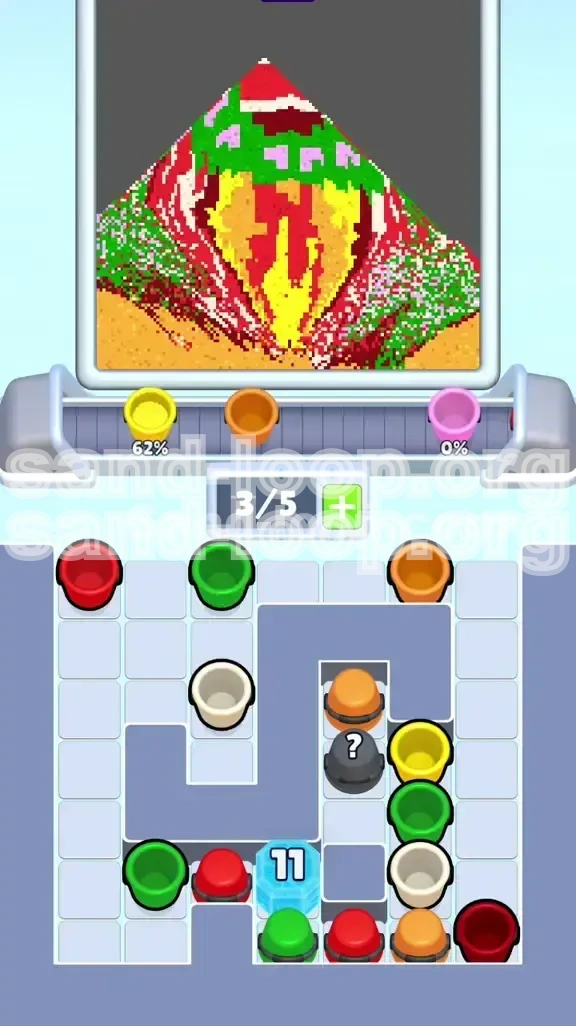
Welcome to Level 480, a stage that combines festive holiday visuals with punishing logical constraints. Unlike previous levels where you could rely on fast reflexes, this stage is a war of attrition against limited space and blocked resources. You are tasked with constructing a detailed pixel art scene featuring a roaring fireplace, a brick mantle, and a hanging green wreath.
The difficulty here stems from the "Snake Tray" layout. A gray, winding barrier splits your supply tray into two isolated zones, drastically reducing your ability to manage temporary storage. Coupled with massive numbered Ice Blocks that function as countdown timers, you must execute a precise sequence of moves. If you manage your slot economy poorly, you will face a hard deadlock that forces an immediate restart. This guide breaks down the logic to ensure your supply lines remain open.
Visual Breakdown
The target image is deceptively complex. While it looks like a simple holiday card, the pixel distribution requires strict color prioritization. The image is divided into three distinct zones: the fire, the bricks, and the wreath.
The Supply Layout
Your tray is not a simple bucket; it is a maze. The gray barrier separates the left and right sides. You cannot move cups freely between zones. This means a clog on the left side cannot be resolved by moving a cup to the right.
Ice Block Mechanics
Three major Ice Blocks dictate the flow of the game. An "8" block on the top left, a "14" block in the center, and a massive "28" block on the bottom right. These act as blockers, hiding essential colors until you process enough matches to destroy them.
Slot Economy Basics
You start with 0/5 slots available. This means you have zero margin for error. Every tap must be calculated. Filling your tray to capacity (5/5) before the conveyor belt is ready to accept those specific colors will result in a game over.
Color Frequency Analysis
Bright Red and Green are the most abundant colors, making up roughly 60% of the canvas. Dark Red, Yellow, and Orange are secondary. White and Pink are rare "accent" colors. Understanding this distribution is key to knowing which cups to prioritize and which to discard or hold.
The "Mystery" Element
Two gray Mystery Cups (marked with a "?") are trapped in the middle rows. These are wildcards. They can produce any color, potentially saving a run or instantly clogging your tray with an unwanted hue.
Strategic Objectives and Priorities
To conquer Level 480, you must stop thinking about "clearing the board" and start thinking about "unlocking the pipeline." Your primary goal is not just to fill the canvas, but to shatter the Ice Blocks that guard your supply lines. If you focus purely on painting, you will run out of movable cups and freeze your progress.
Primary Goal: Shatter the "28" Block
The "28" Ice Block at the bottom is the gatekeeper of the mid-to-late game. It seals away a massive reservoir of Green and Bright Red cups required for the Wreath and Brick background. You must aggressively feed the conveyor with available colors to reduce this counter from 28 to 0 as fast as possible.
Secondary Goal: Free the Roped Yellows
On the middle right, two Yellow cups are tied together with a Rope. You cannot move them individually. To cut the rope, you must first process a separate Yellow cup from the lower levels. Prioritizing this "key" Yellow cup is essential to unlocking the fire colors.
Tertiary Goal: Establish the Fire Base
The bottom center of the canvas features the fire. This area requires Yellow and Orange. You should fill this section early while the board is chaotic. It is easier to fit yellow sand into the fire zone now than to try and squeeze it in later when the precision-based brick work begins.
Quaternary Goal: Slot Management
Maintain a "3/5" rule. Never let your tray fill up beyond 3 cups unless you are about to perform a merge or a pour. Keeping 2 slots open gives you the flexibility to grab a key cup if a Mystery Cup reveals a needed color or if an Ice Block shatters unexpectedly.
Final Goal: Precision Accenting
The White mortar lines and Pink bows are the finishing touches. These must be saved for the very end. Attempting to pour these thin lines while the canvas is mostly empty is a recipe for disaster, as the sand will spread into adjacent empty zones rather than settling into the thin lines.
Step-by-Step Walkthrough
This section provides a linear path through the chaos. Follow these steps in order to maximize your efficiency and minimize the risk of a deadlock.
Phase 1: The Opening Salvo (Top Row)
As soon as the level starts, your eyes should be on the top row. This is the only area free from immediate obstruction. You have a mix of Dark Red, Green, Bright Red, White, and Orange available.
- Step 1: Tap the top-left Bright Red cup. This sends it to the conveyor and immediately starts chipping away at the "8" Ice Block.
- Step 2: Locate the Dark Red cup at the top. Tap it. Dark Red is needed for the shadow inside the fireplace, and processing it clears space in the tray.
- Step 3: Tap the top Green cup. This is positioned directly above the "14" Ice Block. Clearing it helps lower that counter.
- Step 4: Ignore the White cup for now. Tapping it early will clog your tray with a color you cannot use yet.
Phase 2: Breaking the "8" Block
The "8" block is your first major hurdle. It sits atop a stack of essential Red and Orange cups.
- Step 1: Focus your taps on the left side. Continue to feed Bright Red and Dark Red cups onto the belt.
- Step 2: Watch the Ice Block counter. Once it hits 0, the block shatters.
- Step 3: Immediately tap the newly exposed Orange cups. These are critical for the fire base.
- Step 4: Do not tap the newly exposed White cup yet. Store it mentally, but let it sit in the tray if you have space.
Phase 3: The Rope and Yellow Strategy
This is the most dangerous phase of the level. You need Yellow, but the main supply is tied up.
- Step 1: Look beneath the right-side barrier. Identify loose Yellow or Orange cups in the lower clusters.
- Step 2: Process a loose Yellow cup. This triggers the "Rope Break" mechanic.
- Step 3: Once the Rope snaps, the two bound Yellow cups on the middle right become interactable.
- Step 4: CRITICAL: Wait until the conveyor belt is in the "Fire" section (Yellow/Orange zone) before tapping these new Yellow cups. If you tap them while the belt is expecting Red, you create a traffic jam that is very hard to clear.
Phase 4: The Mid-Game Grind (The "14" and "28" Blocks)
With the top cleared and Yellows unlocked, you enter a rhythm state. You are systematically reducing the large numbers.
- Step 1: Alternate between sending Bright Red (for bricks) and Orange (for fire) cups.
- Step 2: Avoid processing Green cups unless the "28" block is close to breaking or your tray is in danger of overflowing with warm colors.
- Step 3: Shatter the "14" block to access the middle reserve of colors.
- Step 4: Aggressively target the "28" block. Every match counts. Once this breaks, the floodgates open, and the level transitions into the final phase.
Phase 5: Constructing the Wreath and Mantle
The bottom of the board is now open. You have access to bulk Greens and Reds.
- Step 1: Tap the Green cups in clusters. Build the green wreath layer by layer.
- Step 2: Switch back to Bright Red. Fill in the brick background around the wreath.
- Step 3: Leave gaps for the White mortar lines. Do not fill the entire red wall yet.
- Step 4: Only tap the Pink cups once the Green Wreath is 90% full. The Pink bows sit on top of the green. If you pour Pink too early, it falls through the empty green slots and ruins the fire below.
Phase 6: The Final Polish (White and Pink)
The canvas is mostly full. Only the fine details remain.
- Step 1: Retrieve the White cups you have been avoiding.
- Step 2: Pour the White sand to create the mortar lines between the bricks.
- Step 3: Finish the Pink bows.
- Step 4: Verify the image. If any brick or fire pixel is out of place, use the remaining cups to correct it.
Color Order and Processing Logic
The order in which you process colors is the single most important factor in Level 480. Processing colors out of order will lead to clogged conveyor belts and inaccessible pixels. Here is the ideal processing hierarchy, from most important to least.
Priority Tier 1: The Foundation (Dark Red & Yellow)
Why these first? The fireplace shadow (Dark Red) and the fire base (Yellow) are located at the bottom and center of the canvas. If you fill the background bricks first, you will struggle to place these base colors without spilling over. Secure the base colors immediately to lock the bottom of the image in place.
Priority Tier 2: The Background (Bright Red)
Once the fire is established, you need to build the wall. Bright Red is your filler color. It takes up the most space. Process this continuously to keep your slot economy moving. It is the "workhorse" color that chips away at Ice Blocks while building the visual structure.
Priority Tier 3: The Wreath (Green)
Green is tricky. It is abundant but blocked by the "28" Ice Block. You cannot process Green effectively until the mid-game. Once the block is gone, switch focus to Green to build the upper section of the image.
Priority Tier 4: The Details (White & Pink)
These are "High Risk, Low Volume" colors. They represent less than 5% of the total sand volume but require 90% of your precision. Do not process these until the very end. If you pour White sand while the Red bricks are still forming, the White will mix with the Red, creating a muddy pinkish color that ruins the crispness of the brick lines.
The "Sandwich" Method
Use a sandwich technique for the bricks. Pour Bright Red, then a small amount of White, then Bright Red again. This prevents the White from being contaminated by the wet Red sand surrounding it.
Key Tips for Success
Mastering Level 480 requires more than just following steps; it requires a mindset shift. These tips are designed to help you manage the chaotic elements of the level.
Tip 1: The Conveyor Line-Up
Never tap a cup just because it's available. Tap it because the conveyor belt is ready for it. Look at the pouring spout. If the belt is currently dispensing Red sand onto the canvas, do not tap a Green cup. Wait until the belt cycles or until you have poured the current cup. Timing is everything.
Tip 2: Mystery Cup Management
The "?" cups are dangerous. Only tap a Mystery Cup if you have at least two empty slots in your tray. If the cup reveals a color you don't need (like Pink when you are building the fire), having an empty slot allows you to store it temporarily without blocking the flow of other essential colors. If you tap a Mystery Cup with a full tray and get a bad color, you are stuck.
Tip 3: Predictive Pouring
Anticipate the next color. If you are currently pouring Red, and you know the next pixel is Orange, start looking for the Orange cup in your tray while the Red is pouring. This saves precious seconds and keeps the flow smooth. Stop-and-go gameplay is what causes timeouts here.
Tip 4: The "Slot Buffer" Technique
Always try to keep 1 slot empty. This is your "Buffer Slot." It allows you to make a move elsewhere on the board without having to immediately dump a cup onto the conveyor. It gives you the split-second decision time needed to navigate the Snake Tray.
Tip 5: Visualizing the Ice Block Counters
Do not obsessively stare at the Ice Block numbers. Use your peripheral vision. You should have an internal sense of how close you are to breaking a block based on how many cups you have processed. If you notice you haven't seen a Green cup in a while, check the "28" counter—it likely means you need to speed up your processing rate.
Tip 6: Handling the Rope
The Rope on the Yellow cups is a psychological trap. When you see the Rope snap, your instinct is to tap the free cups immediately. Resist this urge. Those cups are not going anywhere. Wait for the optimal moment on the conveyor belt.
Common Mistakes to Avoid
Even experienced players fail Level 480 because of these specific errors. Learn what not to do.
Mistake 1: The "White Out" Error
This is the number one cause of failure. Players tap the White cups early because they are "in the way." This floods the conveyor with White sand. Because the White mortar lines are so thin, the excess White sand spills over into the Red brick zones and the Yellow fire zones, creating permanent stains that cannot be fixed.
Mistake 2: Ignoring the "Snake" Barrier
The gray divider is not just a visual element; it is a hard physical barrier. Do not try to move a cup from the top left to the bottom right if the path is blocked by the gray wall. You will waste time tapping a cup that won't move, leading to panic.
Mistake 3: Breaking the Roped Yellows Too Early
If you process the loose Yellow cup and break the Rope while your conveyor is full of Red, the two newly freed Yellow cups will enter your tray. If you then tap them immediately to clear space, you send Yellow sand to a Red section of the canvas. This creates a "color clash" that is very difficult to recover from.
Mistake 4: Overfilling the Tray (5/5 Deadlock)
This happens when you tap cups greedily without thinking about the output. If your tray is full (5/5) and the conveyor belt is full of unprocessed sand, you have no moves left. The game locks up. Always keep the flow moving: Tray -> Conveyor -> Canvas.
Mistake 5: Neglecting the "28" Block
Some players focus so much on the fire and bricks that they forget to target the "28" block. If you reach the end of the level and this block is still up, you will not have enough Green cups to finish the wreath. You will be forced to restart.
Mistake 6: Panic Tapping
When the board gets cluttered, the instinct is to tap faster. This is wrong. In Level 480, speed kills. Slow down. Analyze the board. One correct tap is worth ten fast, wrong taps.
Stuck? Troubleshooting Solutions
Feel like you've hit a wall? Here is what to do when things go wrong.
Problem: The Board is Gridlocked
Symptom: No cups can move, and the conveyor is stuck.
Solution: You likely have a full tray. Look for a color on the conveyor that matches a large open area on the canvas. Pour that color to empty a slot on the belt. Once the belt moves, you can move a cup from the tray to the belt.
Problem: Out of Green Sand
Symptom: The wreath is half-done, but there are no Green cups visible.
Solution: The "28" Ice Block is still intact. You need to go back to basics. Pour Red, Yellow, or Orange—whatever is available—to chip away at the block. Do not stop until the Green cups are released.
Problem: Pink Sand Ruined the Fire
Symptom: You accidentally poured Pink too early, and it's sitting in the Yellow fire zone.
Solution: You cannot remove sand. You must bury it. Pour Yellow or Orange sand on top of the Pink spot to cover it up. This might make the fire look slightly uneven, but it's better than a pink spot. Adjust the bricks above to hide the imperfection.
Problem: The Rope Won't Break
Symptom: You are processing cups, but the Rope on the Yellow cups remains.
Solution: You are not processing the correct Yellow cup. The rope is tied to specific cups. You must find the loose Yellow cup (usually located in the lower right quadrant) and process that one first. The loose cup is the key.
Problem: White Lines Are Messy
Symptom: The mortar lines look thick and blurry.
Solution: You poured White too fast. The sand spread out. To fix this, carefully pour Bright Red along the edges of the white lines to "sharpen" the borders. Use the edge of the sand stream to cut into the white and redefine the line.
Speed Run and Advanced Tips
For players looking to achieve a high score or a fast completion time, these advanced strategies will help you shave seconds off your run.
Pre-Tapping Strategy
While the "Loading" screen is fading, you can mentally map your first three taps. Know exactly which Bright Red cup and which Dark Red cup you will tap the instant the game starts. This eliminates the 1-2 seconds of decision time at the beginning.
Merging on the Conveyor
If you have two cups of the same color in your tray, don't pour them one by one if the canvas isn't ready. Instead, if the conveyor allows, merge them into a larger cup or pour them back-to-back to create a thicker layer of sand in one go. This is faster than waiting for the belt to cycle twice.
The "Reset" Trick
If you make a mistake in the first 5 seconds (e.g., tap the wrong cup), do not try to recover. Immediately hit the restart button. In a speed run, a 5-second mistake costs more than a 5-second restart. Keep your runs clean.
Blind Pouring
Once you have memorized the image, you don't need to watch the pour. Watch the tray. While a cup is pouring, your eyes should be scanning the tray for the next cup. This "look ahead" technique is how speedrunners maintain momentum.
Ice Block Targeting
Focus your taps on the cups that are physically closest to the Ice Blocks. For example, cups directly underneath the "28" block should be prioritized over cups on the far left. This creates a localized clear space that helps you mentally track the game state.
Mystery Cup Gambling
In a speed run, you don't have time to be safe with Mystery Cups. If you have an open slot, tap it. If it gives you a useful color, great. If it gives you a bad color, trash it immediately onto the conveyor if the belt is clear. The time saved by potentially getting a useful color outweighs the risk of a bad roll.