
Level 63
HARDHow to solve Sand Loop level 63? Get instant solution for Sand Loop 63 with our step by step solution & video walkthrough. Sand Loop 63 tips and guide.
Play Sand Loop Now
Experience the puzzle challenge firsthand
Game Screenshots
Sand Loop Level Guides
Level Overview: The Volcanic Eruption Challenge
Welcome to Level 63, "The Volcanic Eruption." This stage is a significant difficulty spike in Sand Loop, designed to test your resource management skills rather than just your painting speed. Unlike previous levels where you could focus solely on color matching, Level 63 requires you to solve a logistical puzzle before you can even finish the artwork.
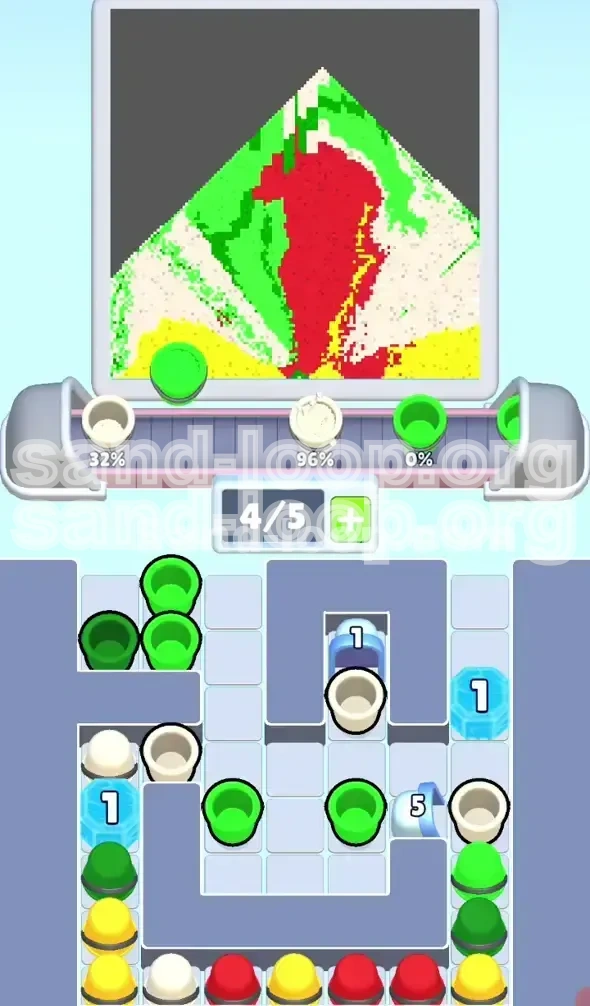
The challenge here is twofold: managing a severely limited tray capacity (only 5 slots) while simultaneously dealing with a "Dual-Ice Blockade." The board is cramped, and if you prioritize painting over unlocking resources, you will fail. This guide will break down the exact sequence needed to clear the ice, manage your tray, and paint the volcano without getting stuck.
Restricted Board Layout
The most noticeable feature of this level is the lack of space. You are not given a spacious tray to organize your colors. You have exactly five slots for temporary storage. This means every cup you pull from the reserve stack must be accounted for. You cannot simply pull cups out to "see what's underneath" without a plan to use them immediately. Clutter is your enemy in this stage.
The Dual-Ice Blockade Mechanic
This is the core mechanic of Level 63. You start the game with two massive Blue Ice Blocks locking away your essential paint supplies. The Left Ice Block traps your White and Blue cups (crucial for the smoke). The Right Ice Block traps your Green and Yellow cups (crucial for the mountain slopes). You cannot paint the mountain effectively until you break these seals.
High Consumption of Green
Analysis of the target image reveals that the Green mountain slopes cover approximately 45% of the canvas. However, you start with zero accessible Green cups in your main tray. If you waste your initial moves painting small details with White or Red, you will eventually run of Green cups while the Ice Block still holds the rest. This creates a deadlock where you have no moves left.
Color Separation Difficulty
The transition between the Green slopes and the White smoke is tight. The pixels interlock in a zig-zag pattern near the crater's edge. This level requires precise pouring discipline. Accidentally pouring a single drop of Green into the White smoke zone will ruin your 100% completion chance, forcing you to restart or waste precious cups fixing the error.
Resource Scarcity
Level 63 is balanced on a razor's edge. You have almost no spare cups. The "percentage per cup" efficiency is very high here. If you waste even one full cup of Green or Red on a wrong spot, you likely won't have enough paint left in the reserve stack to finish the level. This requires a "Zero Waste" mindset.
Clear Objectives: Your Mission Checklist
To beat Level 63, you need to shift your mindset from "Painter" to "Logistics Manager." Your primary objective in the first half of the level is not to paint the picture, but to clear the obstacles that prevent you from painting.
Primary Objective: Breach the Right Ice Block
Your very first goal is to destroy the Ice Block on the right side. This block holds the majority of your Green and Yellow supply. Since Green is the most dominant color, this is your critical supply line. You must locate Blue cups in your initial stack and feed them into the mechanism to shatter this block.
Secondary Objective: Clear the Left Ice Block
Once the right side is open, your focus shifts to the left. The Left Ice Block holds the White and Blue cups needed for the smoke and clouds. You need these for the top 25% of the painting. Do not prioritize this block first, or you will flood your tray with White cups that you cannot use yet.
Painting the Foundation (Green Slopes)
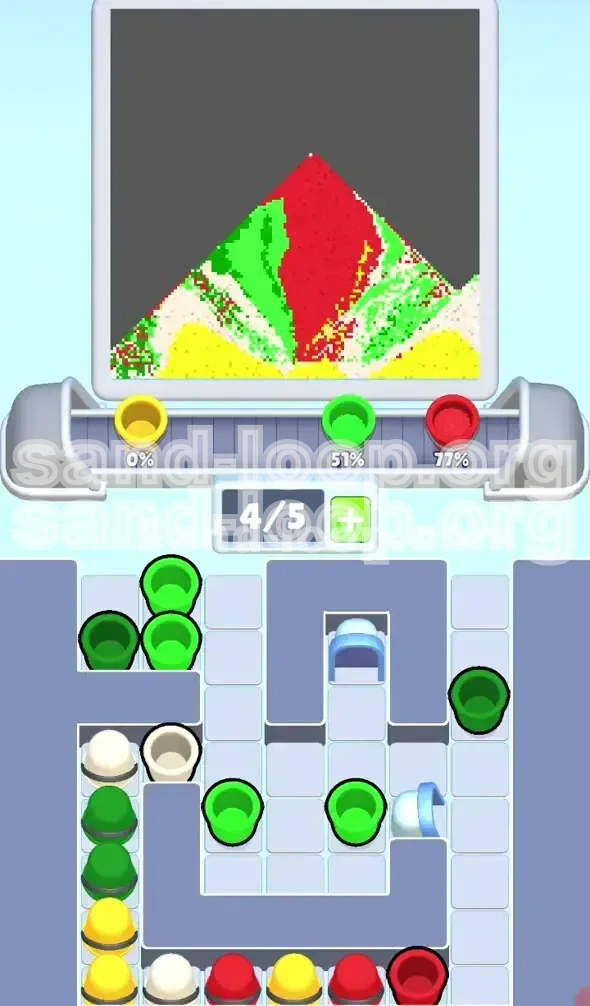
After the ice is broken, you must immediately pour Green cups to clear the bottom left and right slopes. This serves two purposes: it completes the largest section of the art, and more importantly, it clears heavy Green cups out of your limited 5-slot tray, making room for other colors.
Painting the Center (Red Lava)
The Red lava flow is located in the center of the canvas. It acts as a bridge between the two Green slopes. You must queue up Red cups specifically for this section. Do not start the Red flow until you have cleared enough Green space to maneuver your cups efficiently.
Finishing Details (White Smoke & Yellow Highlights)
The final 10% of the level involves the tricky White smoke and Yellow highlights. These require a light touch. The objective here is precision over speed. You must match the dispenser's exact position with the remaining unpainted pixels to avoid wasting paint.
Step-by-Step Instructions: The Exact Sequence
This section provides the turn-by-turn logic you need to follow. Read carefully—order matters.
Phase 1: The Ice Break (Moves 1-10)
At the start, ignore the canvas completely. Look at the cup stack in your tray. You need to find Blue cups. Do not pull any Green or White cups yet.
- Identify Blue Cups: Scan your accessible stack for Blue cups.
- Load the Conveyor: Place a Blue cup on the conveyor belt immediately.
- Target Right Block: Ensure the Blue cup hits the Right Ice Block.
- Repeat: You may need to feed 2 Blue cups to fully shatter the block.
- Avoid the Left Block: Do not send Blue cups to the left yet. Keep your tray empty.
Phase 2: Unleashing the Green Supply
Once the Right Ice Block shatters, a stack of Green and Yellow cups will spill into your tray. This is dangerous because it can fill your 5-slot capacity instantly.
- Check Capacity: Ensure you have at least 2 empty slots before the block breaks.
- Sort Green: Quickly pull Green cups to the front of your stack.
- Paint the Base: Send Green cups to the bottom left and right slopes of the volcano.
- Clear the Tray: Your goal is to paint enough Green so that you are no longer at risk of a "Full Tray" deadlock.
Phase 3: The Left Block & White Smoke
With the Green slopes underway and the tray partially cleared, it is safe to unlock the White cups.
- Feed Blue to Left: Now, send a Blue cup to the Left Ice Block.
- Release White: As the block breaks, White and Blue cups enter the tray.
- Prepare for Smoke: Wait for the dispenser head to move to the top of the volcano (the smoke area).
- Pour White: Fill the white clouds. Be careful not to spill onto the green slopes.
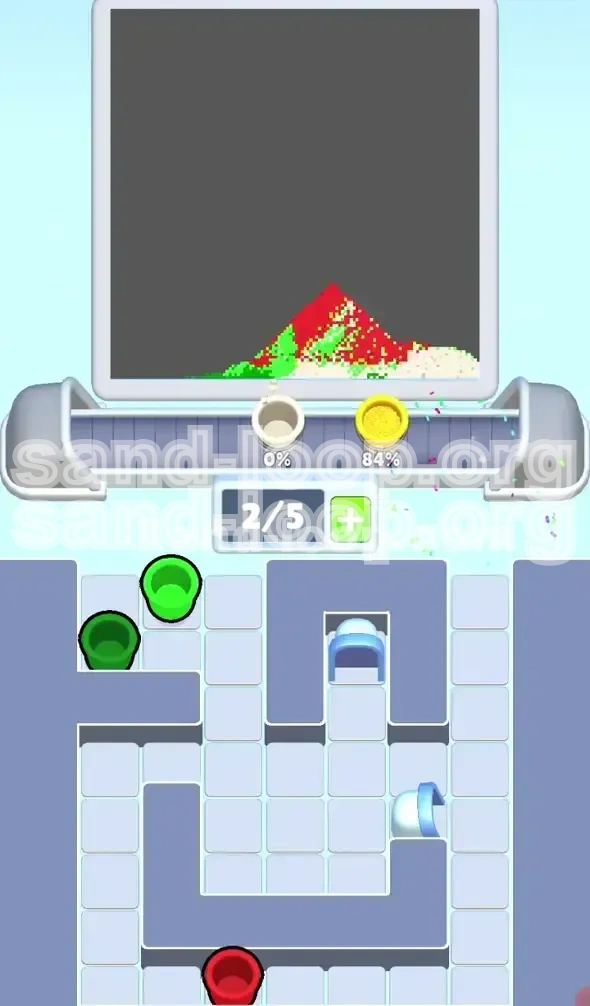
Phase 4: The Red Lava Flow
By now, the top and bottom are done. The middle is empty.
- Locate Red: Red cups are likely at the very bottom of your reserve stack. You might need to burn through a few Yellow or White cups to reach them.
- Queue the Lava: Place 2 Red cups on the belt consecutively.
- Continuous Pour: Let the Red cups flow into the center. Do not interrupt this flow with other colors.
- Fill the Gaps: Use the remaining Red cups to touch up any missed pixels in the crater.
Color Order: Processing Strategy
The "Sand Loop" mechanic relies on a specific order of operations. Processing colors in the wrong order is the #1 cause of failure in this level.
Why Green Must Be First
The Green slopes represent the largest volume of paint required—roughly 45-50% of the total canvas. Furthermore, the Green cups are physically trapped behind the hardest ice block. If you start with White or Red, you will consume tray slots that are desperately needed to sort the incoming Green cups once the ice breaks. You must establish the Green flow immediately to free up memory (tray space).
The Danger of Early White Processing
White is the most contaminating color in this level. The White smoke sits directly above the Green slopes. If you process White before Green is settled, you risk splashing White paint onto the empty Green zones. While this sounds minor, it creates "partial fill" areas that are hard to cover with Green later. Always finish the base Green slopes before moving to the White clouds.
Yellow as a Filler Color
Yellow is used sparingly in this level—mostly for the ground highlight and small spark details. You should not prioritize pulling Yellow cups. Often, Yellow cups will be "blockers" sitting on top of the Red cups you need. Process Yellow only when you have a spare slot on the belt and the dispenser is perfectly aligned with a yellow patch.
Red: The Final Sweep
Red is the center anchor. It connects the Green base to the White top. Because it is centrally located, you can paint it effectively only after the Green and White areas are partially defined. Painting Red first often leads to messy edges where the lava meets the mountain. Save Red for Phase 4 to ensure clean lines.
The Blue Cup Strategy
Blue paint is barely visible in the final artwork (used only for shading in the smoke). However, Blue cups are your most valuable resource. They are your "key" to unlock the level. Do not use Blue cups for painting unless absolutely necessary for a specific pixel. Treat every Blue cup as ammunition for the Ice Breaker mechanism.
Key Tips & Notes for Mastery
Follow these pro-tips to ensure a smooth run and a 3-star rating.
Capacity Management (The 4/5 Rule)
Never let your tray reach 5/5 capacity. If you have 5 cups, you cannot pull new cups from the stack, meaning you cannot find the Blue cups you need to break ice. Always keep at least one slot open. Ideally, operate with 2 cups on the belt and 3 in the tray.
Timing the Ice Break
Watch the conveyor belt movement. Sometimes the dispenser moves away from the Ice Block just as your Blue cup arrives. If this happens, your Blue cup is wasted on the canvas instead of the block. Wait for the dispenser to align perfectly with the "1" marker on the Ice Block before loading the cup.
Recognizing the "Deadlock"
If you find yourself with a full tray of Green/White, but the Ice Block is still intact, and you have no Blue cups, you are in a deadlock. You have no moves. The only solution is to restart. To avoid this, count your Blue cups. If you have less than 2 Blue cups accessible in the tray, stop painting and dig for them.
Pixel Perfect Finishing
The final 2% of this level is often a single pixel of Yellow or White in a corner. Do not deploy a fresh cup for a single pixel if you can help it. Instead, wait for the "dregs" of a previous cup. If you must use a full cup, make sure the dispenser is exactly over the pixel. A full cup has enough paint for 5% coverage. Using it on 1% is a 4% waste of potential.
Using the "Preview" Feature
Before starting a run, zoom in on the Volcano crater. Notice exactly where the Red turns into White. Notice where the Green turns into Yellow. Memorizing these transition points will help you react faster when the dispenser swings rapidly between zones.
Common Mistakes to Avoid
Learn from the errors of other players. Avoiding these will save you hours of frustration.
The "Paint First" Trap
This is the most common error. New players see the empty canvas and instinctively start filling it with whatever color is available (usually White or Yellow). By the time they realize they need Green, the Ice Block is still up, their tray is full of junk colors, and they have no Blue cups to fix it. Rule #1: Break the Ice before you Paint.
Overloading the Belt
Placing 3 or 4 cups on the conveyor belt simultaneously. This feels efficient, but it blocks your ability to react. If the dispenser moves to a new zone, you are stuck waiting for the wrong cups to cycle. Keep the belt light (1-2 cups max) so you can change your color strategy instantly.
Ignoring the Reserve Stack
Some players only look at the cups visible in the tray. They forget that the "Reserve Stack" (the cups waiting to enter the tray) matters. If you pull a Green cup, a new cup enters from the reserve. If you aren't paying attention, you might miss that a Blue cup just entered the tray and then accidentally bury it again.
Wasting the "Super Cup"
Occasionally, a "Super Cup" (larger capacity) spawns. In Level 63, if this Super Cup is White, do not use it on the smoke. The smoke area is small and fragmented. You will get maybe 10% value from a 100% cup. Save the Super Cup for the large Green slope areas if possible, or use it to clear a massive chunk of the mountain in one go.
Panic Pulling
When the board gets tight and you can't find a match, players tend to start pulling cups frantically. This fills the tray. Instead, stop. Look at the dispenser. Is it moving towards the Ice Block? Wait. Patience is the only way to solve the tray space puzzle.
Stuck Solutions: Troubleshooting Guide
Running into problems? Here is how to get out of specific sticky situations.
Problem: Full Tray, Ice Block Intact
You have 5 cups in the tray. None are Blue. The Ice Block is blocking your progress. You are effectively dead.
Solution: Look at the cups on the conveyor belt. Can you cancel them? If yes, cancel them to free up a slot. If no, you must burn a cup. Pour a cup onto the canvas—even if it's the wrong color—just to reduce the tray count to 4. This gives you the slot needed to dig for the Blue cup hiding underneath.
Problem: Ran Out of Green
The Right Ice Block is broken, but you still don't have enough Green to finish the slopes.
Solution: You likely poured Green on non-Green areas (waste). Check the bottom of the volcano. Are there pixels you painted Yellow or Red that should have been Green? You can't undo it, but you can optimize. Use the remaining Green to fill the largest patches first. Leave the tiny 1-pixel gaps for the end.
Problem: Dispenser Stuck in a Loop
The dispenser keeps moving between Left (White) and Right (Green), but you need it in the Center (Red).
Solution: You need to "force" a move. Place a cup of the color you *don't* need on the belt. If you need Red, put a Green cup on. The dispenser will move to the Green zone, pour it, and then likely move to the next zone in the sequence. Sometimes you have to feed the machine the "wrong" color to advance the physical position of the dispenser arm to where you want it.
Speed Run Tips & Shortcuts
Once you understand the logic, you can optimize for speed. Here is how the pros finish Level 63 in under 60 seconds.
The "Double Blue" Opening
Advanced players don't wait for the first Blue cup to break the ice before finding the second. Scan your initial stack. If you see two Blue cups in the first 3 layers, pull both immediately. Queue them up on the belt one after another. This breaks the Right Ice Block instantly without waiting for the belt to cycle back. It saves about 10 seconds.
Pre-Loading the Lava
While you are finishing the Green slopes (Phase 2), start digging for the Red cups. Don't wait until Green is 100% done. Pull the Red cups to the front of the tray stack so that the moment the last Green cup is poured, you can slam the Red button. This eliminates the "searching" downtime between phases.
Bulk Pouring Strategy
Don't pour one cup, check the canvas, pour another. The dispenser moves faster than you think. Line up 3 Green cups on the belt. Let the machine auto-fire them while you use your mouse/finger to pre-sort the next batch of cups from the tray. This "fire and forget" method is much faster than micro-managing every single drop.
Ignoring Perfection
For a speed run, 95% completion is often enough to get 3 stars. Don't chase the last 5% of pixels if they are hard to reach. If the Green slope is 98% done, move to Red. The time bonus for finishing fast outweighs the small penalty for missing 2% accuracy. Only perfect the pixels if they are easy "clicks" on the way.