Level Overview: The "Color Sandwich" Challenge
The Core Visual Layout
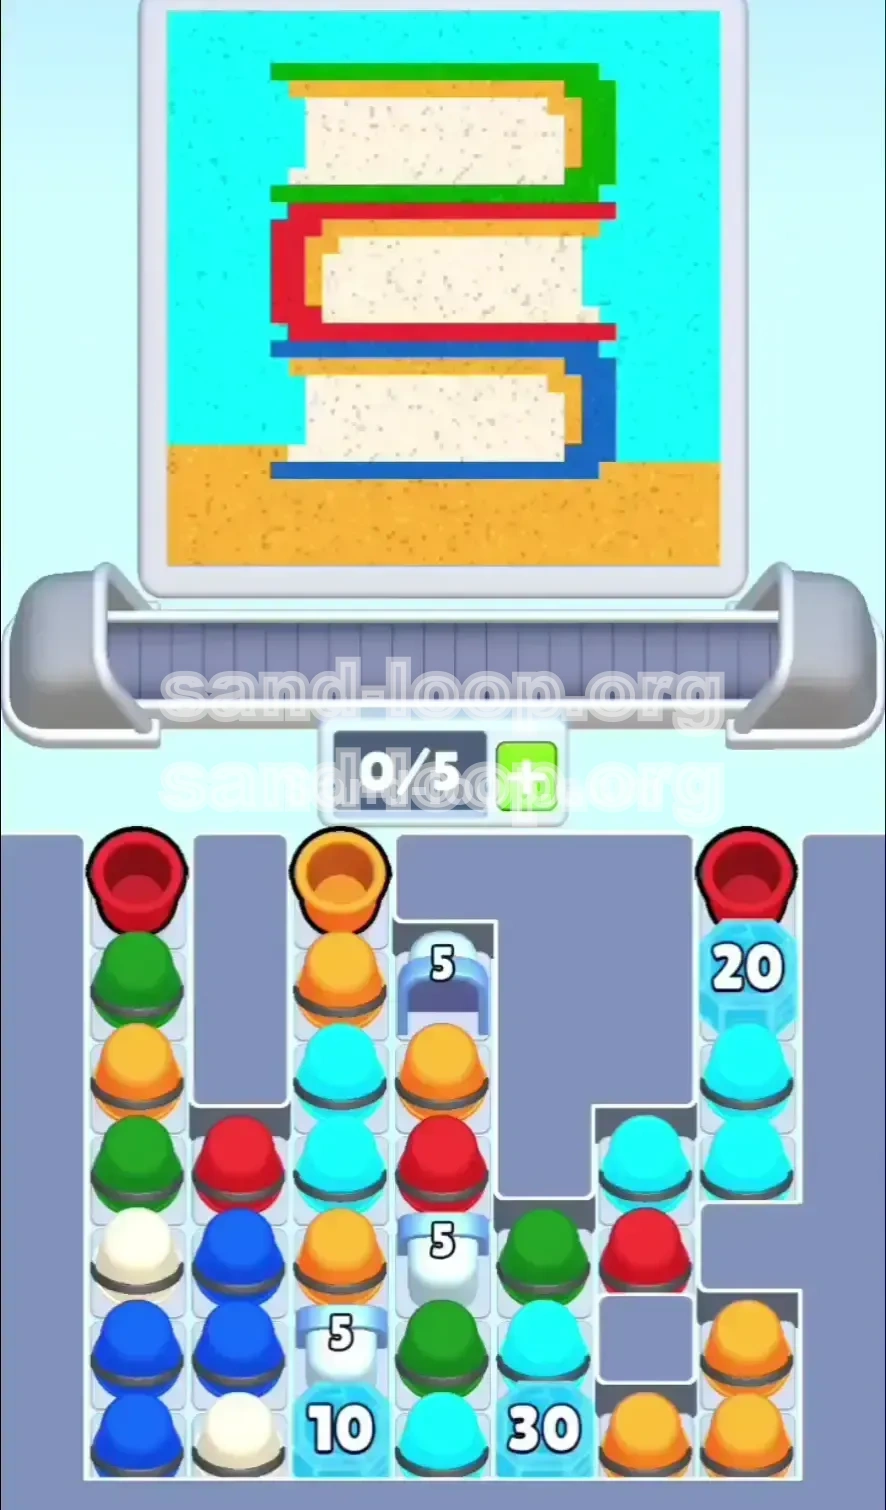
Level 69 presents a distinctive visual puzzle often referred to as the "Color Sandwich." The canvas is dominated by a vibrant Cyan background, which acts as the primary container. However, the central challenge lies in the horizontal bands intersecting the screen. You will see Deep Green borders on the periphery, Warm Orange accents, Crisp White fill zones, and Bold Red stripes stacked tightly in the middle. The visual clutter is intentional; the White zones are particularly narrow, acting as sensitive barriers between the more aggressive color bands. If you misjudge a pour, you will instantly bleed into a neighboring zone, turning a clean fill into a messy failure.
Starting Inventory Analysis
At the start of this level, your conveyor belt is empty (0/5 slots used). Looking down at your supply tray, the setup is deceptive. You have immediate access to Red, Green, and Orange stacks. However, a quick inspection reveals the critical bottleneck: the Blue cups are buried under a stack of 10 or more blockers, and the secondary Cyan cups are similarly trapped deep in the tray. This "Buried Resource" mechanic is the primary difficulty driver. You cannot simply play the colors you see; you must execute a specific sequence to liberate the trapped Blues and Cyans before your conveyor belt jams with unusable colors.
The Win Condition
To conquer Level 69, you must fill all color zones—Cyan, Orange, Green, Red, Blue, and White—to exactly 100% capacity. The game is unforgiving of overflow; any single zone exceeding its limit will trigger a failure. Furthermore, you must manage your conveyor capacity (5 slots) effectively. If you fill the belt with colors you don't immediately need while the necessary colors remain buried in the tray, you create a deadlock. Success requires a balance of aggressive unblocking and precise, rhythmic pouring.
The "Slot Economy" Mechanic
Unlike earlier levels where you might keep the belt full, Level 69 requires strict "Slot Economy." You have 5 available slots, but the optimal strategy involves keeping 1 slot empty approximately 60% of the time. This open slot acts as a buffer, allowing you to receive cups from the tray without immediately forcing a pour. It also gives you the flexibility to shuffle the order of cups on the belt, ensuring that the color you need reaches the pouring point exactly when the corresponding zone on the canvas is ready to receive it.
Why This Level Stalls
Most players fail not because they lack the skill to aim, but because they mismanage the queue. The classic failure state is "The Red Lock." Players see Red, load Red, and pour Red. Suddenly, the Red zone is full, but the belt is still carrying two more Red cups. Meanwhile, the Blue zone is empty, but Blue cups are still buried under 10 layers of other cups. With no free slots to dig for Blue, the game effectively ends. Recognizing this pattern early is the key to beating Level 69.
Clear Objectives and Strategic Goals
Primary Objective: Liberate the Blue Stack
Your most critical mission in the first phase of the level is to clear the massive stack of blockers sitting on top of the Blue cups. The Blue zone is significant, and without access to Blue, you cannot finish the level. You must prioritize clearing the tray's "10-stack" column as early as possible. Do not wait until your other zones are nearly full; by then, it will be too late to recover. Treat the unblocking of Blue as a priority objective, even if it means temporarily ignoring the easily accessible Red and Orange cups.
Secondary Objective: Maintain the Cyan Balance
Cyan is the background color, which makes it tricky. It covers a large surface area, meaning the meter fills up slowly but requires a massive volume of liquid to reach 100%. However, because it is the background, other colors are layered *on top* of it. If you overfill Cyan early, you might find yourself unable to finish the smaller, more detailed zones like Red or White without overflowing the Cyan. Your goal is to treat Cyan like any other color—steady, rhythmic inputs—rather than panicking and dumping it all at once.
Precision Objective: The White Zone Squeeze
The White zones are the "make or break" elements of Level 69. They are geometrically tiny and sandwiched between high-volume colors like Green and Orange. A standard "full" pour from a cup is often too much for these White zones. Your objective here is to recognize that White requires "dribble" pours or perfectly timed single-taps. You must plan your load order so that when a White cup is on the belt, it is the *only* thing you are focusing on. Do not try to multi-task while pouring White; it demands your full attention.
Management Objective: Avoiding the Deadlock
A deadlock occurs when all 5 conveyor slots are filled with cups for colors that are already full (e.g., you have 3 Red cups on the belt, but the Red zone is at 100%). Your objective is to prevent this scenario by constantly monitoring the "Next Cup" preview. If the next cup in the tray is Red, and Red is full, you must have an empty slot ready to catch that Red cup and move it to the discard/pour queue to get it out of the way, or you must pause loading until a needed color appears.
Flow Objective: Establishing the Rhythm
Level 69 is a rhythm game as much as a puzzle game. The optimal strategy involves a specific cadence: Load, Wait, Pour, Release. Your objective is to find a tempo where you are always loading the next cup while the current one is pouring. If you break this rhythm—stopping to think or stopping to panic—the timer (if active) or the conveyor momentum will work against you. Establishing a flow prevents the mental overload that leads to accidental overflows.
Step-by-Step Walkthrough: The Phases of Victory
Phase 1: The Setup and Initial Load (0% - 30%)
Start the level by loading exactly 4 cups onto the belt. Do not fill the 5th slot yet. Aim for a mix of 1 Red, 1 Green, 1 Orange, and 1 Cyan. Avoid loading Blue initially if it requires digging through the deep stack; let the tray naturally cycle or clear small blockers first. As the first cup reaches the pour point, tap immediately to release a burst. Your goal here is to get the meters moving slightly—aiming for about 20-25% completion on Red, Green, and Orange. Keep the 5th slot open. This open slot is your insurance policy, allowing you to grab a Blue cup the moment it becomes accessible without clogging the belt.
Phase 2: The Great Blue Unblock (30% - 50%)
Once your initial colors are cycling, shift your focus entirely to the tray. You will see the stack with the "10" counter. You need to clear this. To do this, load and cycle the cups sitting *on top* of the Blue stack. Usually, these are Red or Green blockers. Load them onto your belt (using your 5th slot) and pour them into their respective zones. This might overfill Red or Green slightly, so stop pouring if they hit 40-30%. The moment the Blue cup is the top item in that stack column, load it immediately. Pour it into the Blue zone. Repeat this "unblock and pour" cycle until the Blue zone reaches roughly 50% capacity.
Phase 3: The Mid-Game Balancing Act (50% - 75%)
At this stage, the tray is opening up, and you have access to most colors. The danger here is "runaway" meters. You might find Cyan at 80% while Blue is still at 40%. You must force a balance. Stop loading Cyan. Even if Cyan cups are right in front of you, ignore them. Load Orange or Green to give Blue time to catch up. Maintain the "1 Empty Slot" rule rigorously here. If you load 5 cups in a row without pouring, you will lose control of the order. Tap, pour, and release in a steady 1-2-3 rhythm. If you see a color meter hit 70%, stop loading that color immediately.
Phase 4: The White Zone and Final Stretch (75% - 95%)
As you enter the endgame, the White zones become the priority. If you have been ignoring White, now is the time to address it. Load White cups one at a time. Ensure your other colors are hovering around 90%. Pour the White cups with extreme caution—tap once, watch the fill, and tap again if needed. Do not hold the pour button. If you overflow White, you lose. If you find yourself with Red at 100% and White at 80%, but the only cup available is Red, you are in a "Sacrifice" scenario. You may have to deliberately waste a Red cup (pour it into an already full zone) to cycle the belt and get to the White cups. It's better to lose a few points on accuracy than to fail the level entirely.
Phase 5: The Final 5% and Millimeter Mode
When all meters are above 90%, enter "Millimeter Mode." Stop loading multiple cups. Load a single cup, let it traverse the belt, and pour it. Watch the meter update. If it hits 100%, move to the next color. If it hits 98%, you need a tiny micro-pour. This is the slowest part of the level. Do not rush. If you have a cup loaded and the meter is already at 100%, you must discard it or pour it into a "safe" full zone to get it off the belt. The victory screen triggers only when *all* zones are satisfied simultaneously. Patience here is the ultimate key.
Key Tips and Tactical Notes
The "Tap-Release" Technique
For this level, do not use a continuous stream (holding down the button). The pressure is too high for the delicate White zones. Use the "Tap-Release" method: Tap the screen, let a burst of liquid out, and immediately release. This gives you granular control over the fill level. It prevents the "spillage" that occurs when the liquid pressure builds up too much in the nozzle. This single technique change will reduce your error rate by 50%.
Understanding Lead Time
There is a delay between when you tap "Load" and when the cup actually arrives at the pouring position. In Level 69, this delay is approximately 3-4 belt positions. You must plan your taps in advance. If you see you need Blue, and Blue is currently at position 4 in the tray, tap it *now*. Do not wait until it's position 1, or you will break your pouring rhythm. Always be looking 2 steps ahead of your current action.
The "Buffer Cup" Strategy
Sometimes you have a cup on the belt that you don't want to pour yet (e.g., a Blue cup when Blue is at 95%). Use it as a "Buffer." Let it ride on the belt without pouring. Pour the cups *behind* it first if possible. This buys you time for the meter on the target zone to settle or for you to unblock a different color. Just be careful not to let it pass the pour point without action if the belt is auto-moving, or you'll waste the cup.
Managing the "Jams"
If you encounter a "Jam" where the tray won't give you the color you want, it usually means the tray logic is waiting for you to clear a specific column. You might need to load a "useless" color (like Red when Red is full) just to clear the physical space in the tray so it can shuffle and reveal the color you actually need (like Cyan). Treat the tray like a sliding puzzle; sometimes you have to move pieces out of the way to get to the prize.
Visualizing the "Sandwich"
Keep the visual of the "Color Sandwich" in your mind. The White zone is the meat in the middle. When pouring into the Red or Green zones, visualize the liquid stopping exactly at the border of the White zone. This mental imagery helps you stop the pour just at the right moment, preventing the "bleed" that ruins the score. Focus on the borders, not the center of the color band.
Common Mistakes and Speed Run Tips
Common Mistake: The "Initial Flood"
Many players try to fill the conveyor belt to 5/5 slots immediately. This is a mistake. In Level 69, a full belt reduces your reaction time to zero. If you load 5 cups and realize 3 of them are wrong, you have to pour 3 cups before you can fix the problem. This usually leads to overfilling. **Correction:** Start with 3 or 4 cups. Keep the flow liquid, not static.
Common Mistake: Ignoring the "Buried" Counters
Ignoring the numbers (5, 10, 20) on the stacks is fatal. If you see "10" on a Blue stack, do not assume you can get to Blue in 10 seconds. It takes 10 *cycles* to get there. You must start working on that column immediately. **Correction:** As soon as the level starts, check the deep stacks. If Blue is deep, start clearing blockers immediately, even if Blue isn't your immediate priority.
Speed Run Tip: Pre-Loading
If you are aiming for a high score or fast time, use the "Pre-Load" technique. While a cup is pouring, look at the tray. As soon as you see the cup you need for the *next* zone, tap it while the current pour is still happening. The game allows you to queue the next load. This overlap saves precious seconds and keeps the conveyor momentum high, preventing the "stall" that kills your time bonus.
Speed Run Tip: The "Skip and Sacrifice"
In a speed run, perfection is the enemy of speed. If a zone is at 98% and you have a cup for it, don't wait for a micro-pour. Just dump it and take the tiny overflow penalty (if the mode allows it) or quickly move to the next cup. Getting stuck trying to get 100% precision on a 2% deficit often wastes more time than the small score deduction. However, this only applies if the mode doesn't instantly fail on overflow.
Recovery Tip: The "Reset" Pour
If you realize you have completely messed up the order and the belt is full of wrong colors (e.g., all Red but you need Blue), you have one option: The Reset Pour. Quickly pour the "wrong" cups into the corresponding zones to get them off the belt, even if it means overfilling those zones slightly. This clears the belt (resets the board) and allows you to load the correct colors from the tray. It is better to have one zone at 110% and the others at 50%, than to have a full belt and a deadlock. You can often recover from a 10% overfill; you cannot recover from a deadlock.