
Level 71
HARDHow to solve Sand Loop level 71? Get instant solution for Sand Loop 71 with our step by step solution & video walkthrough. Sand Loop 71 tips and guide.
Play Sand Loop Now
Experience the puzzle challenge firsthand
Game Screenshots

Sand Loop Level Guides
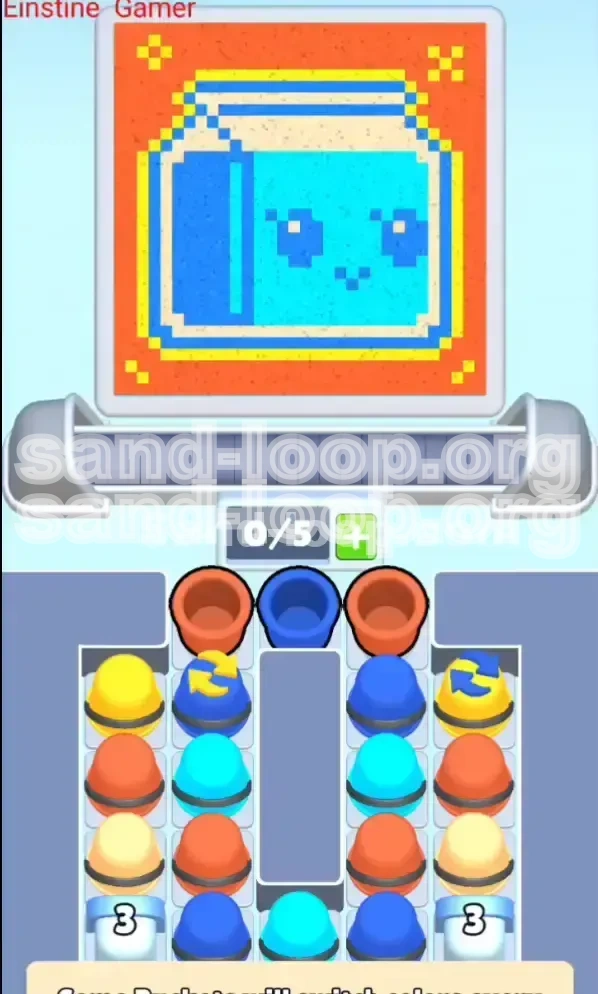
Level Overview: The Deceptive Milk Carton Challenge
Level 71 in Sand Loop introduces a significant spike in difficulty by combining complex pixel art with dynamic inventory mechanics. Visually, the level presents a cheerful, "Kawaii" style Milk Carton with a cute face, but do not let the adorable art style fool you. This stage is a test of rhythm management and spatial awareness.
The primary challenge here is the restricted space and the deceptive nature of your supply tray. Unlike previous levels where you could simply pour as you please, this level requires you to manage a "Conveyor Capacity" of only 5 active slots. The supply tray is densely packed with obstacles, including "Cycling Buckets" that change color periodically. If you tap rhythmically without visually confirming the color, you will inevitably contaminate your canvas. Furthermore, the background constitutes approximately 60% of the total area, creating a constant temptation to over-pour and bury the finer details of the carton.
The Dual-Layer Visual Composition
The artwork is split into two distinct planes that must be handled separately. The background is a massive field of Red and Orange, requiring high volume but low precision. The foreground is the Cyan Milk Carton, which requires high precision. The game physics engine treats these as competing fluids. If you fill the background too quickly, the Red sand will push underneath the Cyan carton, muddying the colors. You must establish the foreground structures first to create a "dam" that holds back the red tide.
The "Cycling Bucket" Mechanic
This is the core mechanic of Level 71. Certain buckets in your tray are marked with circular arrows. These do not contain a fixed color. Instead, they cycle through a palette (e.g., Yellow to Dark Blue to Red) every few seconds. This creates a rhythm trap. You might see a Yellow bucket, reach for it, and by the time your finger hits the screen, it has turned into Blue. You must break your rhythm and wait for the "lock-on" moment.
Conveyor Capacity Constraints
Your tray can only display 5 columns of buckets at a time. Since the level starts with "Trash" colors (colors you don't immediately need) at the top, you are forced to waste moves to clear space. If you do not aggressively clear the top rows, you will run out of room for the new buckets entering from the bottom, causing a traffic jam that can lead to a failed run.
The Density Trap
The "Triple-Charge" Cream buckets (marked with a '3') represent a density trap. These contain three times the amount of sand as a standard bucket. Pouring these too early will cause the heavy cream sand to sink to the bottom of the glass container, displacing the lighter Cyan sand. This creates a muddy, inverted layer effect that ruins the pixel art. These buckets must be reserved for the very end of the filling process.
The Risk of Color Bleeding
The Yellow trim on the milk carton is extremely thin, often only 1-2 pixels wide. Red sand is very fluid and aggressive. If you pour the Red background before securing the Yellow outline, the Red will bleed into the Yellow zones, turning them orange and ruining the crispness of the art. The fill order is not just about aesthetics; it is about physics.
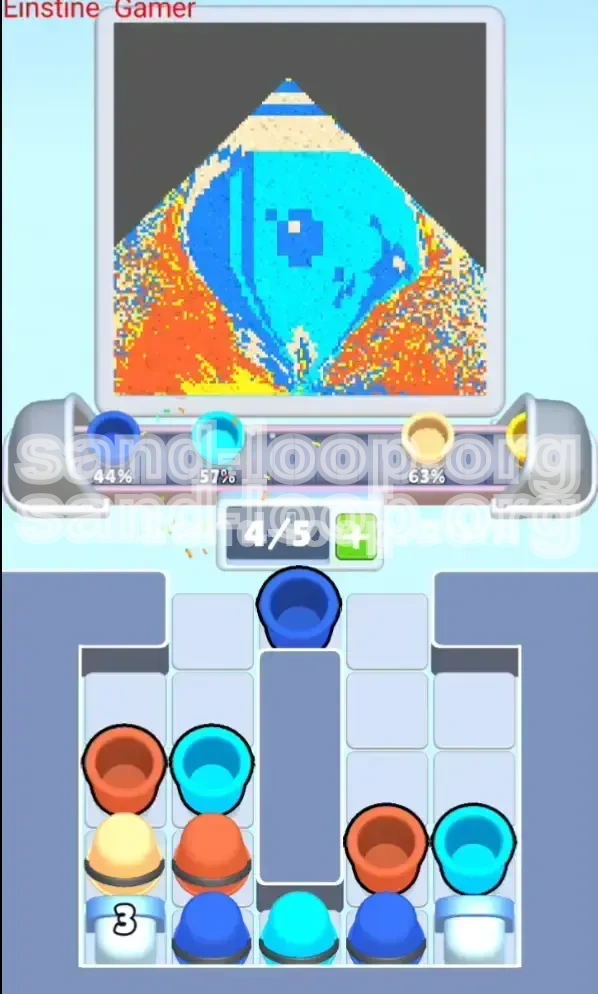
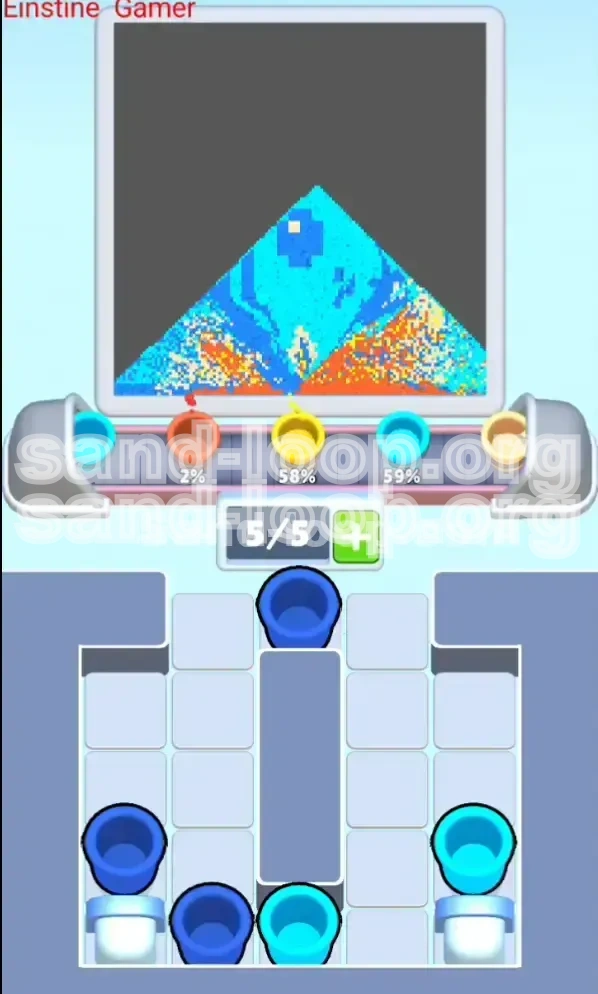
Percentage Breakdown of the Canvas
To help you visualize the workload, the canvas is roughly divided as follows: 55% Red/Orange Background, 25% Cyan Carton Body, 10% Cream/White Label, 5% Dark Blue Shadows/Details, and 5% Yellow Trim/Sparkles. This breakdown highlights why you cannot start with the background—filling 55% of the board first leaves no room for error on the small details.
Clear Objectives: Your Mission Checklist
Completing Level 71 is not just about filling the glass; it is about preserving the integrity of the image while managing a chaotic inventory. Your primary goal is to isolate the Milk Carton from the Background. Below is the strategic checklist you need to follow to achieve a 100% completion rate.
Establish Dark Foundations First
Your immediate objective is to secure the "Shadow" and "Face" details using Dark Blue. These are the anchors of the image. Because Dark Blue is the darkest color in the palette, it acts as a base layer. If you pour lighter colors (Cyan or White) first, the Dark Blue sand will sink through them, creating a messy blur. You must place the eyes and mouth of the carton before anything else.
Secure the Yellow Border
The Yellow outline is your defensive wall. Before you unleash the massive amount of Red background sand, you must cement the Yellow borders. This acts as a barrier, preventing the Red background from bleeding into the carton's body. Think of the Yellow pixels as the "retaining wall" of your structure.
Build the Cyan Body
Once the details and borders are safe, your objective shifts to volume. The Cyan body is the largest block of the foreground. You need to fill this solidly to create a mass that pushes against the glass walls. However, you must stop exactly at the boundaries to avoid mixing with the background zones.
Master the "Cream" Capstone
The White/Cream label on the carton is the visual focal point. Your objective is to keep this clean. You must use the special "Triple-Charge" buckets to fill this section in one go, ensuring the cream sits on top of the cyan without sinking or being overrun by the red background.
Execute the Background Flood
This is the final step. Only after the Milk Carton is 100% complete—colors crisp, borders defined—should you tap the Red buckets. The objective here is to fill the remaining void space around the carton. This requires patience, as you have to navigate around the carton's shape to fill the corners of the glass container.
Inventory Management
Meta-objective: Keep the conveyor belt moving. You cannot let the screen clog up. A secondary objective throughout the level is to use "Burn" moves (pouring unwanted colors into safe zones) simply to clear the tray for new colors. If you stall, the cycling buckets will desync, making the level impossible.
Step-by-Step Instructions: The Precise Pour
Follow this exact sequence of actions to navigate Level 71. Do not deviate from the order, as the physics engine is unforgiving.
Phase 1: The "Trash" Clear (Opening Moves)
The level starts with a row of Red and Dark Blue buckets at the top. These are blocking the good stuff underneath.
- Action: Locate the Dark Blue bucket in the top row.
- Target: Pour this directly into the "Eye" and "Mouth" areas of the carton sketch.
- Action: Locate the Red buckets.
- Target: Pour Red only into the far top-left and top-right corners of the glass (background areas).
- Why: You are clearing the top row of the tray to expose the "Cycling Buckets" underneath. You are also pre-filling the background corners so you don't have to worry about them later.
Phase 2: Sniper the Cycling Yellow
Once the top row is gone, you will see the buckets with arrows.
- Action: Watch the left-hand cycling bucket. Wait for it to turn Yellow.
- Target: Immediately tap it and pour into the Yellow outline and corner sparkles.
- Action: If it cycles to Red, ignore it or pour it into the background corner. Do not pour Red into the carton area.
- Tip: If you miss the Yellow window, wait for it to cycle back. Do not force a Blue or Red pour into the Yellow slots.
Phase 3: The Cyan Core Construction
As you clear the middle rows, you will unlock a large block of Cyan (Light Blue) buckets.
- Action: Rapidly tap all Cyan buckets.
- Target: Fill the main body of the milk carton.
- Caution: Stop pouring before the sand reaches the top of the carton's outline. Leave a tiny bit of room (approx 5%) for the Cream label later.
- Note: This is the "safe" phase. You can tap quickly here because the area is large and the margin for error is high.
Phase 4: The Triple-Charge Cream Execution
At the bottom of the tray, you will find two White/Cream buckets marked with a "3".
- Action: Wait until the Cyan body is 90% full.
- Target: Tap one of the "3" buckets. Pour gently into the label area on the front of the carton.
- Physics Check: The cream is heavy. It will push the Cyan down slightly. This is expected. It creates a nice layering effect.
- Finish: Tap the second "3" bucket to top off the label.
- Warning: Do not use these buckets until the Cyan is there. If you pour Cream onto an empty glass, it will just sit at the bottom and get buried by the Cyan later.
Phase 5: The Great Red Flood
By now, your carton should be perfect. The only thing left is a messy tray full of Red and Orange buckets.
- Action: Tap every remaining Red/Orange bucket.
- Target: Pour aggressively into the remaining empty space (the background).
- Goal: The Red sand should wrap around the finished carton.
- Final Polish: If the Red sand is getting too high near the Yellow borders, slow down and tilt your device (if playing on mobile) or pour carefully to guide the sand into the pockets.
Color Order and Logic: The Strategic Palette
Understanding the logic behind the color order is the difference between a messy blur and pixel-perfect art. This level follows a "Dark-to-Light" and "Inside-Out" logic.
The "Anchor" Principle (Dark Blue)
We start with Dark Blue because it is the heaviest and lowest layer. In the game's physics, heavier/denser sands tend to settle below lighter ones. By placing the eyes and mouth first, we ensure they are visible on top of the glass base but contained within the carton's boundaries. If you save Dark Blue for last, it will sink through the Cyan and disappear, ruining the face.
The "Barrier" Principle (Yellow)
Yellow is placed second not because of its weight, but because of its function as a boundary. The Red background is the "enemy" of the carton. Yellow serves as the containment field. If you pour Red before Yellow, the Red fluid will dynamically mix with the Cyan at the edges. By hard-coding the Yellow pixels first, you create a physical seal that the Red sand cannot easily cross.
The "Volume" Principle (Cyan)
Cyan is the filler. It makes up the bulk of the carton. We do this mid-process because we need the Dark Blue details to be in place to define the Cyan's shape, but we also need the Cyan to be present so the White Cream label has something to rest upon. It is the structural core of the subject.
The "Capstone" Principle (Cream/White)
The Triple-Charge buckets are saved for the end of the foreground process. This is because White/Cream is the "Highlight" of the image. If you pour highlights first, they get covered by subsequent layers. Furthermore, due to the "3x" density, pouring this last forces the lighter Cyan sand aside, creating a crisp, popping effect for the label, rather than having it submerged at the bottom of the glass.
The "Background" Principle (Red)
Red is always last in this type of stage. Why? Because Red is the filler for the negative space. The negative space is undefined until the positive space (the carton) is built. Trying to guess where the Red background starts and stops while the carton is empty is guessing work. Once the carton is built, the Red naturally fills the void. Also, pouring Red last prevents the "bleeding" risk mentioned earlier.
The Palette Hierarchy Summary
To remember this easily, think of the hierarchy as: Structure > Details > Volume > Highlights > Environment. Dark Blue (Structure), Yellow (Details/Boundary), Cyan (Volume), Cream (Highlights), Red (Environment). Following this hierarchy ensures that every layer has a purpose and a place.
Key Tips, Mistakes, and Solutions
Even with a plan, things can go wrong. Here is how to troubleshoot the most common issues players face in Level 71.
Tip 1: The "Hover and Wait" Technique
Do not tap the Cycling Buckets as soon as you see them. Hover your finger over the bucket. Count the rhythm (usually a 2-second beat: Yellow... Blue... Yellow). Tap exactly when the color flips to the one you need. This eliminates the "wrong color" mistake.
Tip 2: Using "Burn" Moves
Sometimes, the cycling bucket is stuck on Red, but you need it to turn Yellow to clear the row, and your tray is full. In this case, tap the Red bucket anyway and pour it into the background corner. This is a "Burn" move—you are wasting the color to clear the inventory slot. It is better to waste a Red bucket than to get stuck waiting for a Yellow one while the timer runs out.
Tip 3: Visualizing the Cream Label
When using the Triple-Charge buckets, don't just tap and hope. Imagine the cream sand is a heavy liquid that will slide *over* the Cyan. Aim for the center of the label area. If you pour on the very edge, it might spill over the side and mix with the Red background.
Mistake to Avoid: Premature Background Filling
The #1 error is filling the Red background first. Players think, "I'll get the big area out of the way." This is fatal. Once the background is full, any mistake with the foreground colors will result in "overspill" that you cannot fix. The sand will pile up on top of the Red, but the boundaries will be lost. Always fill the foreground (Carton) before the background.
Mistake to Avoid: Ignoring the Triple-Charge Mark
If you treat the "3" buckets like normal buckets, you will likely tap them too early and run out of sand for the label. Conversely, if you don't realize they are 3x strength, you might over-pour and bury the whole carton in white. Recognize these buckets immediately and plan your whole strategy around when not to tap them.
Solution: What to Do If You Get Stuck
If you are at 85% completion and the last few buckets just aren't fitting:
- Check the Corners: There are often tiny pockets of air in the top corners of the glass that need just a few more grains of Red.
- Shake it Up: Gently tilt your device left and right. This helps the sand settle more densely, potentially creating room for that last bit of liquid.
- Review the Art: Zoom in (if possible) and check if a Dark Blue pixel is missing from the eye. Sometimes you think you are out of Dark Blue, but you actually just missed a spot.
Speed Run and Advanced Strategies
Once you have mastered the standard completion, you can aim for the fastest time possible. Speed running Level 71 requires risk management and macro-management.
Advanced Tip: Pre-Loading the Tray
Start the level by immediately identifying where the "3" Cream buckets are. They are usually at the very bottom. Do not tap the top rows so fast that you accidentally push the "3" buckets off the screen before you need them. You want to time your clearing of the top rows so that the "3" buckets arrive at the tapping zone exactly when the Cyan body is ready.
Shortcut: The "Combined Flood" Technique
For expert players, you can combine Phase 3 (Cyan) and Phase 4 (Cream). If you have a very steady hand, you can pour the Cyan and immediately follow it with the Cream before the Cyan settles. This uses the weight of the Cream to push the Cyan into place faster. This saves about 5-10 seconds but requires precision; if you miss, the layers mix into a dirty grey.
Macro-Management: Ignoring Small Details
To maximize speed, ignore the "Sparkles" in the background corners until the very end. Don't stop your flow of Cyan to place a single pixel of Yellow in the corner. Keep pouring the main volume. You can come back with the "Trash" Red buckets at the end to fix those tiny details. This maintains your rhythm.
Rhythm Mastery
Learn the cycle time of the switching buckets. It is usually 3 seconds. If you internalize this beat, you can look away from the tray to watch the canvas, tapping the bucket in rhythm without looking. This "blind tapping" is the key to breaking under 60 seconds.
Inventory Speed Clearing
If you have two Red buckets and one Dark Blue bucket clogging the tray, and you need Cyan: Don't wait. Dump the Red into the background immediately (even if it's not perfectly placed) just to get them off the conveyor belt. In a speed run, an empty tray is worth more than a perfectly placed background pixel. You can fix background errors; you cannot fix a clogged inventory.
Final Speed Check
Your target time for a perfect run should be around 1:30 to 2:00 minutes. If you are going over 3 minutes, you are likely spending too much time waiting for Cycling Buckets or over-focusing on the background corners. Focus on the Carton, finish it, then flood the rest.