
Level 12
HARDHow to solve Sand Loop level 12? Get instant solution for Sand Loop 12 with our step by step solution & video walkthrough. Sand Loop 12 tips and guide.
Play Sand Loop Now
Experience the puzzle challenge firsthand
Game Screenshots

Sand Loop Level Guides
Sand Loop Level 12 Walkthrough: Mastering the Cheesecake Slice
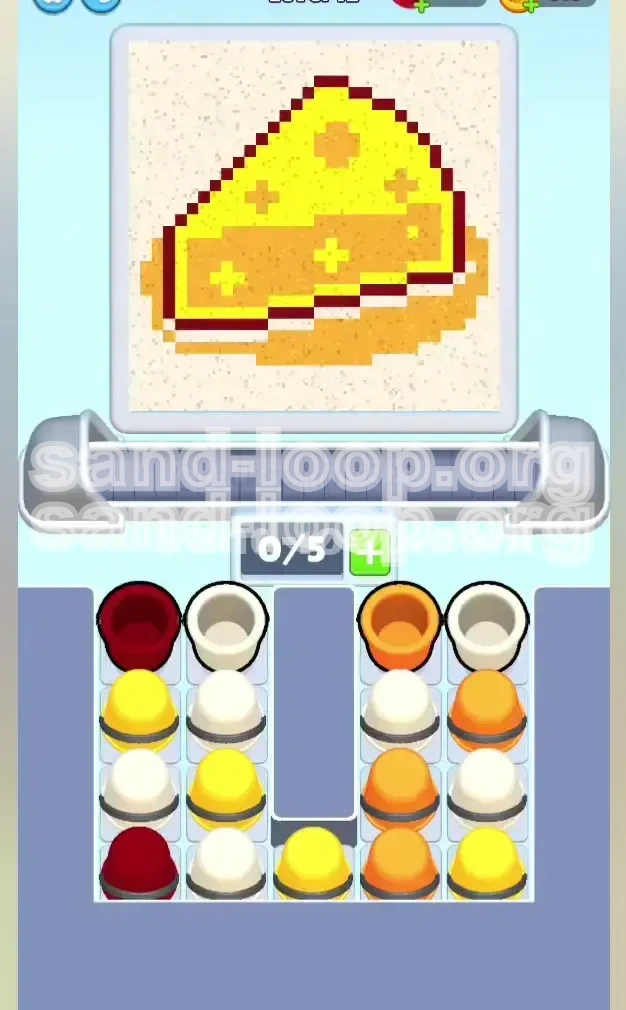
Welcome to Level 12 of Sand Loop, widely known by players as the "Cheesecake Slice" challenge. This stage represents a significant spike in difficulty, moving beyond simple color matching into the realm of resource management and spatial logic. In this level, you are tasked with assembling a vibrant slice of cheesecake featuring a buttery yellow crust, a deep orange shadow, a creamy white filling, and a precise dark red outline.
The core difficulty of this level lies in the "Vertical Lock" mechanic. The supply tray is designed to frustrate you, stacking essential colors (like the dominant Yellow) underneath low-priority colors (like the sparse Dark Red). With only 5 slots available on your conveyor belt, one wrong move can clog the system, leading to a deadlock. This guide will break down the exact strategy to clear the tray, manage your slots, and secure a 3-star finish.
Understanding the Cheesecake Layout
Before you tap a single cup, you must understand the geography of your target. The canvas is a 3D-looking wedge, meaning colors wrap around edges in specific ways. Visualizing the volume of each color is crucial for prioritizing your taps.
- The Top Crust (Bright Yellow): This is your primary objective. It covers the top surface of the wedge and represents approximately 45% of the total pixel volume. You will need to feed the machine a constant stream of Yellow sand to finish this section.
- The Side Shadow (Orange/Tan): This color creates the 3D depth of the slice. It covers the side of the cake and extends into the background plate area. It accounts for about 30% of the canvas and serves as your secondary priority.
- The The Filling (Creamy White): Located at the bottom of the wedge, this layer is visually distinct but volumetrically smaller (around 15%). It often gets squeezed between the crust and the outline, requiring careful timing to pour without overflowing.
- The Outline (Dark Red): This is the danger zone. The dark red outline is intricate but extremely thin, making up less than 10% of the image. It is very easy to overfill this section, leading to wasted cups and blocked slots.
Decoding the Vertical Stack Constraints
Unlike previous levels where colors might be scattered, Level 12 groups specific colors into vertical columns. This physical obstruction is the main puzzle you need to solve.
- The Left Column (The Red/Yellow Lock): This is the most critical column. It is usually topped with a Dark Red cup (low priority) sitting directly on top of a massive stack of Yellow cups (high priority). You cannot access the Yellow until you physically remove the Red.
- The Right Column (The Orange Flow): This column generally contains your Orange and White cups. It is more accessible but requires management to ensure you don't ignore the White filling while chasing Orange shadows.
- Slot Limit (5/5): Your conveyor belt can only hold 5 cups at any given time. If you fill all 5 slots with colors the machine isn't ready to accept (e.g., sending 5 Whites when it wants Yellow), the belt jams, and you lose.
Pre-Game Checklist
To achieve a 3-star rating, you need to minimize idle time and avoid overflow errors. Keep these mental checkpoints in mind before hitting start.
- Calibrate Your Tapping: Stop spam-tapping. In this level, accuracy is speed. A single accidental tap of a wrong color can cost you 3-5 seconds while you wait for the cup to process.
- Monitor Progress Bars: Do not rely solely on the visual canvas. The progress bars at the top of the screen are your early warning system. If a bar is 90% full, stop sending that color immediately.
- Accept "Waste": Sometimes you must send a cup you don't need just to clear the tower. Be prepared to "waste" a Dark Red cup early on to unlock the Yellow supply.
Strategic Color Order: Unlocking the Tray
You cannot rely on random tapping. The tray is a puzzle where order matters. Processing colors in the wrong sequence will lead to a "Soft Lock," where you have empty slots but no accessible colors that the machine will accept. The following sequence is mathematically derived to prevent these locks.
Phase 1: The "Strip-Mining" Operation (Unlocking)
Your first goal is not to finish the painting, but to finish the *tray layout*. You need to clear the top layers of debris to expose the high-volume colors underneath.
- Priority Target: Dark Red (Top Left): Even though the outline is small, the Red cup is blocking your access to the Yellow column. You must tap the Dark Red cup immediately to push it onto the belt. This "unlocks" the column for future Yellow access.
- Secondary Target: Orange (Top Right): While the Red is traveling, tap the top-right Orange cup. This clears the right column and starts filling the largest secondary color zone.
- The "Buffer" Move: If the belt is moving slowly, tap a White cup (Left Column, Row 2) immediately after the Red moves. This fills your slots and keeps the machine active while you dig for Yellow.
Phase 2: The Yellow Marathon (Mid-Game)
Once the initial blockers (Red and top White) are cleared, you enter the longest phase of the level. The top crust requires a massive amount of sand.
- Aggressive Yellow Tapping: You will likely need to send 3 to 4 Yellow cups consecutively. Since you cleared the Red in Phase 1, the Yellow cups in the left column should now be accessible.
- The "Interleave" Strategy: Do not send 5 Reds in a row. Alternate between Yellow and Orange. Send two Yellows, then an Orange (to keep the shadow progress moving), then two more Yellows. This prevents the Orange bar from stalling out completely.
- Watch the 95% Mark: As the Yellow bar approaches 95%, stop tapping Yellow cups immediately. Do not rely on your eyes; trust the percentage meter. Overfilling Yellow by even 1% can clog a slot needed for the final White fill.
Phase 3: The Balancing Act (White Filling)
White is the trickiest color because it sits in the middle of the volume hierarchy. It's not big enough to focus on exclusively, but not small enough to ignore.
- Use as a Spacer: Treat White cups as "gap fillers." Send a White cup when your Yellow stack is reloading or when you have a brief lull in Orange availability.
- Avoid Late-Game Blocks: If the White section is full, but a White cup is blocking a Yellow cup you need, you may have to send the White cup to a full section. The machine will reject it, but it clears the physical space in the tray, allowing you to tap the Yellow underneath.
Phase 4: The Cleanup (Endgame)
In the final 10 seconds, the screen will look messy with half-filled columns. Precision is more important than speed here.
- Single-Tap Protocol: Do not queue multiple cups. Tap one cup, watch it pour, verify the color is still needed, and then tap the next one.
- Scanning for Pixels: The difference between 98% and 100% is often just a few pixels on the edge of the crust or the corner of the plate. Look for the specific missing spots rather than looking at the whole shape.
- The Final Countdown: If you are stuck with 2 colors remaining at 99%, check the corners of the canvas. Often, a single pixel of Orange is hiding in the bottom-left corner of the plate.
Step-by-Step Walkthrough: Action Plan
This section provides the exact chronological actions to take from the moment the level loads. Follow this sequence to navigate the "Cheesecake Slice" safely.
Step 1: The Immediate Unload (Seconds 0-10)
The start of the level is the most volatile moment. The tray is full, and your belt is empty. You must establish flow immediately.
- Action A: Locate the Dark Red cup at the top of the Left Column. Tap it first. This sends the blocker to the belt and exposes the White/Yellow stack beneath.
- Action B: Immediately tap the Orange cup at the top of the Right Column. You now have Red and Orange traveling.
- Action C: Tap the White cup now exposed in the second row of the Left Column. You now have 3 cups en route.
- Action D: Tap the White cup at the top of the Right Column (if available) or the next accessible Orange. This fills your belt to 4/5, keeping the machine busy.
- Result: You have cleared the top layer of the tray. The Left Column is now open for Yellow access.
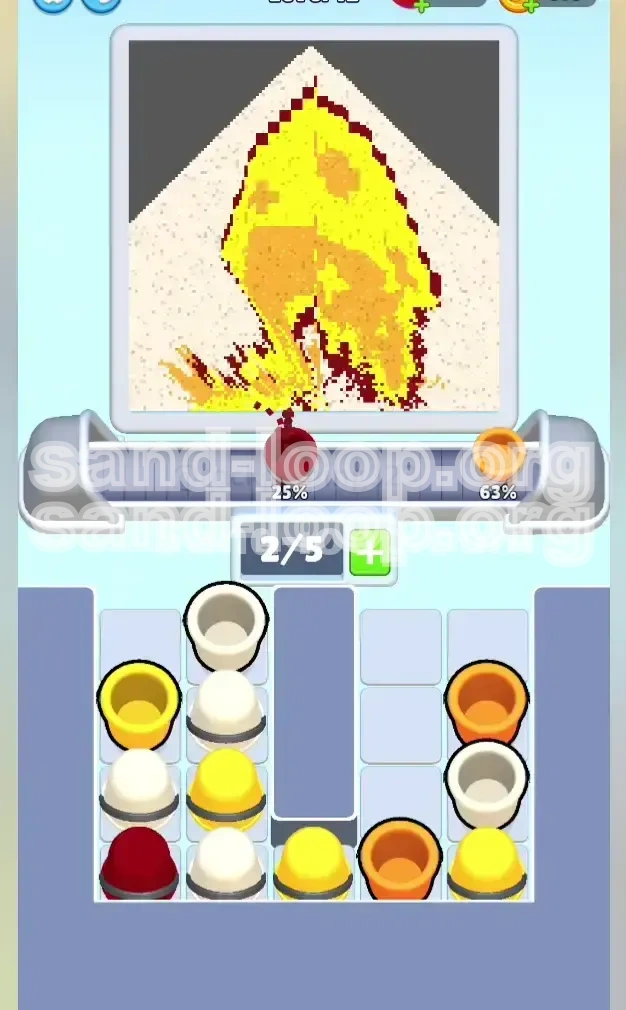
Step 2: The Main Crust Filling (Seconds 10-30)
The initial cups are pouring. Now you must focus on the heavy lifting: the Yellow Crust.
- Action A: As soon as the first White cup clears the tray, tap the exposed Yellow cup in the Left Column. Send it immediately.
- Action B: Look at the Center Column or the lower Left Column for a second Yellow cup. Queue it behind the first.
- Action C: Glance at the Dark Red progress bar. If the first Red cup has finished the outline (100%), do not send any more Reds. If a Red cup is on the belt and the outline is full, the machine will reject it, but that's acceptable. Just don't manually tap more.
- Action D: Alternate Yellow and Orange taps. Keep the Yellow flow constant but insert an Orange cup every 10-15 seconds to prevent the belt from mono-color locking.
Step 3: Managing the Shadow and Filling (Seconds 30-50)
You are likely 70% done. The Yellow bar is slowing down. The Orange and White bars need attention.
- Action A: Stop tapping Yellow completely if the bar is >90%. Shift focus to the Right Column.
- Action B: Clear the remaining Orange stack from the Right Column. This will finish the side shadow and the background plate.
- Action C: Check the White progress. The creamy filling usually needs 1-2 cups in this phase. Send them now.
- Action D: Watch for "Hidden" colors. Sometimes a Yellow cup gets buried under a Red cup again. If you are starving for Yellow and Red is full, you may have to tap the Red blocker just to move it aside (a calculated sacrifice).
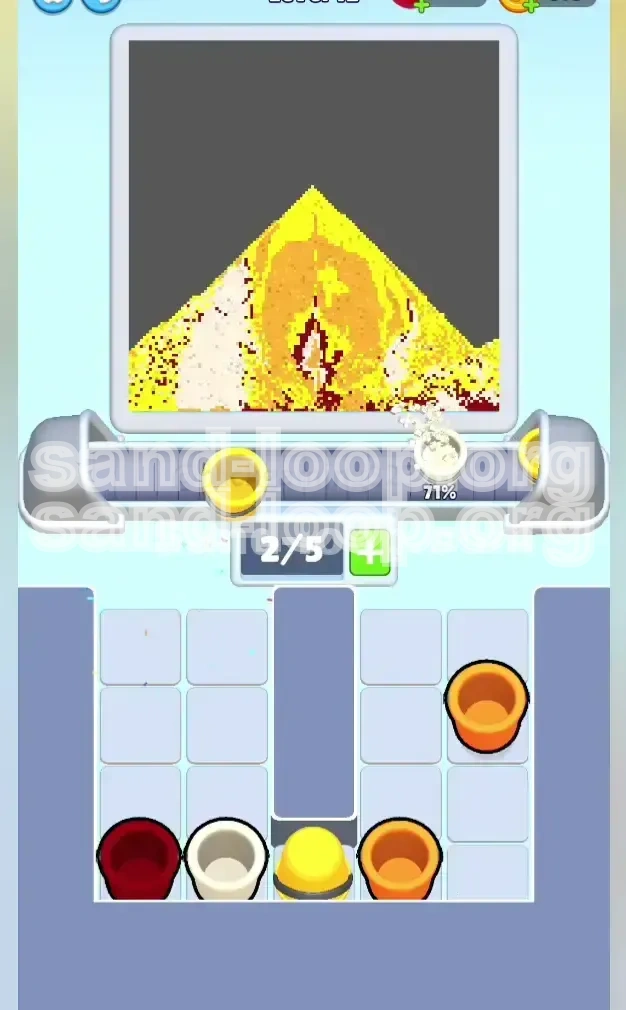
Step 4: The Final Polish (Seconds 50+)
The tray is likely empty or nearly empty. You are relying on the conveyor belt to cycle the last few cups.
- Action A: Pause and assess. Look at the canvas. Which color is the least complete?
- Action B: If a cup is rejected by the machine (pops out immediately), it means that color is 100% done. Ignore that cup for the rest of the level.
- Action C: If you have multiple cups on the belt but only one color left to fill, let the machine reject the unwanted cups naturally. Don't try to force them.
- Action D: Final Scan. The "Cheesecake" often has a tiny pixel of Orange on the far left tip of the crust or the bottom right of the plate. Find that last pixel and win.
Common Mistakes to Avoid
Level 12 is designed to trap players who rely on instinct rather than observation. These are the four most common reasons players fail or lose their 3-star rating.
Mistake 1: The "Slot Jambalaya" (Overfilling the Belt)
Many players treat the conveyor belt like a queue, trying to fill it up to 5/5 immediately.
- The Error: You tap 5 cups in rapid succession: Red, Orange, White, White, Yellow.
- The Consequence: The first cup (Red) finishes the thin outline in 2 seconds. The machine is now full of Red. The remaining 4 cups (Orange, White, White, Yellow) are stuck behind the finished Red cup on the belt. The machine stalls because it can't accept the Yellow cup stuck at position 5.
- The Fix: Treat the belt like a heartbeat. Keep it flowing. If a color is close to finishing (e.g., >80%), leave an empty slot behind it so the machine can cycle through the remaining cups quickly.
Mistake 2: The "Outline Overdose"
Players often obsess over the Dark Red outline because it looks intricate.
- The Error: Sending two Dark Red cups in the first 10 seconds.
- The Consequence: The first cup fills the outline to 100%. The second cup travels to the machine, gets rejected, and sits on the belt taking up space for 5 seconds. Meanwhile, you are starving for Yellow and can't tap it because the belt is full of useless Red.
- The Fix: The outline is small. One cup is usually sufficient. If you send one and the bar moves to 100%, never tap Red again for the rest of the level.
Mistake 3: Ignoring the "Verticality" of the Tray
This is a spatial reasoning mistake. Players look for a color, don't see it, and panic.
- The Error: You need Yellow. You look at the tray and see Red, White, and Orange. You think, "I'm out of Yellow!" and start tapping Whites frantically.
- The Reality: The Yellow cups are buried underneath the Red cup in the left column.
- The Fix: Always check the bottom cups in the vertical stacks. If a critical color is buried, your priority shifts to clearing the *top* cup, regardless of whether you need it or not, just to access the one below.
Mistake 4: Premature Optimization (Speeding)
Trying to run the level at 2x speed before mastering the logic.
- The Error: Tapping the next cup before the previous one has even settled into the machine.
- The Consequence: You accidentally tap the wrong cup because the tray shifted. You send a Red when you meant to send Yellow. This single error can cost you the level.
- The Fix: Speed is a byproduct of accuracy. Play slowly first. Learn the stack layout. Once you can beat it reliably without looking at the progress bars, then you can start increasing your tapping speed.
Speed Run Tips and Tricks
Once you have conquered the level and can consistently finish it, you can optimize your time to achieve the fastest possible clear. These tips are for advanced players looking for top leaderboard scores.
The "Travel Time" Exploit
There is a delay between tapping a cup and it arriving at the machine. You can use this delay to your advantage.
- The Concept: While a cup is traveling from the tray to the machine (approx. 1-2 seconds), the machine is still processing the *previous* cup.
- The Strategy: Tap your next cup the *instant* the previous cup leaves the tray. Do not wait for it to start pouring. This "pipelining" ensures the machine never has an empty input buffer, shaving seconds off your total time.
The 4/5 Slot Strategy
Professional runners rarely let the belt hit 5/5.
- Why? At 5/5, if the machine rejects a cup, the entire line halts until that rejected cup slides off.
- The Strategy: Try to maintain 4 active cups at all times. This leaves one "buffer" slot. If a cup finishes early, the buffer slot absorbs the spare capacity, allowing the belt to keep moving smoothly without a stutter-stop.
Pre-emptive Color Switching
Don't wait for the progress bar to hit 100% before looking for the next color.
- The Strategy: If your Yellow bar is at 90%, stop looking at the Yellow column. Immediately shift your eyes to the Orange column. Locate the next Orange cup you need.
- The Execution: Have your finger hovering over the Orange cup. The millisecond the Yellow cup finishes (and the machine accepts the new color), tap the Orange cup. This transition should be instantaneous, with zero search time.
Visualizing the "Pixel Count"
Memorize the rough pixel count for each color so you don't have to check the progress bars constantly.
- Dark Red: Needs ~1 cup (or less).
- White: Needs ~2-3 cups total.
- Orange: Needs ~4-5 cups total.
- Yellow: Needs ~6-8 cups total.
If you know Yellow needs 8 cups, and you've only sent 5, you can aggressively tap Yellow without checking the bar. This builds muscle memory and allows for "blind" speed runs.